System Preferences in OS X 10.10, Yosemite: Introduction |
 |
![]()
System Preferences have been used since OS X first appeared and provide a number of ways in which to control the way the operating system displays information and interacts with applications or with other parts of the operating system. With the latest iteration of OS X, 10.10, Yosemite, certain of the panels have had additions and changes, some have kept the same interface. Many of the icons have been redesigned. There is one new preference: Extensions.
The system Preferences panel itself has been cleaned up considerably. The toolbar at the top has Back and Forward arrows to the right of the red and yellow Finder controls (the green available in most applications is greyed out). To the right of the arrows there is a redesigned Show All button. A Search box is available to the right.
Certain technologies installed only become active when specific devices are attached. For example the handwriting recognition software called Ink, is designed to work with attached graphics tablets. I have omitted this. I have also excluded the third party technologies that install preference panes, such as Flash. There are several available and these may be unique to a user's setup. I have, however, included the CDs & DVDs panel, even though new Macs do not have a disk drive: there are enough older machines out there to make this still relevant for some.
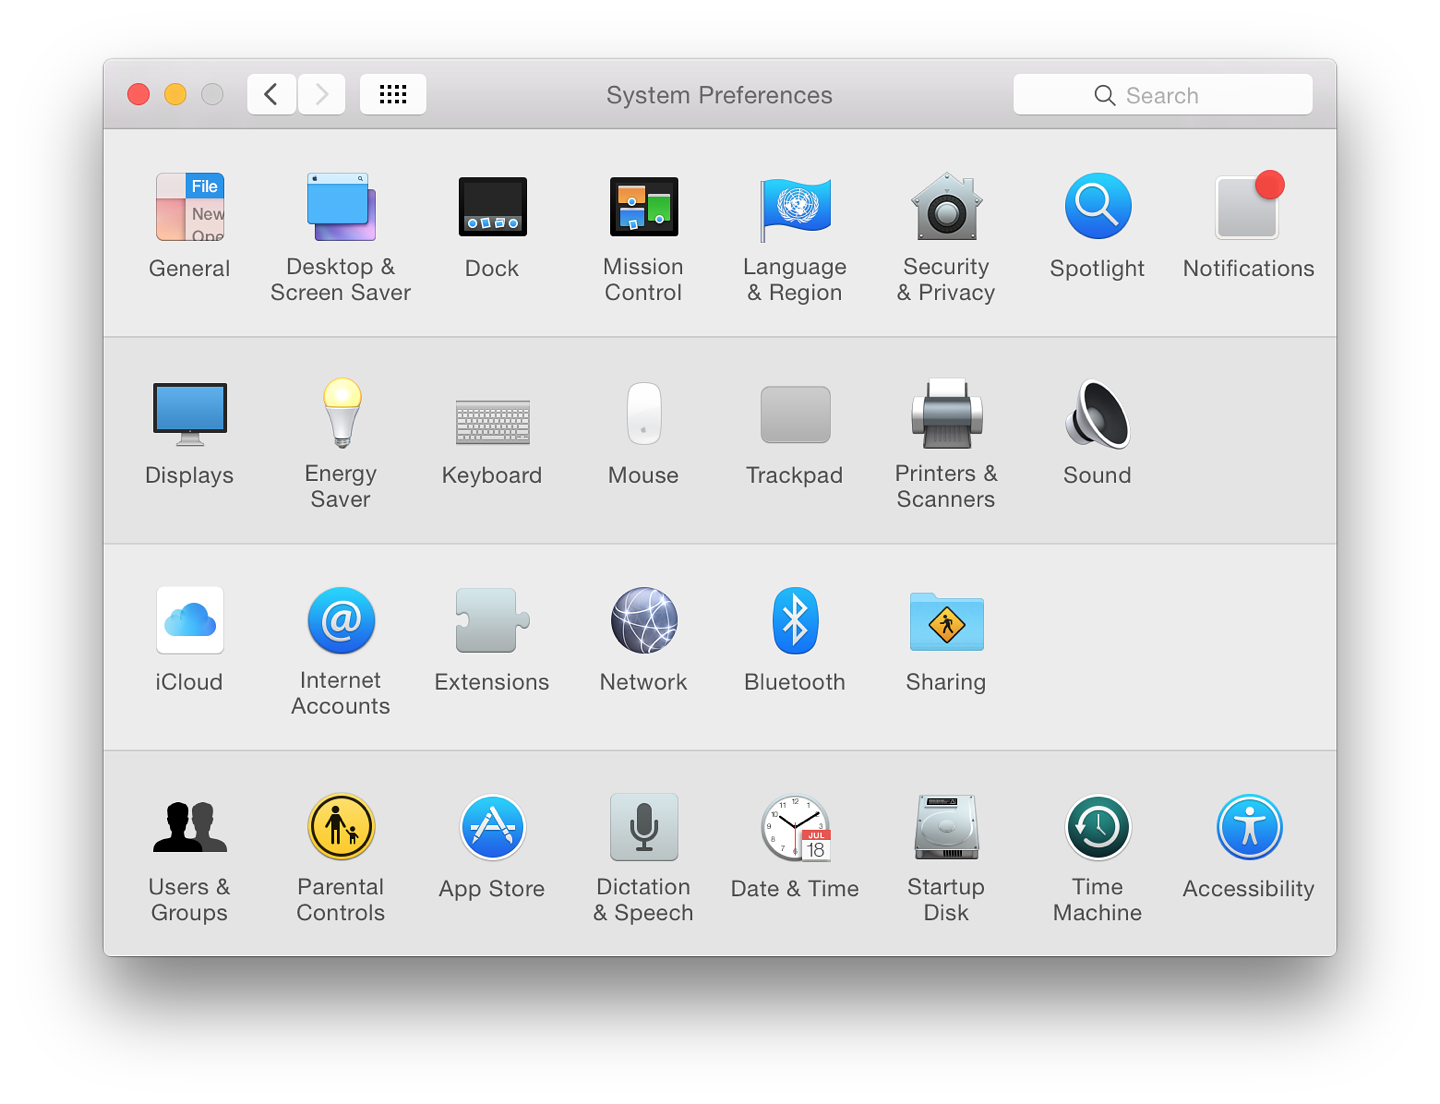
Preferences are displayed by default in four categories. These used to be marked as Personal, Hardware, Internet & Wireless and System. The headings disappeared in OS X 10.9, Mavericks, but they are organized in the same way. The sections are shown in alternate lines with slightly darker and lighter coloring.
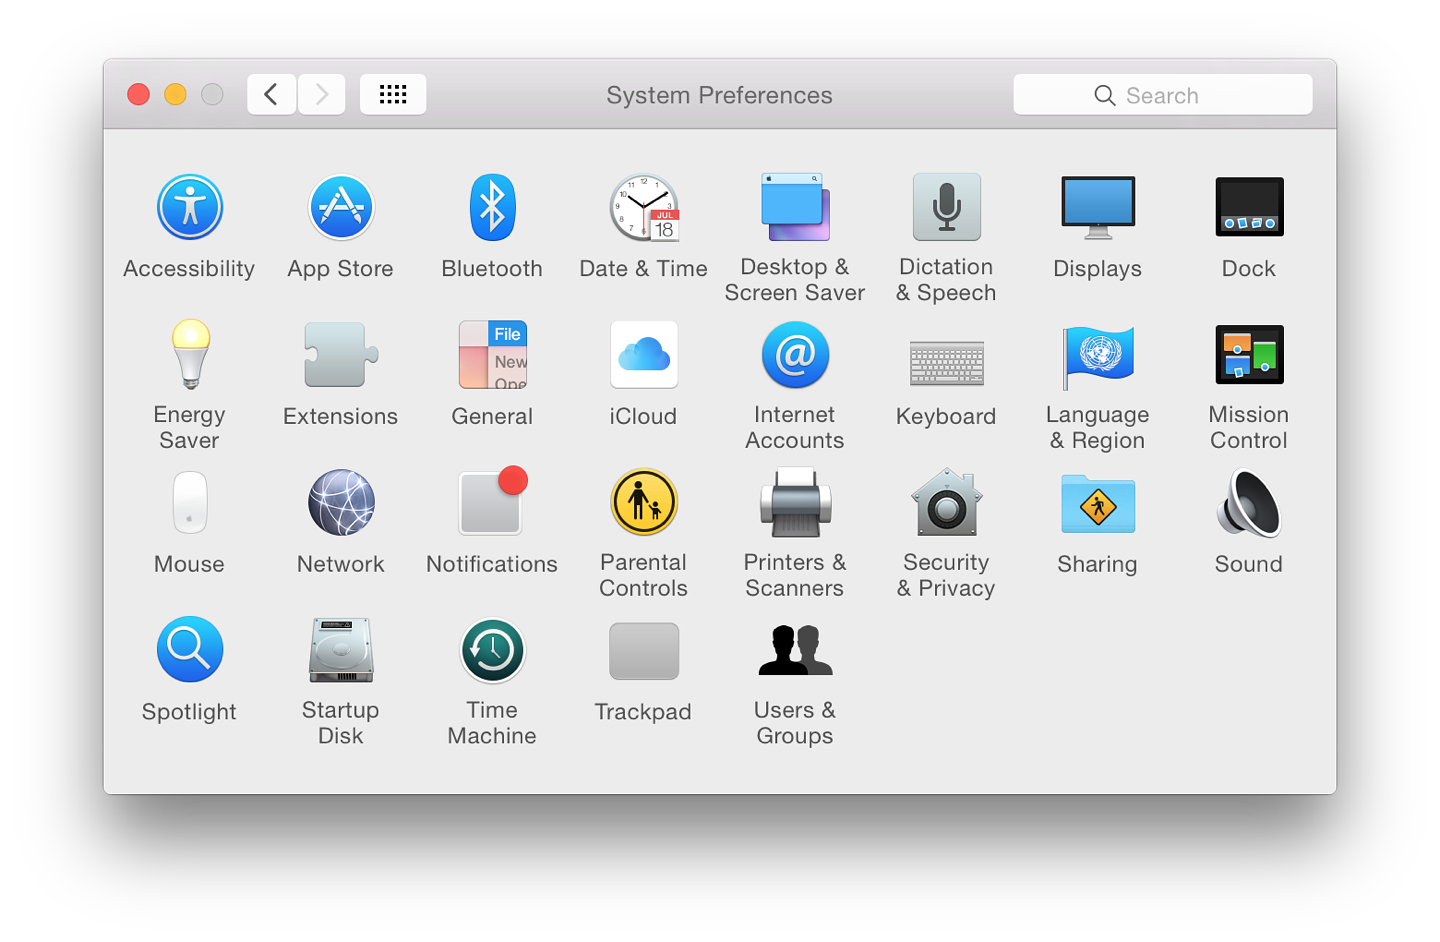
Using the View menu at the top of the screen, it is also possible to display preferences in alphabetical order. This is how I prefer to work and this is how I will work through the individual panels explaining each.
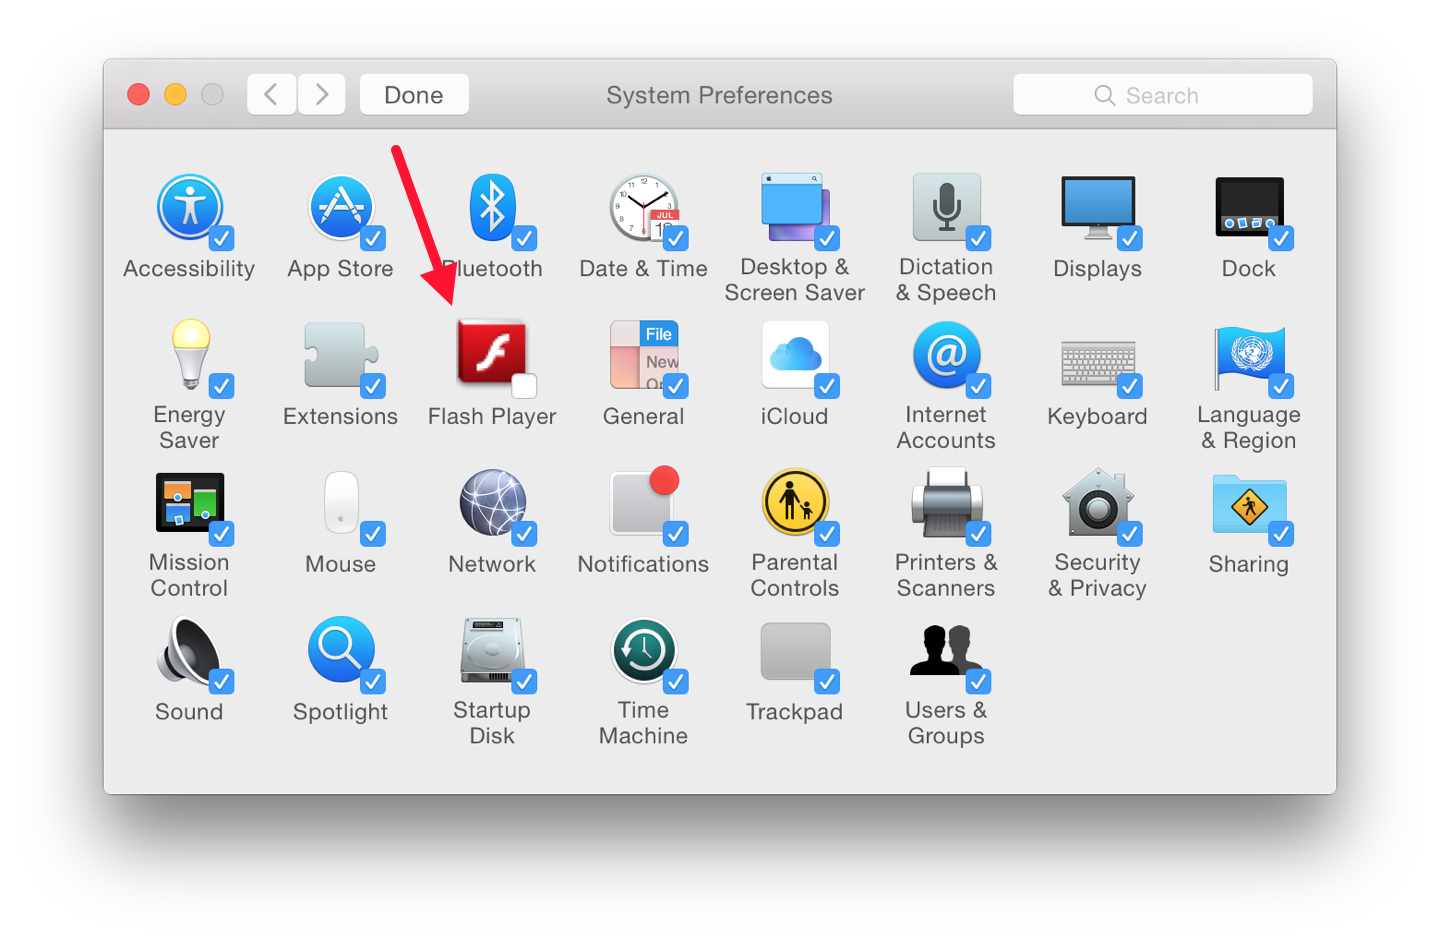
In that same View menu (just above) is an item marked Customize. When this item is selected, the preferences appear with a checked box beside each icon. Unchecking any box, then pressing Done at the top left of the panel removes the icon from the display. This does not remove the preference itself.
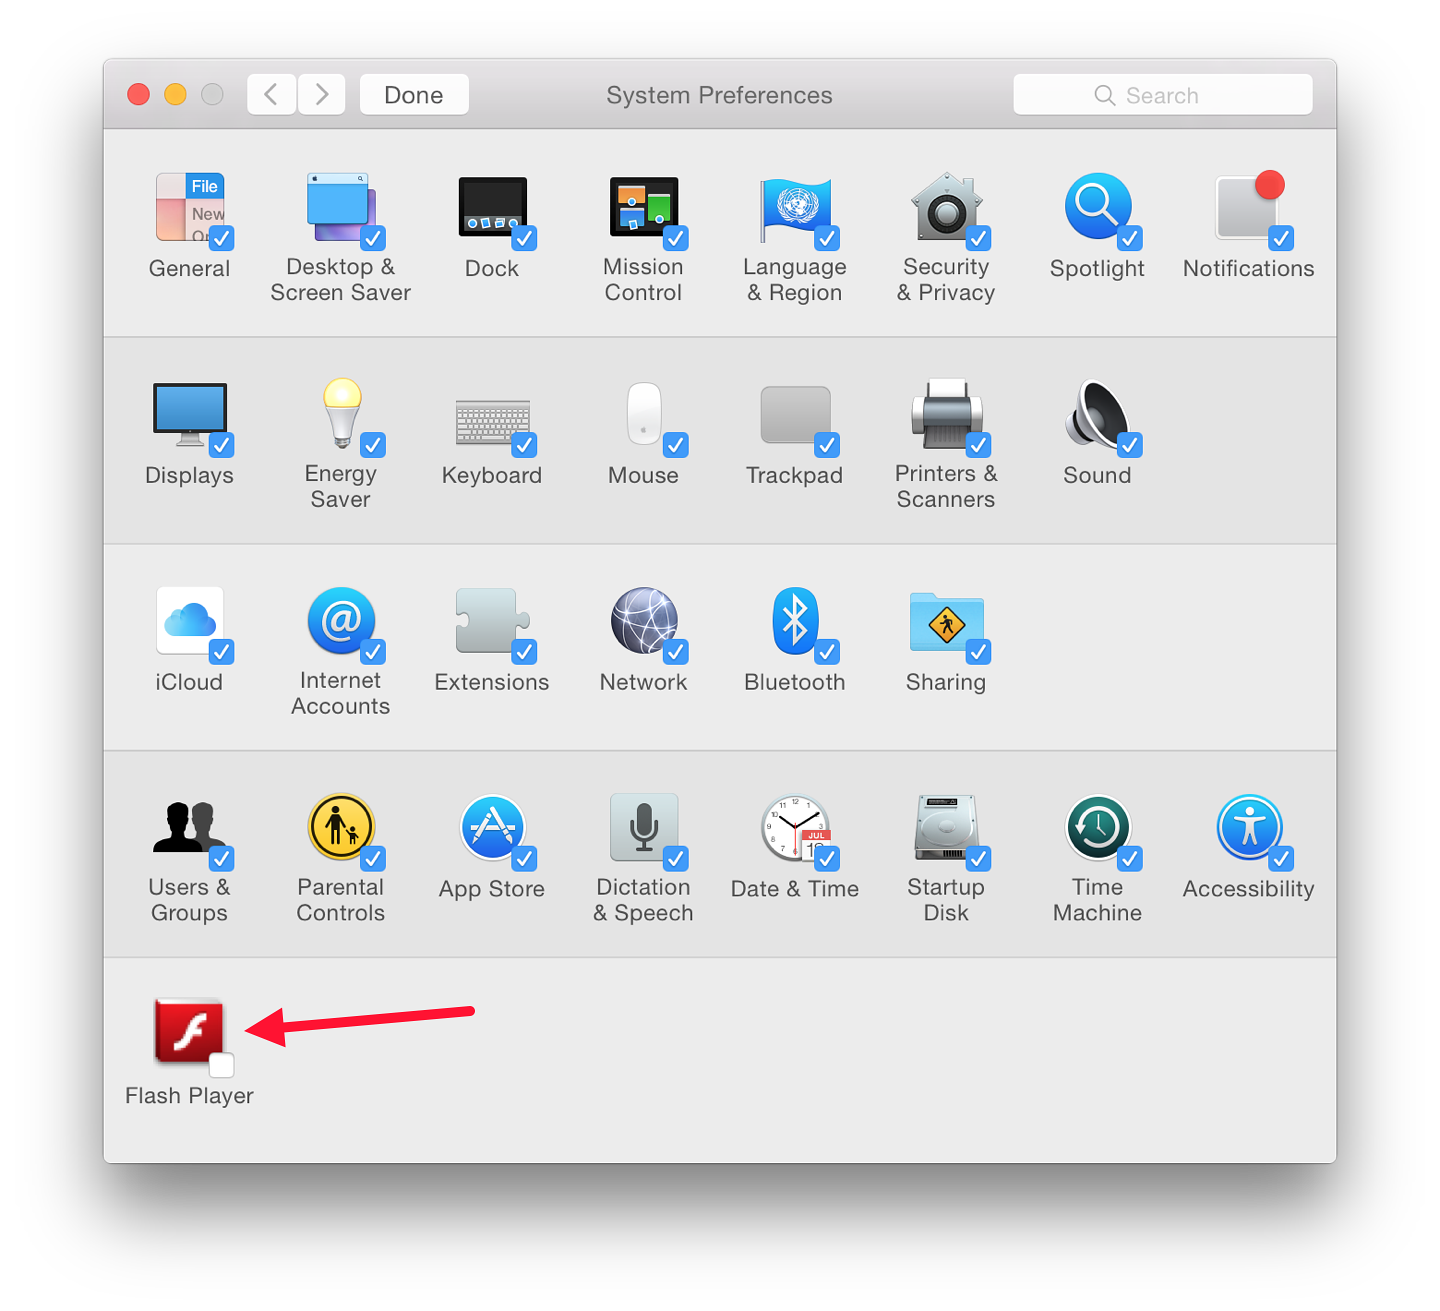
It can be returned to the display by again using Customize and checking the box beside the icon again. This feature may be useful in some installations where a user does not wish to reveal that a particular preference is being used.
Each of the System Preferences panels has been redesigned in terms of visual display, with a flatter look and a slightly thinner font (Helvetica Neue). Many of the panels themselves have also been changed with some functions added and a number removed, making the whole appear much simpler. For a comment on design changes, particularly the font, see "Apple Doesn't Design for Yesterday" (Eric Karjaluoto).
System Preferences in OS X 10.10, Yosemite: Accessibility |
|
![]()
Before Mavericks, Accessibility was known as Universal Access. In the current version there are now four areas of assistance: Vision, Media, Hearing and Interacting. The functions are displayed in a window to the left. There are 10 items.
As each item in the left side window is highlighted, so controls are shown in the main panel. At the bottom of every pane is a singel checkbox: Show Accessibility status in menu bar. As well as the icon, a scrolling text is shown for a short period when certain features (e.g Sticky Keys) are activated.
Display has been revised. The settings here are intended for those with vision problems. There are now four checkboxes: Invert colors; Use grayscale; Differentiate without Color; Increase contrast (new); and Reduce Transparency. The "Invert" feature (previously called, "White on Black") may also be activated using the key combination of Control + Option + Command + 8. The same key combination turns it off.
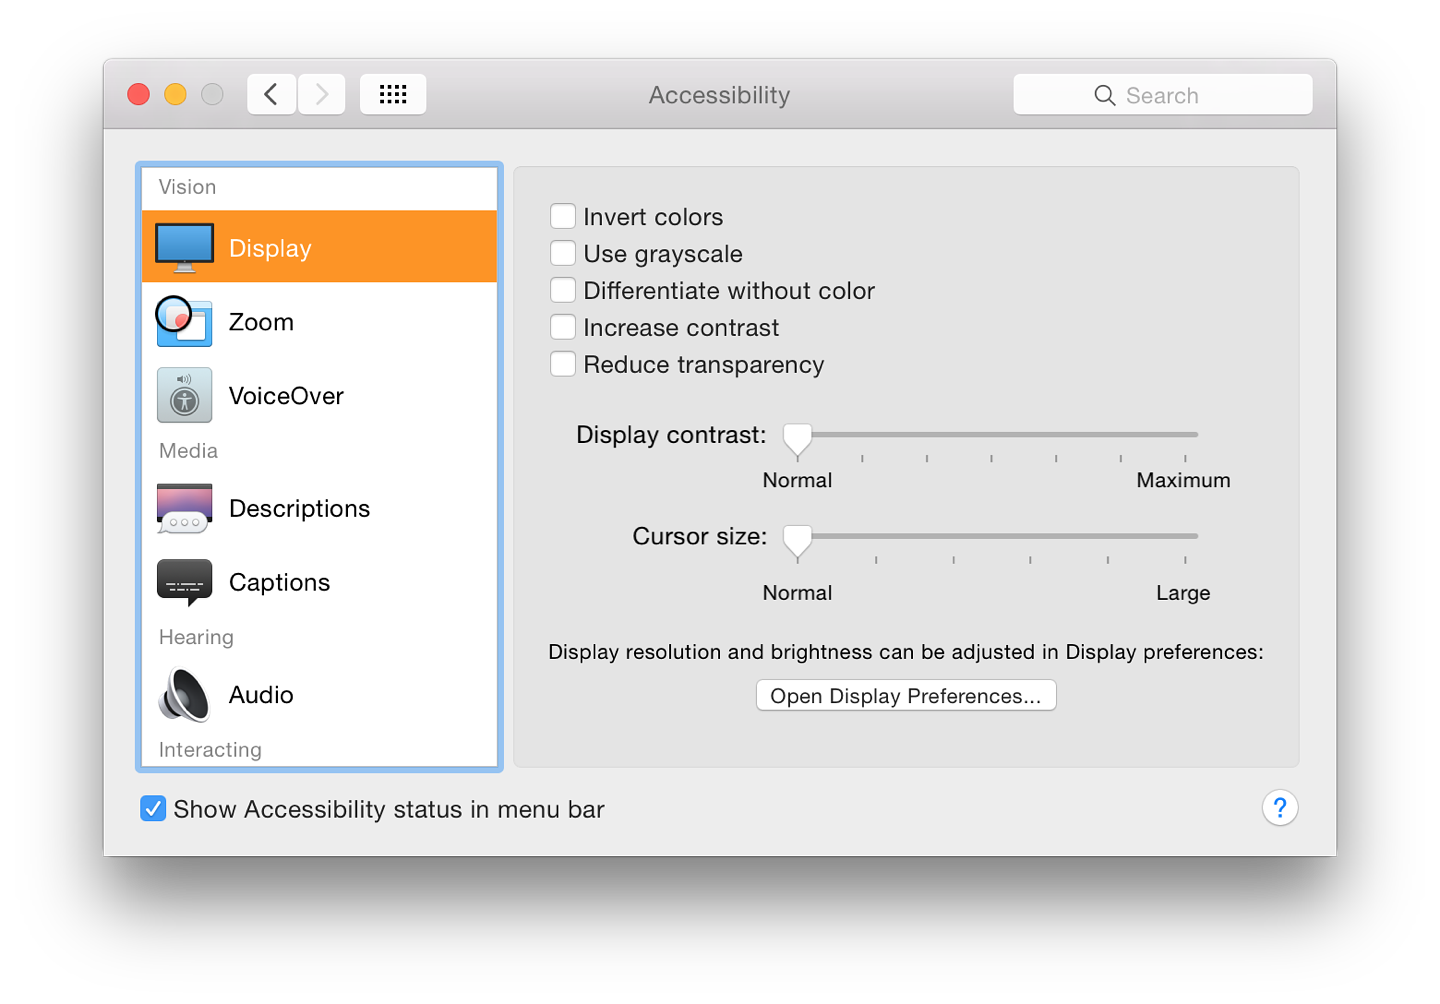
Below the checkboxes are two sliders: Display Contrast (Normal to Maximum); and Cursor Size (Normal to Large). The largest cursor is about 1" from end to end. Near the bottom of the panel is a button marked Open Display Preferences.
Zoom provides several ways to control the way zoom may be used. At the top is a checkbox (off by default on my computer) allowing a series of key commands to be used:
Option + Command + 8 zooms in and out;
Option + Command + = zooms in;
Option + Command + - zooms out;
Option + Command + \ toggles smooth images (when off, jagged edges appear).
There is a further option of "Toggle keyboard focus following . . .". On my MacBook Pro this was marked as Unassigned and the key command space was greyed out. This may be added using the Shortcuts pane in System Preferences > Keyboard.
Below the key command options is a checkbox to allow the scroll gesture (e.g. using 2 fingers on a trackpad) to be used with a key to zoom in and out smoothly. Before Mountain Lion (OS X10.8), this had been in the Trackpad preferences. The default key that this works with is Control, but Option and Command are also available as before.
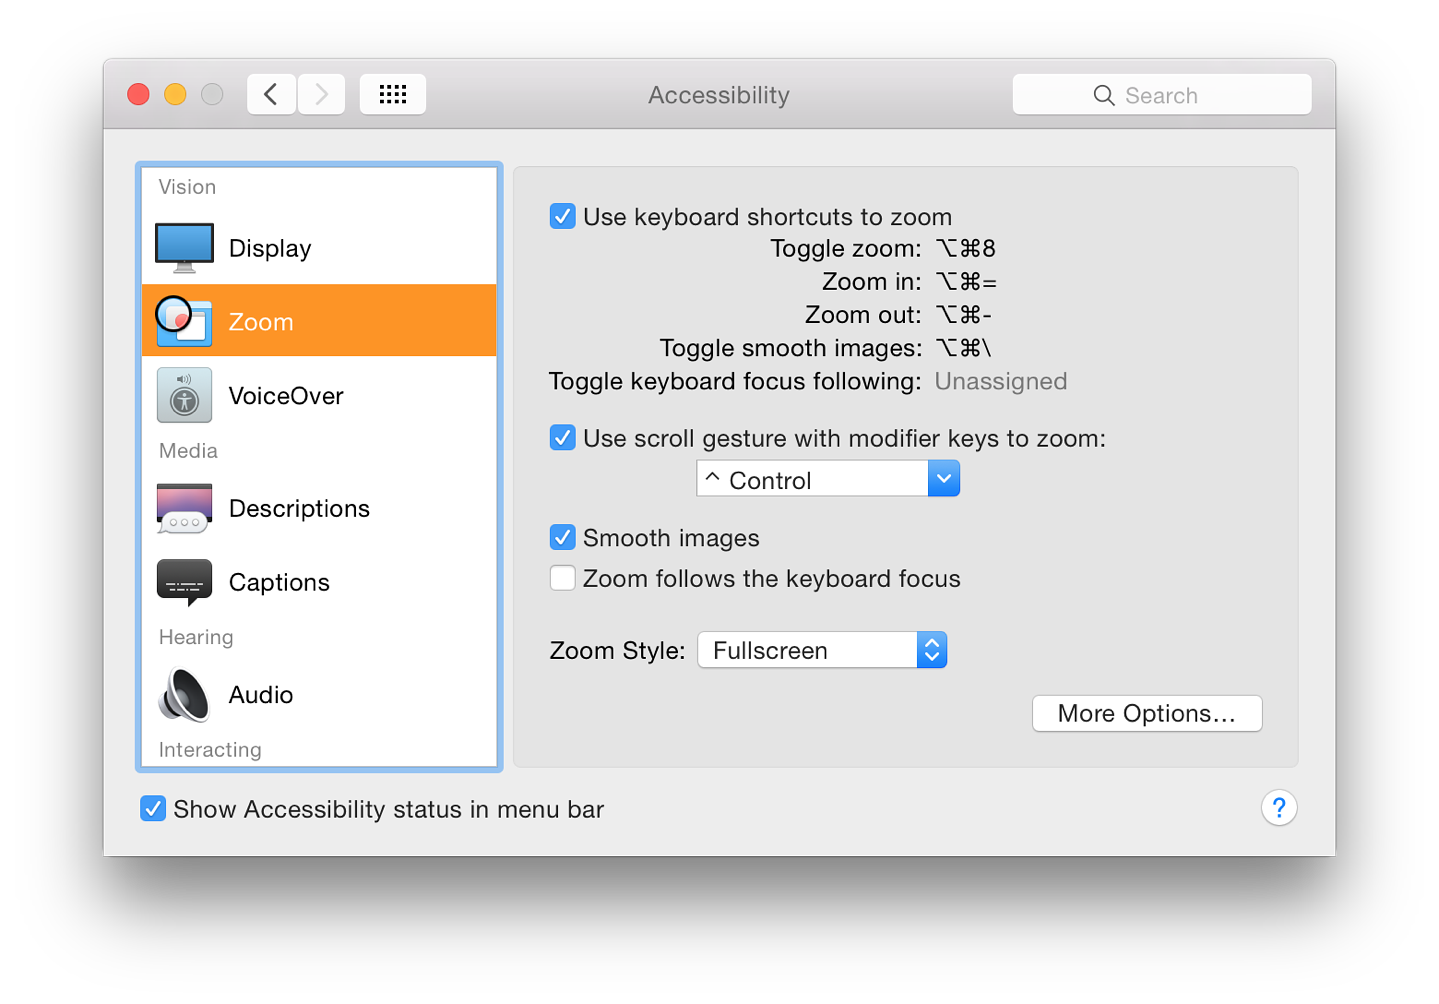
Two other checkboxes below are to turn on Smooth images (wise when zooming); and "Zoom follows the keyboard focus". A button below these checkboxes allows options for the Zoom style. This is allows either a full screen zoom or "Picture-in-Picture" when a panel displays the section of screen zoomed, with the surrounding part not zoomed.
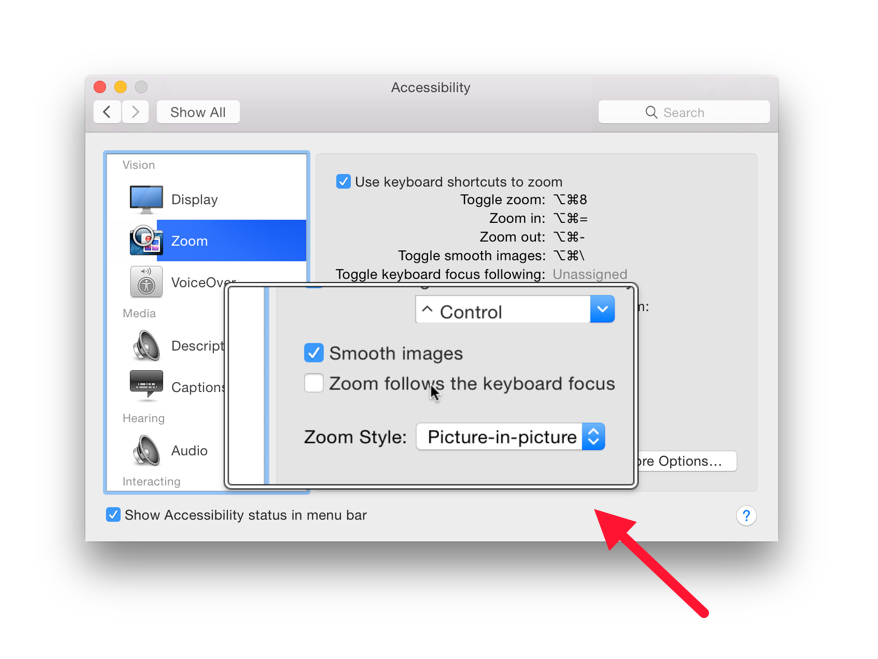
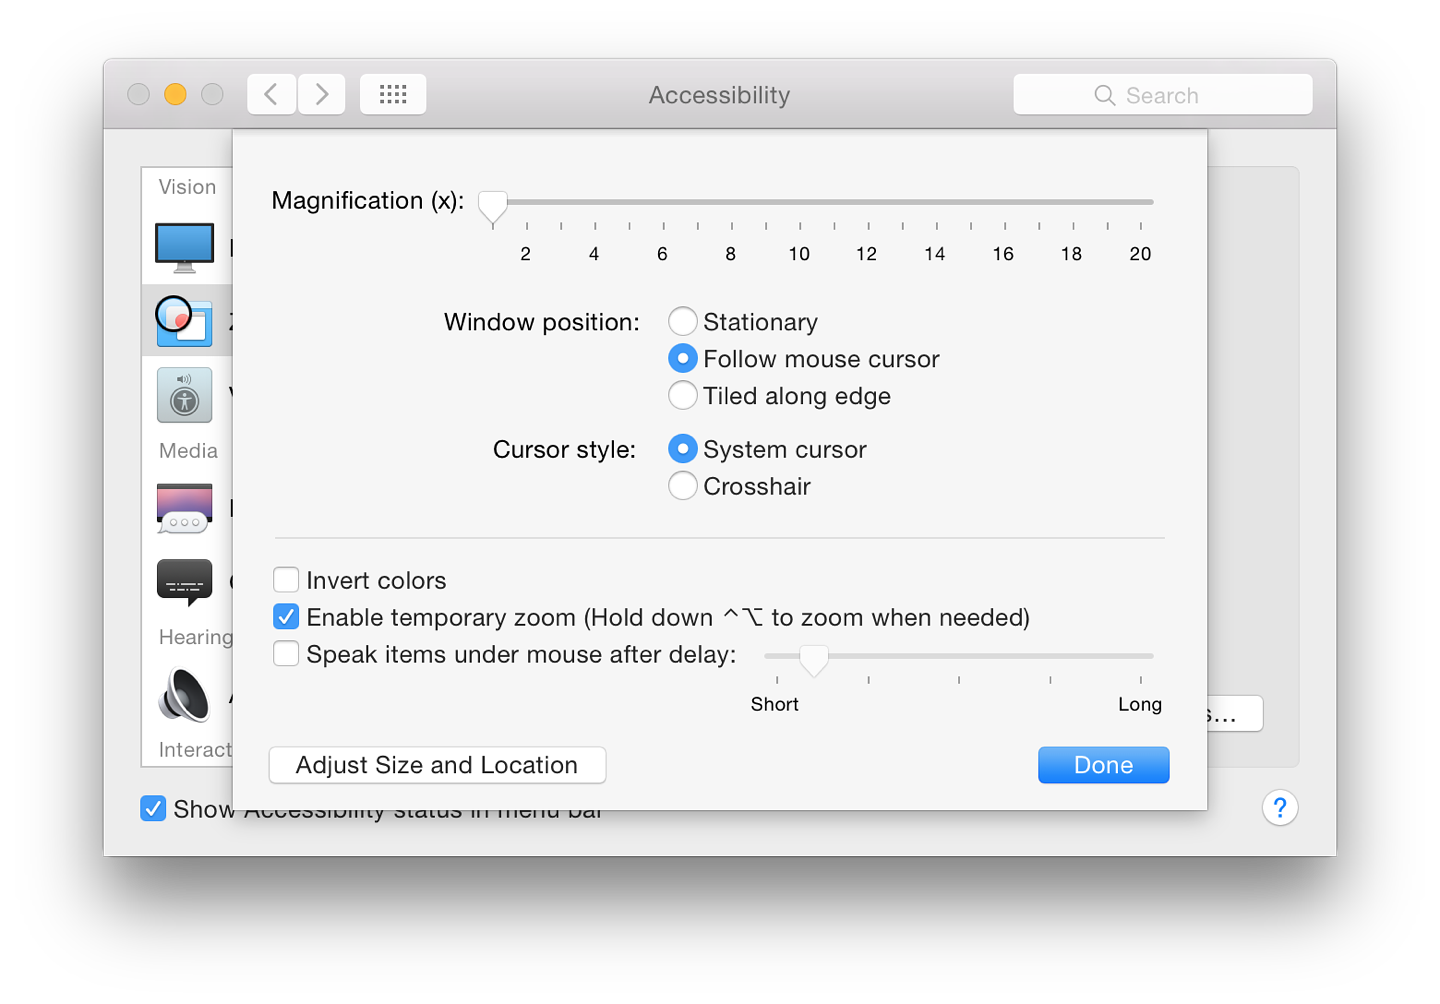
Below these controls is a button marked, More Options which opens a panel with controls for zoom magnification and how the screen behaves during zoom. This panel differs depending on whether Fullscreen or Picture-in-Picture are used as the zoom method.
VoiceOver provides spoken input for those who need assistance with sound commands. The panel has a simpler text description of the purpose of VoiceOver: "Provides spoken and brailled (sic) control of the computer through the use if the keyboard."
There is a single checkbox: Enable VoiceOver. This may also be turned on using the Command + F5 keys. When either is used, a panel appears and a voice reads out information. There is access to a series of VoiceOver training screens, with a spoken commentary. The screens are made available either through a "Learn More" button on the screen, or by pressing the Space Bar.
Near the bottom of the VoiceOver preference screen are two buttons: Open VoiceOver Training; and Open VoiceOver Utility. The training application reveals the same large screen seen with "Learn VoiceOver" in the panel (above). The system voice reads out the training pages and talks the user through the operations.
The voice was a little fast for my liking (certainly too fast for a non-native speaker), so I adjusted the speed down from Normal in the Text to Speech panel of Dictation & Speech preferences. Even so, it might take a couple of runs through to grasp the full idea.
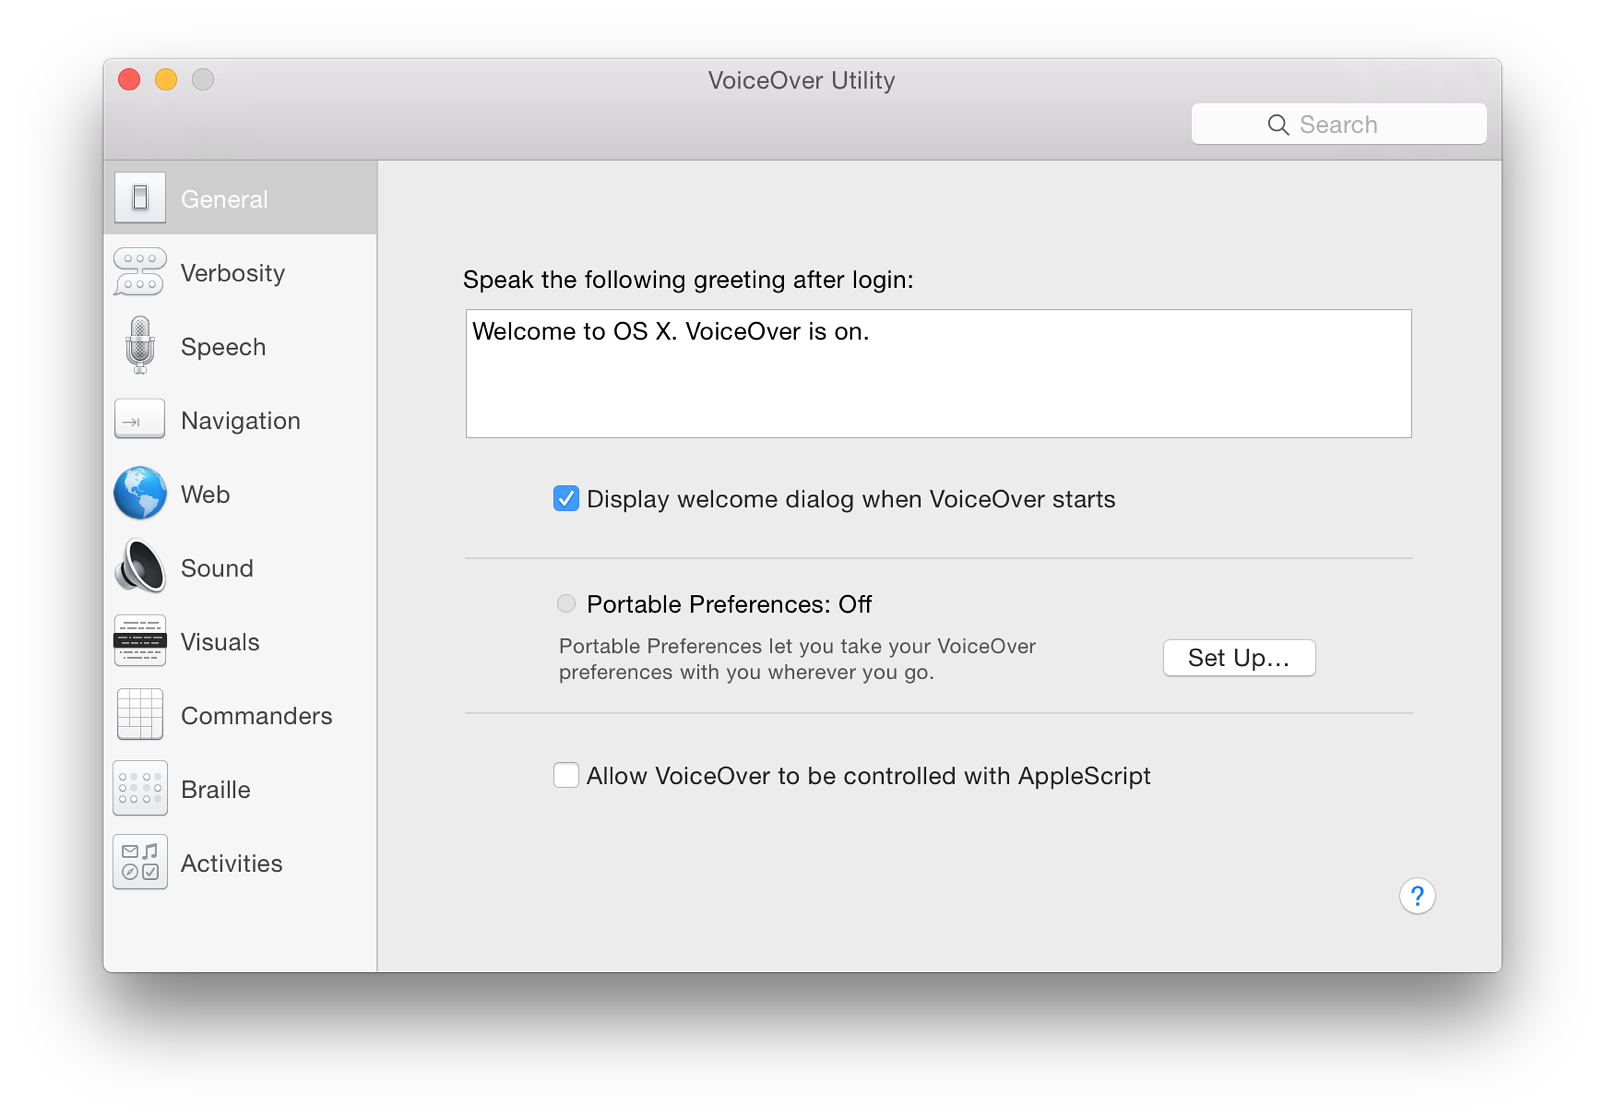
The other button opens the VoiceOver Utility panel (similar to System Preferences in appearance) with 10 separate functions, each with their own fine-tuning sections.
These allow VoiceOver to be set up for a user's specific needs and includes settings for any Braille display attached. The same 10 settings are available as before: General, Verbosity, Speech, Navigation, Web, Sound, Visuals, Commanders, Braille and Activities. There are a considerable number of options available within the settings, allowing a high degree of tuning for those who need assistance.
Descriptions has a brief text explaining the purpose of the setting panel and a single checkbox marked, Play video descriptions when available. This makes available a feature, such as used in some video output, which provides a spoken commentary with video. This is not widely available currently, although some output on sources such as the BBC iPlayer may incorporate such commentary.
Captions was a new option with Mavericks. It is intended for setting up Closed Captions and Subtitles when these are available. The panel is in two parts: a style panel and a checkbox below for turning on Closed Captioning and Subtitles for Deaf and Hard of Hearing (SDH) when available.
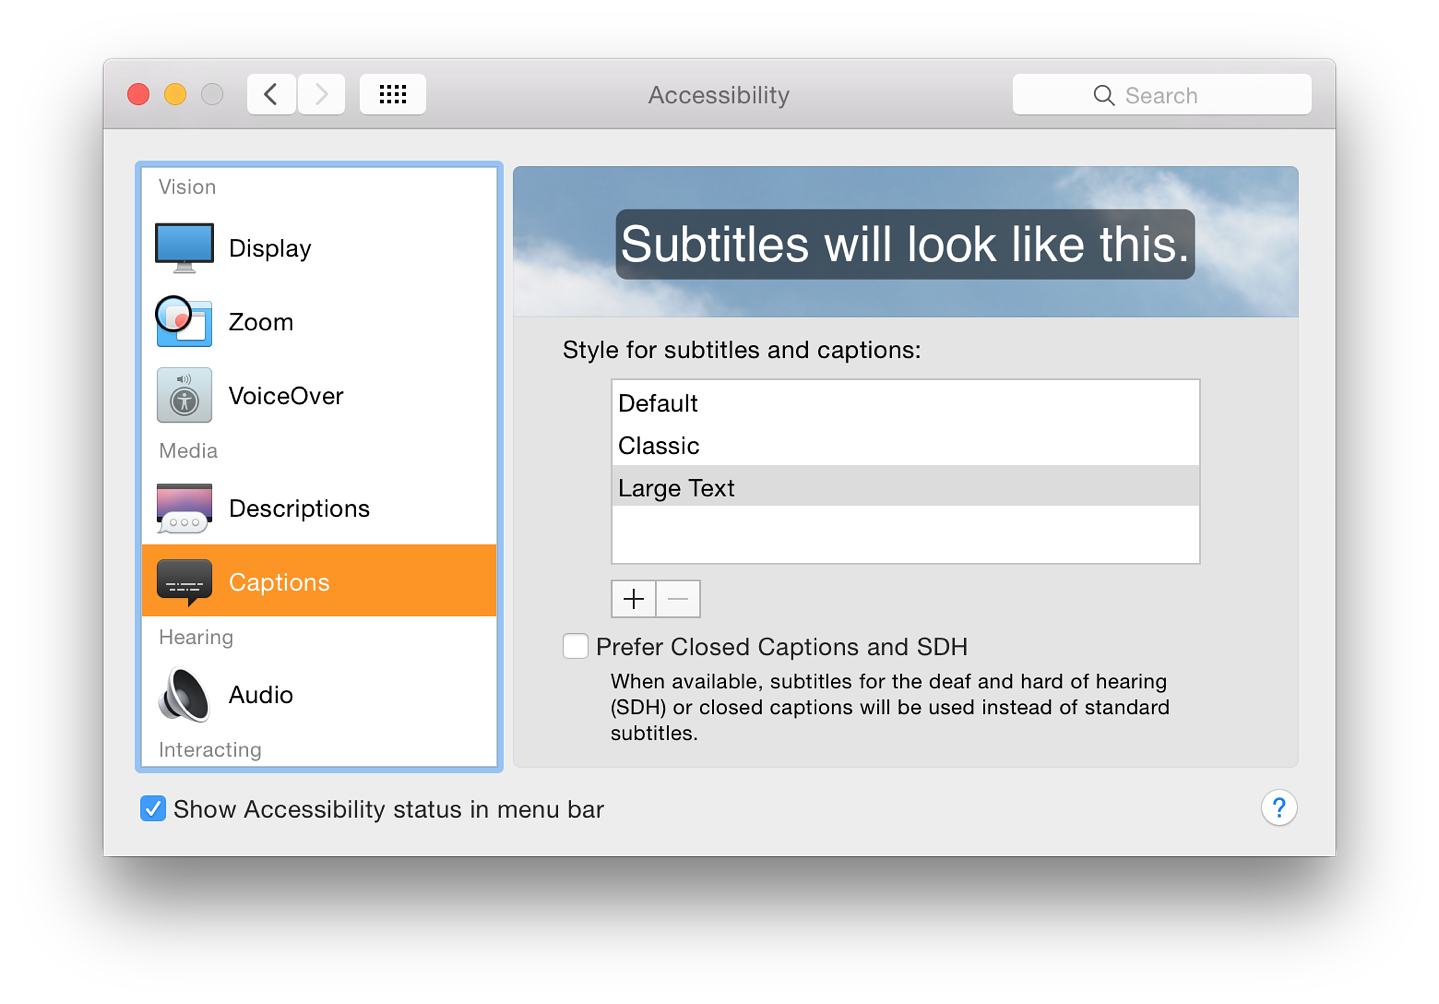
When the panel is opened there are three styles of subtitling: Default, Classic and Large Text. Highlighting one of these displays the style in a window above. There are animated clouds behind the text.
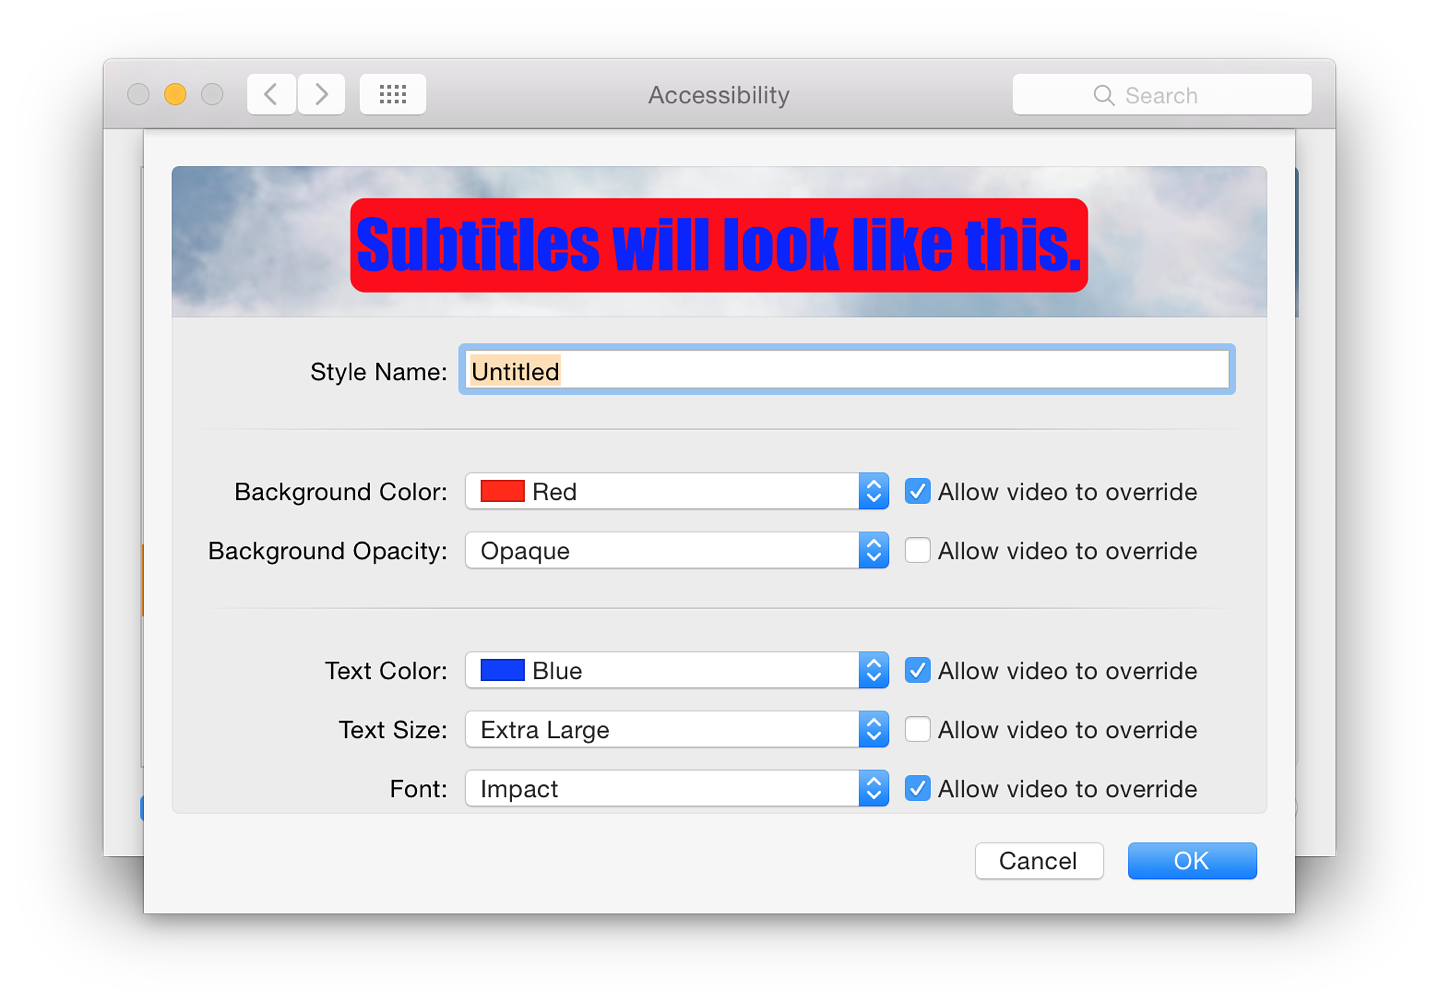
It is easy to add (or remove) a style by pressing a + (or -) below the list of styles. Adding a style opens a panel that displays 16 different settings for text fonts, colours and sizes.
Audio has two basic features (as before): two checkboxes marked
Between the two is a button to allow a test of the feature. Another button at the bottom of the panel is marked Open Sound Preferences, with the text, "System volume can be adjusted in Sound preferences."
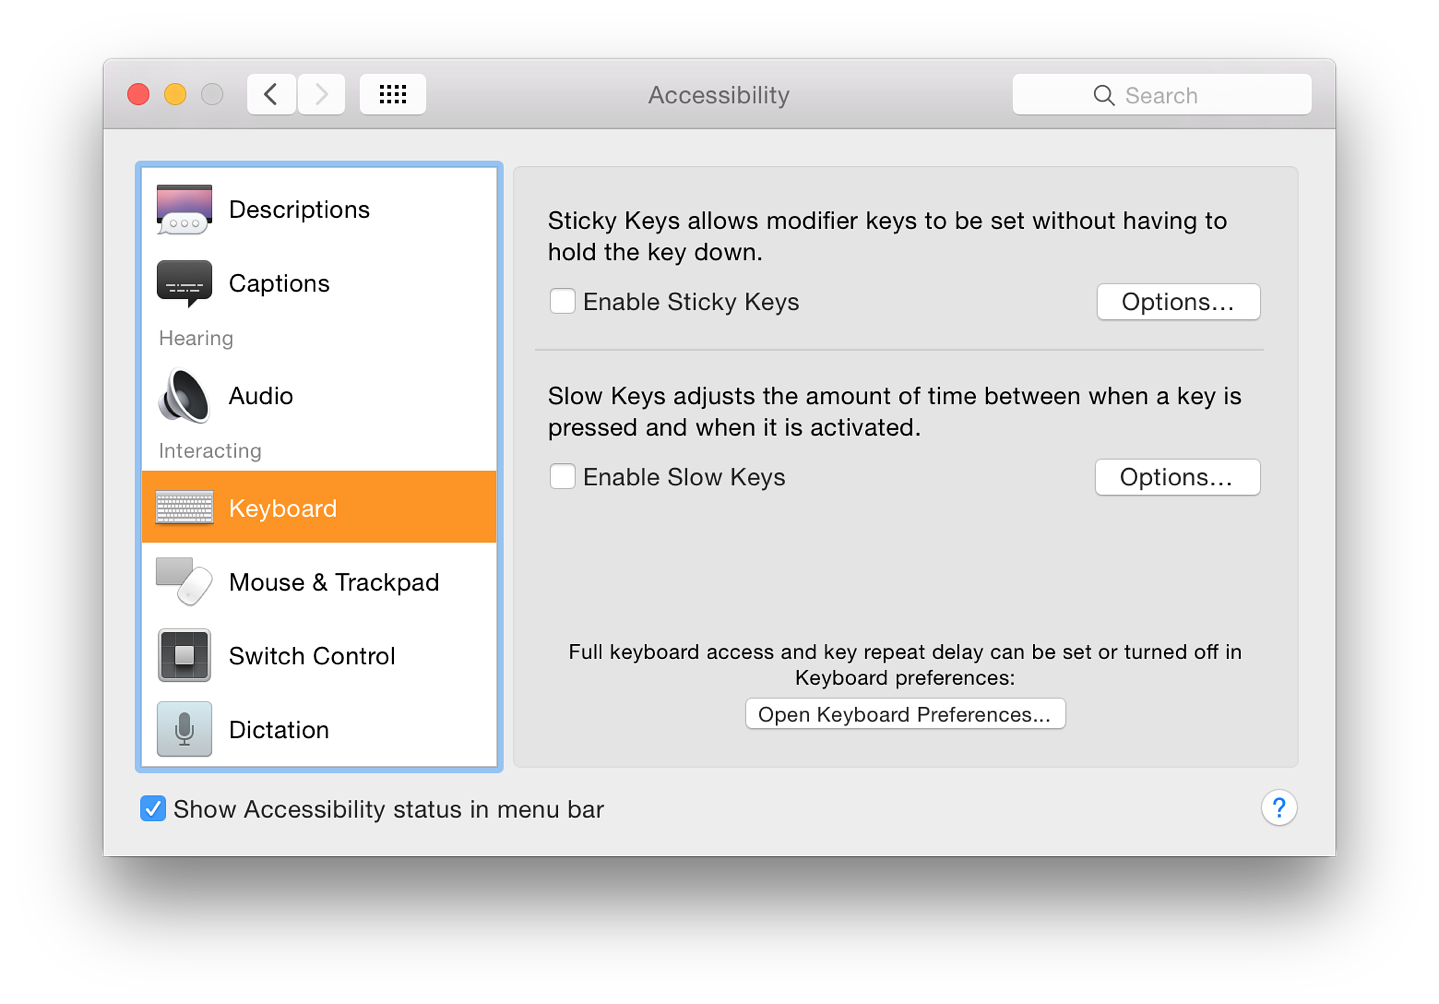
Keyboard again appears unchanged. With this the keyboard may be adjusted so that those with certain difficulties can type with a little less difficulty. There are two checkboxes in this panel: Enable Sticky Keys; and Enable Slow Keys. If a person is restricted to using a computer with one finger only, even typing a capital letter is a problem. With "Sticky Keys" and "Slow Keys", the Keyboard panel provides some solutions to those with limb-movement problems.
With Sticky keys the last-selected modifier key -- those used in combinations, like Command or Control -- remains active. When turned on (or as a modifier key is pressed), the computer makes a sound. Another sound is made when the feature is turned off. Pressing the key a second time, highlights it (with an optional sound), and pressing a third time cancels the key.
A button marked Options reveals a panel that allows some fine tuning: checking a box allows this feature to be active (or switched off) by pressing the shift key five times. A checkbox below this marked "Beep when a modifier key is set" is slightly misleading: the sound is more like a mechanical "clunk". The placement of the icon that appears may be selected with options for top, bottom, left or right of the screen. [If this option is selected in that panel, sticky keys will activate even when the option on the main pane is unchecked.]
Slow Keys adds a delay for those who have difficulties with initial or repeated keystrokes. Rather than simply tapping a modifier (or other) key as in touch typing, the key remains active and a second Key (or more) may be pressed. As an example I pressed Command then Shift, and then 3 to take a screen shot using one finger only. There is a short mechanical sound when the key is pressed and another when it appears on the screen.
A Slow Keys Option button reveals a slider allowing the acceptance delay to be adjusted, so those with disabilities that make typing very slow can be accommodated. I found that moving the slider more than about 25% along produced a delay so significant I was not sure the keys were being recognised. This was the same in earlier versions of OS X. This may need some careful setting up if it is to be used successfully.
To access more features, there is a button here that opens the Keyboard preferences where full keyboard access and key repeat delays can be set or turned off.
Mouse & Trackpad displays a panel that is in two parts, separated by a thin line. At the top is a checkbox for Mouse Keys. When this is active, the cursor can be controlled using the number pad on the keyboard.
On a notebook computer where there is no number pad, 7, 8 and 9 control upward (and diagonal) movement; U and O control left and right movement; J, K and L control downward (and diagonal down) movement. However, when these keys are used, the normal typing functions of the keyboard are not accessible.
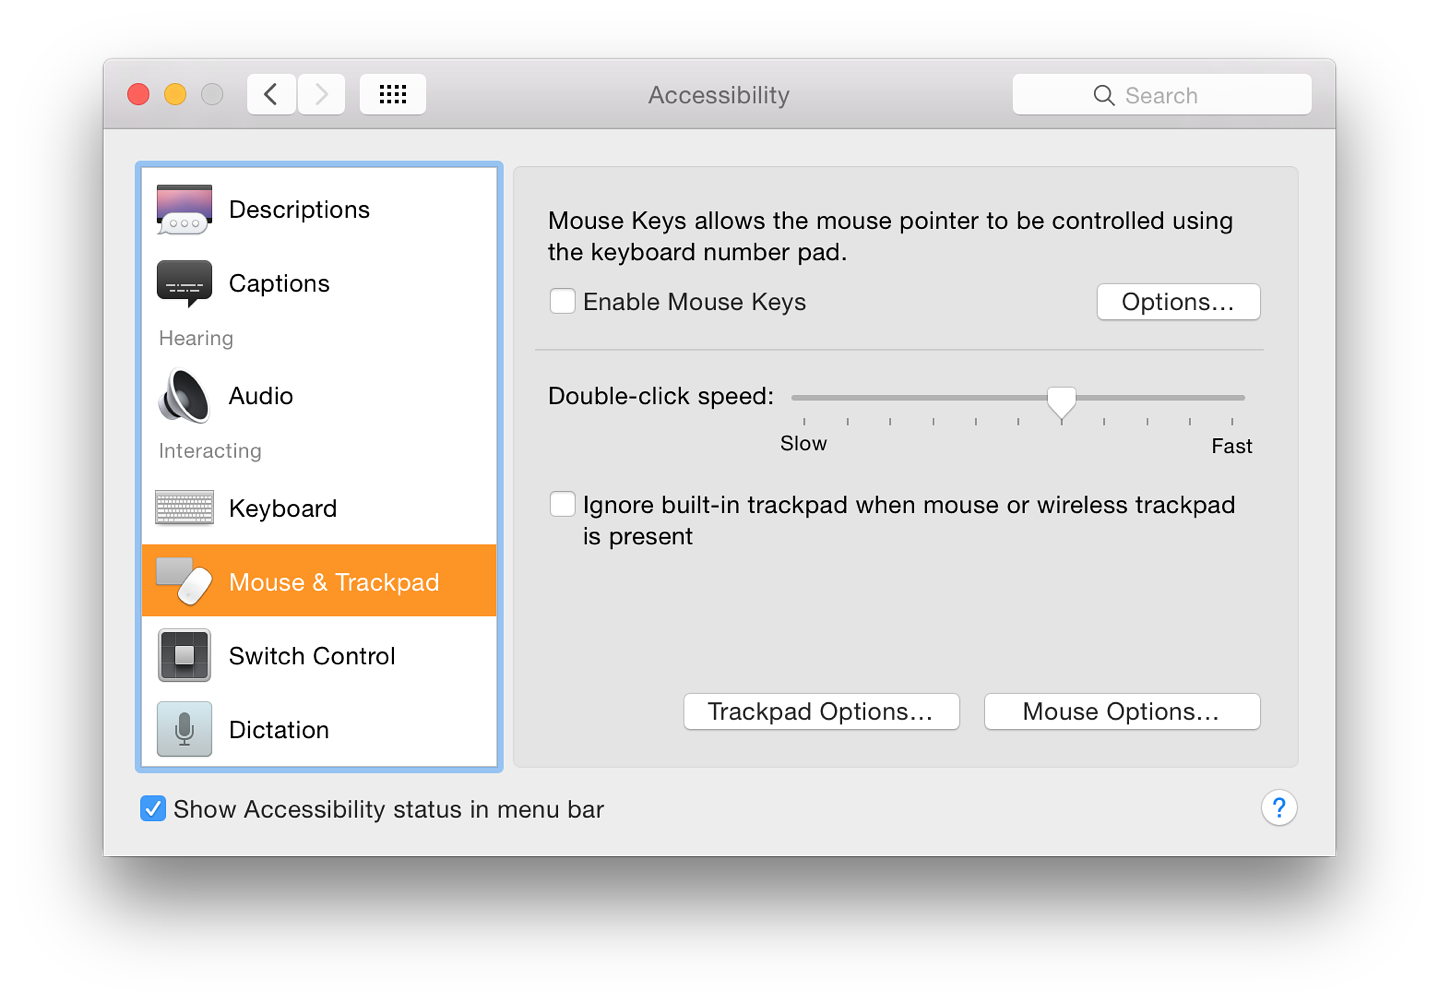
As it is not convenient to keep turning this options on and off to resume typing, an option panel allows a checkbox to be used to toggle the feature On and Off by pressing the Option key five times. Also in the Options panel is a checkbox marked, "Ignore built-in trackpad when Mouse Keys is on." There are two sliders below the checkboxes for Initial Delay (Short - Long) and Maximum Speed (Slow - Fast).
A further useful checkbox in the main panel is the ability to Ignore the built-in trackpad when this feature is on. Two buttons at the bottom of the panel give access to Trackpad Options (scrolling speed, scrolling and dragging), and Mouse Options (Scrolling Speed).
Switch Control was new with Mavericks. It is a highly tunable feature that allows connected devices to be set up with specific controls or options for use by physically challenged users. The panel explains that with this, the computer may be controlled by one or more switches, such as mouse, keyboard, gamepad buttons, or dedicated services.
There is a Knowledge base document - HD6027 for Mavericks, which has an explanation of how these features may be used. There are now three sections to the panel: General, Switches and Navigation:
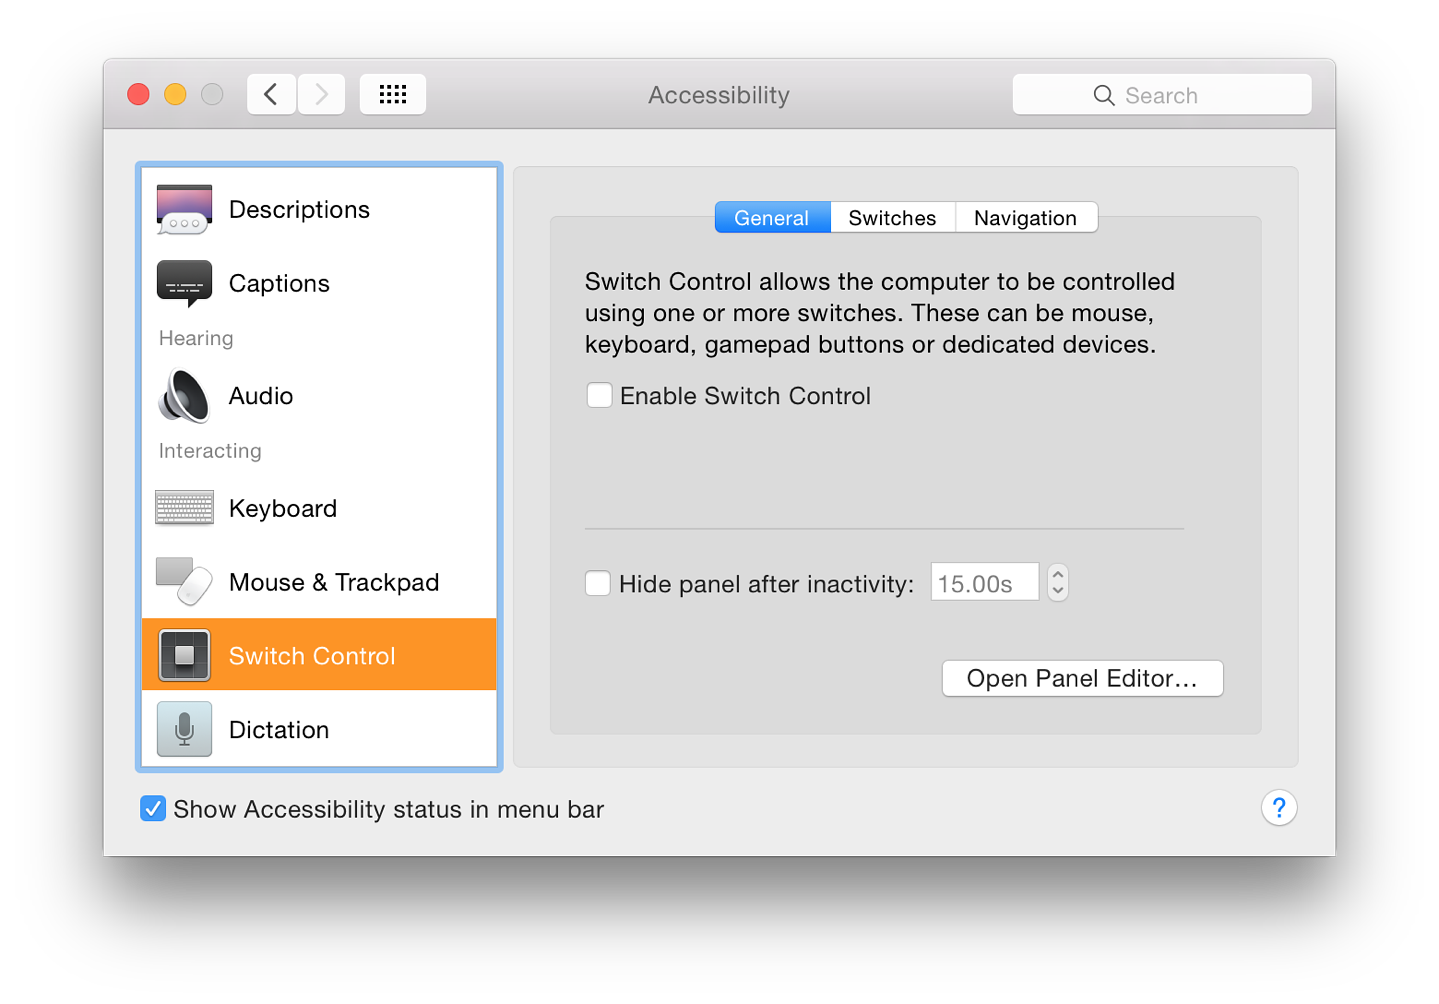
When Switch Control is made active, a panel appears on the screen with a number of controls available: Keyboard, Pointer, App, Dock, Menubar, System, Custom and Location. Pressing any one of them allows a user to change the behaviour of these input methods. See the Knowledge base document - HD6027 for more information.
The voice and the motion were too fast initially, but this can be adjusted using a Timing button in the Switches section (below).
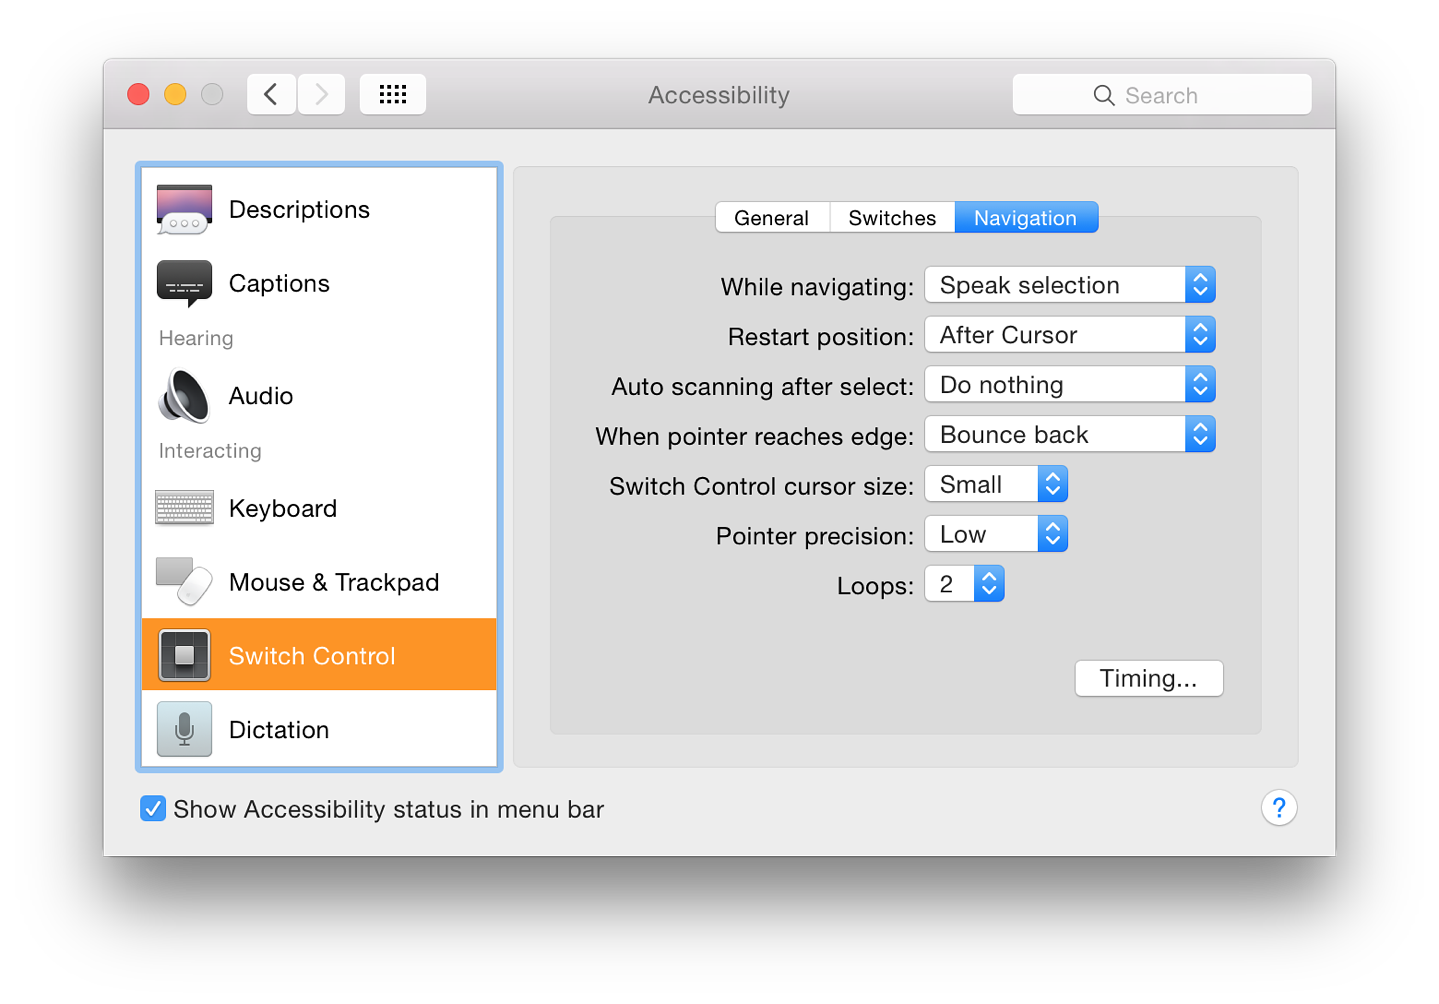
This panel provides a number of ways in which devices can be tuned so that they provide better input for users. Apple has provided some documentation in the that allows users and developers to make use of these controls. This text will be updated if more documentation becomes available. There are also a couple of useful articles from other sources, directly involved with providing assistance to disabled people.
Dictation is designed to allow control of the computer using voice and, although not clear in this panel, needs to be used with Dictation & Speech preferences. Since this first appeared, I have had limited success with this, particularly when using older applications.
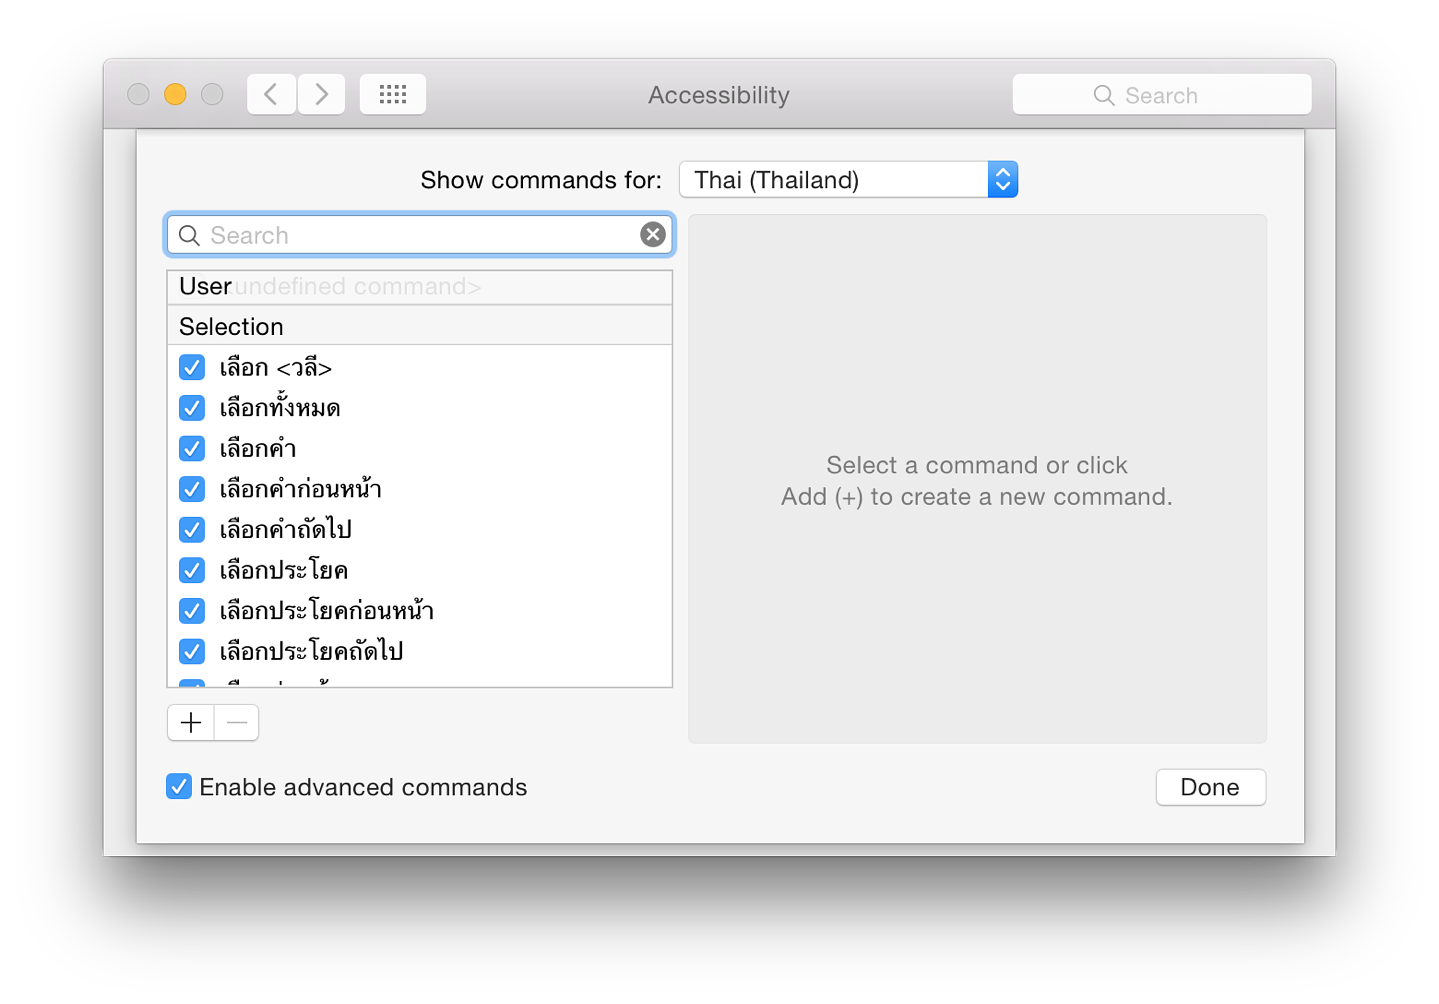
There is now a single (and much simplified) panel here with just one button: Dictation Commands. This opens a panel on which there is a list of commands that are available to the user in 5 sections: Selection, Navigation, Editing, Formatting, and System.
Alternative language sets are available. As I have downloaded enhanced dictation sets for UK and Thai, commands for these are also available in the Dictation Commands panel. Access to the different language sets is via a button near the top of the page.
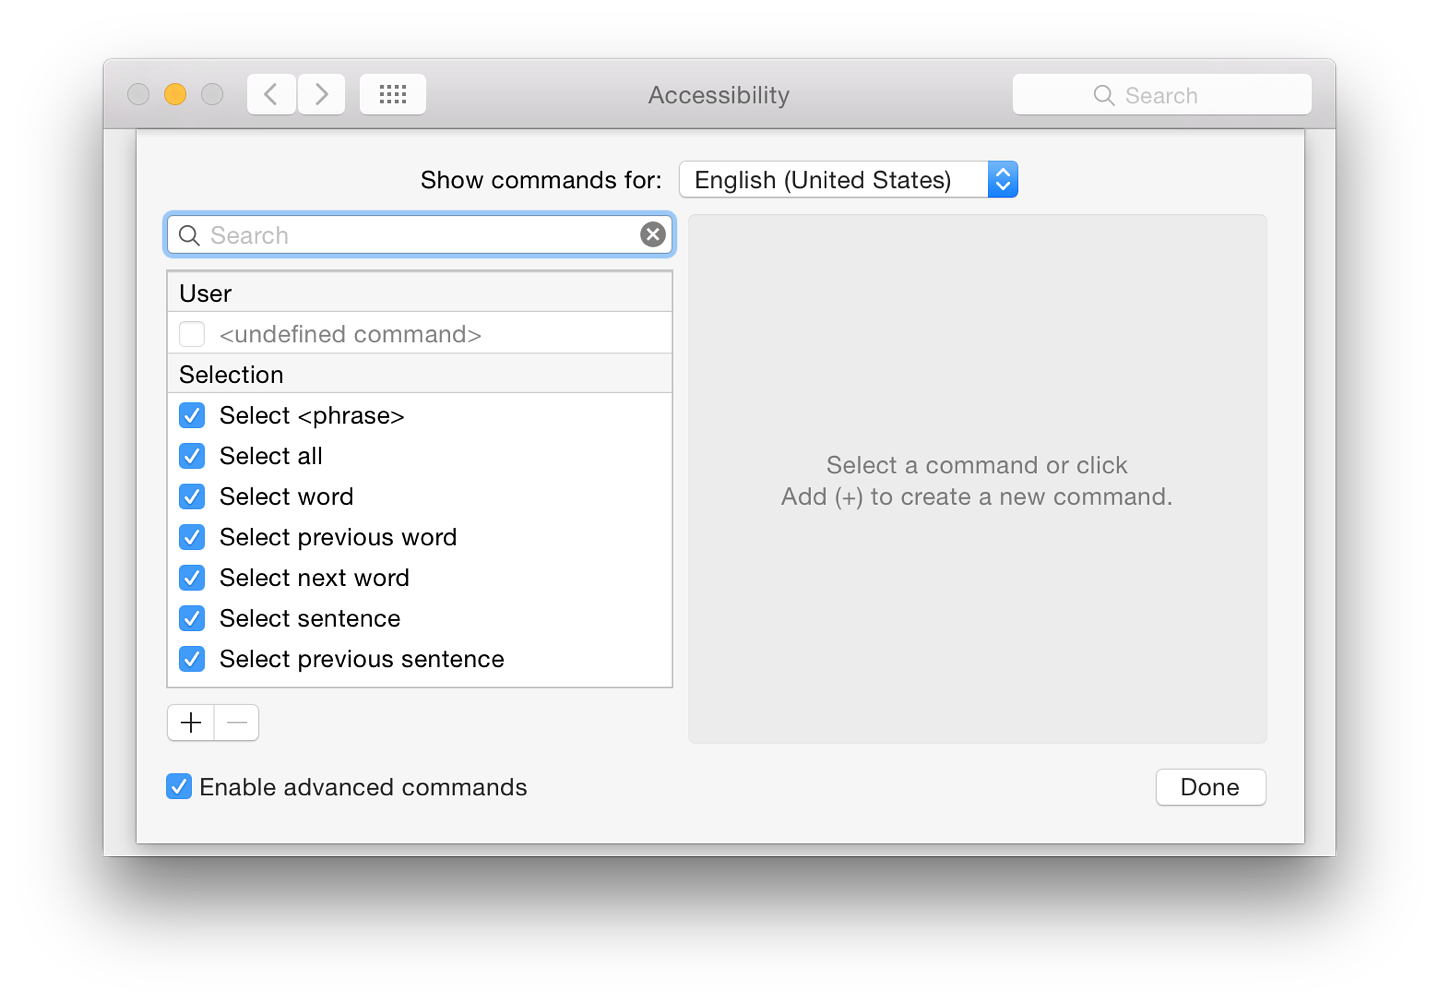
A checkbox underneath the list is marked Enable advanced commands. Using this adds a number of commands and also adds two more sections: Application and Document. A further section marked User is added at the top of the list if the box is checked and this allows user specific texts (undefined commands) to be added. Parameters for the user commands include, When I say. . ."; While in (any application, or a specific one); Perform (a button allows certain actions to be selected).
System Preferences in OS X 10.10, Yosemite: App Store |
|
![]()
In OS X 10.10, Yosemite, there have been some changes to System Preferences. The preference panel, App Store, which was new in OS X 10.9, Mavericks, provides settings that work with the App Store application. There have been some minor changes here.
Apart from some differences in wording and a new checkbox option, the App Store preference panel is almost identical to the previous version. Like all System Preferences panels, however, it has a new look, including a redesigned icon that matches the one used by the App Store application.
There is a single panel with checkboxes for most functions. Admin access may be required for part of this. With the use of the Mac App Store, all updates (apps and system) are now funelled through this online source. This appears now to apply to software that was previously bought in boxed sets (before the App Store existed). Some third-party software available in the App Store that was bought from developers, may not update in the same way, so will still need to be downloaded via the developer sites.
The Apple menu item, Software Update, is no longer supported. Instead there is App Store. Any checks are made via that application. In addition, if any updates are available, the menu item shows a number to the right of the words, App Store.
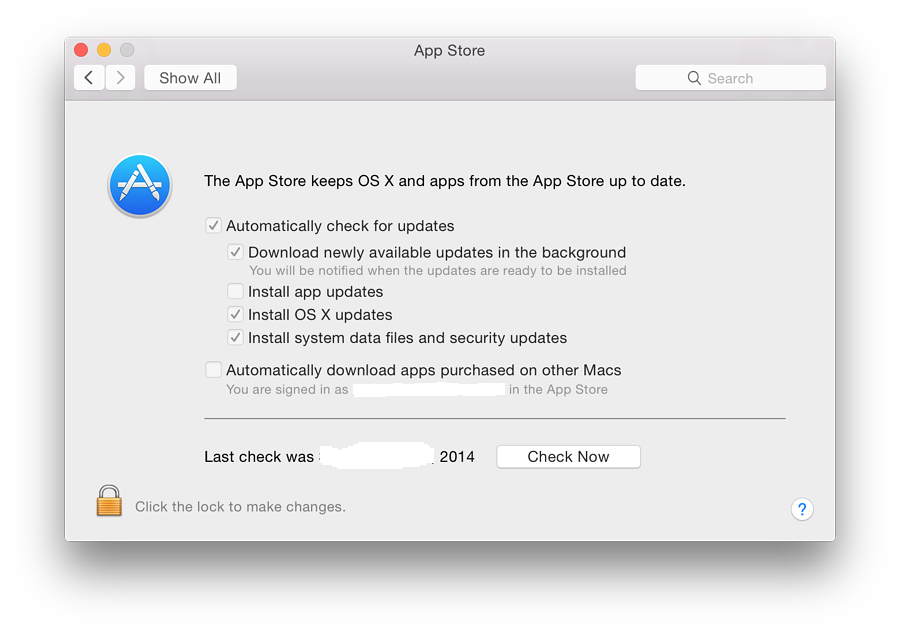
To the right of the icon in the System Preferences panel is a short description of the purpose of App Store: "The App Store keeps OS X and apps from the App Store up to date."
There are 6 checkboxes now available:
In my case, when it has been activated in the Admin account, it indicates that I am signed in to the Mac App Store and gives my username (erased in the screenshot). Even if set up in the Admin account, the checkbox remains unchecked in the user account, but downloads still take place.
Below the checkboxes is a text which indicates when the last check was made, or if updates are available. This may not always be accurate. Beside this there is a button marked, "Check Now" (or "Show Updates" if these are indicated). As with the Finder menu item, when this is pressed, the Mac App Store app is activated and a check made. Any apps available are shown; or the Updates panel in the Mac App Store will show, "No Updates Available."
System Preferences in OS X 10.10, Yosemite: Bluetooth |
|
![]()
In any major update to OS X there are expected to be some changes to specific System Preferences, while others are unchanged. With OS X 10.10, Mavericks, the Bluetooth Preferences panel, which is for setting up and connecting Bluetooth devices settings and the way Bluetooth pairing operates, have seen no changes, apart from the cosmetic updates common to all panels.
Bluetooth devices exchange data over short distances under standards of the Bluetooth SIG organisation. The Bluetooth standard, originally put forward by Ericsson, later became a standard under IEEE (802.15.1). This is now maintained by the Bluetooth SIG. The name "Bluetooth" was originally the name of a Danish king - Harald Bluetooth - who was a uniting force.
The Bluetooth Preferences panel is in two parts. The left side has a logo (itself made up of Harald Bluetooth's initials) and an indication of the On/Off state of the Bluetooth installed on the computer. Below is a button marked "Turn Bluetooth On". When Bluetooth is active, the button changes (Turn Bluetooth Off) and text below shows that the computer is discoverable by other devices and the name that would be used.
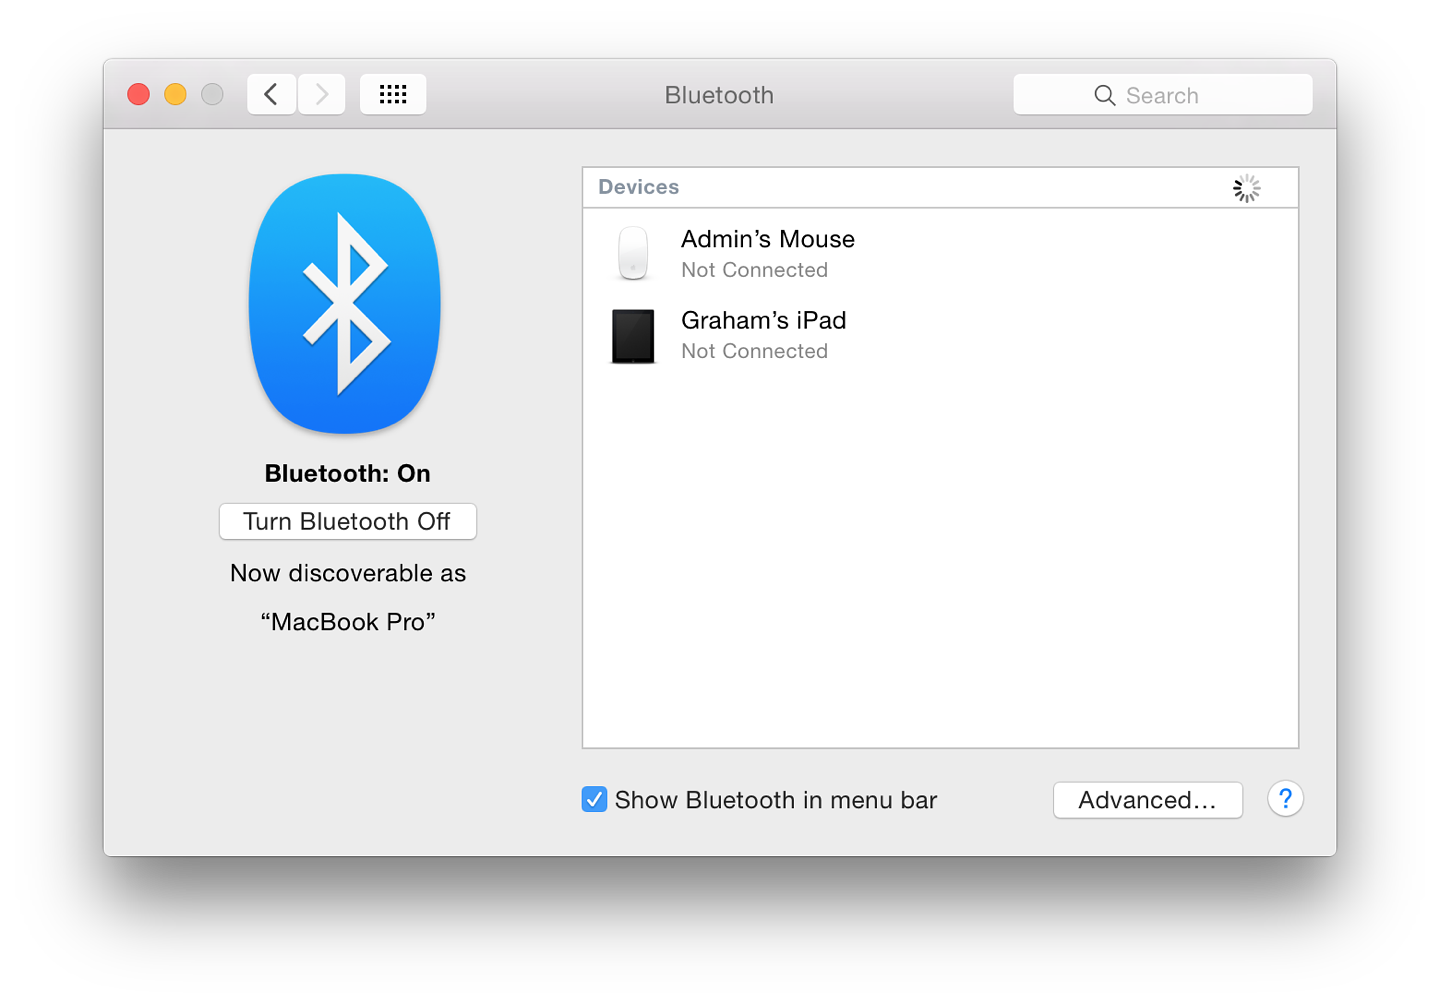
The main panel displays names (and icons) for any devices paired with the computer with the current state of the connection. When the panel is open and Bluetooth active, a spinning icon indicates that the computer is searching for compatible devices. When the cursor is run over a paired device, an X appears to the left so that the device may be removed from the list. When this is pressed a panel asking for confirmation of the deletion appears, adding that "You have to pair this device again if you want to use it later."
Below the panel is a checkbox that places a Bluetooth icon in the menubar. This provides a menu that allows some controls of the device, including file transfers. To the right of the checkbox is an "Advanced" button. Pressing this opens a panel with 3 checkboxes:
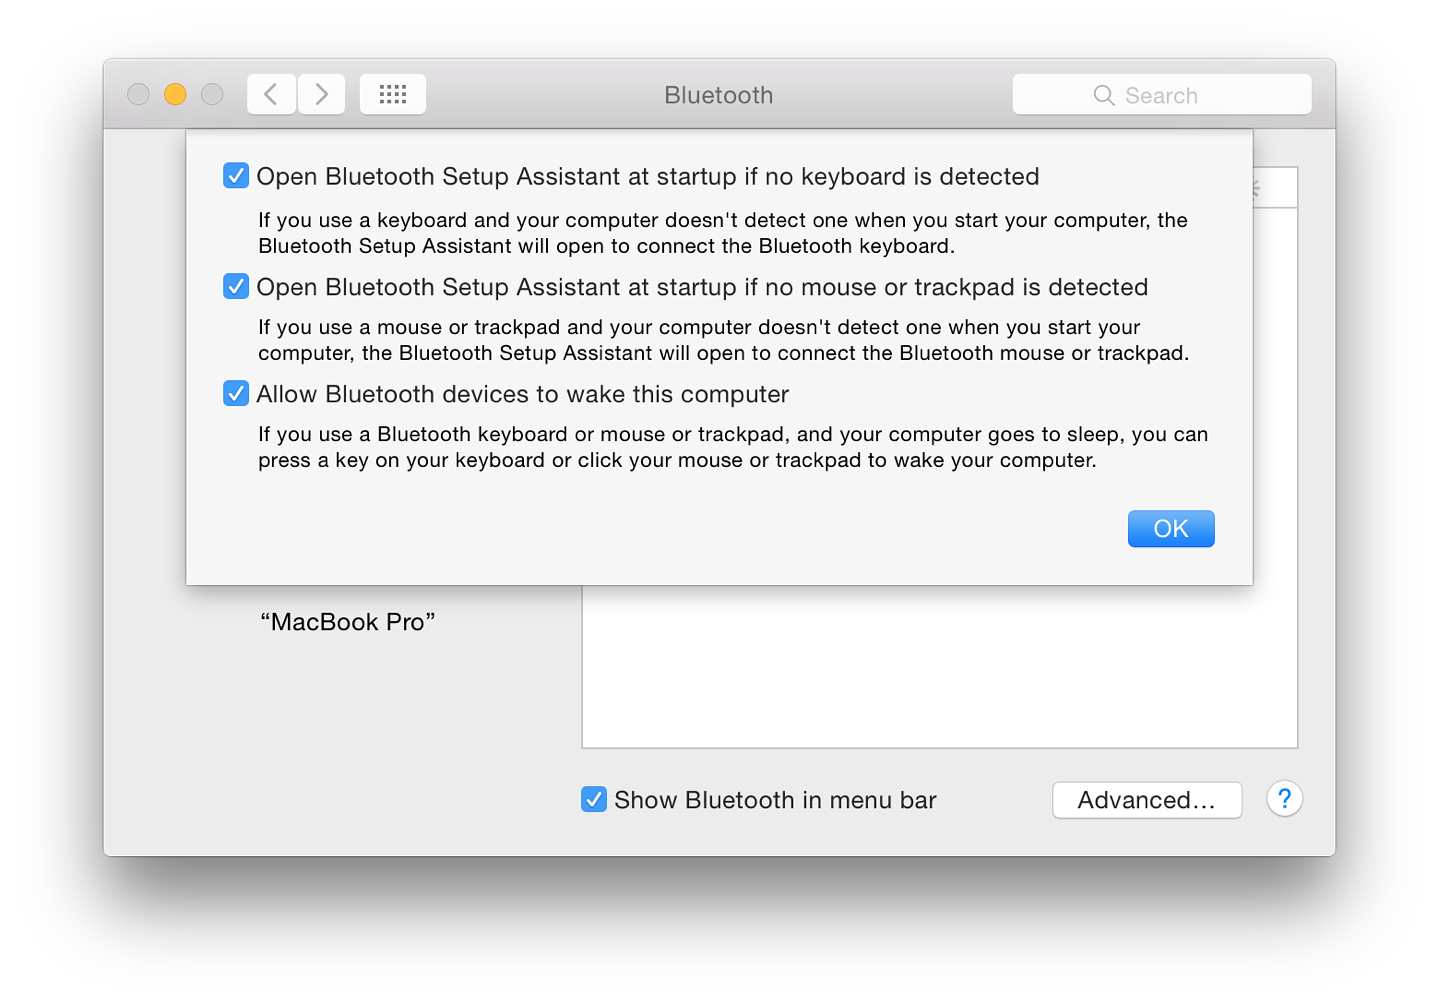
Bluetooth Setup Assistant is not in the Applications or Utilities folders. This is now in the System folder. The process operates automatically when a suitable device a connection. A panel appears and the user is asked to verify to confirm that pairing was desired.
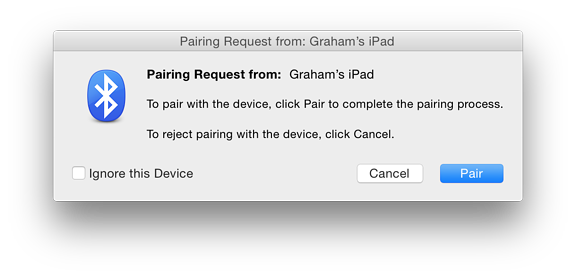
Any devices discovered by scanning are shown in the list with a Pair button to the right. Pressing this will initiate pairing: to complete a pairing a panel on the target device is used to confirm acceptance.
System Preferences in OS X 10.10, Yosemite: CDs & Disks |
|
![]()
In the latest version of OS X - 10.10, Yosemite - some System Preferences have seen changes. As many new Macs no longer have internal disk drives, the CDs & DVDs preferences panel may not be shown, although the necessary files are installed. The panel is available to control the actions of the computer when a disk drive is available.
The CDs & DVDs panel does not appear in the panel for System Preferences on my MacBook Pro. However, on the older iMac which has an optical drive, it is unchanged from previous versions of OS X, apart from the different interfacing and fonts that are used for Yosemite. A close look, however, will reveal that the minute icons used on the selector buttons have been updated (e.g. iTunes).
These preferences allow users to control how the computer will behave when blank disks - or disks that have media on them - are inserted in a drive. Five disk options are available: blanks CDs, blank DVDs, music CDs, picture CDs and video DVDs. As before, blank disks options are separated slightly on the panel from those for media disks. Buttons for the blank disks have more options.
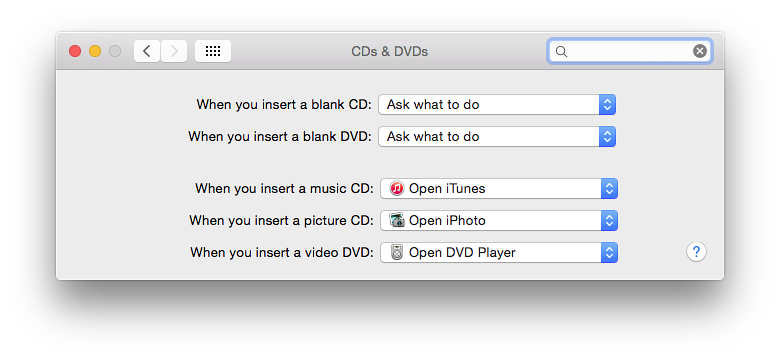
Beside each of the two blank disk items is a button with a number of choices, the top in each being, "Ask what to do": the Finder will alert a user and the user can then open an application, or deal with the disk in another way.
|
|
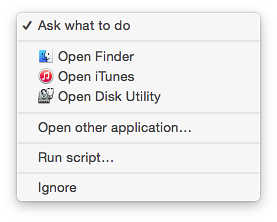
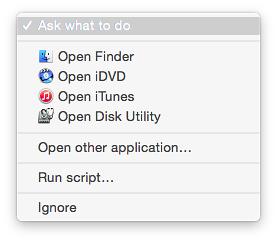
Other options available are: Open Finder, Open iTunes, Open Disk Utility, Open other application, Run script and Ignore. The blank DVD menu also has the additional item, Open iDVD. As an example of thoroughness, the tiny icons for iTunes and iPhoto actions have been updated from the previous versions in Mavericks as they were when moving from Mavericks to Mountain Lion.
The specific media items (music, pictures, video) each have as the top selection the probable default application for most users: iTunes, iPhoto or DVD Player (respectively). The user may select other applications, depending on the software installed on the computer. The buttons also allow a user to run a script or "Ignore".
System Preferences in OS X 10.10, Yosemite: Date & Time |
|
![]()
OS X 10.10, Yosemite is a major update to OS X and there are many changes to System Preferences including new interfacing. Many of the new icons and panels have a new flatter look. The Date & Time preferences panel is for setting up and controlling how the computer uses and displays time data.
The settings within the Date & Time Preferences have the same structure as before, but there have been changes with the interface. Each of the three sections has a different look. The panels operate as they did before. The Date & Time preference pane is in three parts: Date & Time; Time Zone; and Clock.
To the right of the calendar is an analog clock, with a digital time display just above. As with the calendar, this cannot be changed if the checkbox - Set date and time automatically - is active.
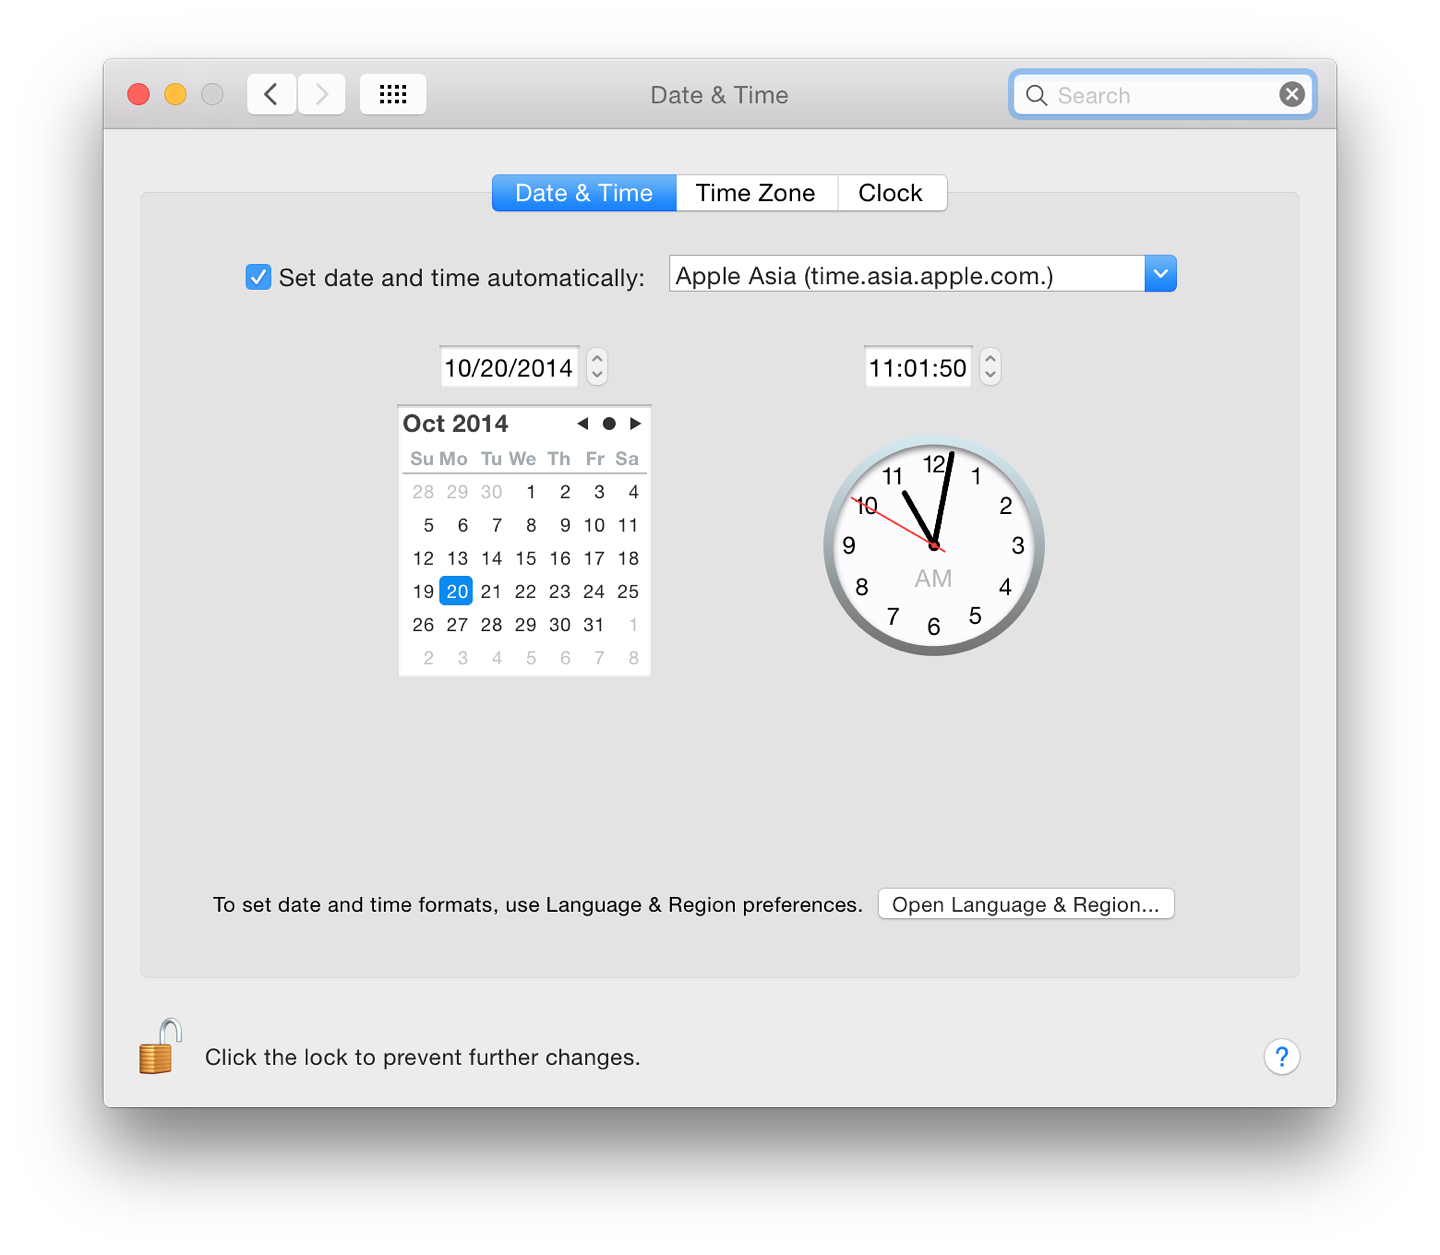
When the checkbox is used, the online server that is used (Apple Asia, in my case) controls the date and time displayed. Other servers listed are Apple Americas/US and Apple Europe. With each of these servers, a server link is shown (e.g. time.asia.apple.com). This cannot be used to open a page in a browser. Alterations to settings can also be prevented by a padlock icon to the bottom left of the panel.
A button at the bottom of the panel will open the Language & Region preferences where relevant language settings may be changed.
Note that if the battery fails and the calendar resets to 1 January 1970, in some cases automatic settings will need to be turned off as the computer may not be able to access essential functions, including Wi-Fi. Once date and time are reset, the checkbox may be used again.
These locations may also be changed manually. For example, visitors to Bangkok may wish to keep the computer set for their own home locations; and when I visited San Francisco, I kept the settings for Bangkok for working convenience (deadlines and phoning friends).
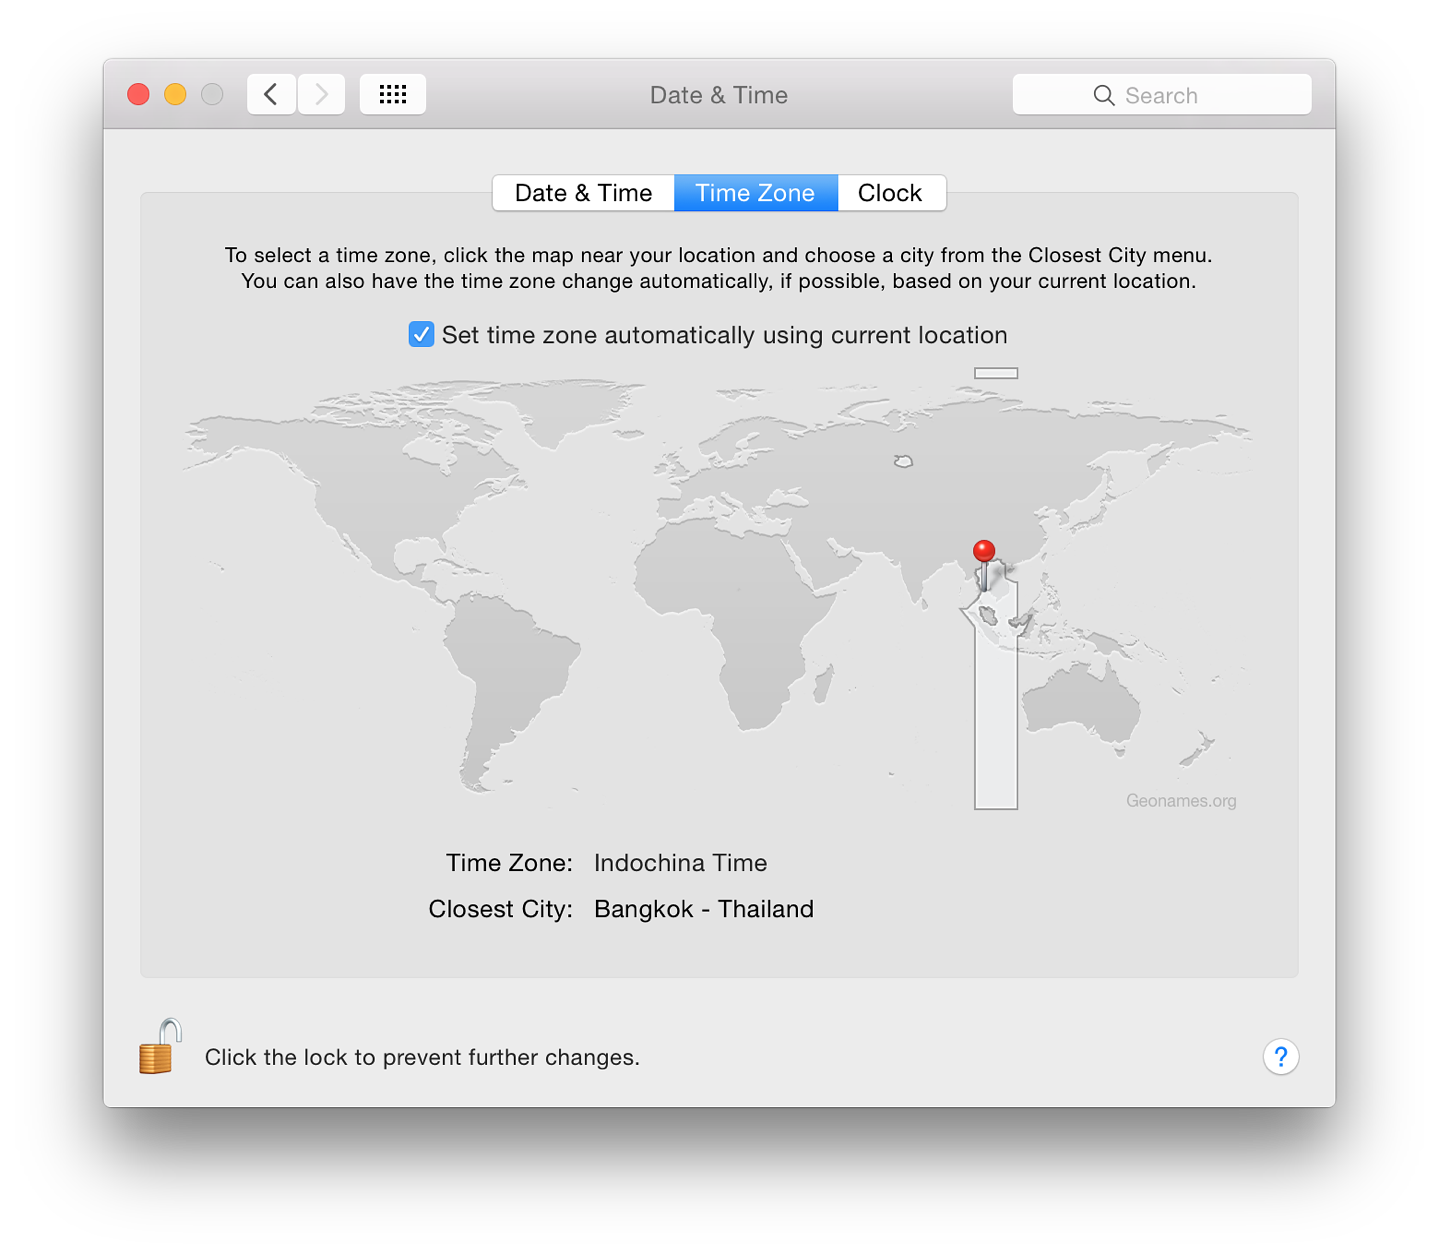
A checkbox near the top of the panel is for automatic setting of the time zone, so that a change in the computer's location will reset the date/time with no need for user input. As the location is changed (even within a country) an additional pin may also be dropped to indicate a refreshed location. As that happens, a grey panel "floats" down onto the screen with the location. The change of location from my home to office - around 20 Kms - is enough to trigger this.
All these settings may also be adjusted manually. For example, if I wanted to synchronise with an event in another country, I can click on the time zone: the zone/city/country are displayed with other relevant details. For automatic time zone operation, Location Services must be enabled in the Privacy settings of Security & Privacy preferences.
At the top is a checkbox for the display of time data in the menu bar. If this is used the options below are live. First are radio buttons to select a digital or analog (clock face) display. Selecting Analog greys out other options.
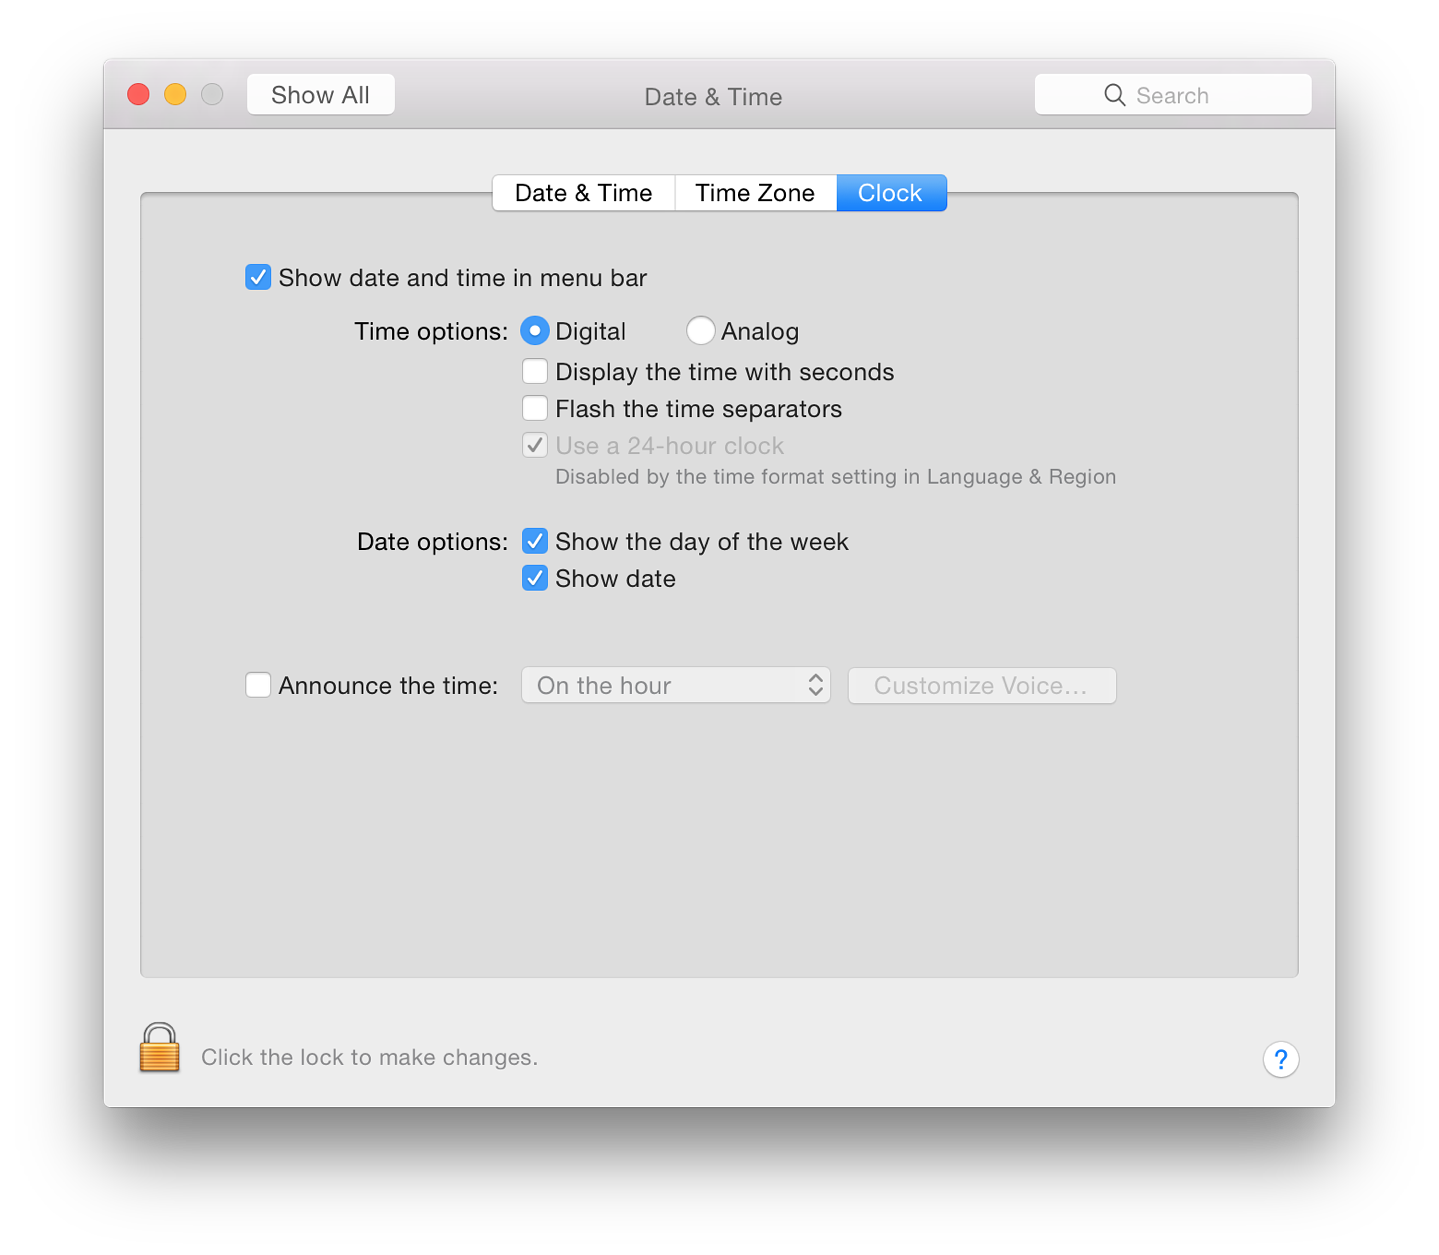
There are several choices for the digital displays, for example "Display the time with seconds" and "Flash the time separators". If the time format in Language & Region preferences has the 24 hour clock selected, "Use a 24-hour clock" is now greyed out, and "Show AM and PM" is not visible.
Two other checkboxes are available for displays of day of the week and date. If the Digital clock display is selected, these are shown in the menubar. When the Analog clock is selected, the checkboxes are now greyed out, but the day/date information is shown in a menu displayed when clicking on the analog clock. Using that menubar item, the user may also switch back to the digital display. Settings are changed automatically in the preference panel when this is done.
An additional checkbox may be used to announce the time at intervals: on the hour, half-hour, or quarter hour. The voice used for the announcements can also be selected here using the button to the left which opens a panel for customization of announcements.

This voice used may be independent of the system voice. The speed and volume of time announcements may also be changed in this panel via sliders. A Play button here allows us to check the voice before pressing OK to confirm.
System Preferences in OS X 10.10, Yosemite: Desktop & Screensaver |
|
![]()
In OS X 10.10, Yosemite - the current version of Apple's Mac operating system - all System Preferences have seen changes with the interface design. The content of some preferences remain unchanged. Apart from the new design, the Desktop & Screensaver preferences panel appears identical to what has been available in previous version of OS X.
The Desktop & Screen Saver panel controls the appearance of two fairly visible parts of the OS X interface. The panel is in two sections: Desktop and Screen Saver.
The Desktop pane is in two main parts. At the top left is the current desktop image displayed as a thumbnail. This changes if the user works in another space which has a different desktop picture allocated. The name of the picture is shown just to the right of the thumbnail panel.
A button below the name shows 5 methods for the display of the image: Fill Screen, Fit to Screen, Stretch to Fill Screen, Center and Tile. Depending on the image selected, using one of these options may produce a better display.
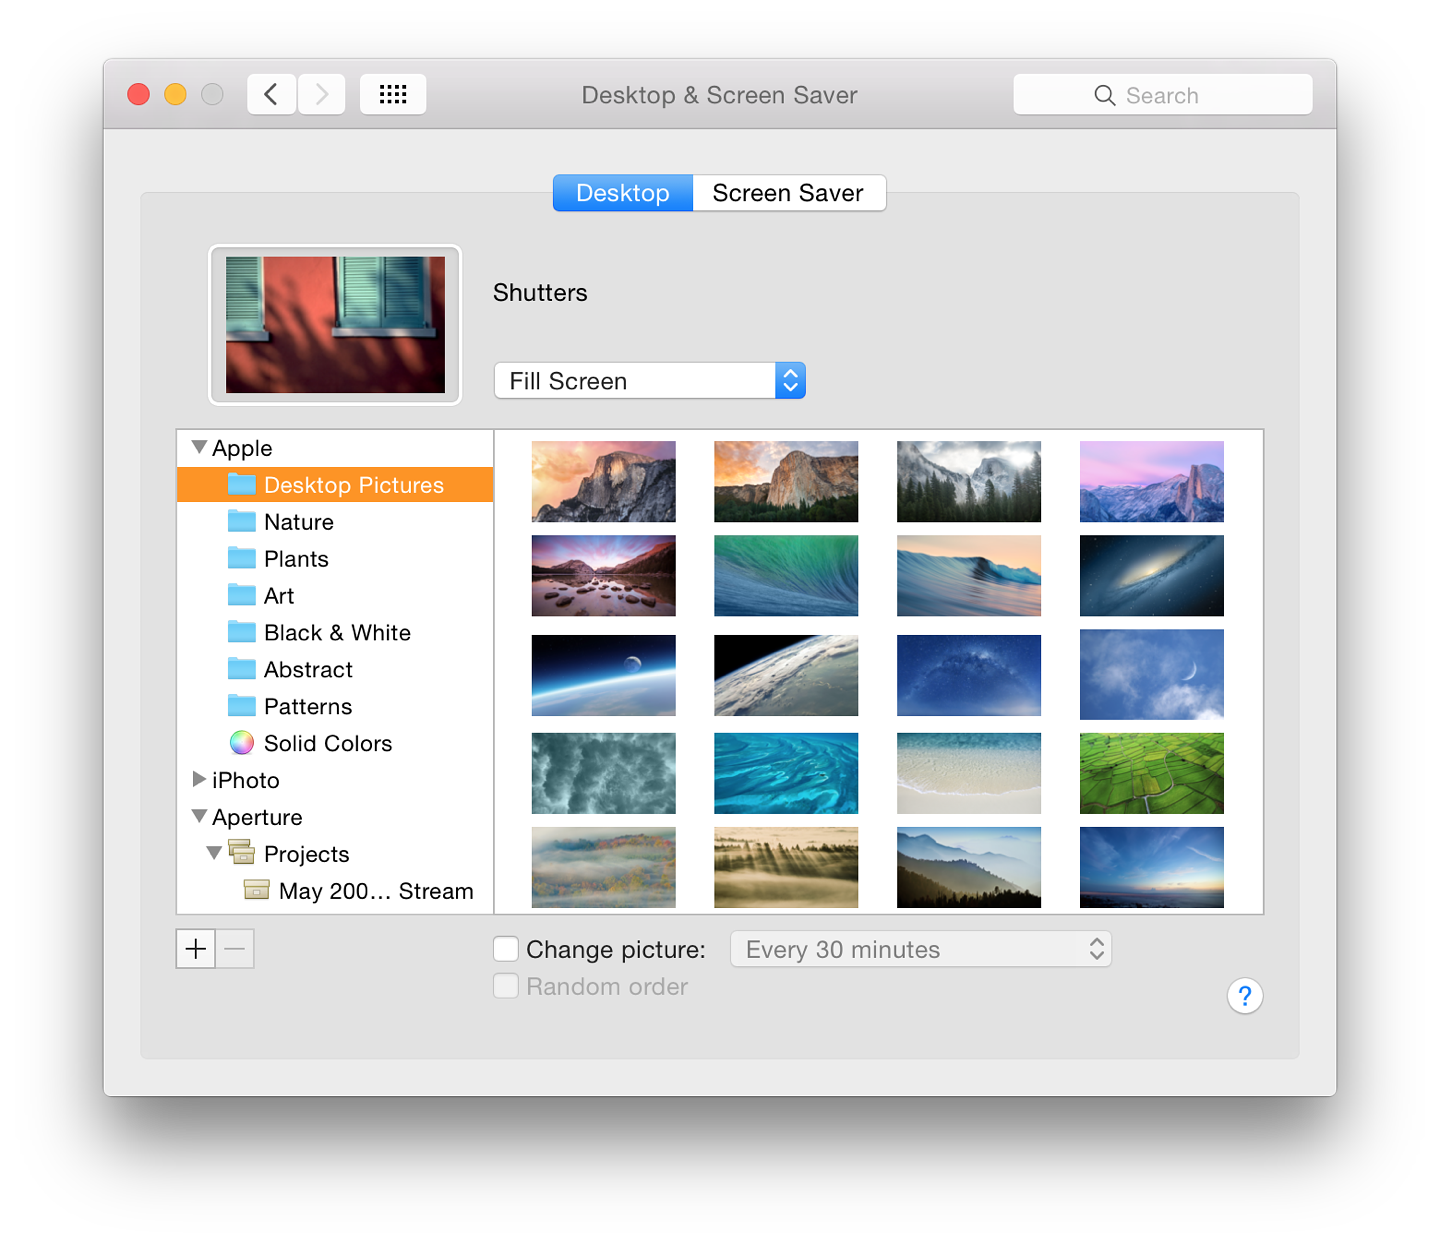
Below is a split panel for selection of desktop pictures. These can be from a standard set of system images under a menu item, marked Apple. The folders are: Desktop Pictures, Nature, Plants, Art, Black & White, Abstract, Patterns and Solid Colors. There are several new pictures to choose from, including the Yosemite "El Capitan" [Also see the note after the Screensaver images section (below)].
iPhoto albums are also included, giving access to a user's own photographs. As I use Aperture I added these albums. Below these two menu items are Pictures folders. Using a + icon at the bottom of the panel a Finder panel opens and we may also add our own folder selections. The - icon removes unwanted folders. It may also be possible to see icons for outside sources, such as Facebook or Flickr.
When any folder is highlighted, the available images in that folder appear in the main panel. Clicking on any picture makes that the desktop picture for the current space. The picture also appears as a thumbnail but will change as a new space is accessed. There is no Undo button.
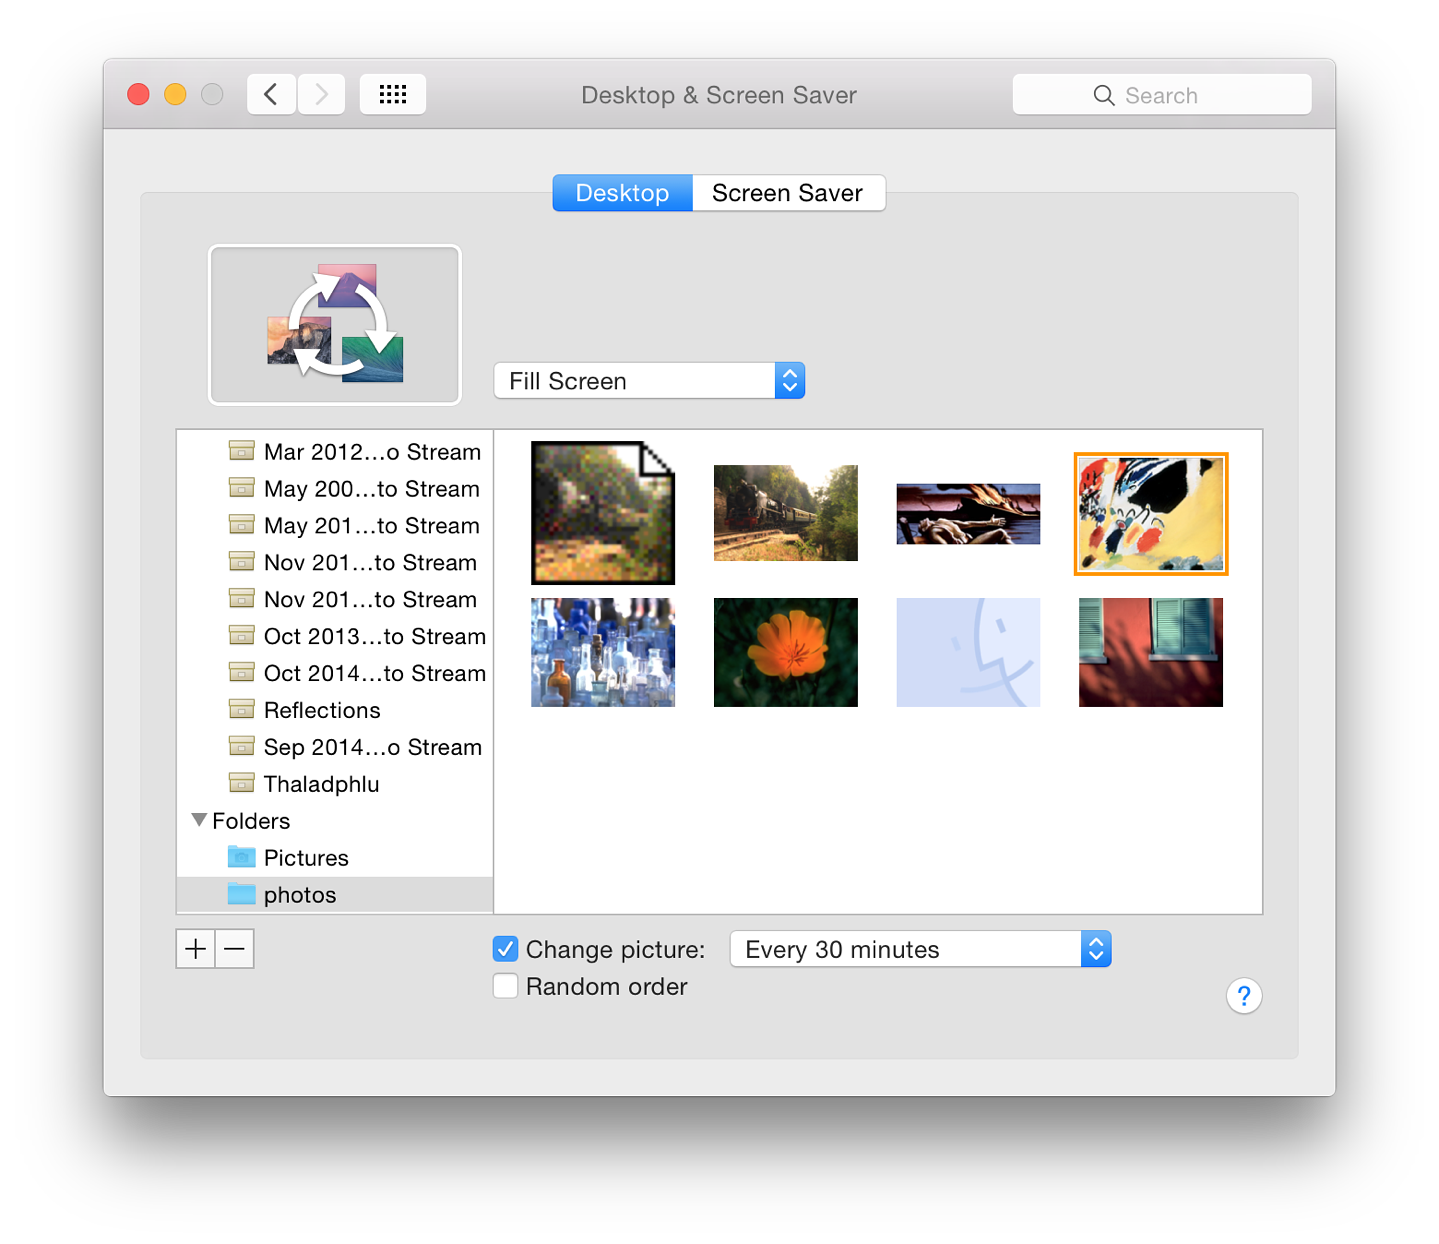
Below the panels are two checkboxes. Selecting the first makes it possible to change the picture with several time-settings, from Every 5 seconds up to Every day. There are two other options in that menu: "When logging in" and "When waking from sleep". When this box is checked, the image icon changes. This feature only works for those spaces it is applied to: a user can have one or more spaces that change the pictures, while others keep the same image.
If the Change picture box below the panel is checked, the Random order item below becomes available. When the checkmark in the Change picture box is removed, the picture originally selected may not be shown if a different album has been accessed.
The top 14 options are the same as the slideshows available before, although on my installation there is a slightly changed order: Floating, Flip-up, Reflections, Origami, Shifting Tiles, Sliding Panels, Photo Mobile, Holiday Mobile, Photo Wall, Vintage Prints, Ken Burns, Classic, Scrapbook and Snapshots. Thumbnails of the slideshows are shown in the left hand panel.
Twelve of the fourteen use the Ladybug desktop picture as illustration. The icons have some subtle display changes, but their content is mostly the same. Scrapbook and Snapshot use mini image icons, but these two options were not available on my older iMac.
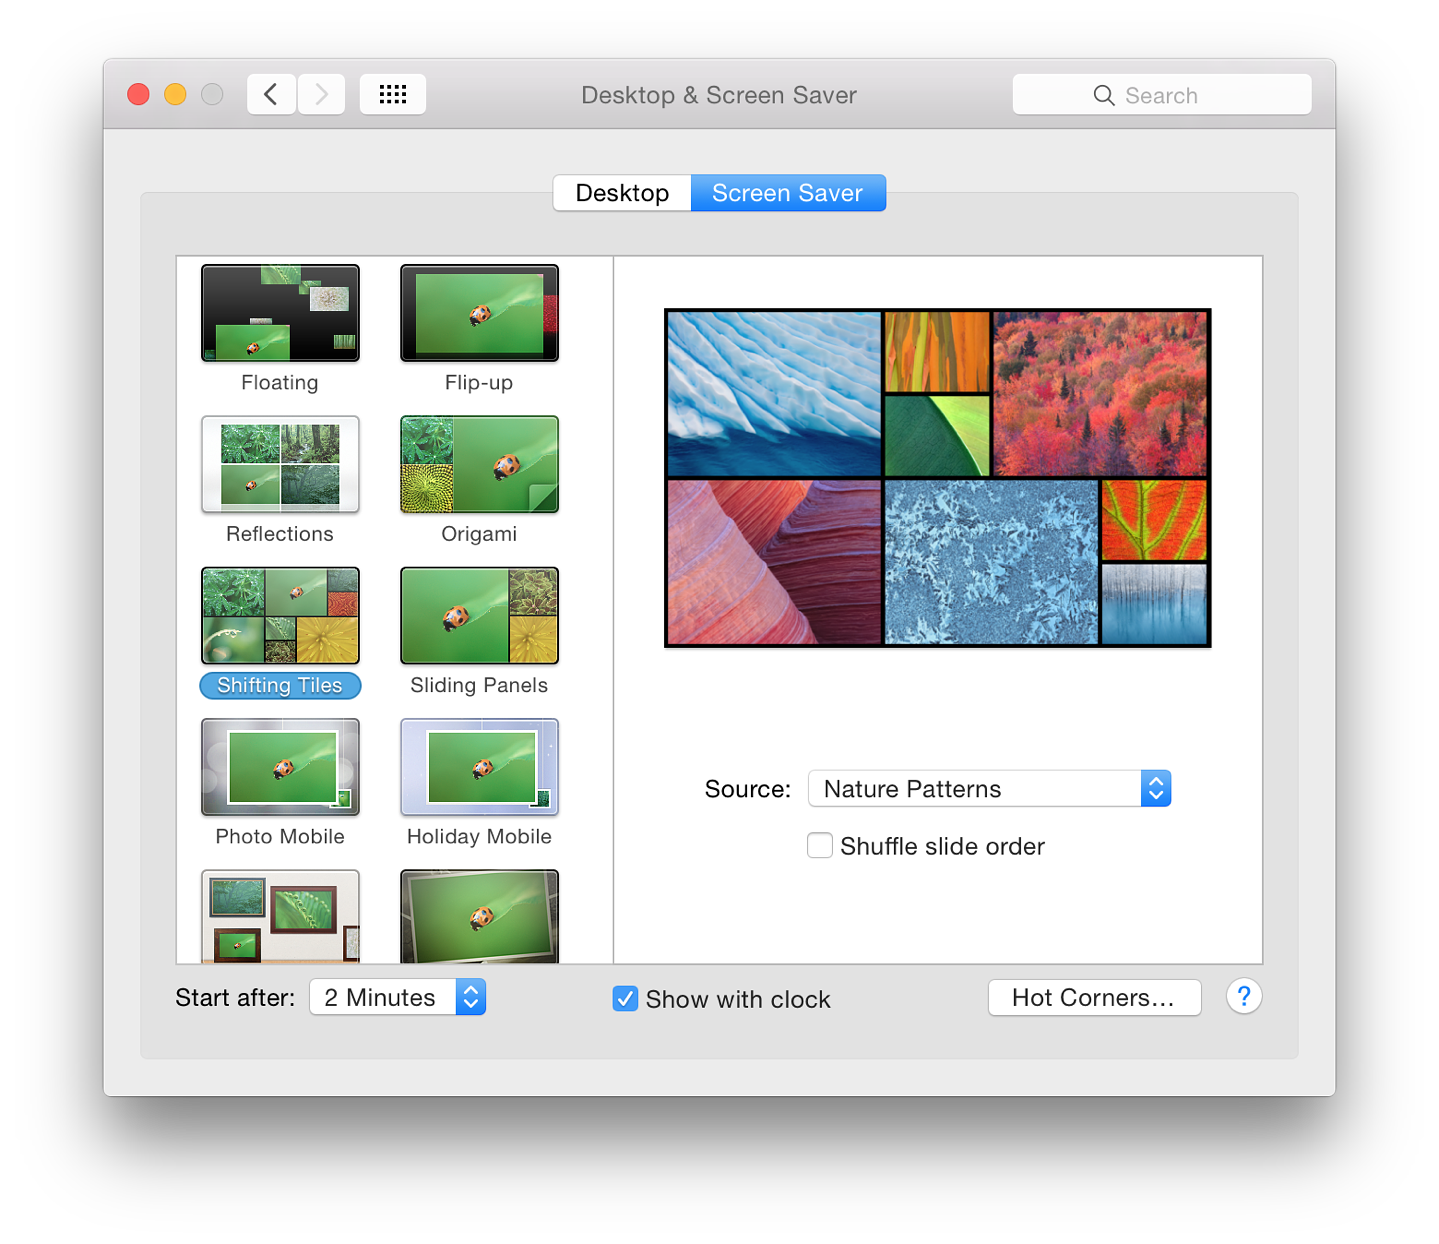
When one of the options is selected, the user is offered a button marked "Source". This can be used to select a folder or album from which pictures can be used. In my case, as well as recent events from iPhoto and Aperture, there are also four default sources included with the installation: National Geographic, Aerial, Cosmos, and Nature Patterns.
Users may also choose from the Library or any suitable folder. As a source is selected, so a slideshow of sample images is displayed in a small window above the selector button. A checkbox below the button allows shuffling of image order.While Snapshot (using the same sources as the other screensaver types) did work, I was not able to make the Scrapbook screensaver work.
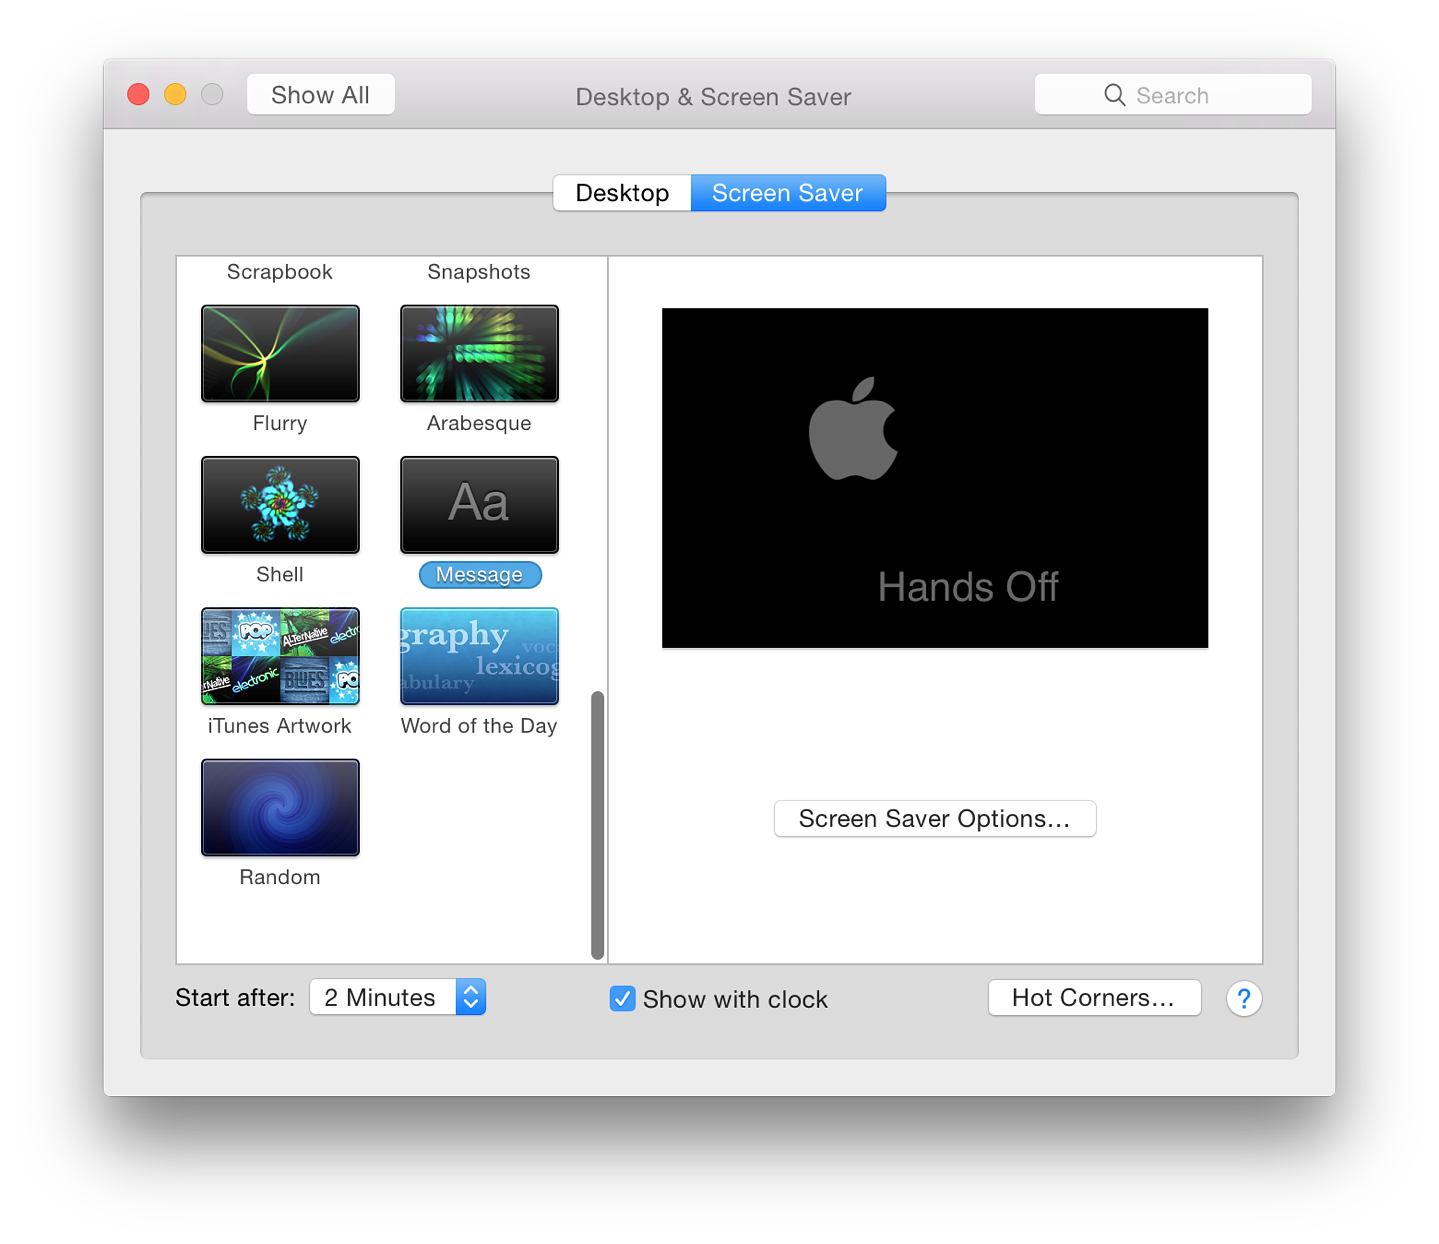
The same 7 screen savers as in OS X 10.8 Mountain Lion and 10.9, Mavericks, are available. These are: Flurry, Arabesque, Shell, Message, iTunes Artwork, Word of the Day, and Random (a screen saver is selected at random).
When a screen saver is selected, a preview appears in the window to the right. A button below for Options, when available, can be pressed. These are not the same for each screen saver:
There are three additional controls at the bottom of the screen: a button for selection of the time to start the screen saver (Never and time intervals from 1 minute to 1 hour); a checkbox for "Show with clock"; and a button for Hot Corners.
This opens a panel which has four buttons for actions to be started when the cursor is moved to the four corners of the screen. In my case, I use top right to Put Display to Sleep; and bottom right to Start Screen Saver. Actions available are
As above, this may be done by using the + icon at the bottom of the Desktop panel. In the Finder panel that opens we may use the Finder menu to access the /Library/Screen Savers/Default Collections/ and add any folders required. [Klosowski writes that the images could be copied using the Finder, but they are accessible this way as well.]
System Preferences in OS X 10.10, Yosemite: Dictation & Speech |
|
![]()
With the latest release of OS X, 10.10, Yosemite there are a number of changes to System Preferences. The Dictation & Speech Preferences panel is for producing text from speech, and speech from highlighted text. While it appears basically the same, there are a number of improvements below the surface, particularly with the addition of new voices.
The Dictation & Speech panel has two sections: Dictation and Text to Speech.
Below this icon, the currently selected input method is shown, for example, "Internal Microphone." Clicking on this reveals a small menu. By default, it is set to Automatic which uses the most suitable input method. This menu will change if other devices are connected to the computer.
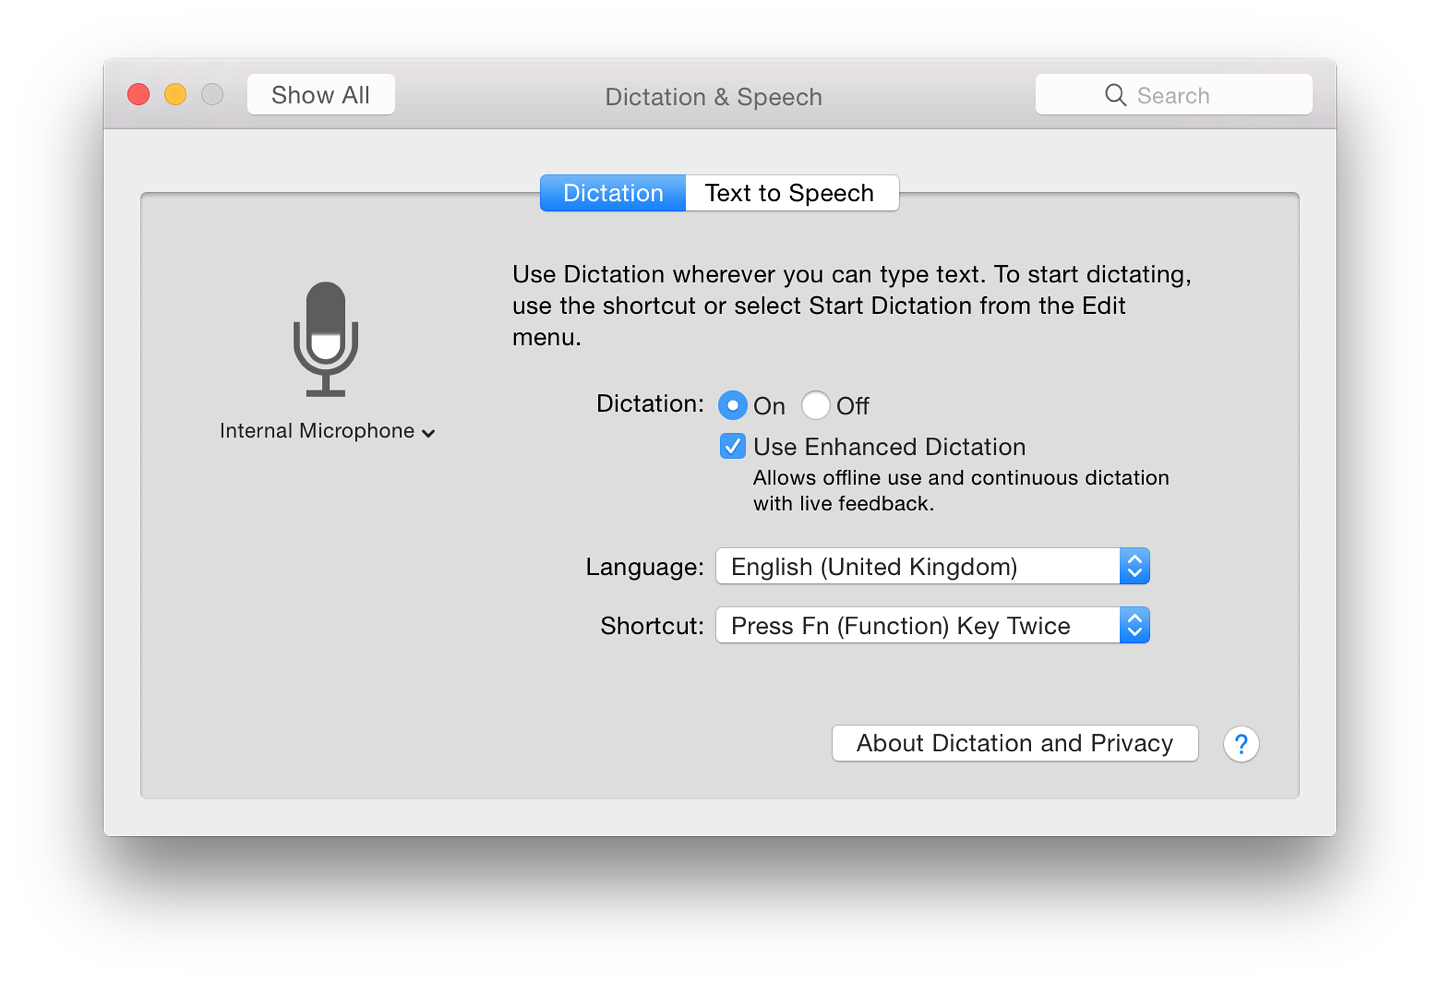
There are two radio buttons in the center top of the Dictation panel: On and Off. A check box below is marked, "Use Enhanced Dictation". When this is checked for the first time, a download of software that will allow offline use and continuous dictation takes place (see below). Below a short text description of the feature are two buttons for Language and Shortcut.
Results may vary with user input. While I had better success by changing Siri to a UK English voice on the iPhone, selecting "English (United Kingdom) did not provide the accuracy I wanted until I turned on Enhanced Dictation.
Using Customize, I was able to use the F6 key (F11 and F12 were already allocated). If a key or combination cannot work as a shortcut, instead of a warning triangle as before, the feature (e.g. Volume) is shown. If a Shortcut is deselected, Dictation may be started by an item in the Edit menu of suitable applications. Changing the key combination settings in the Dictation pane changes the entry in the Edit menu item of applications immediately.
When Dictation is started, a small microphone icon appears on the screen that shows the language option, with a button marked "Done" which is pressed when dictation is completed. There is a limit to the amount of dictation a user is able to do in the basic setup. I found that with the standard settings, the input was stopped at about 30 seconds. "Done" then changes to "Cancel".

|

|

|
However, when Enhanced Dictation was selected, a download of almost 500MB took place and the text was then changed to remove mention of the download. There were a number of improvements. When I tried the microphone, I was first asked to confirm the language. Adding another language later, needed that to be downloaded. The download of the Thai package was some 714 MB.
The microphone icon is now grey. Sound levels are indicated by white, as on the main panel. I was able to produce text output in each language I tried. When Enhanced Dictation was off, the feature worked in the limited way that it had before. A user may select another dictation language by clicking on the language shown on the microphone icon. There is a delay while the software is loaded.
Sometimes output may need editing and correcting. For example, slight pauses may cause a capital letter to be typed. Accuracy is another problem: While spellings are generally correct, homonyms (four, for, fore) may need some fixing.
As an additional note, using the Thai option, I was able to write quite effectively, although I am only able to speak street Thai. I cannot read or write the language, but using the dictation feature, I was able to produce some sentences which were correct.
Used in conjunction with System Preferences > Accessibility, there are also several commands available to enable a user not only to dictate, but to correct, or enter system commands. The commands available in Accessibility may be deselected, or users may add their own commands
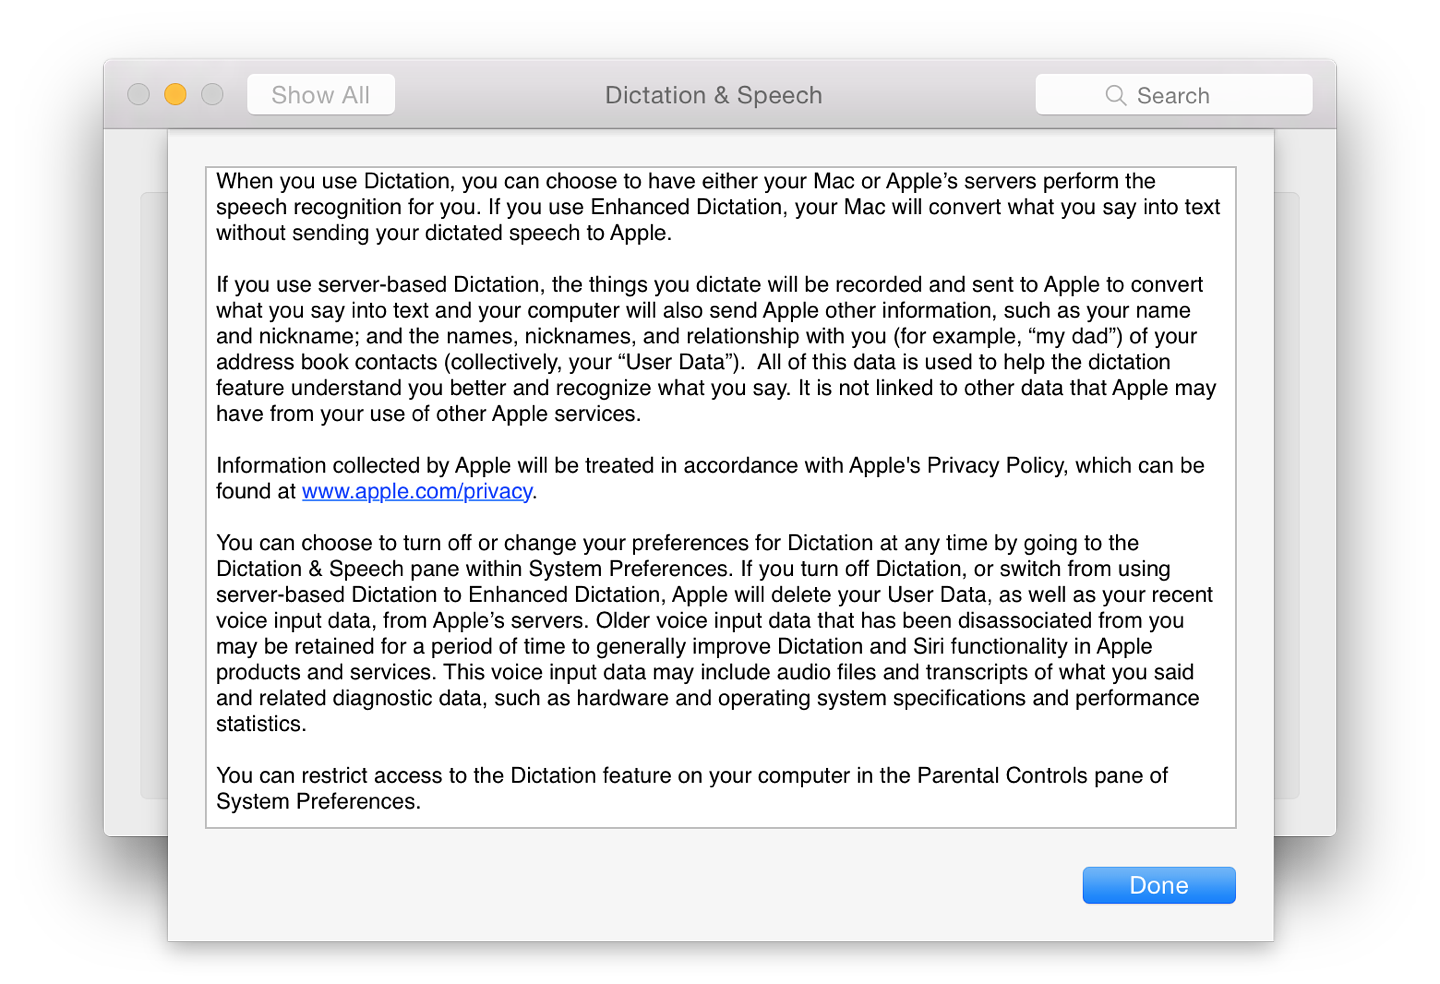
At the bottom of the screen, is a button marked, "About Dictation and Privacy". This opens a panel which has a text explanation of the use of online access and the storage of data on remote servers.
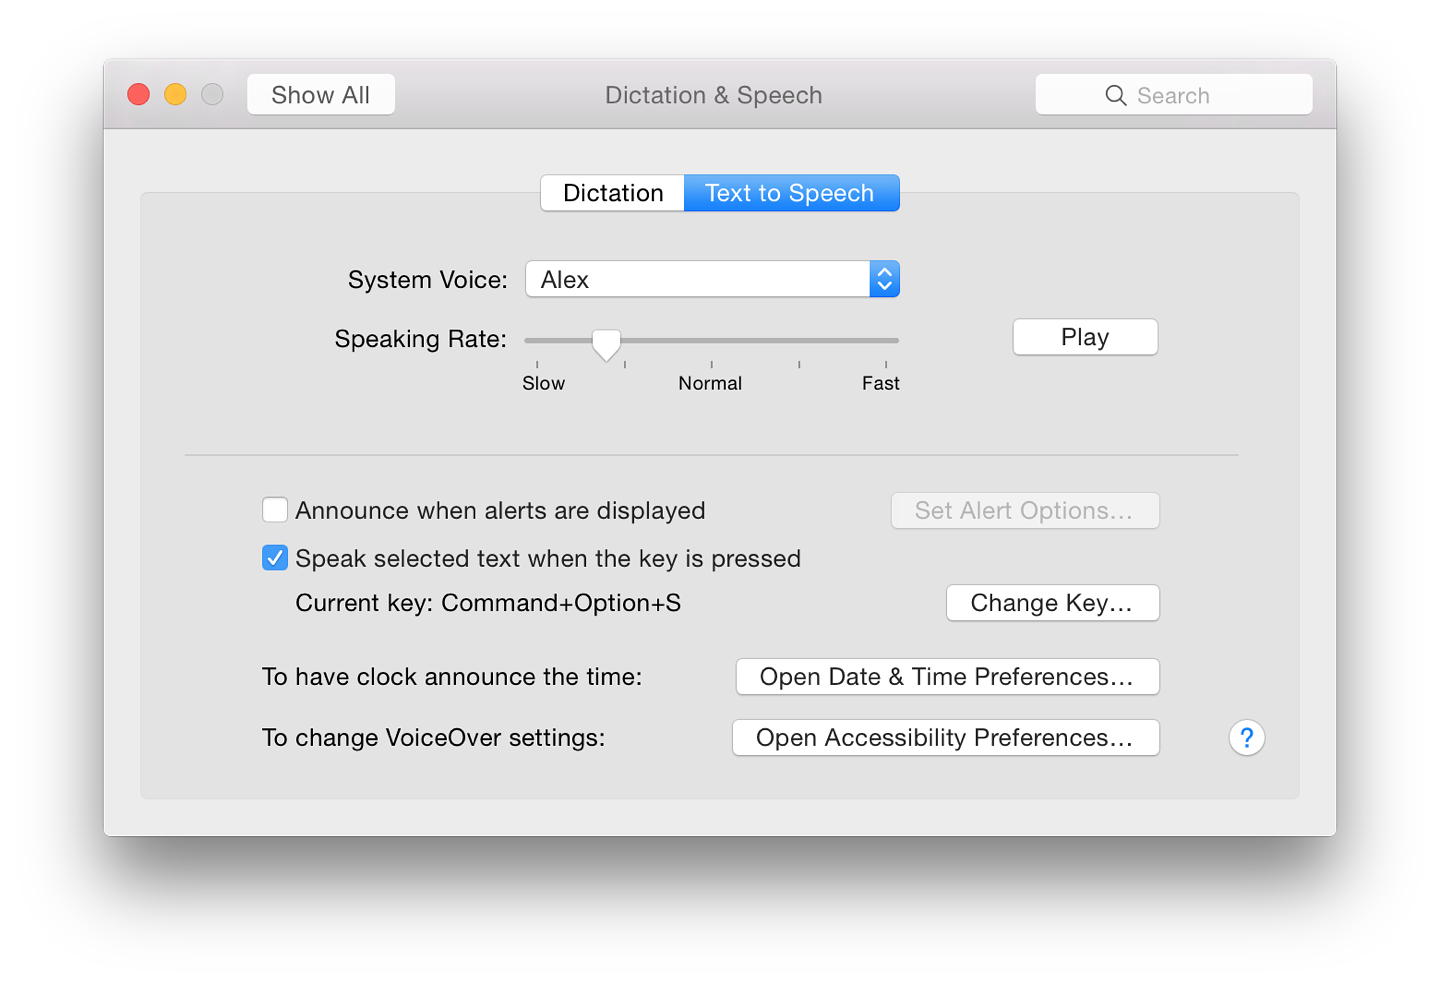
The main button at the top of the panel is marked System Voice, with the default being Alex. This voice has had considerable work done concerning its output and is perhaps the most natural voice available in OS X.
Several other voices are available. On my installation, I already have,
I had already installed two: Fiona, which is a female voice with a Scottish accent; and Narisa, female with a Thai accent. "Narisa" has some interesting "errors", some of which are close to how some Thai speakers read out English. There are a number of inaccuracies, however, that are not simply down to accented speech.
Below the voice selector button is a slider to adjust the rate at which the voice speaks text. The Fast setting is perhaps only understandable by a native speaker, but even then is too fast for full understanding. The Slow setting is almost painfully slow but may well be useful for those learning to read, or for non-native speakers of English. The Normal setting produces output at a reasonable speed for a native speaker. Adjustment using the slider is easy and users should experiment to find the output that suits them best.
Beside the slider on the Text to Speech pane is a Play button which produces an example of the voice selected, at the set speed.
In the middle of the panel is a faint horizontal line. Below this are features that work with the System.
Text to Speech may not work successfully with some non-Apple applications. However, Services (in the application's main menu) may provide an alternative by adding the highlighted text to iTunes.
There are two other options available that use the System Voice, but these need to be activated by other System Preferences: Have the clock announce the time; and Change VoiceOver Settings. Buttons beside these options open Date & Time Preferences or Accessibility Preferences respectively.
System Preferences in OS X 10.10, Yosemite: Displays |
|
![]()
In System Preferences the Displays Preferences panel appears similar to that in the last version of OS X, although panels differ depending on the computer. One important feature concerning Spaces and presentations is affected by Mission Control preferences.
The Displays panel controls the way screens show their content. It is normally in two sections: Display and Color. For a computer with an inbuilt display, like the MacBook Pro or the iMac, the information will be for the machine's own monitor. This will differ for computers that use an external device (Mac Pro, Mac mini). An additional panel - Arrangement - will appear when extra external displays are connected.
The Mac's current desktop picture is displayed. If the desktop is changed (see, Mission Control) and the Displays preferences panel re-opened, the picture will change to the current desktop picture (See Desktop & Screensaver.
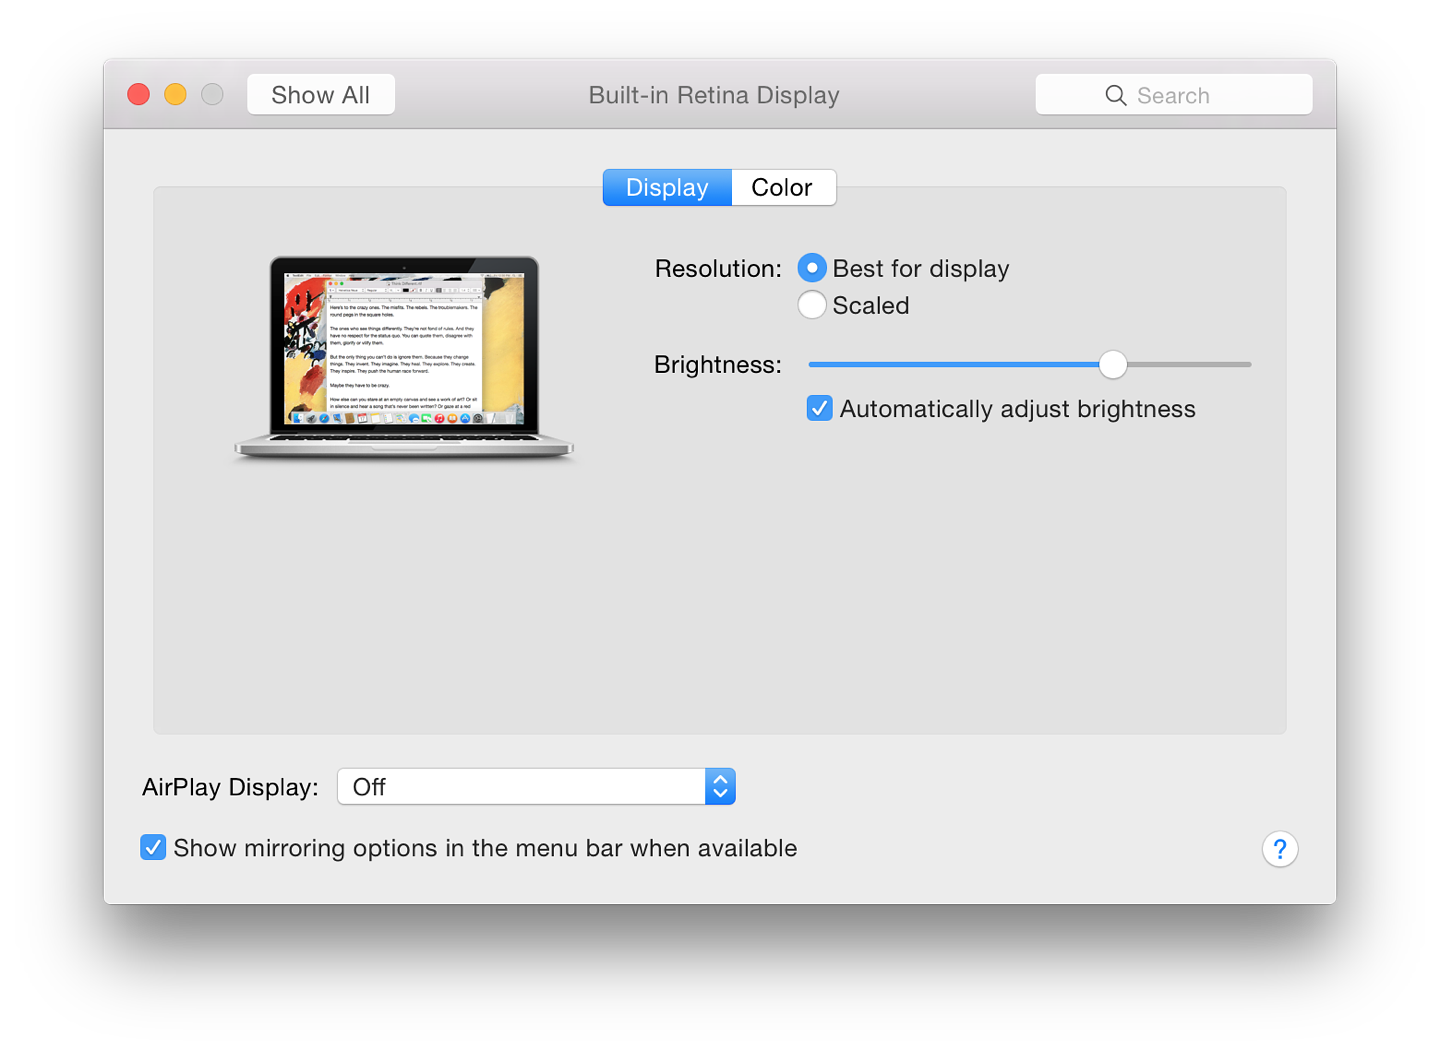
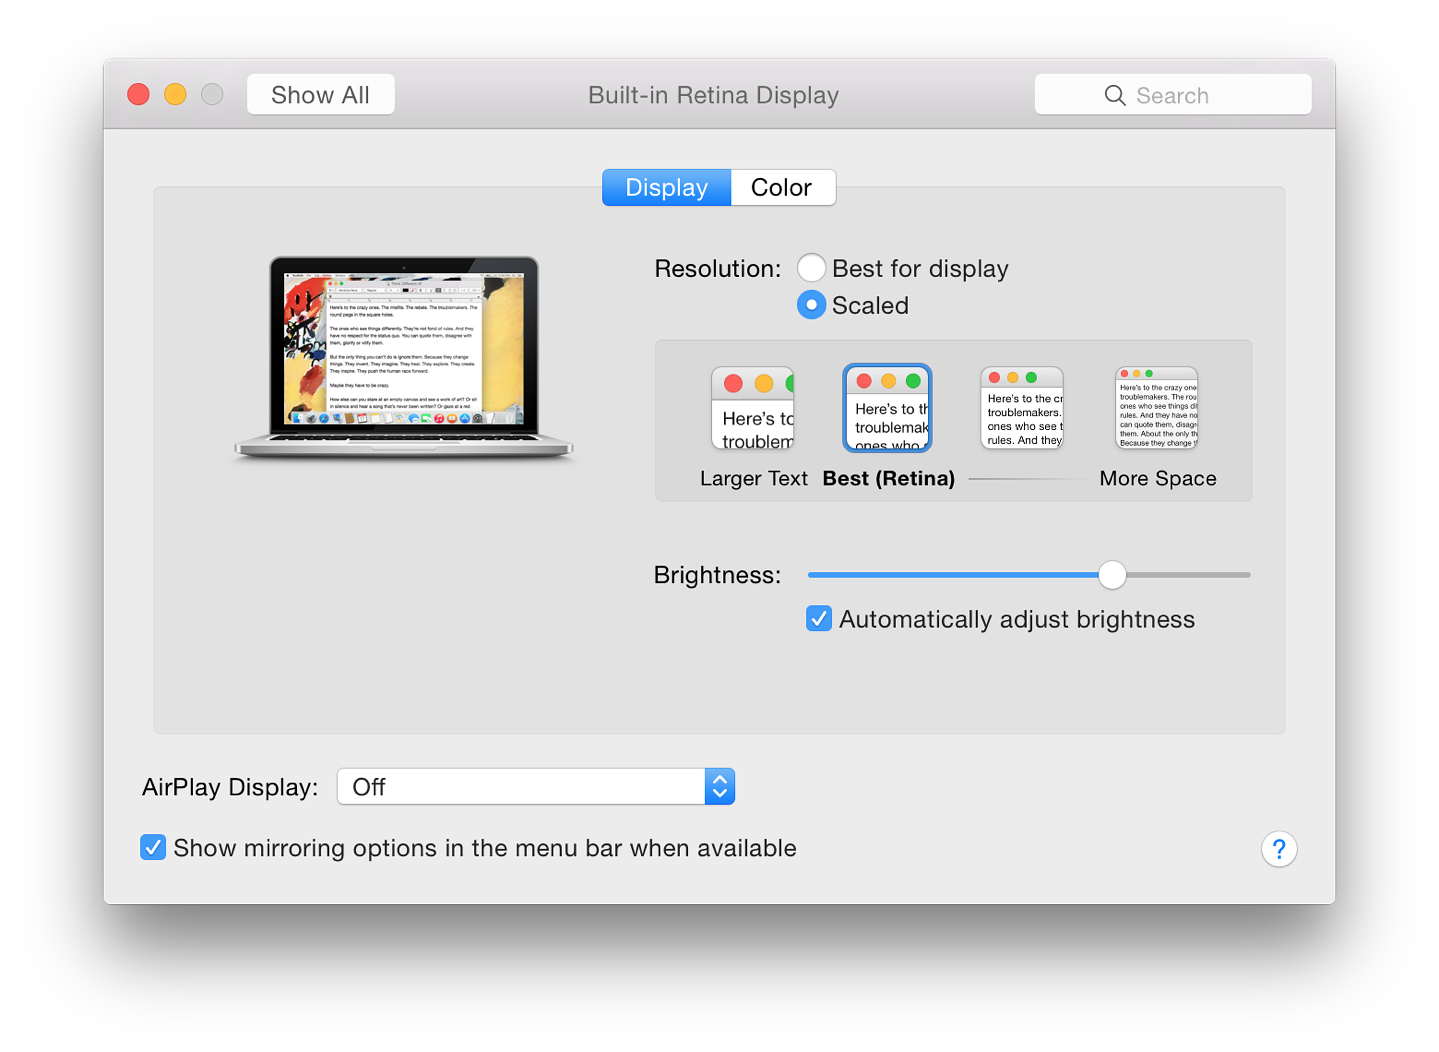
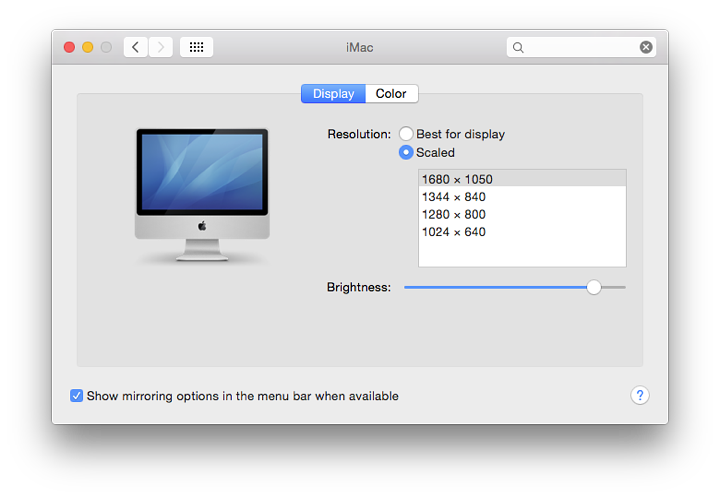
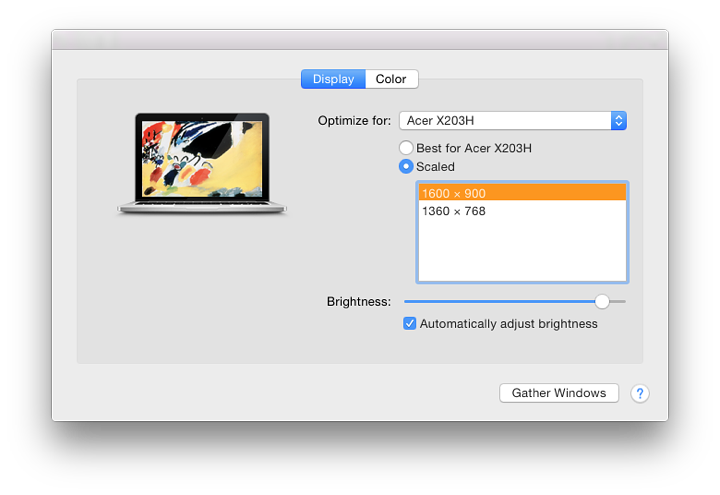
There are two Resolution options shown on the right: Best for display and Scaled. The resolutions will appear when Scaled is selected or when an external monitor is attached. With OS X 10.9, Mavericks the resolutions were displayed as numbers (e.g. 1024 x 640 - See below).
With the Retina display MacBook Pro the numbers are replaced with small icons, some of which have text descriptions below. When the cursor is placed over an icon, the Mac image on the panel changes to indicate how the display would look. A text describing the approximate resolution appears beneath the image. Selecting a new setting changes the Mac icon.
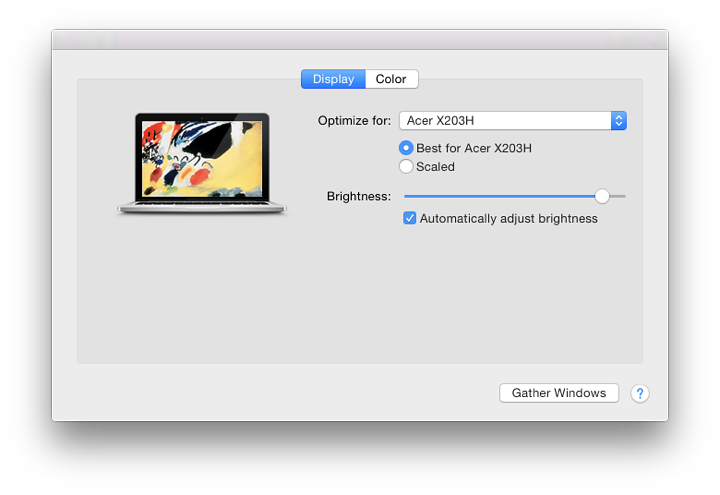
"Best for display" is for users who will want to leave well alone and will be content with the setup as provided. When this is selected, there is only a slider for Brightness and a checkbox below this, marked "Automatically adjust brightness." It is still possible to use the slider when the box is checked. When the Function keys (F1 and F2) are used, the slider moves as well.
On some Macs, such as the iMac I use at work, selecting "Scaled" reveals a box now with 4 options, from 1024 x 640 up to the optimal 1440 x 900. These resolutions cannot be edited, nor can we add any others. Below is the Brightness slider and the "Automatic" checkbox.
Pressing the Option key will show a "Detect Displays" button at bottom right on some Macs. This is used when an external display is connected, although in most cases, the Display Preferences will detect the display automatically.
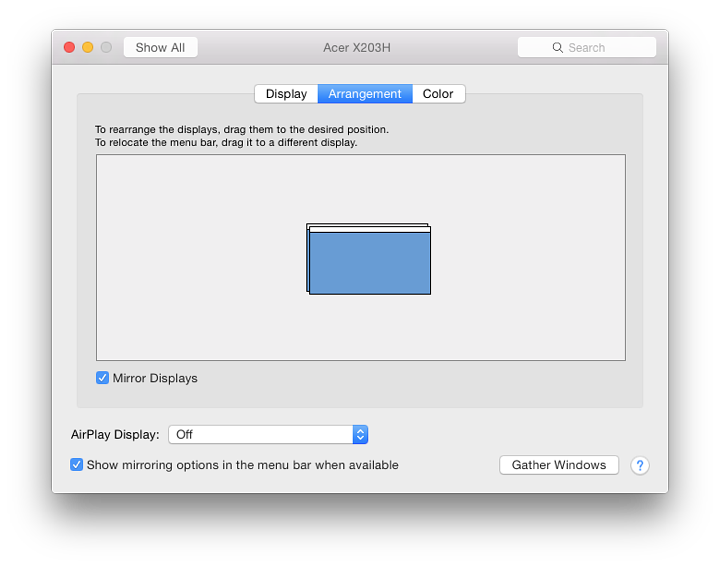
At the bottom left of the panel is a checkbox marked "Show mirroring options in the menu bar when available."
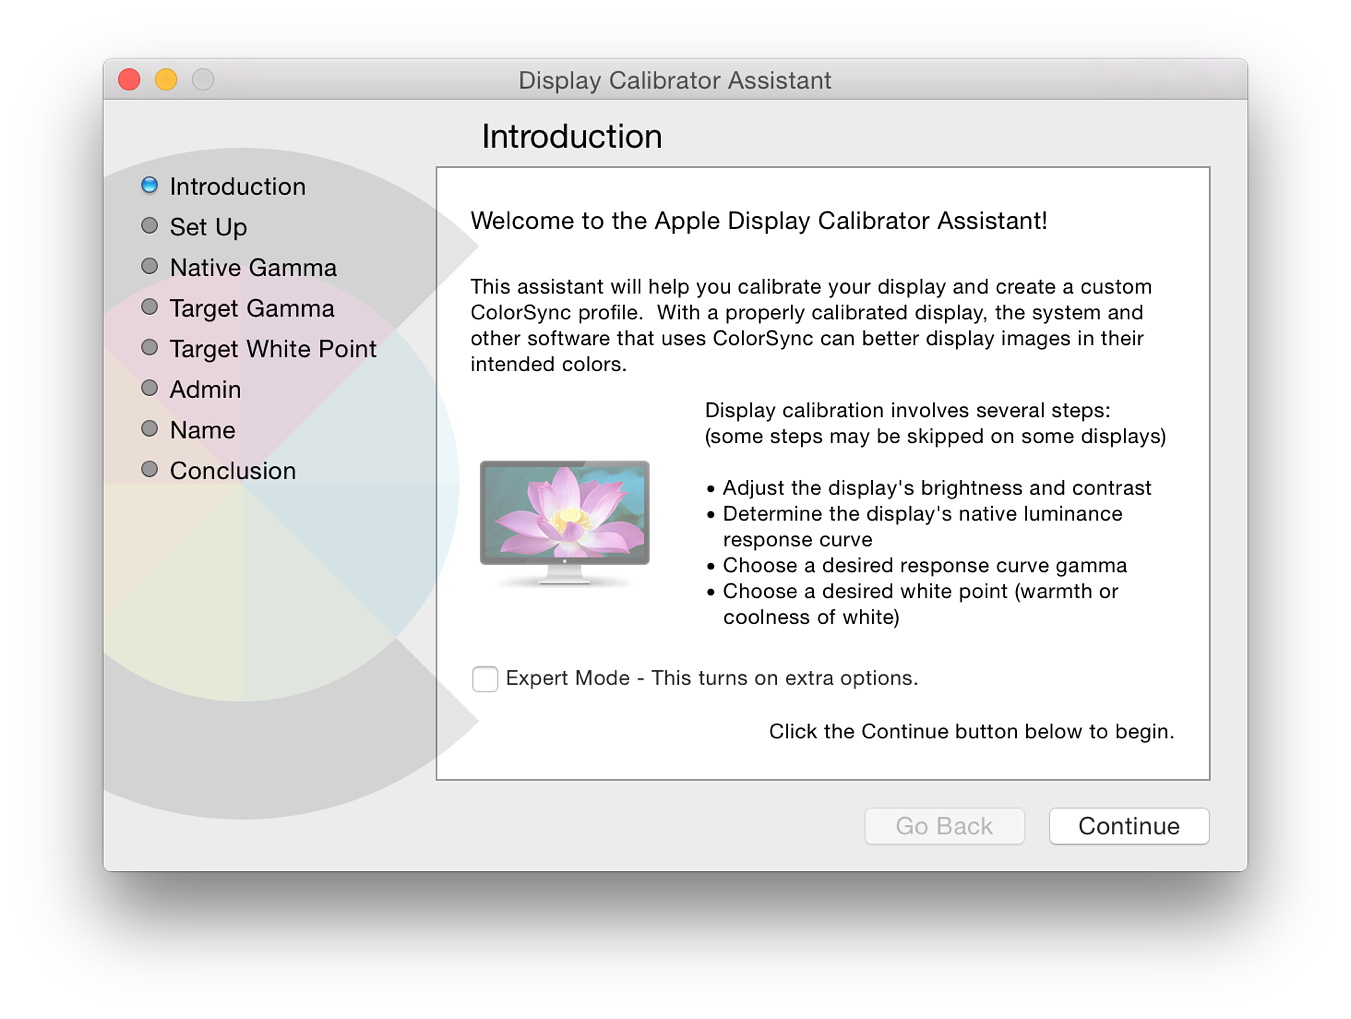
There is a warning here: if you are not sure, don't touch.
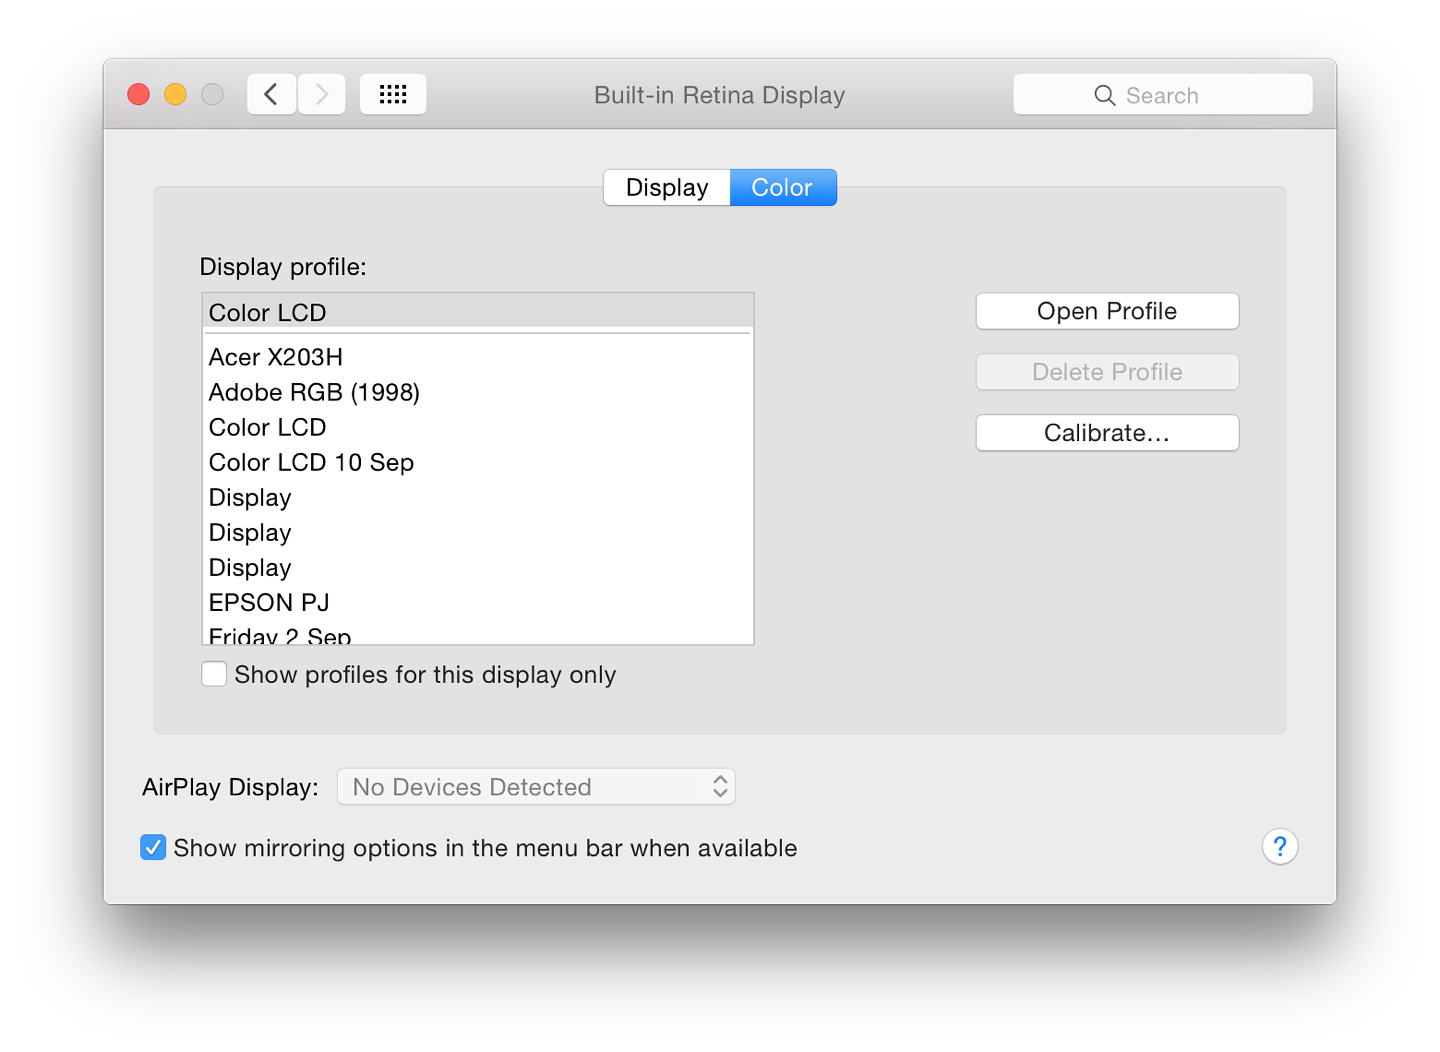
The default display for the Mac is shown. Below is a checkbox marked, ""Show profiles for this display only". When this is unchecked, any profiles previously created are shown in the main window. Highlighting a profile will change the display to the specific settings for that profile. To the right are three buttons: Open Profile, Delete Profile, and Calibrate.
[A recent article on OS X Daily by Paul Horowitz has a good explanation of the calibration process using Display Calibrator.]
Relative to the main display, the second one may be positioned not only to the left or right but also above or below. This may be imagined by moving the cursor to the right edge of the screen (for example) and then seeing it appear on the left side of the second display.
When displays are mirrored, the information on the screen is identical (See also information, below, and Mission Control).
When mirroring is deselected, the Finder menubar is displayed on the main screen of the Mac but not the secondary display.
This feature is especially useful when editing photographs or movies. It is also used with presentations: with Keynote the user's screen can have a Presenter Display which shows current and next slides, along with elapsed times and presenter notes. This is also available in PowerPoint for Macs.
Mission Control has a new option for displays to have separate spaces. This requires the user to logout for this to become available. (see notes below). When this is used, the Finder menubar is shown on displays that are not mirrored: greyed out when the external display is not the main window, but solid white when user clicks on the desktop of that screen. When the external display is the main window, the menubar on the Mac is greyed out.
When two (or more) displays are used, a second panel appears with controls for the extra output that are similar to the main panel. Instead of a Mac there is a display icon that matches the unit connected.
Depending on which of the displays is selected as the optimal choice when Mirroring was on (Mac or external) an "Arrangement" pane will be added. In my case, when the Acer monitor in my office was shown on the "Optimize for" button, that panel had the three panels, while the Mac had the original Display and Color panels.
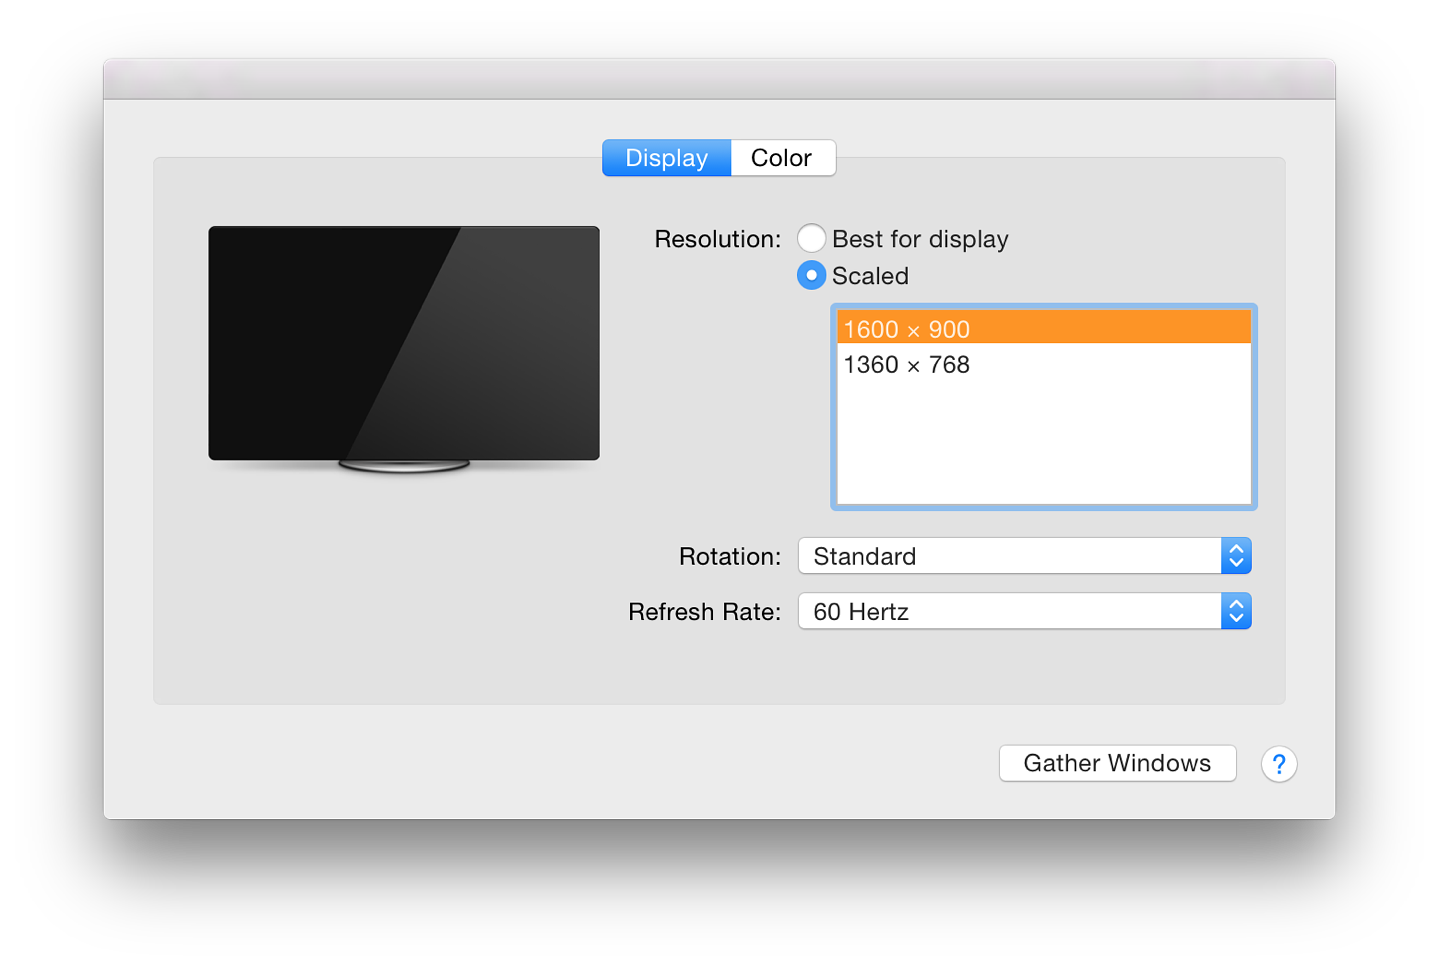
When mirroring was off, the resolution adjusted itself to the best for the respective display, so while the MacBook Pro was running in its optimum 1440 x 900, the Acer display was at a 1600 x 900 resolution.
When an external display is attached, a button appears at the bottom right of both panels, marked Gather Windows. Panels for Mac and external display brought together. This works in whichever window the panel is when the button is pressed, so if it is in a window on an external display (mirrored or not), pressing the Gather Windows button will move both panels to that external window. In use, the second panel moves to the external source when adjustments are made but may be hidden on that second display, so this feature is useful
By clicking on the white Finder bar at the top of the blue Window shown in the preferences display (image above) it can be dragged to another of the windows shown. With this, the window on the external display may become the main (Finder) window (see above).
On the external display panel on my computer, when mirroring is OFF, I also have a Rotation button. I added this some time back using a Terminal command in the main panel (see below), but it is now only shown when a suitable external monitor is attached.
With this, I am able to turn the display through 90, 180 and 270 degree options which may be useful when certain displays are used or some images need to be shown at different angles.
I have provided as much information as I can, but I am aware there are some differences with certain monitors and screen capabilities, for example, I have not been able to examine the panel for any special information when 4K displays are used (and certainly have no knowledge of the latest iMac with 5K Retina display). The information in System Preferences > Displays is not always easy to discover, so this is presented as a general look at the panel and its capabilities.
System Preferences in OS X 10.10, Yosemite: Dock |
|
![]()
Some of the panels in System Preferences remain unchanged in the update to OS X 10.10, Yosemite. The Dock preferences panel is for settings that affect operations of the Dock and its appearance. Like all Preferences this has an updated interface design, while there is one small change on the panel itself.
With OS X 10.10, Yosemite, the single panel appears initially to have the same settings as it had in earlier versions of OS X. It provides ways to make adjustments to the Dock feature. The Dock itself has a much-changed appearance in Yosemite which may not suit everyone. The icon for the Dock has been changed, although I use the old one here.
In earlier versions of OS X, some changes were made directly in the Dock by clicking on the divider line (towards the right side) and using the Control key. This is still possible. The divider is more visible than it was in Mavericks.
The divider line is located between the apps and folders/documents in the Dock. As the cursor nears the spot between the two parts, a double vertical arrow will appear: pressing the Control key then brings up a menu. Both the Dock and the menu appear differently if the user has selected "Use dark menu bar and Dock" in the General preferences panel.
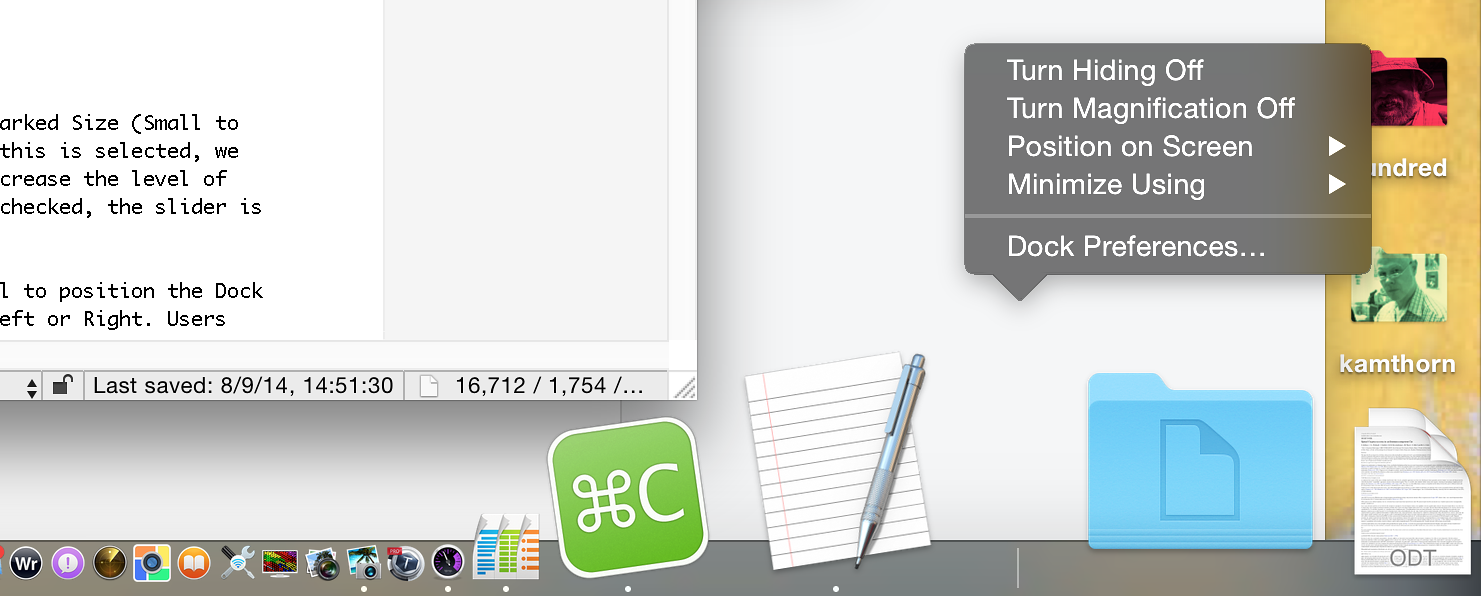
Near the top of the preferences panel is a slider marked Size (Small to Large). Below this is a check box for Magnification. When this is selected, we may use the adjacent slider (Min to Max) to increase or decrease the level of magnification of app icons in the Dock. When the box is unchecked, the slider is greyed out.
Three radio buttons are provided in the middle of the panel to position the Dock on the screen. The default is Bottom. Also available are Left or Right. Users who access tools at the bottom of a screen in an application (e.g. Final Cut) may prefer the Dock to be positioned to one side.
A button below these three selectors is available to decide the effect used when a Window is minimized. The default effect is Genie, which makes a file appear to shrink as if it were going into a bottle-neck. The reverse happens when it is clicked in the Dock and becomes large again. The Scale effect uses less processing power and as the panel becomes smaller, the width and height are kept in proportion. Both effects may be slowed by pressing the Shift key at the same time.
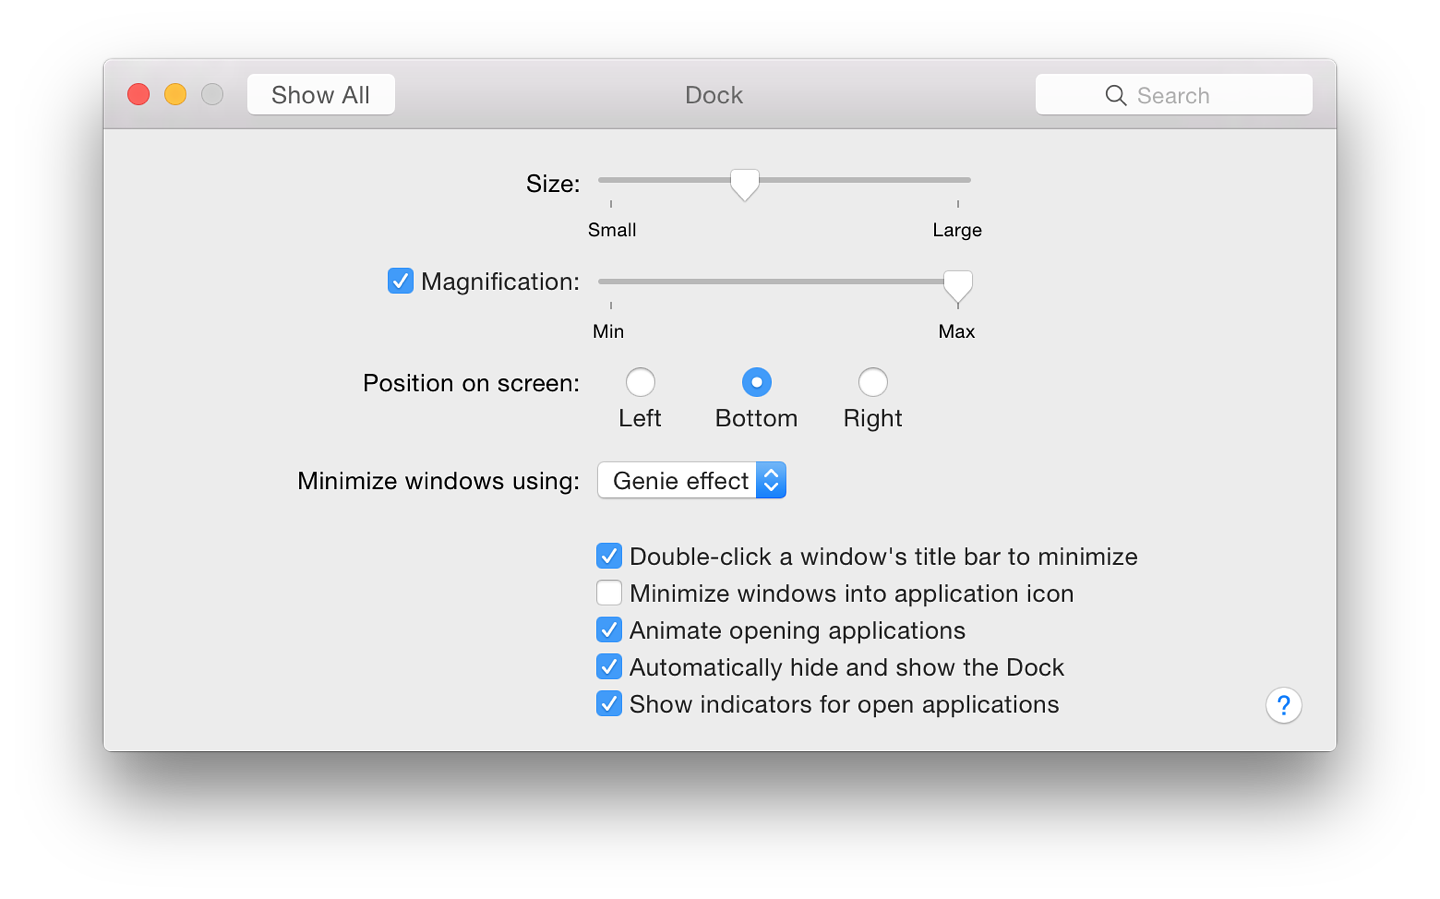
The bottom of the panel has the same 5 checkboxes it had with Mountain Lion although the last of these has a small change to the text:
System Preferences in OS X 10.10, Yosemite: Energy Saver |
|
![]()
In OS X 10.10, Yosemite, System Preferences has seen changes with the design of the interface, while some panels have seen changes, some remain unchanged. The Energy Saver preferences panel appears identical to before although it does have a new icon.
Different Energy Saver preferences panels are displayed depending on the type of computer being used. A desktop computer like the iMac or Mac mini will have a single pane, while a MacBook Pro, with a battery, has a preference pane for each source: battery and power adapter. A feature called Power Nap is available to users of the latest computers and the preference pane has been changed.
On MacBook Pro computers with two graphics cards, there is a checkbox for "Automatic Graphics Switching". The same checkbox is available in the Power Adapter pane. This is to allow the computer to switch automatically between graphics modes for better battery life. For this description of Energy Saver, I am using a 13" MacBook Pro with Retina display (and no graphics switching) and an iMac.
The display information and features differ with the selected power source and with the computer. All, however have the common feature of a single slider for "Turn display off after:" from 1 min to 3 hrs and Never.
Checkboxes are available for controlling how the computer works with the sleep feature, although not all are available on every device.
On the iMac I use, the following are shown:
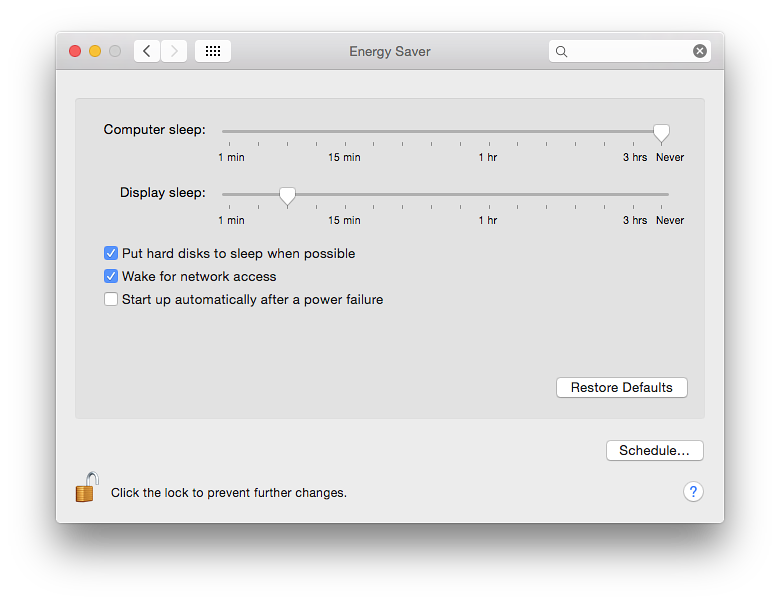
The last one is not available on the MacBook Pro I use. In earlier versions of OS X, there was a further button marked, "Allow power button to put the computer to sleep." This is no longer available.
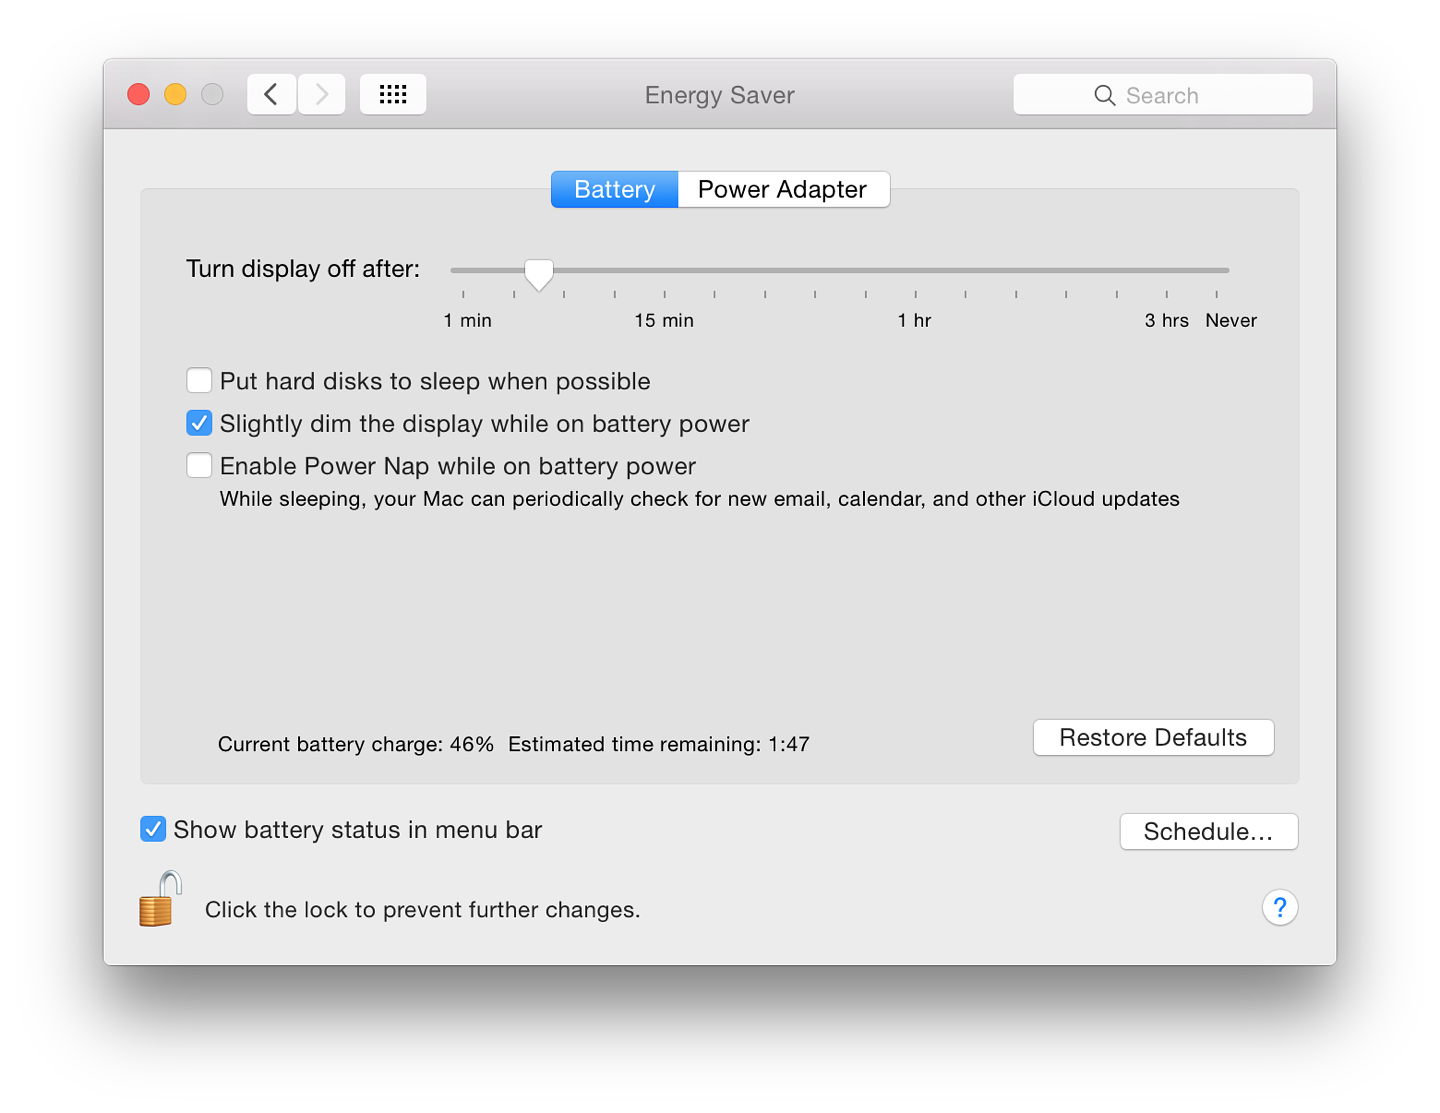
In the Battery preferences pane, the MacBook Pro shows two checkbox options as in OS X 10.8, Mountain Lion:
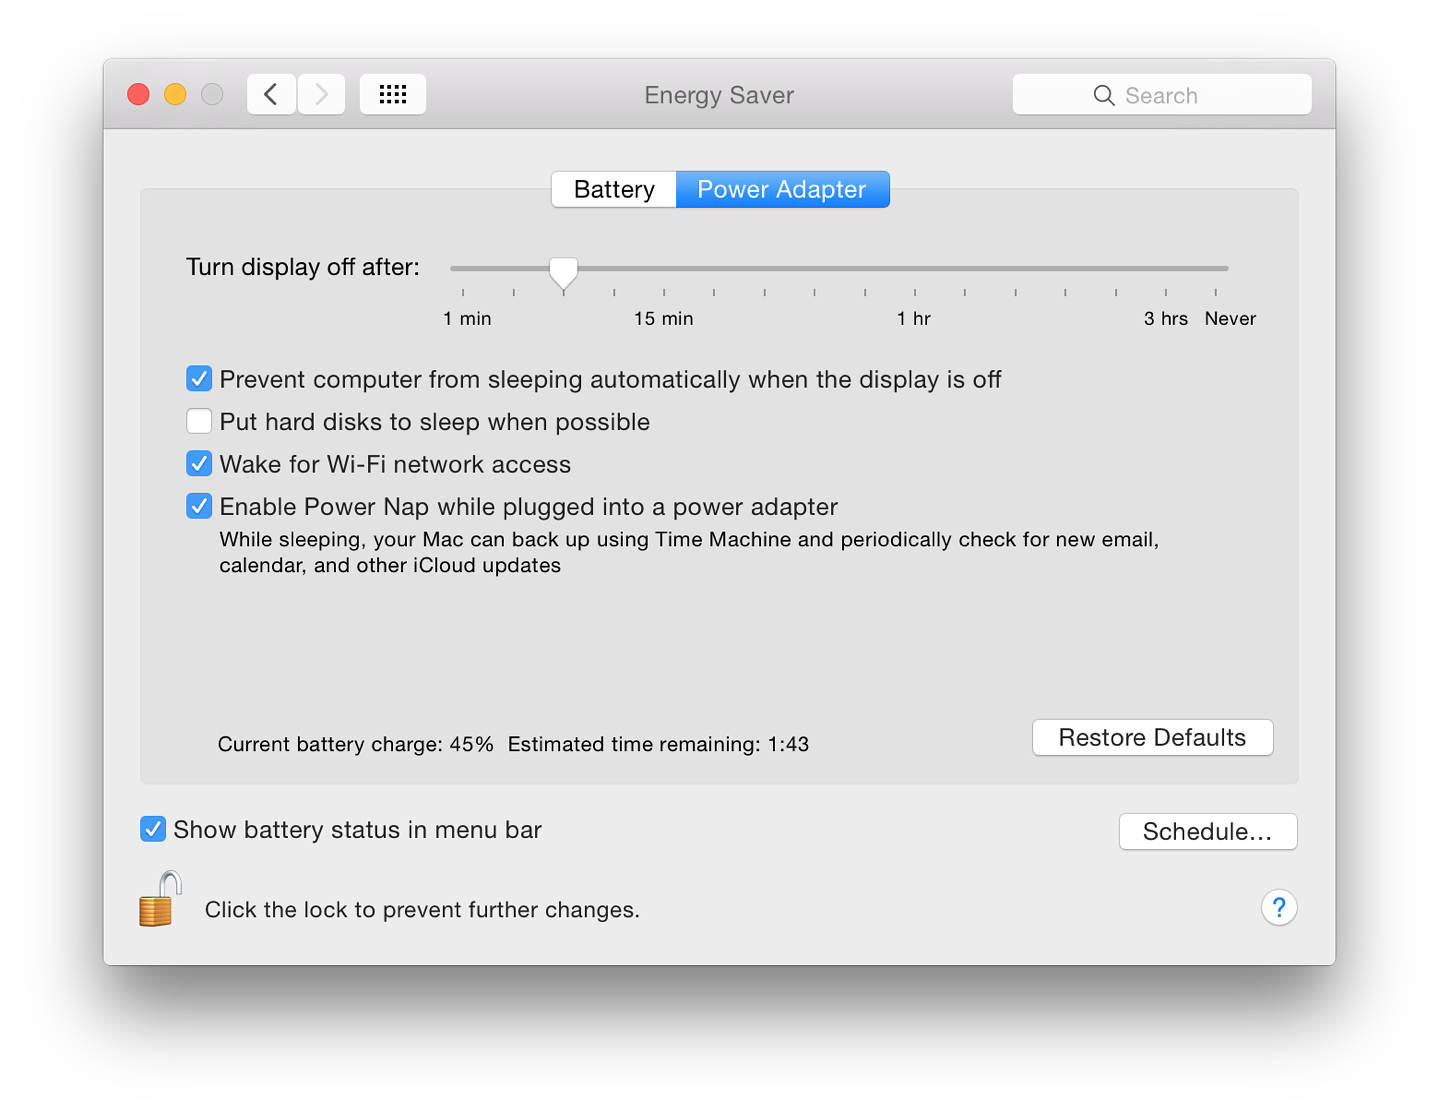
When using the Power Adapter the MacBook Pro shows four checkbox options:
Underneath these checkboxes on both panels is information about the current state of the battery charge and the estimated time until full. To the right of this is a button, marked Restore Defaults.
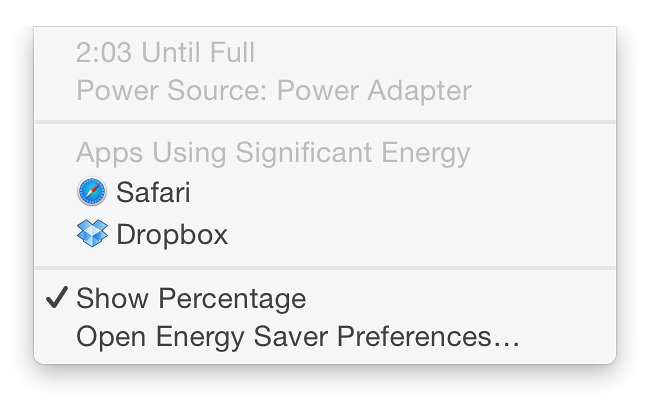 A menu appears when the user clicks on the menubar icon. Items at the top of the menu are: either Time "Until Full" (adapter), or Calculating Time Remaining (battery) or a time figure; followed by "Power source" (battery or power adapter). The Current Battery charge or Time Until Full will be displayed on the Energy Saver preference pane.
Below this is a new section. When first opened, it will display "Collecting Power Usage Information". When the menu is held open, this changes to "Apps Using Significant Energy" and any such applications are listed.
At the bottom of the menu are "Show percentage" and "Open Energy Saver Preferences". When a power adapter is connected to the computer, menu items change and Time Until Full replaces Time Remaining (initially "Calculating time. . ." is shown). If there is a problem with the power source, for example the Mag Safe connector is not fully inserted, the icon may show, Not Charging. Other system information may also appear, depending on the state of the battery.
If the same panel is opened while the Option key is pressed, the condition of the battery will be shown at the top of the menu. This will change from Normal to indicate if the battery needs attention. Long periods with the power adapter attached may affect battery life.
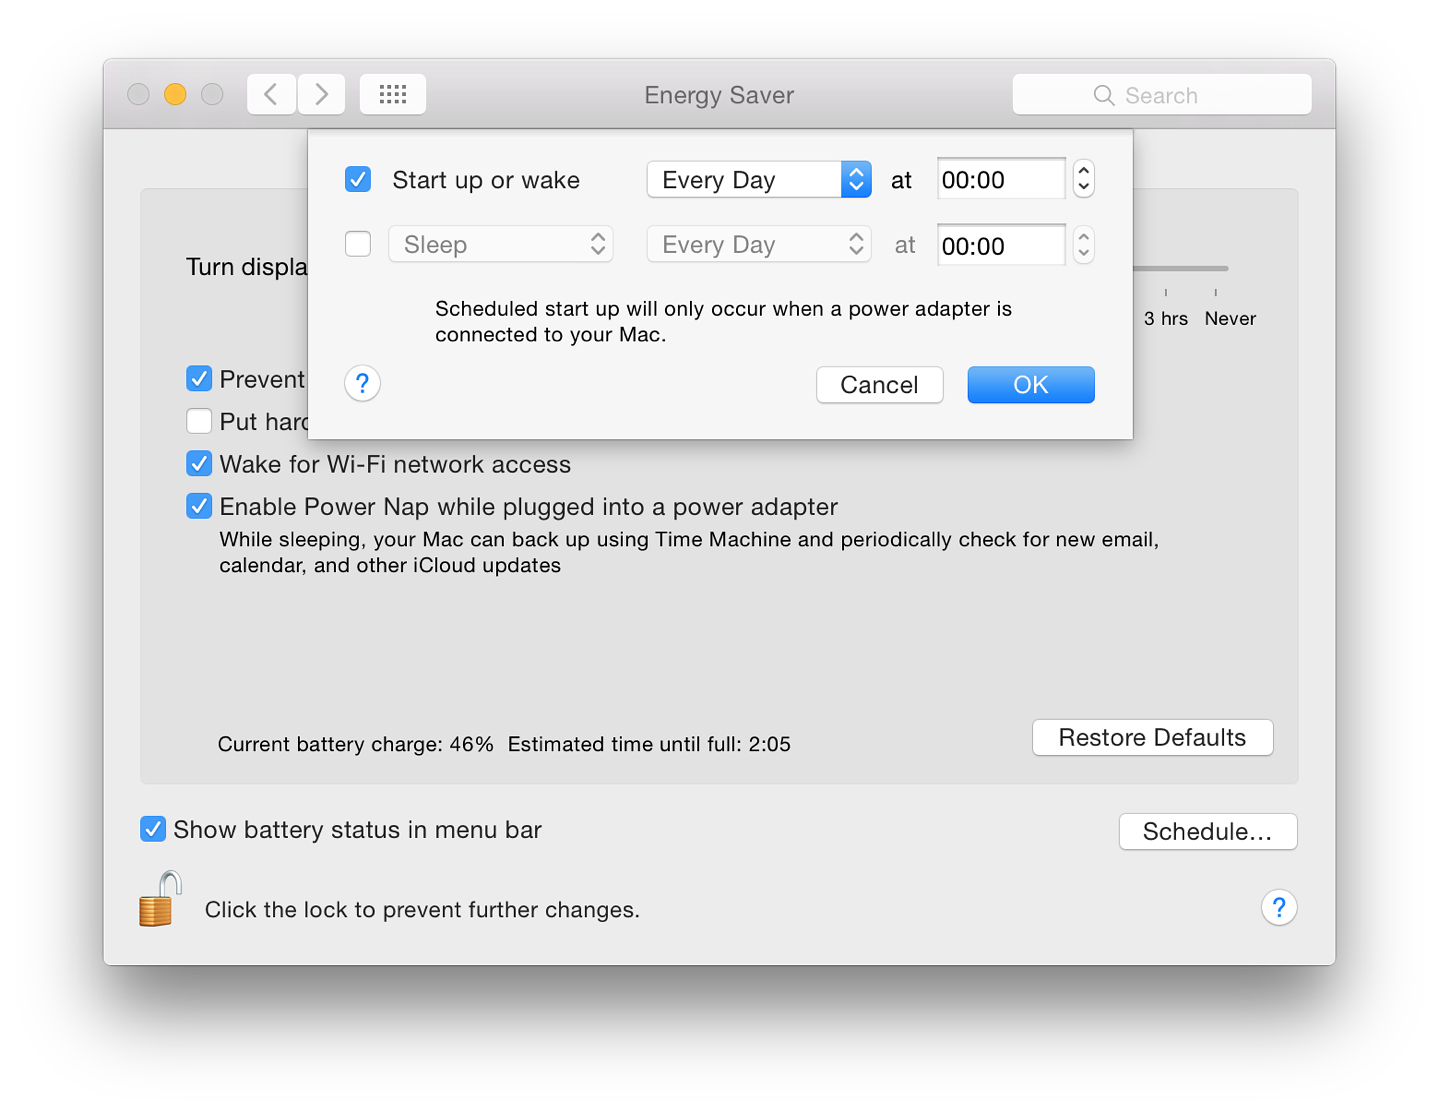
A button below is for selection of the action: Sleep, Restart or Shutdown. Days and times can also be specified like in Wake or Start up. If the Startup checkbox is selected, a text appears below: "Scheduled start up will only occur when a power adapter is connected to your Mac." There is no text if the sleep box is checked.
A reader, Jon Austin, makes the valid point that - when playing online games - the checkbox for "Put hard disks to sleep when possible" should not be checked. He uses World of Warcraft as an example. To play this optimally, that box should remain unchecked, plus App Nap should be deselected for that application. The relevant folder should also be excluded from Spotlight searches.
I also found that using a disk with Thunderbolt cable, Finder would periodically report a spontaneous ejection. There is a risk of data loss if this happens. I am fairly certain that this is for the same reason and Put hard disks to sleep when possible should not be checked, but I am also suspicious of Power Nap. Other disks (USB 2, USB 3 and Firewire 800) were not affected.
System Preferences in OS X 10.10, Yosemite: Extensions |
|
![]()
In OS X 10.10, Yosemite, System Preferences has seen changes with the design of the interface, while some panels have seen changes, some remain unchanged. Extensions is a new panel. This controls the way these additional control files are used by the Mac, including those from 3rd-party developers.
Extensions for Apple operating systems have existed since before OS X: indeed, the name of this site and the column I write for the Bangkok Post came from this and the new emphasis (then) on the X of OS X: OS Ten, not OS x. These small files add functions to applications: extending their normal capabilities. Some other functions are already available by using the Services menu for each application.
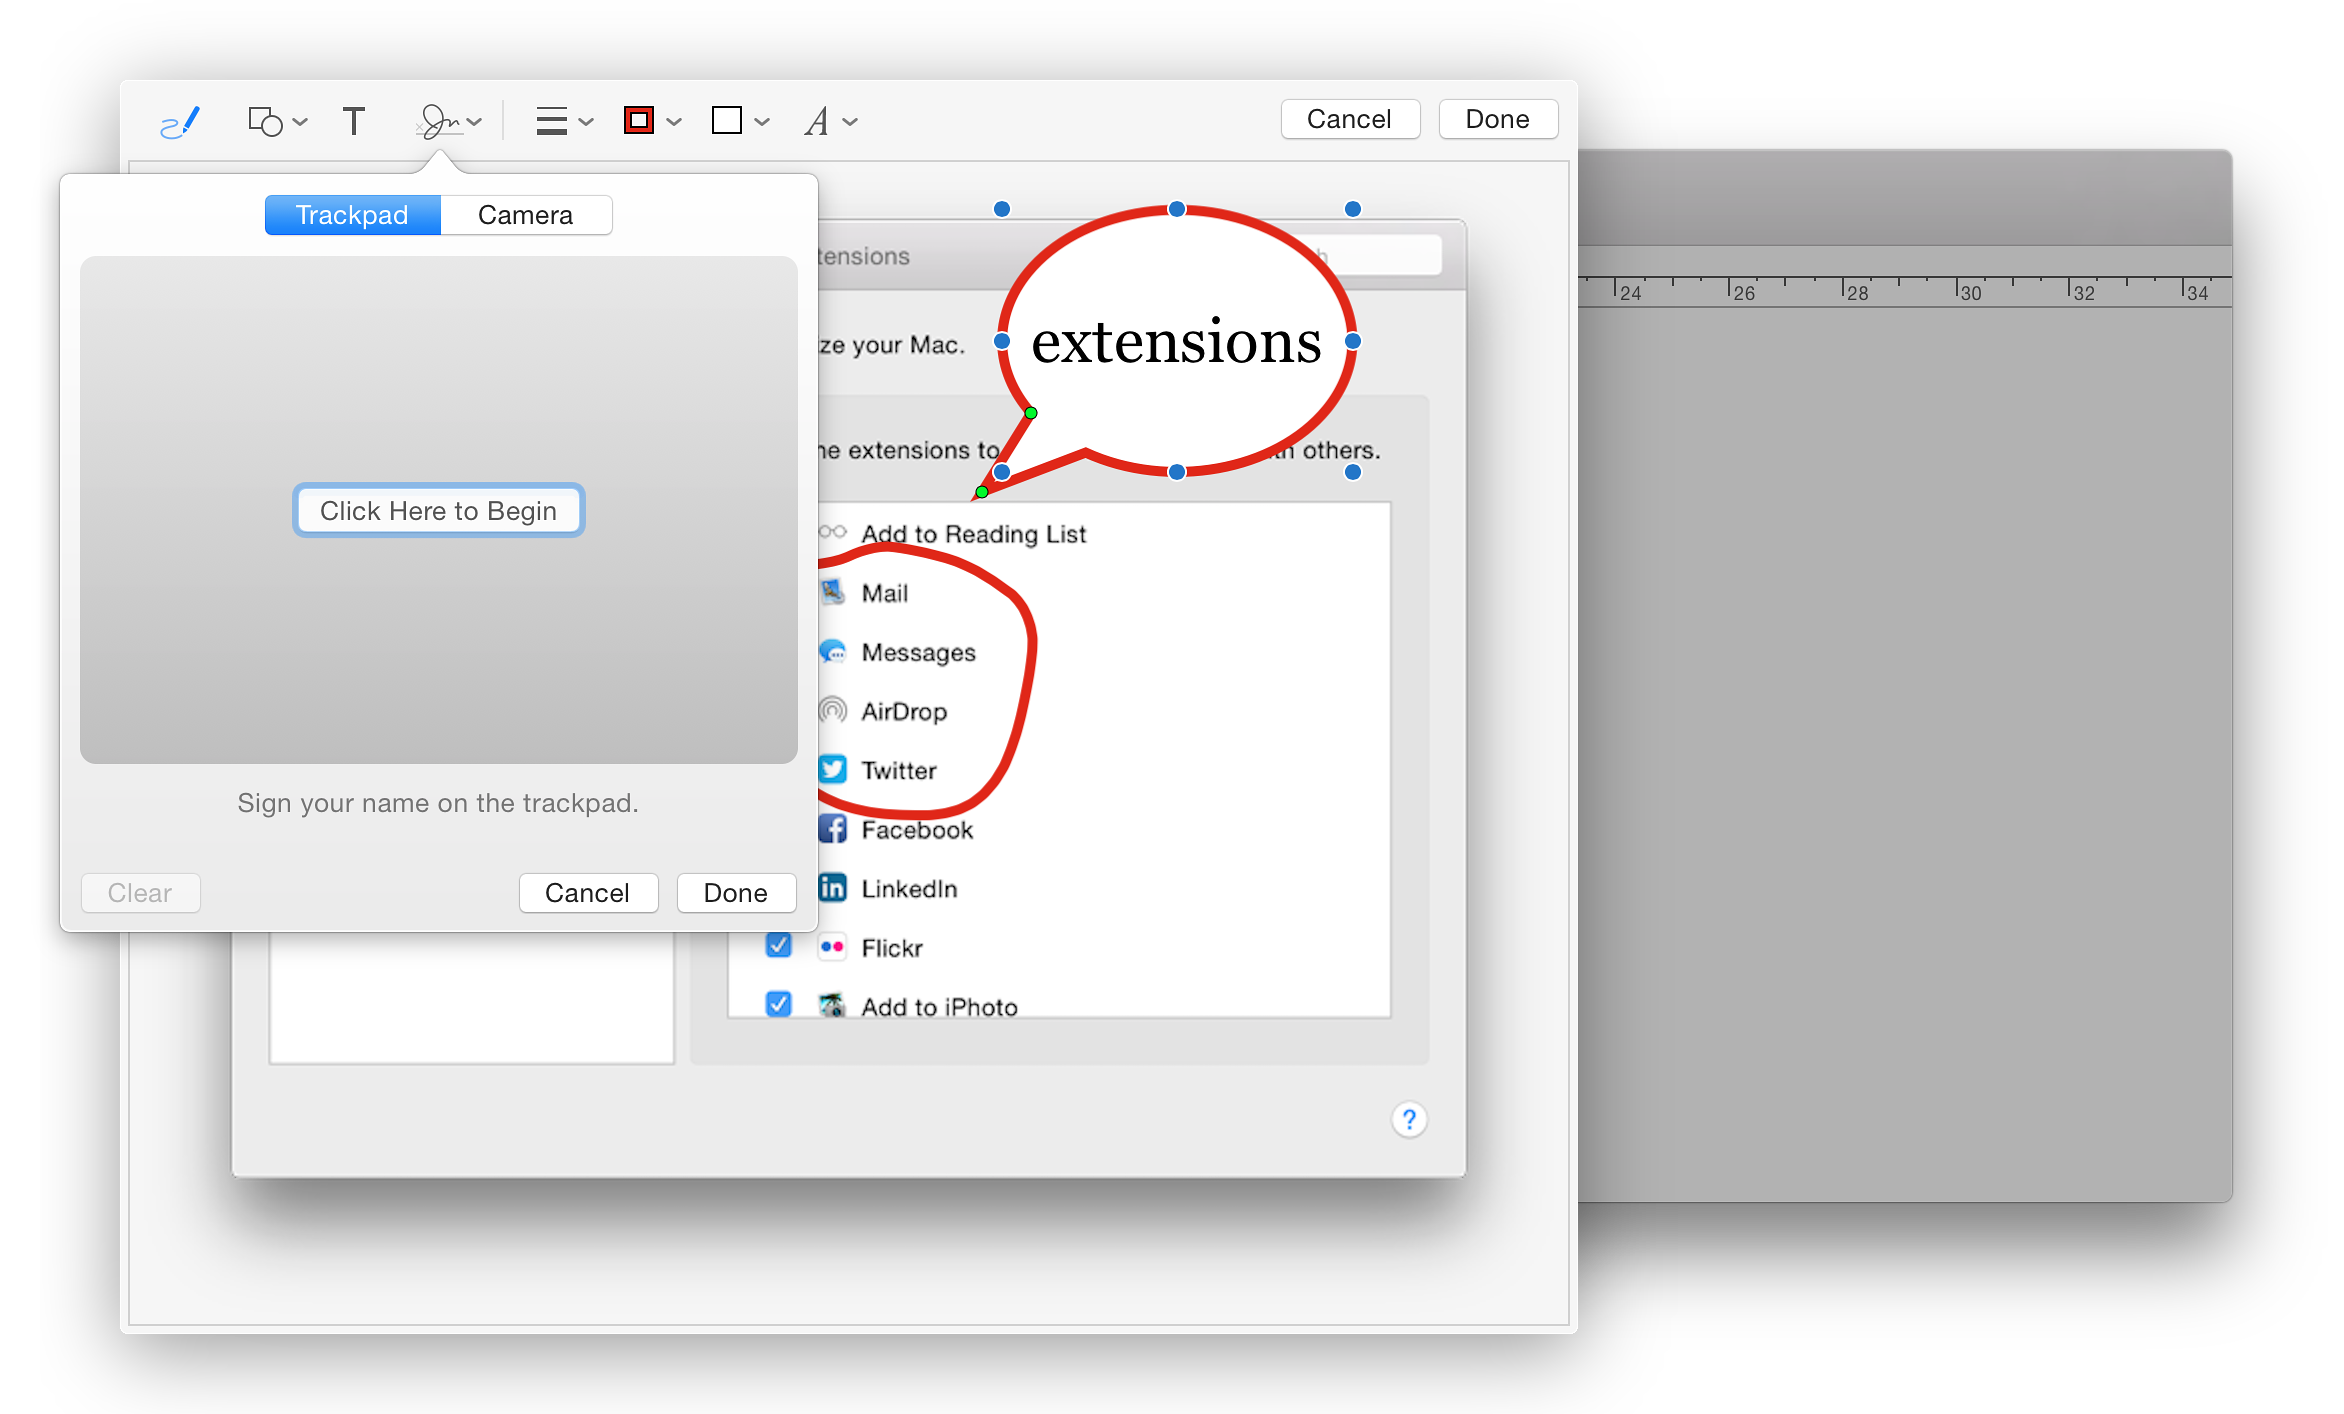
When demonstrated at the World Wide Developers Conference in June 2014, an image captured from Safari was added to an email and then Markup was used to add information and comments to the photograph. Markup is one of the extensions already available and works in many apps that already mix text and images, such as TextEdit and Stickies. Not all apps have such extensibility. Preview incorporates similar functions as part of its tool-set.
As a new feature, there is still some learning to be done; and as more developers (or Apple) increase the availability of extensions so more functions will be added to those apps that are able to use such new features. Links to articles written on the feature are available below.
The single panel has two parts: to the left the types of extensions: All, Actions, Finder, Share Menu, Today. Below each extension type, is a summary (in grey) of what is available. When one of the types is highlighted, any extensions are shown in the main panel to the right.
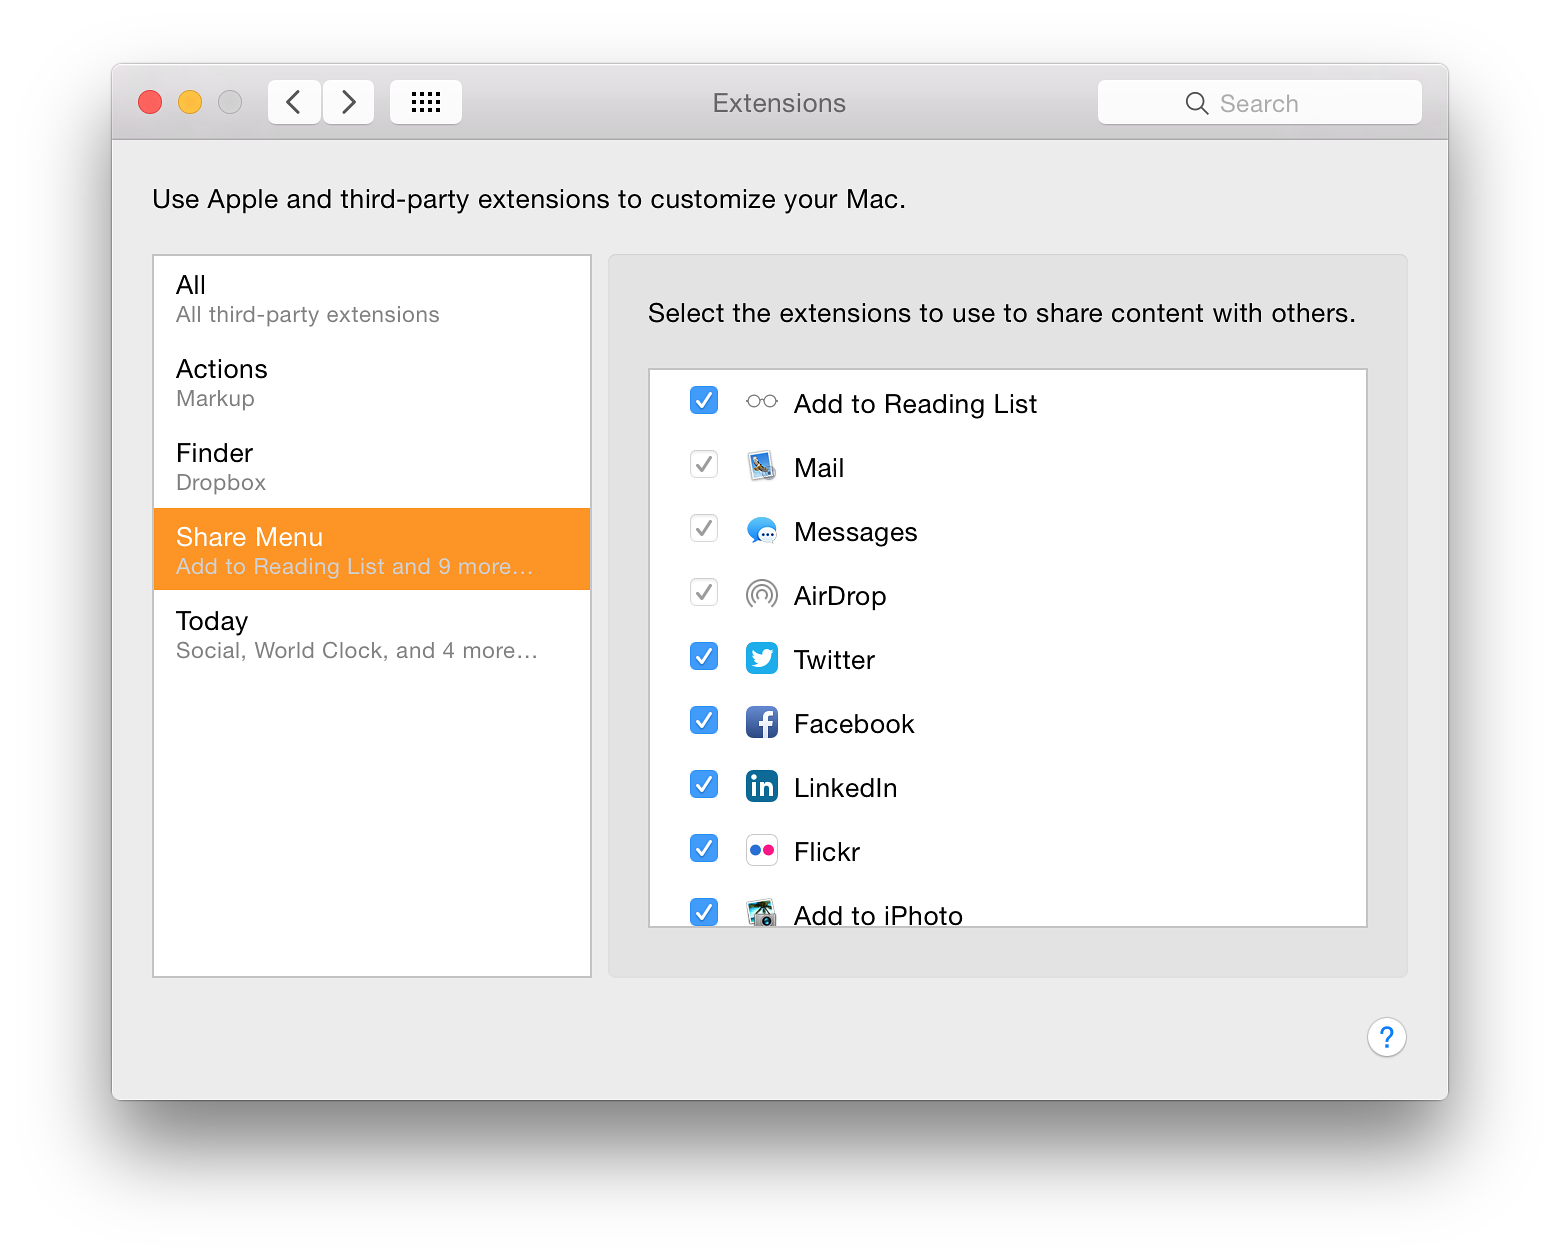
In my "Today" display I use Social (allowing links to sites like Facebook and Twitter if wanted), Stocks, World Clock, Weather and other such data displays. Other extensions that are installed, but are not used, are unchecked.
The extensions here are installed for system-wide use, so those installed specifically for Safari (for example) are not shown here. It is expected that more extensions will appear, but will be part of new applications (or updates to already-installed applications).
As more information becomes available, or if changes are made, this page will be updated.
System Preferences in OS X 10.10, Yosemite: General |
|
![]()
OS X 10.10, Yosemite has had a considerable update to several parts of the interface, including System Preferences. There are also changes to the way certain preferences work. The General System preferences panel controls how the Finder operates and displays files. This panel has small, but significant changes.
General preferences has a single panel (with 5 sections) to control the way that the Finder displays information. The first section has a new check box plus the 3 buttons previously available: Appearance, Highlight color and Sidebar icon size. The first, Appearance, has the same two options: Blue and Graphite. This changes the color of displays like download progress bars. The wording at the side of the button remains the same: "For Buttons, Menus, and Windows".
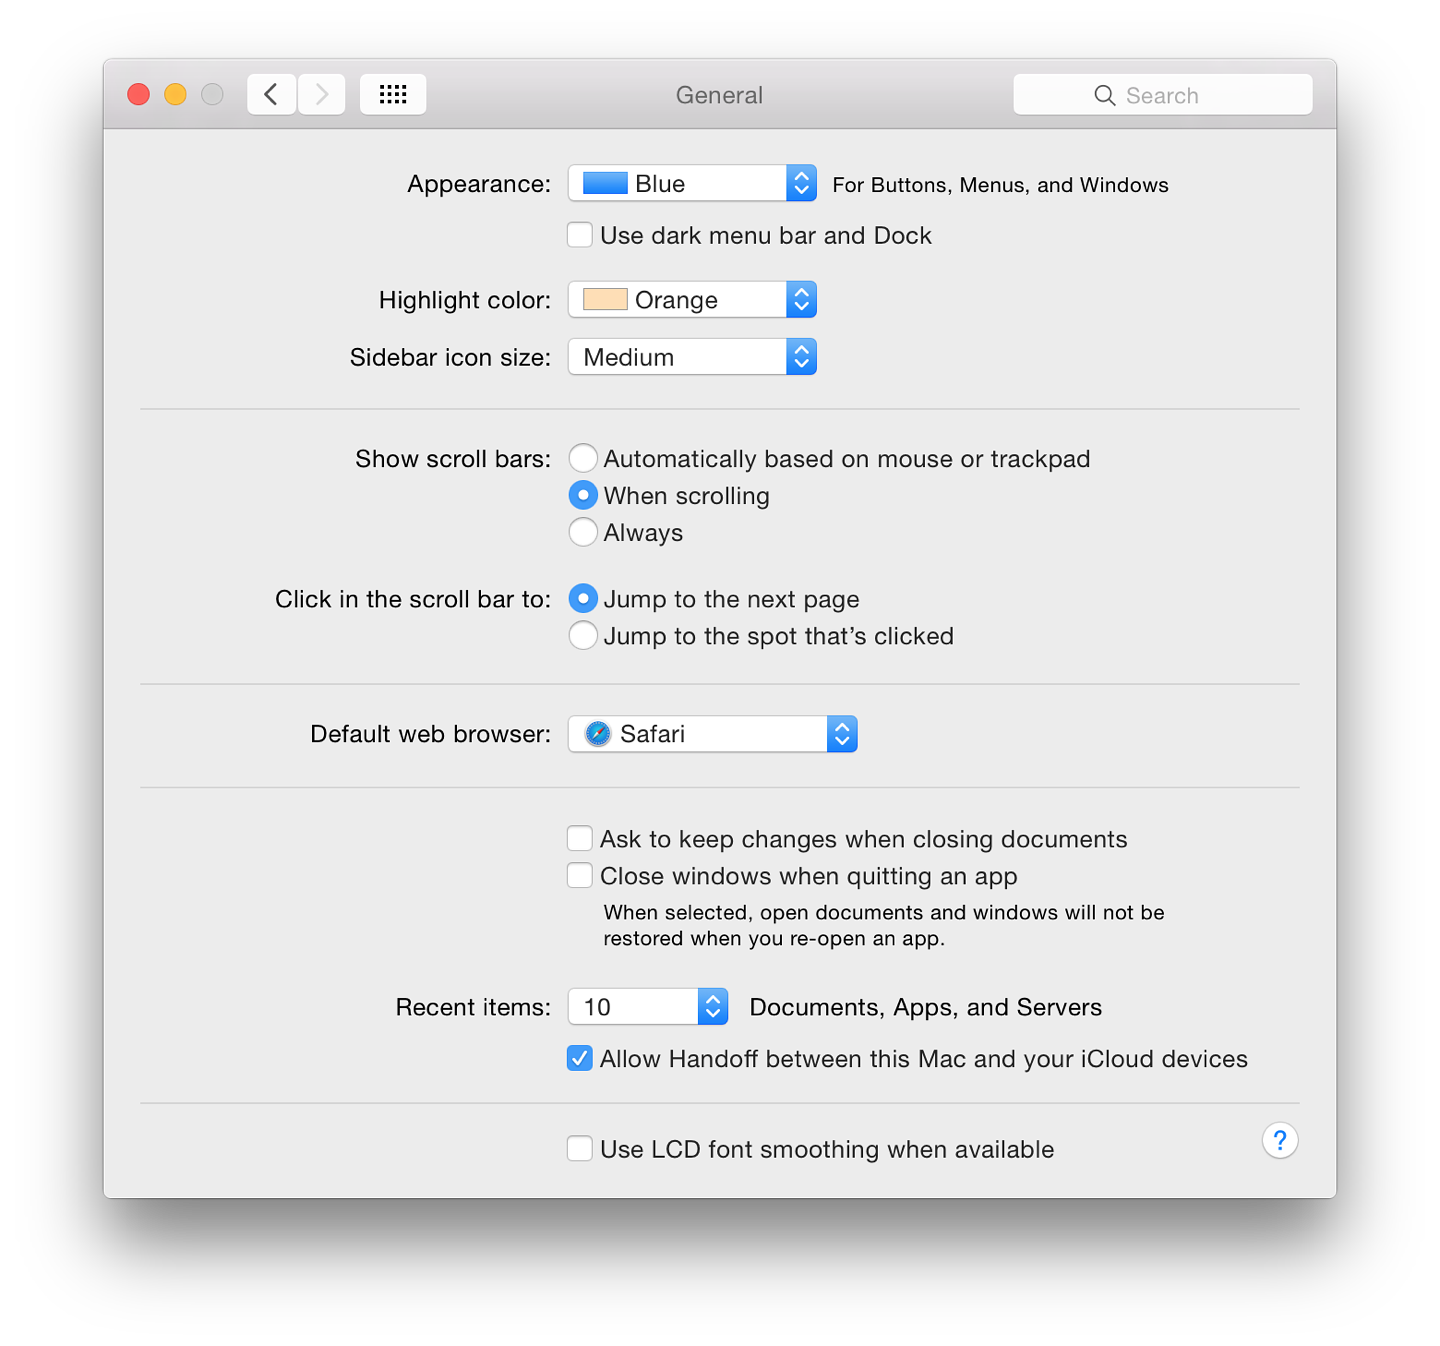
Selecting the "Graphite" option also changes the color of the red/yellow/green controls at the top left of an application window (for close, hide and minimize) to the same graphite color. The purpose is to help those who work in graphics and who may want more neutral displays.
Immediately below this button is a new checkbox marked, "Use dark menu bar and Dock" which changes the normal white menubar to black (with white text and icons). The Dock has a dark grey finish when this feature is selected and the black spots beneath an open application change to white.
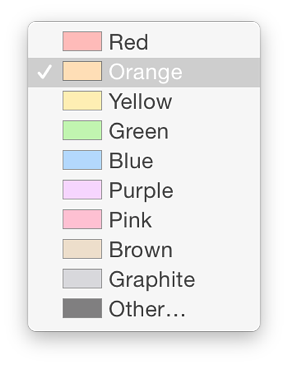 The Highlight color button, below, controls the way that a highlighted file name is displayed in the Finder as well as the color of highlighted text. There are now 9 default colors and "Other" which allows a user to choose any color using a selector that opens when this option is selected.
There are changes in the color names and their order too: Red, Orange, Yellow (formerly Gold), Green, Purple, Pink (new), Brown (new) and Graphite.
Below is a button that first appeared in Mountain Lion (10.8): Sidebar icon size (Small, Medium, Large). This makes a significant difference to the icon size in the Finder sidebar. Those with specific needs may find this useful. The change is made instantly.
The placing of scroll bars at the side of a panel is controlled in the second section which is in two distinct parts (unchanged): "Show scroll bars"; and "Click in the scroll bar to".
There are three radio button options for showing scroll bars:
Below these controls are two items that control where the content moves to when the scrollbar is clicked:
The third section is new: a single button for selection of the default web browser. Options seem to depend on which browsers the user has installed. For example, downloading and installing Opera added that to the list when System Preferences was restarted.
The fourth section is concerned with document and application behaviour when windows are closed. This was revised in the Mountain Lion release. There are two checkboxes:
Text below reads, "When selected, open documents and windows will not be restored when you re-open an app". This may save the frustration of wading through several windows when all that is wanted is to open a new document. This is unchanged from before apart from a slight (non-strategic) difference in the text.
The Recent Items option in the Apple menu is controlled by a button below those checkboxes. The single button works for Documents, Apps and Servers, allowing from 5 - 50, plus None to be shown in that menu as before.
Recent Items in the Apple menu (top left of the screen) assists a user with a swift way to re-open a program or file. The Servers item allows a quick reconnection to a network connected disk or computer. At the bottom of the recent Items menu is an option to Clear Menu. When accessing the menu, pressing the Command key adds the option to "Show" a specific item.
Finally, there is the same checkbox for "Use LCD font smoothing when available" as was found in Mavericks.
System Preferences in OS X 10.10, Yosemite: iCloud |
|
![]()
In OS X 10.10, Yosemite, a few of the System Preferences have seen changes. iCloud arrived in an update to OS X 10.7 at the same time iOS 5 was released. We are now using iOS 8. As more features have been added to iCloud, so the panel has evolved, although it retains the same design as before.
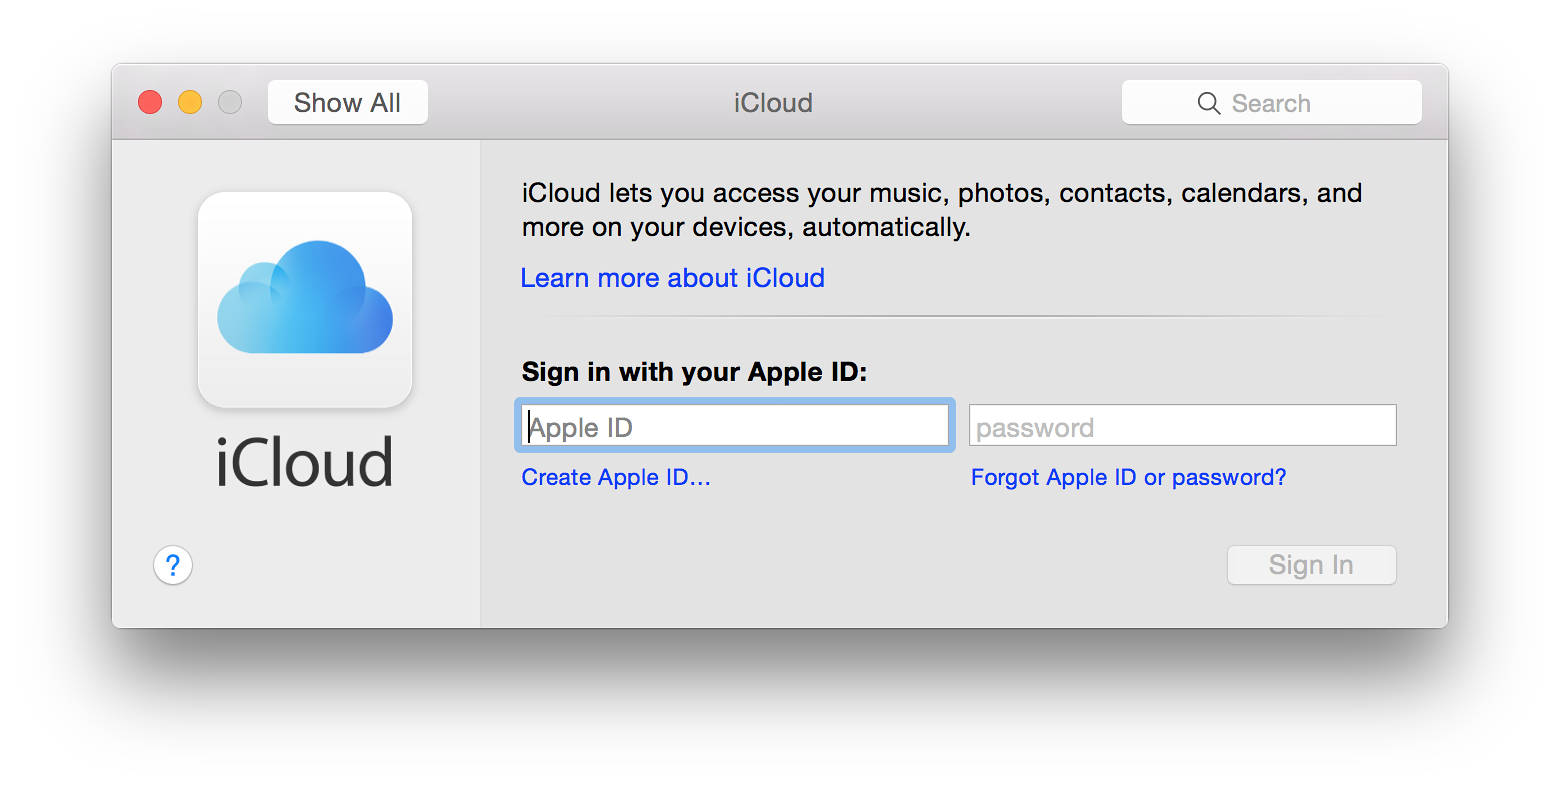
As part of the setup process for a new Mac includes registration for (or logging in to) an iCloud account, most users will see the normal preferences panel for which helps the services which are to be used. For a new account, or a computer which skipped the iCloud setup, there is a sign up when the iCloud preferences panel is accessed for the first time.
When the user has already signed in - and remains signed in (see below) - the normal panel is in two distinct parts: account information to the left with services in a larger window to the right. The left part is now dominated by the user's picture. This is independent of the user account image and may be edited from within this panel. Beneath that is the user name and below that the account name (email) in grey. Three buttons are available below the name: Account Details; and Set Up Family.

Pressing the Account Details button brings up a small panel that allows access to information once the password is entered. Information about the account is displayed on a panel with four tabs that allow the user to manage aspects of the account: General, Contact, Security and Payment.
Set Up Family allows the use of the new feature of Family Sharing: purchases of movies, apps, music and books; photos and videos in a family photo stream; events via a family calendar; location sharing; finding family devices. A button marked, Details, opens a web page with more information.
A series of Continue buttons allows the head of family to set up this service.
Sign Out will return the preferences to an information pane that is only usually seen when starting a new account (above): setting up OS X from new includes the iCloud registration process. Before a user is able to sign out, a warning panel appears. Logging out will delete the information from the Mac and limit other services (see below).
The main panel shows the services that are currently available for users. These are shown in a list of icons and names. The order is not alphabetical on my computer and starts with the new iCloud Drive. Other services I have available are: Photos, Mail, Contacts, Calendars, Reminders, Safari, Notes, Keychain, Back to My Mac, and Find My Mac. To the left of each is a checkbox indicating whether it is currently active or not (see below).
For some services, individual applications (such as iPhoto with Photos) may need additional settings activated. This is expected to change in early 2015 with the release of a new application: Photos. Other features work with OS X and iOS devices.
There is also a Finder item for iCloud Drive giving access to the folders within. Although it is possible to add a folder and to upload files, these may not be visible on other devices, especially those running iOS without a 3rd party application (current wisdom is that these may be unreliable). Apple retains an app-centric approach rather than file-centred and may expect users to work with the apps (Apple and 3rd party) that save files in iCloud.
An Apple Knowledge Base Document, PH2572 (referring to OS X 10.7.2), has more details about the service in iCloud, but there are two main parts: Browse your remote Mac computer's hard drive, and drag files and folders to your local Mac; and Control your remote Mac just as if you were sitting in front of it.
The Documents & Data option that was available with Mavericks, is no longer listed and some of the functions are now available with iCloud Drive.
Below the main panel is a bar that shows the amount of iCloud storage currently in use. In the Finder sidebar there is now an iCloud item that opens a window with a number of folders, each related to apps using the feature. Apple provides 5 GB of storage for users. Additional storage is available and the price of this has now been reduced. Details are available on the Apple website -
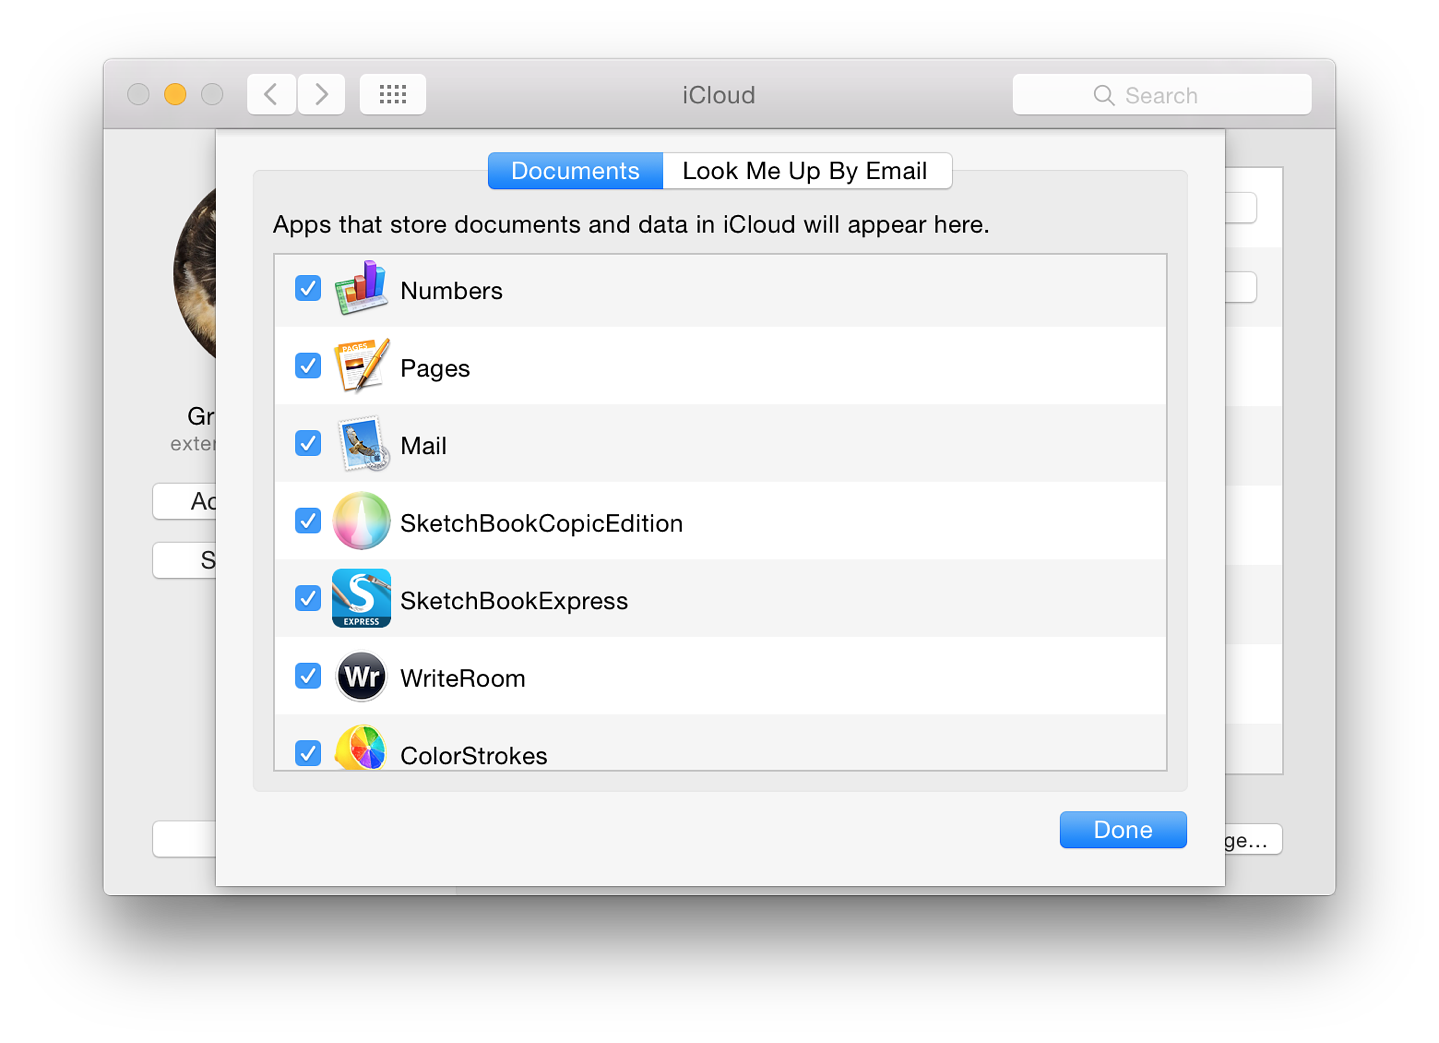
A button to the side of the capacity display is marked, Manage. This loads a two-part panel with apps to the left (both Apple and 3rd party) and basic details to the right when an app is highlighted. There is also an icon for Backups which shows the amount of data used by the iPad and iPhone. As well as Apple software like Keynote and Numbers, several iOS apps are shown.
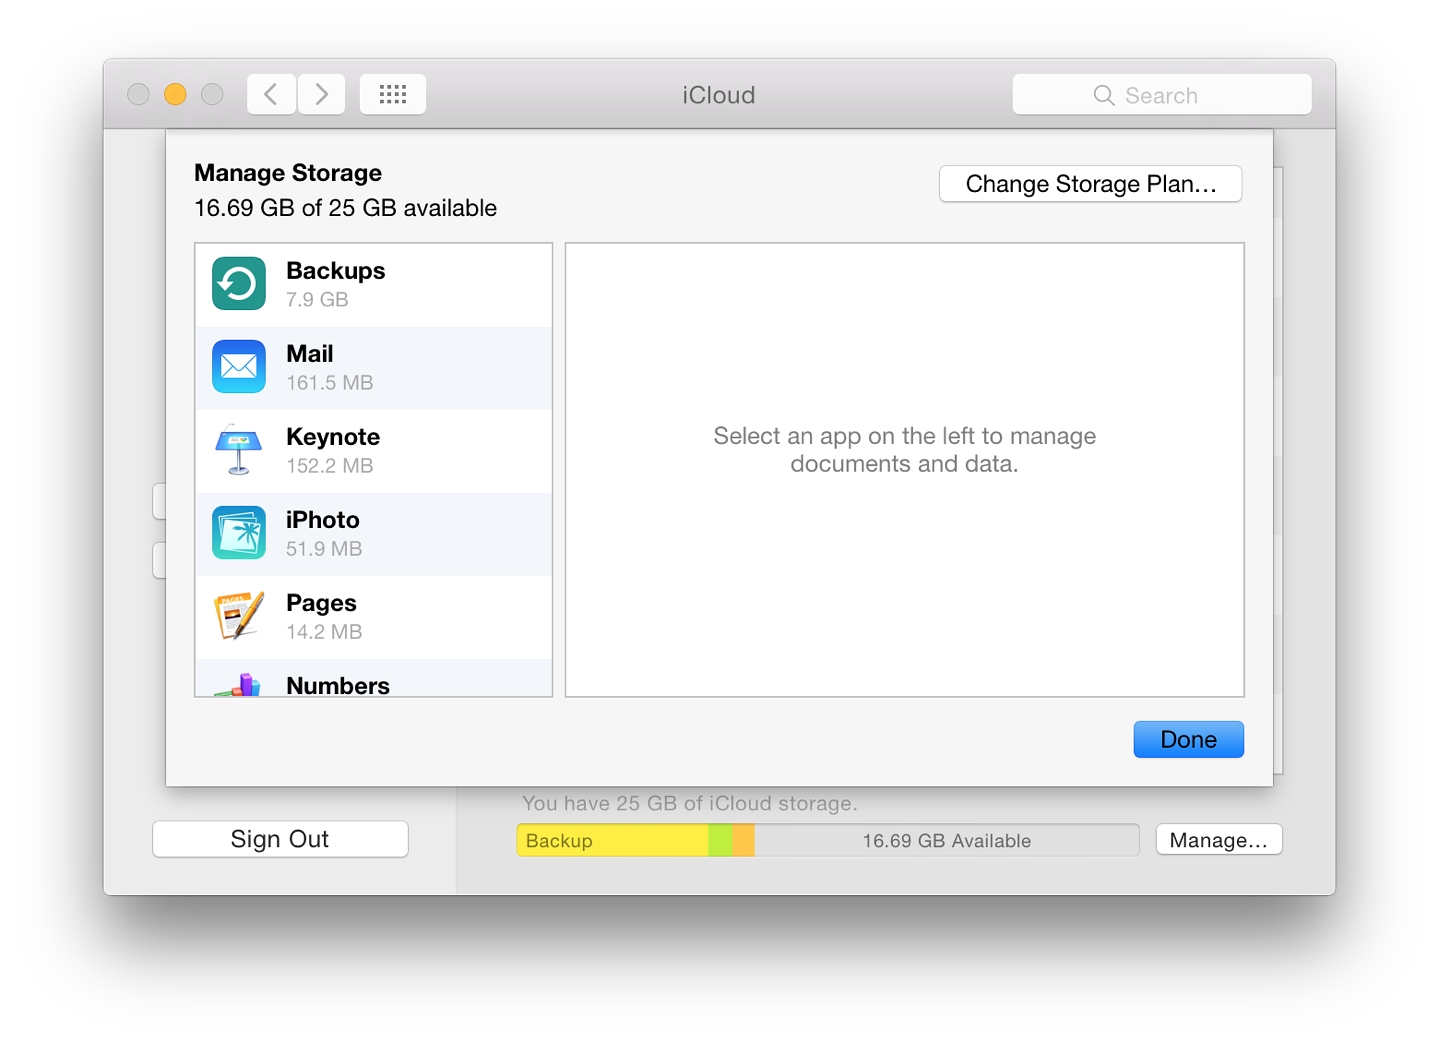
Information for the apps outlines the amount of storage being used, with an explanation of how to free up more data (. . . go to iCloud Drive in Finder, open [app name] and delete documents). At the time of writing, not all the applications listed had folders in iCloud Drive.
Each of the highlighted applications in the "Manage Storage" panel has a button marked, "Delete Documents & Data"
System Preferences in OS X 10.10, Yosemite: Internet Accounts |
|
![]()
Changes to System Preferences with the update to OS X 10.10, Yosemite include some minor differences to the Internet Accounts Preferences panel that first appeared in Mavericks. This is for setting up accounts to use with apps on the Internet. In earlier versions of OS X this preference panel was called Mail, Contacts & Calendars.
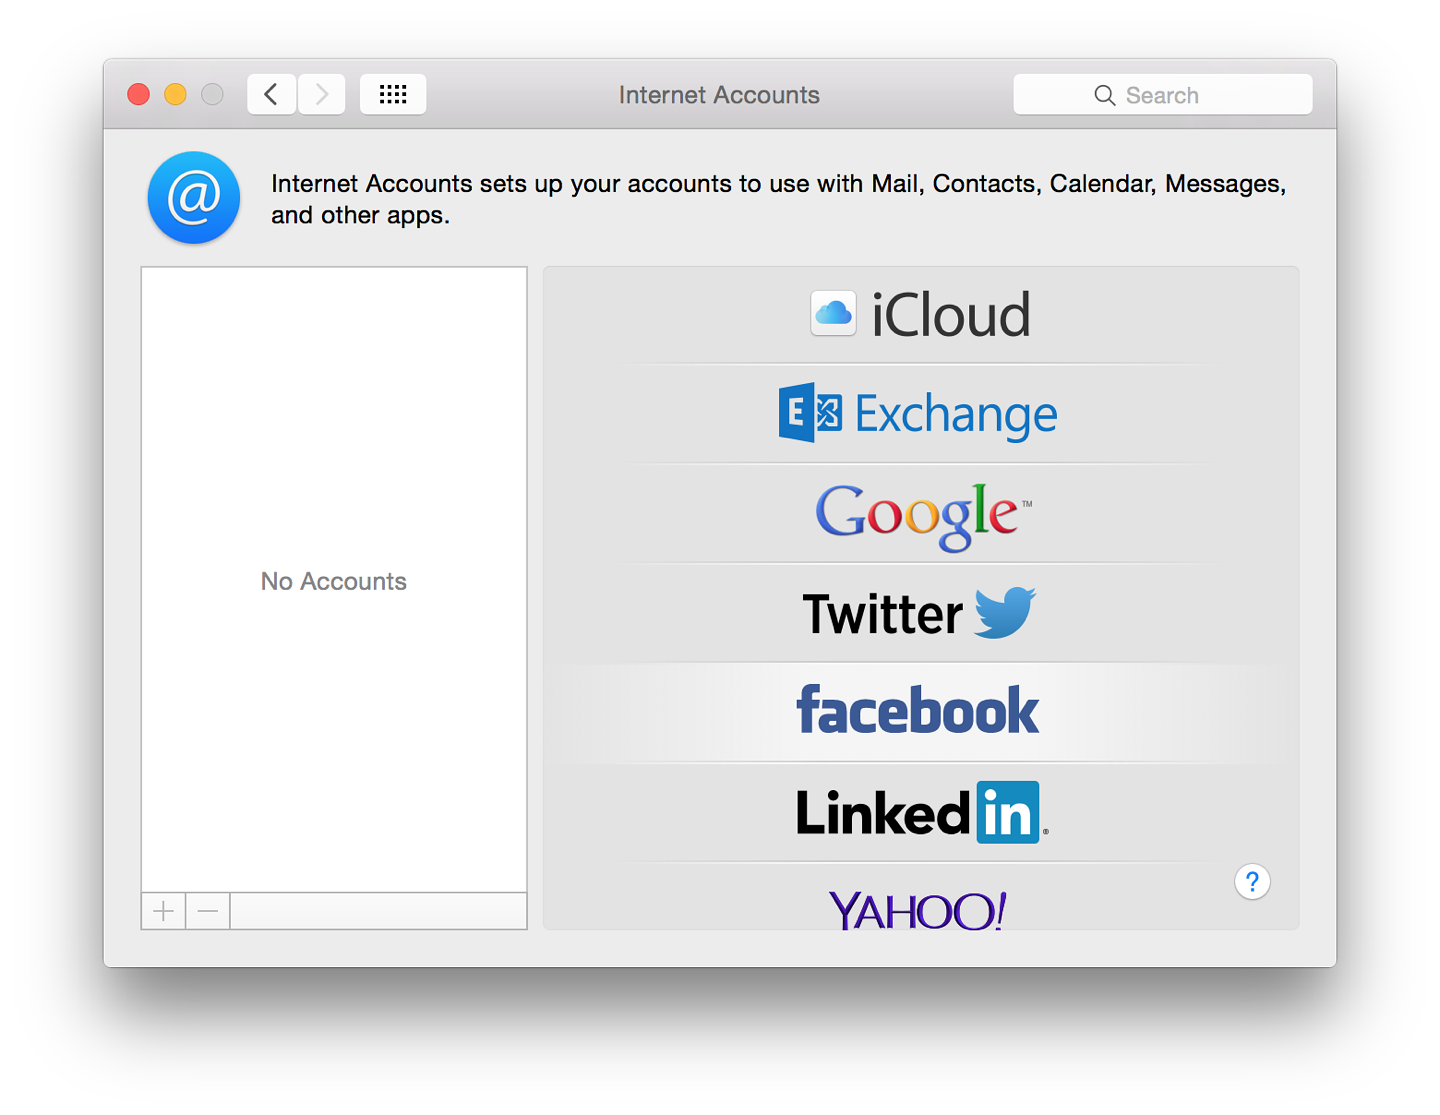
The Internet Accounts panel is for setting up accounts to use with Mail, Contacts, Calendar, Messages and other apps. With Mavericks, the panel saw an expansion in the number of apps listed: an indication of the way iCloud is more integrated into OS X; and of how other apps are better integrated into daily operations as well. Using Internet Accounts preferences simplifies the creation of new accounts and is aimed at those who use online services.
When first opened the interface is in two parts: to the left, a panel that lists services that have already been joined; and to the right a list of online services.
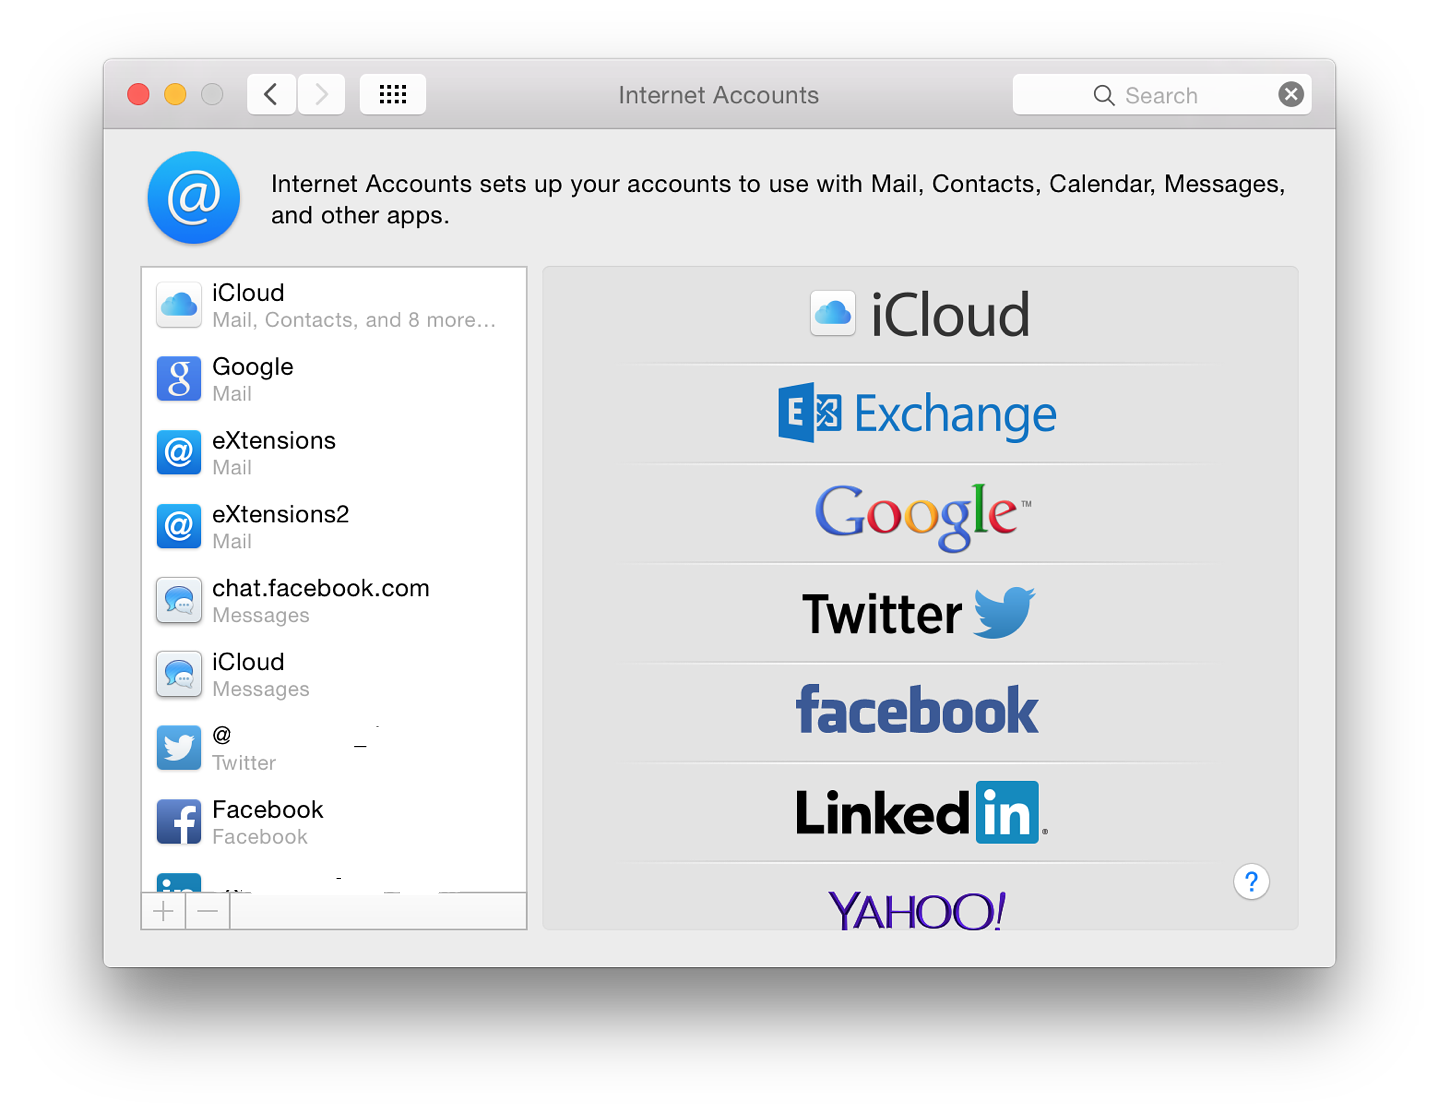
If the user is already using services such as Mail, or has one of the online accounts, the details will have been automatically entered when OS X was installed. As well as iCloud and related services, I found that Twitter, Facebook and Linkedin details were automatically included in my regular account on the Mac.
When an account exists and is listed in the panel to the left, highlighting the account name changes the main panel to show account details of the service: email address, full name and description. It will still be necessary to enter a password to make the specific service active in the Internet Accounts panel.
With some services (for example iCloud or Facebook), a list of specific parts of the service (mail, calendars, chat) are shown, with a checkbox beside each to show if it is in use. With iCloud, the panel is identical to the iCloud Preferences pane. The Google item shows which services are in use, with basic account details. A "Details" button to the right opens a panel with account information including a password box (bullets only are shown).
Other services will display connection data specific to that item (e.g. iCloud Messages, Facebook chat). Icons of any inactive services are greyed out lower down the panel. If visible, there may be data already available and a checkbox (active/inactive) will bring them to life again, if wanted.
To add an account, we click on the + Add Account item at the bottom of the list of services. On a new computer (or new user account on a computer) to create an account, we press the same + Add Account item in an otherwise empty list.
There are a number of changes to the account types offered. The order of services listed is not alphabetical: iCloud, Microsoft Exchange, Google, Yahoo! and AOL have been joined by Twitter, vimeo, Flickr and Linkedin. Other links may be offered depending on country.
Clicking on any of the listed services reveals a panel with Full name (in some cases already entered), other identification details, depending on the service (e.g. Apple ID, Yahoo! ID, email), and password.
At the bottom of the services list is Add Other Account. A panel opens with six options. These are the same as in OS X, 10.9, Mavericks and Mountain Lion before:
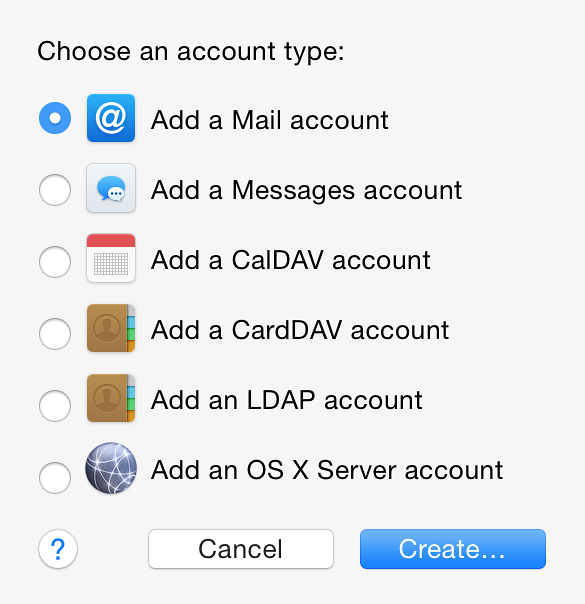
A triangle below Server Address opens a Server Options box for entering port number (default 389); there is a checkbox for SSL (Secure Sockets Layer). Below the data entry fields is a button for Authentication: options are None (default) or Simple. This is the same as in Mavericks and Mountain Lion before.
Some of the entry types in Mail, Contacts & Calendars are duplicated in Apple's Mail, through online web pages of the specific services, or via other applications.
The Internet Accounts Preferences panel is a form of centralised control so that a user may add new accounts easily without going through the separate applications/sites. It is also a way to assist users who are increasingly expected to use online services.
System Preferences in OS X 10.10, Yosemite: Keyboard |
|
![]()
The Keyboard preferences panel was changed in OS X 10.9 Mavericks to include a number of features that had previously been in the Language & Text panel. While changes in the earlier version of OS X were significant, there have been few in the evolution to OS X 10.10, Yosemite apart from minor cosmetic differences.
The Keyboard preference panel is in four sections: Keyboard, Text, Shortcuts and Input Sources.
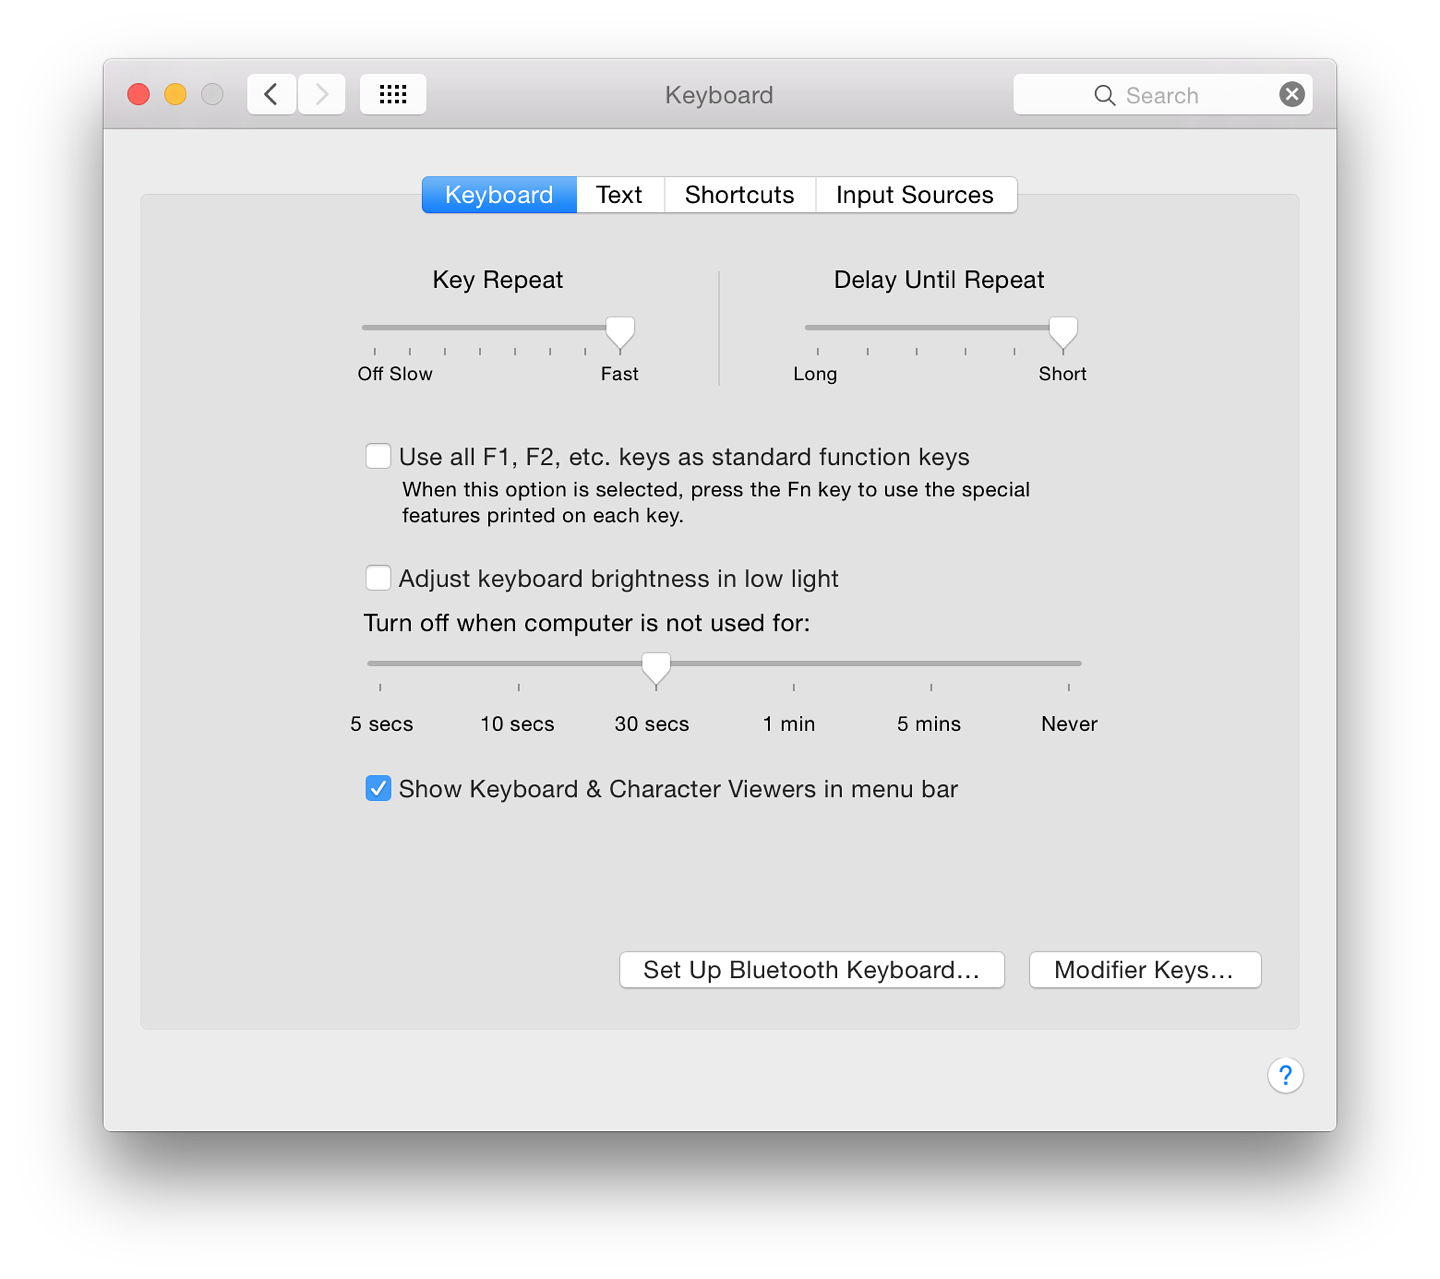
Since the 10.8 update, key repeating has not been available on my MacBook Pro for characters or numbers. Punctuation and other marks do repeat: for example 2 does not, while @@@@@@@@@@@@@@@ does. This is the same for Thai characters. On the same 2 key, when Thai is active, the / key repeats, while the Thai character for 1 does not. Other keys (punctuation, character/numeric) are likewise affected. The delete key does repeat.
The Delay Until Repeat slider adjusts the time before the first repeat begins. The delay may be adjusted between short and long.
Below the sliders is a check-box to turn on or off the use of F keys as standard function keys. When active the Fn key must be pressed to use the function key for its additional purpose. This then allows the F-key to have a second use (some may already be allocated), which can be allocated in the Keyboard Shortcuts section.
An example might be the F12 key which is marked with the speaker symbol and increases sound volume. When the checkbox is used, pressing the F12 key reveals Dashboard. When the Fn key is pressed with F12, the volume is increased. If the box in the Keyboard panel is not checked, F12 adjusts volume; used with Fn it opens Dashboard.
Care should be taken when selecting this. Users should make sure they are aware of what pressing a Function key will do.
The location of the Fn key differs depending on the keyboard used: on a MacBook Pro, this is bottom left; on an Apple Wireless Keyboard, the Fn key is between keyboard and number pad.
On some computers, a check box below this has the wording, "Adjust keyboard brightness in low light". A slider bar below the checkbox selects how long this lighting feature operates when the computer is not being used. The slider runs from 5 secs to over 5 mins, and Never.
There is a final checkbox (below the slider): Show Keyboard & Character Viewers in menu bar. This uses the same menubar item as for selecting different language keyboards (see Input Sources, below).
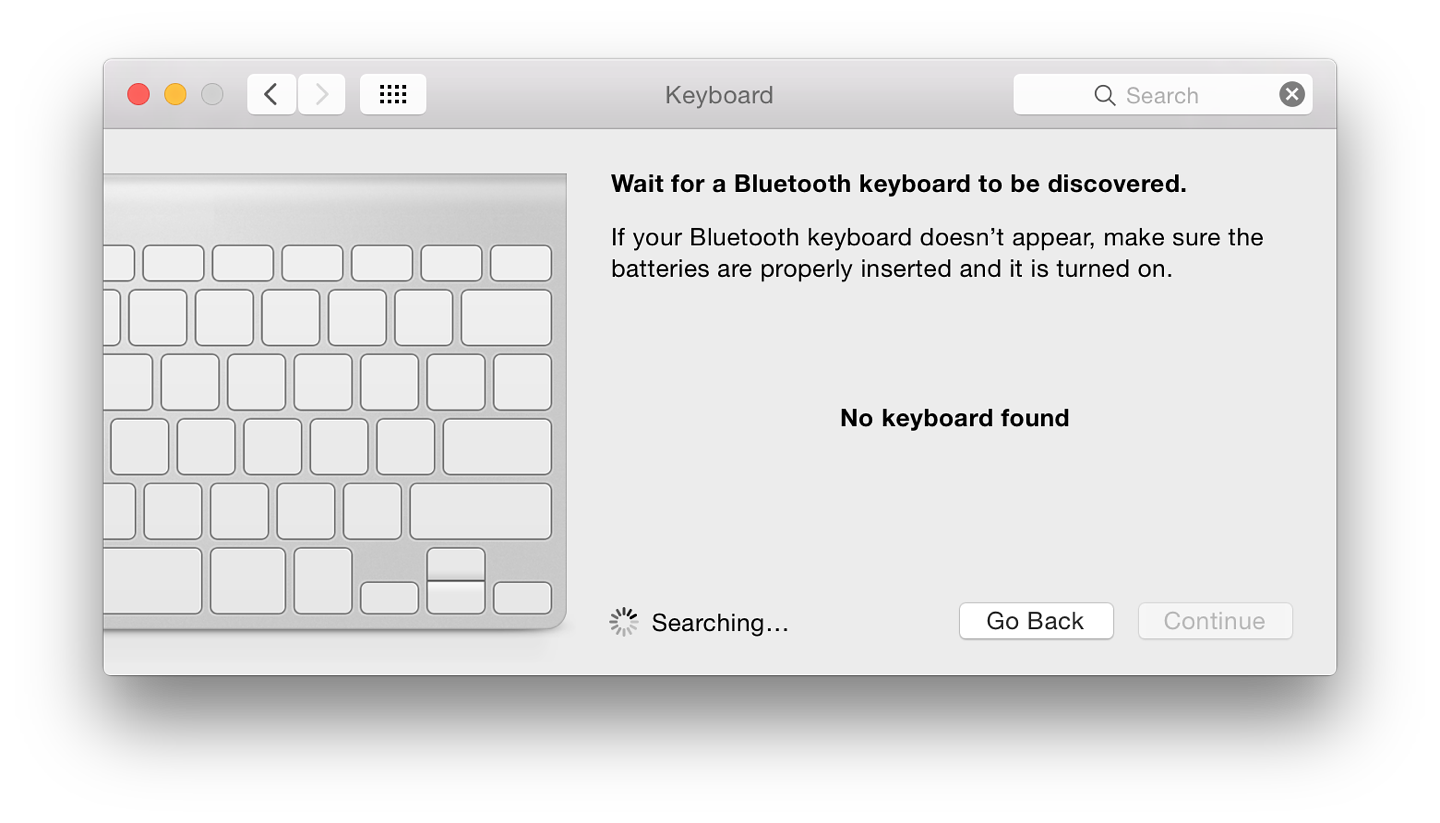
At the bottom of the panel, not quite in the center, is a button marked, Set Up Bluetooth Keyboard. When pressed, a panel appears. If Bluetooth is off, a button offers the option to turn it on. The system searches for a Bluetooth keyboard and initiates pairing if one is found.
A Modifier Keys button at the bottom left allows a user to re-allocate the uses of certain keys: Caps Lock, Control, Option, Command and "No action". For example, the Caps lock key can be changed to operate as the Option key. The panel also has a Restore Defaults button.
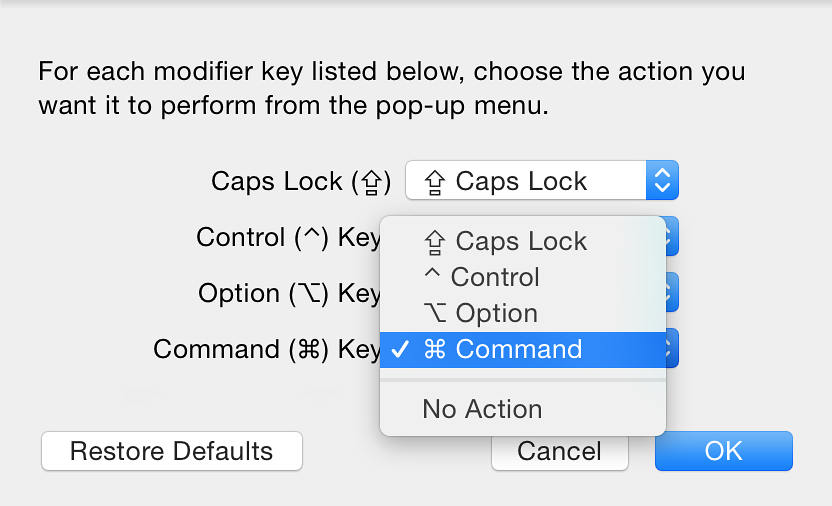
Great care should be exercised if such changes are considered.
The panel to the left contains shortcuts for typing, but should not be confused with the Shortcuts panel (see below). Previously the copyright symbol was included in a text when the user typed (c). There are no such symbols included now. However, by using the Character Viewer, a symbol may be dragged into the "With" column and I was able to add this once again.
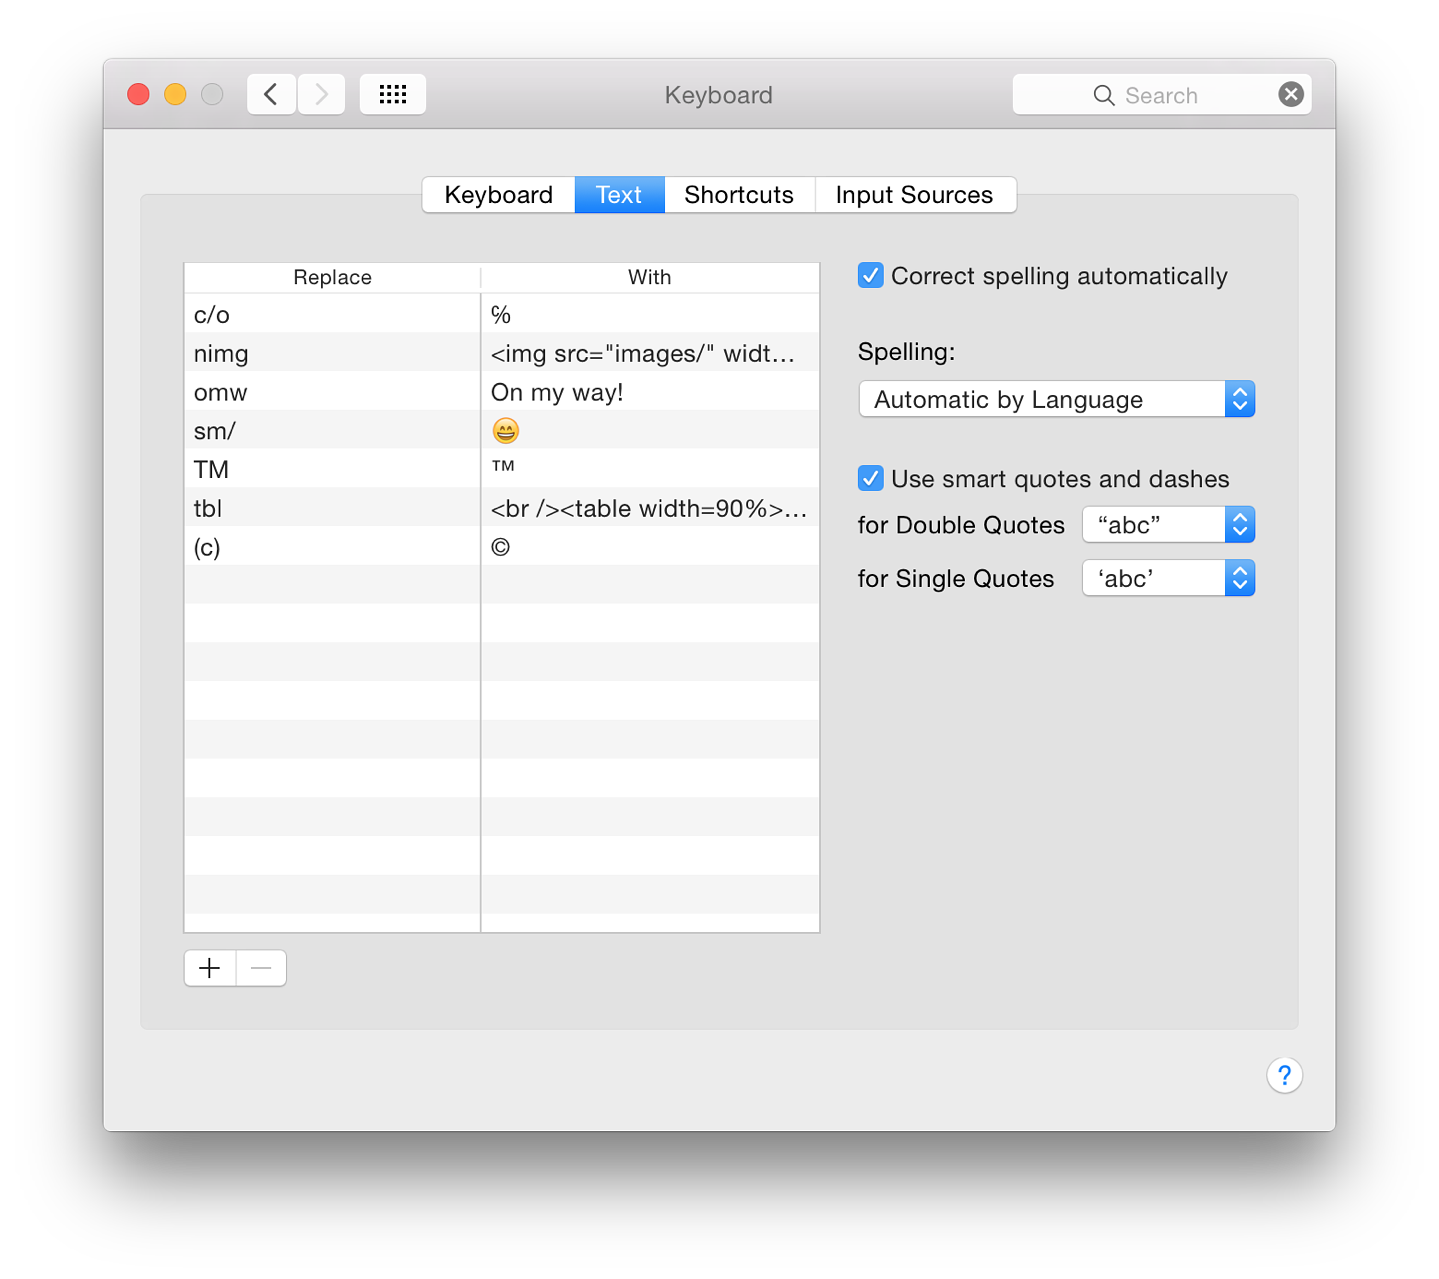
Using the + button below the panel allows user-defined shortcuts to be added. I use a number of such shortcuts when writing: for inserting images and for entering page links.
With shortcuts I can avoid much tedious and repetitive typing, while avoiding mistakes. Such a feature from Apple is all very well, but in a perfect world users do not work all day long in Apple-developed applications. None of these shortcuts will work in some of the 3rd party software I use: these commands will only work with applications written in Objective C.
I use the utility yType from Plum Amazing to do this (recommended). This is available in the Mac App Store, but not in Thailand. It does work in all the writing applications I use. Plum Amazing also have a shortcuts app called iKey ($29.99) available on the Mac App Store.
To the right of the panel are other controls for typing: again simplified from the previous version. At the top is a checkbox for spelling to be corrected while typing. Spelling corrections may be made automatically by language - selected by a button below - or by selecting a specific language from those in the list. At the bottom there is a Set Up option. This opens a panel which gives access to a number of other languages. Text here - as before - tells us we may add more by copying dictionary files (.aff and .dic) to the Spelling folder in the Library folder.
Like line-breaks, different languages have their own ways to use quotations. A checkbox activates the two buttons available to select the user's preference: with double ("") and single ('') speech marks.
Longtime Mac users are aware that using the keyboard is much faster than using a mouse or trackpad. I have written on this a number of times for example in a three-part article: (1) Outline and Applications; (2) Startup keys and Some Suggestions for Their Use; and (3) More Startup keys and Suggestions for Use.
The panel for Shortcuts is in two parts: on the left, the area or group that is being controlled. On the right, the commands themselves.
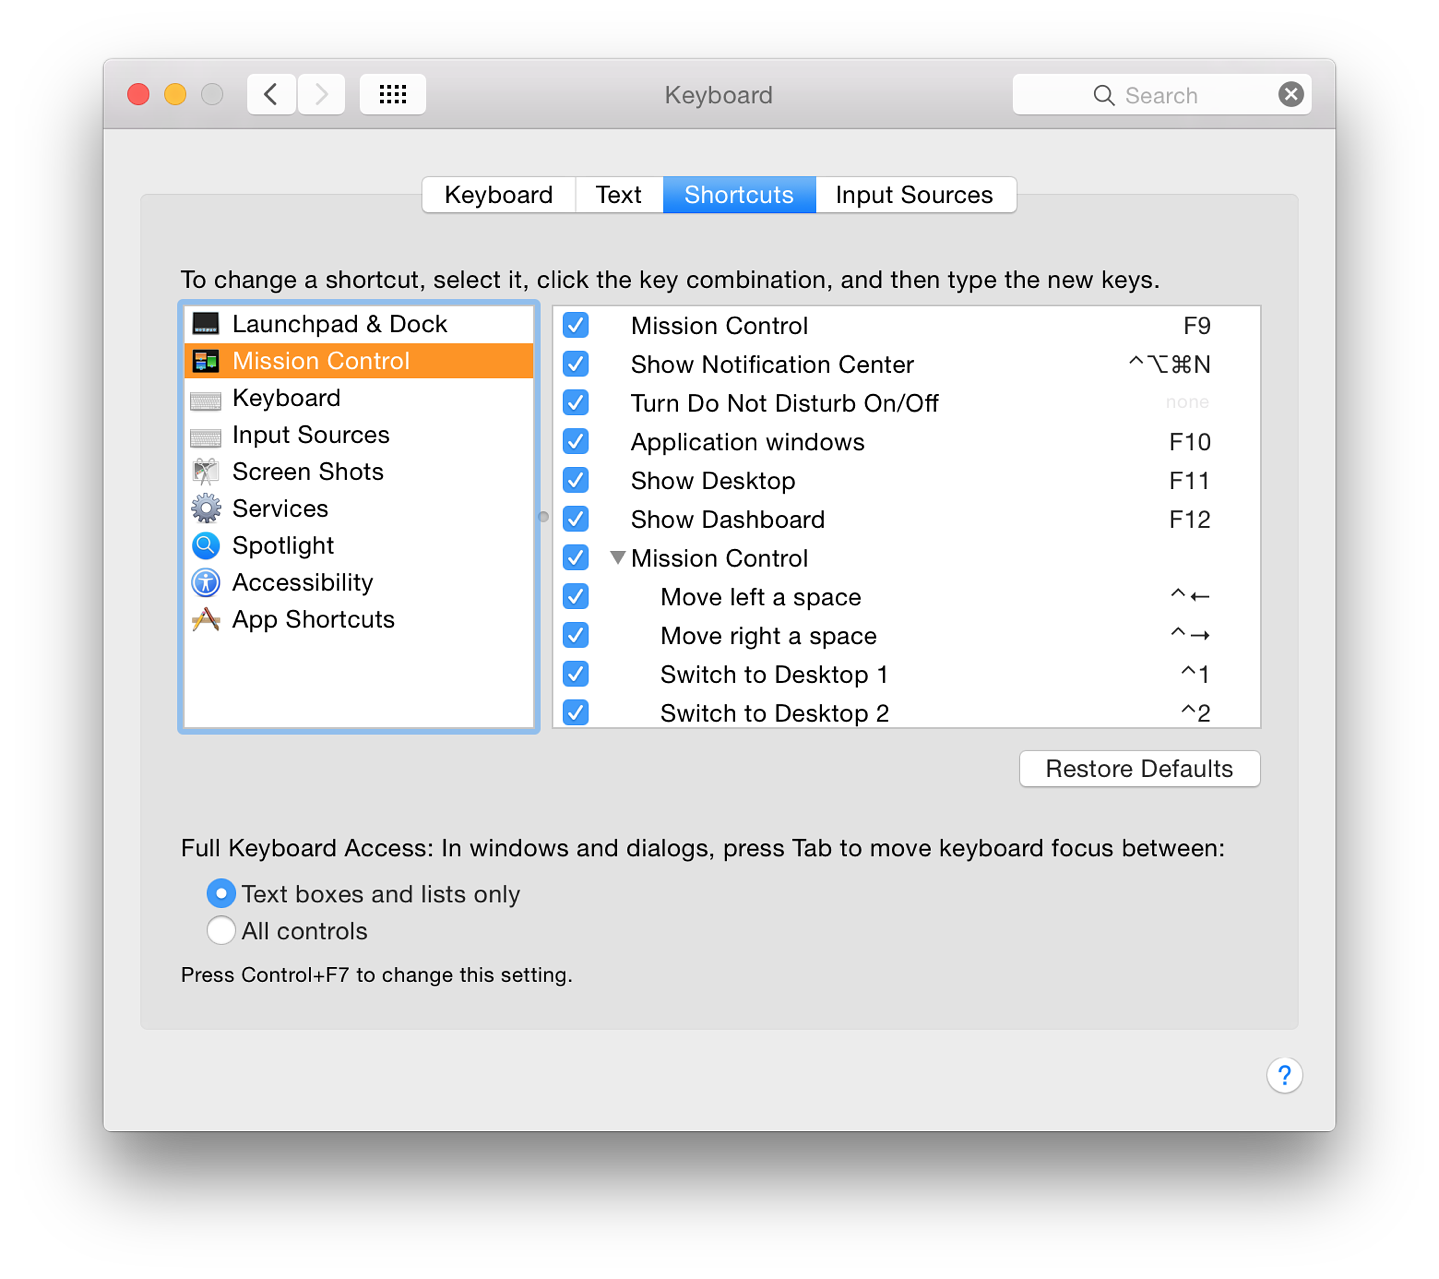
There are now nine groups (or types) shown: Launchpad & Dock; Mission Control; Keyboard; Input Sources; Screen Shots; Services; Spotlight; Accessibility; and App Shortcuts.
When one of these sections is highlighted, the panel on the right lists all commands for that specific group. Some have fewer than others. For example, Launchpad & Dock has only two listed like the new Input Sources; Screen Shots has only four. Services has many more. It is only possible to add commands to the App Shortcuts section (also see Services, below).
Each key command has a checkbox to its left (active/inactive) and any assigned key command. If the checkbox to the left is not checked, the key combination is greyed out or shows, "none". Clicking on this brings up a box that allows a key combination to be added or changed.
To add or change a shortcut, we may double-click over the key command shown. This reveals a small box in which the new key combination can be typed. If there is a conflict (the combination is already being used), yellow warning triangles appear: beside the command, under the panel, beside the current section and beside the section which is using the keys.
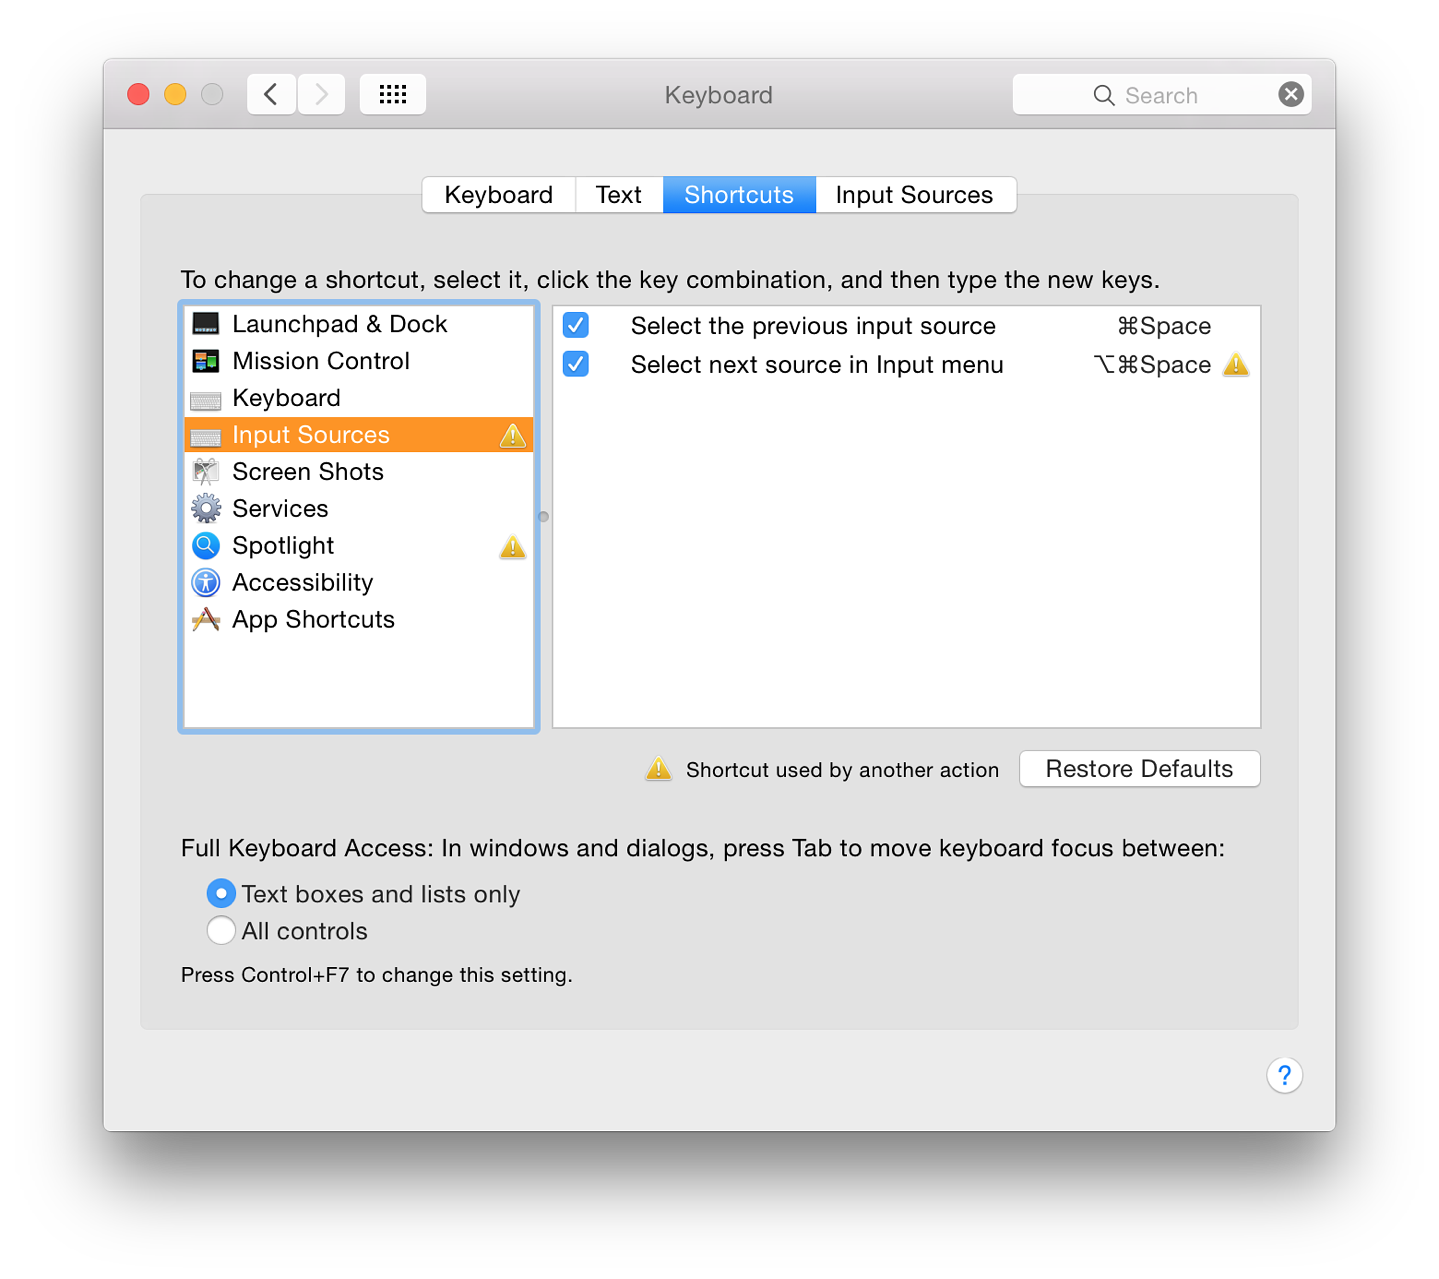
By default in OS X, Command + Space opens a Spotlight search. For many years I have used this combination to switch keyboards. I prefer to keep it that way. To use the keyboard switcher keys, I entered the combination (now in Input Sources) and deactivated the Spotlight command. This now has its own specific section and a different key command (F5 or Fn F5).
The Services menu has a large list of commands that may be used, particularly for some of the installed 3rd party applications. Any Services are listed in an application's menu (some way below the Preferences item). They are only displayed when a specific task may be available. In Safari, for example, opening the menu item shows, No Services Apply (with a link to Services Preferences). However, if a section of text is highlighted (or a URL) some services are listed.
When viewed in the Keyboard > Shortcuts panel, most Services commands do not have a key combination allocated. By highlighting the command, a small button marked "add shortcut" appears. Clicking on that opens a text box in which a key combination can be entered. This will be useful for those who have a specific task that is repeated often.
However, when I entered a key command which I knew would conflict, the yellow triangles did not appear. I was able to do this more than once in the Services section.
Great care should be exercised if such changes are considered.
We may also add commands using the + icon that appears below the panel when App Shortcuts is selected. The other 8 groups do not display the + below the panel. As an example of the use of this feature, iTunes has a menu item (in the Window menu), "Zoom", which had no keys allocated. Pressing + in the Shortcuts panel reveals a dialogue box. We may select All Applications or specify: the list shows all installed applications, and Other.
I selected iTunes and typed in the menu title (the words for the command) as it appears in a menu, then allocated a key combination. I specified Command Shift and = for this. The key command now appears in the iTunes, Window menu. New menu commands cannot be added this way. A new Services item - perhaps created with AppleScript or in Automator - might get round this.
The ability to add (+) is not restricted to Apple applications. It is possible to add such key commands to 3rd party applications in the same way.
Controls at the bottom of the panel refer to the focus of the keyboard within windows and dialog boxes (such as a search box) in applications. This is unchanged from before Mountain Lion. By pressing the Tab key a different part of a panel or window is highlighted.
With "Text boxes and lists only" the focus is only where we may enter text (such as Search boxes or address fields in Safari). "With All controls" the focus cycles round text windows and other controls like buttons, sliders (and bookmark entries in Safari). Text beneath reads, "Press Control + F7 to change this setting." For some setups this will require fn + Control + F7 to be used.

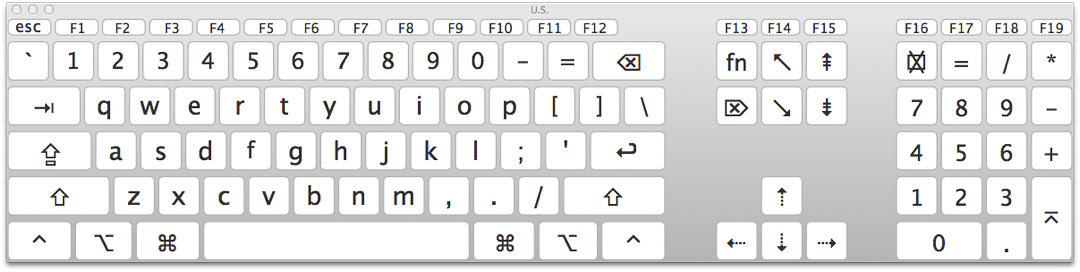
To the left of the panel is a list of keyboards chosen by the user. In the panel to the right is a display of the keyboard highlighted. This is large enough so that most users would be able to identify the keys (as confirmation). Pressing keys or double-clicking does nothing to the keyboard (see comments on menubar, below).
The default selection is the localised language: US English for computers in many areas. When only the default is selected there is no icon in the menu bar. We may add or remove keyboards by using the + or - at the bottom of the panel.
When other keyboards have been added, the current keyboard language is changed using the menubar icon. We may also use a keyboard shortcut. There are two checkboxes. The first, Show Input menu in menu bar is checked by default when a second language is added. Unchecking the box will remove the icon from the menubar. A second checkbox, "Automatically switch to a document's input source." Below is the comment, "The input source is used until the document is closed." I have not been able to make this work with Thai documents.
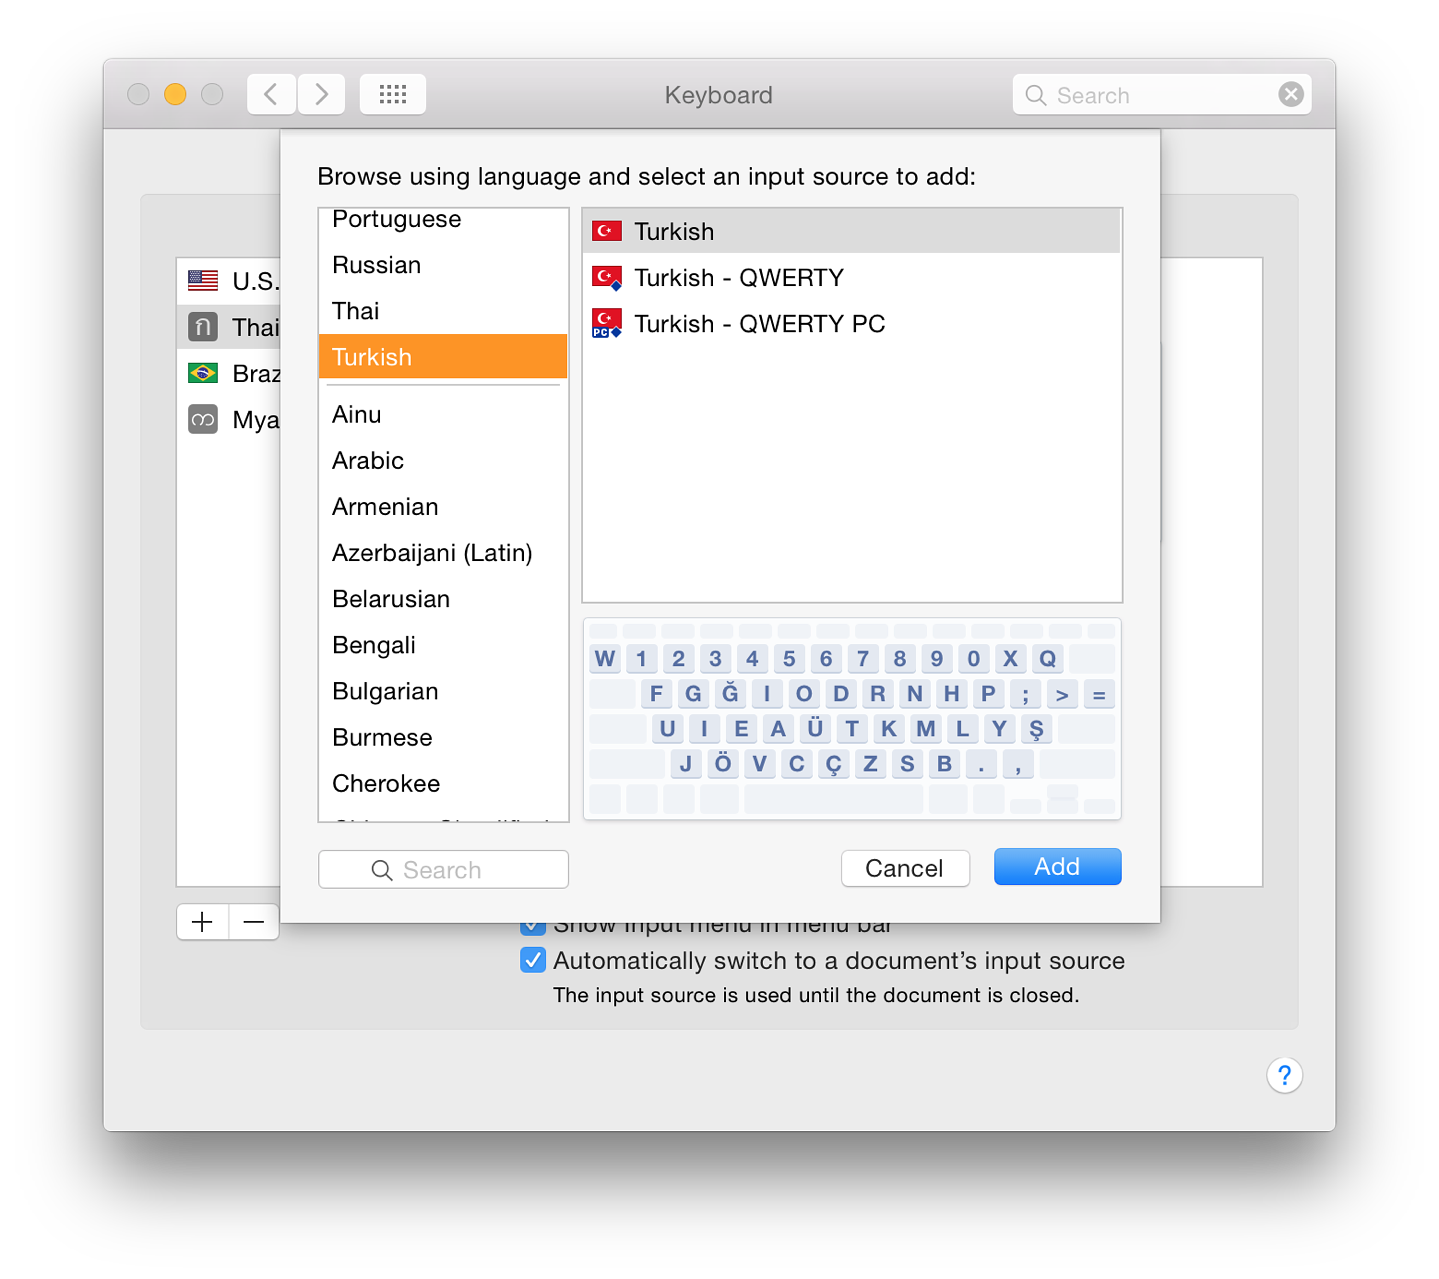
The panel used has been redesigned in a way that makes selection of a specific keyboard easier. To the left, when the add (+) is used, I counted 74 language types and "Others". At the top of the list are languages that have already been selected (including those no longer in use).
Highlighting one of the languages reveals in a panel (right, top) any keyboards that are available for the language. For example, Inuktitut has Inuktitut - Nunavut, Inuktitut - Nutaaq, Inuktitut - QWERTY and Inuktitut - Nunavik. Selecting one of these options, shows a representation of the specified keyboard in a panel (right, lower).
A change has been made in the keyboard icon and its display in the menubar. Several counties no longer have country flags: examples include Greek, Myanmar and Thailand. However some regional keyboards (e.g. Hawaiian) show flags.
There is a search box at the bottom of the panel to speed things up. A keyboard already selected and in use is greyed out in the input source panel. Currently, "Others" only displays a keyboard marked Unicode Hex Input as before.
Any input source is included to the list of those in use by pressing the Add button.
System Preferences in OS X 10.10, Yosemite: Language & Region |
|
![]()
There have been a number of changes to System Preferences in OS X 10.10, Yosemite. The old preferences pane for Language & Text was renamed in Mavericks and the options within the panel changed significantly then. Language & Region provides settings for users to set language and other settings for localised use.
The preference panel for Language & Region controls the way the system uses specified languages for display and input. There is a single panel, with Advanced settings available for more fine-tuning.
The main section of the panel has a window to the left that displays a list of preferred languages used on the Mac. The languages shown will depend on the user's own previous selections. When the panel is first used in a new account, it will display languages and settings that depend on the user's location. The right side of the panel has a number of buttons and a checkbox used for fine-tuning settings for a specific account.

In earlier versions of OS X, all the languages that were supported were in the display to the left side of the panel. The display on my Macs now only shows those languages I have specified. English is shown as the "Primary" language. Beneath that is Thai which was added with the 10.7.3 update: menus can be displayed in Thai if this is selected. A display language can be changed by dragging the required one to the top of the list and restarting the computer.
At the bottom of the panel on the left is a + button to add a language (the - is greyed out until a language is highlighted). The selection panel is in 2 sections. At the top 33 languages are listed. Below a grey line are several more although it is expected that these will only change the keyboard (see below).
Examples of the languages listed below the line are English (UK) and Deutsch (Schweiz). When any of these languages is highlighted, a yellow warning triangle appears and the text, "While some applications and web pages can use the selected language, it is not fully supported by OS X." English (UK) would be used with the Primary language English, while others may only be display options, for example there are keyboards for German, Swiss German and Austrian (See Keyboard).
Between the last two buttons (above) there is a checkbox for 24-hour time.
Below the settings is a display showing examples of the way information (dates times, numbers and currency) is to be displayed. These are fine-tuned by using the Advanced button at bottom right.
A final button at the bottom (center) of the panel takes a user directly to the Keyboard Preferences panel.
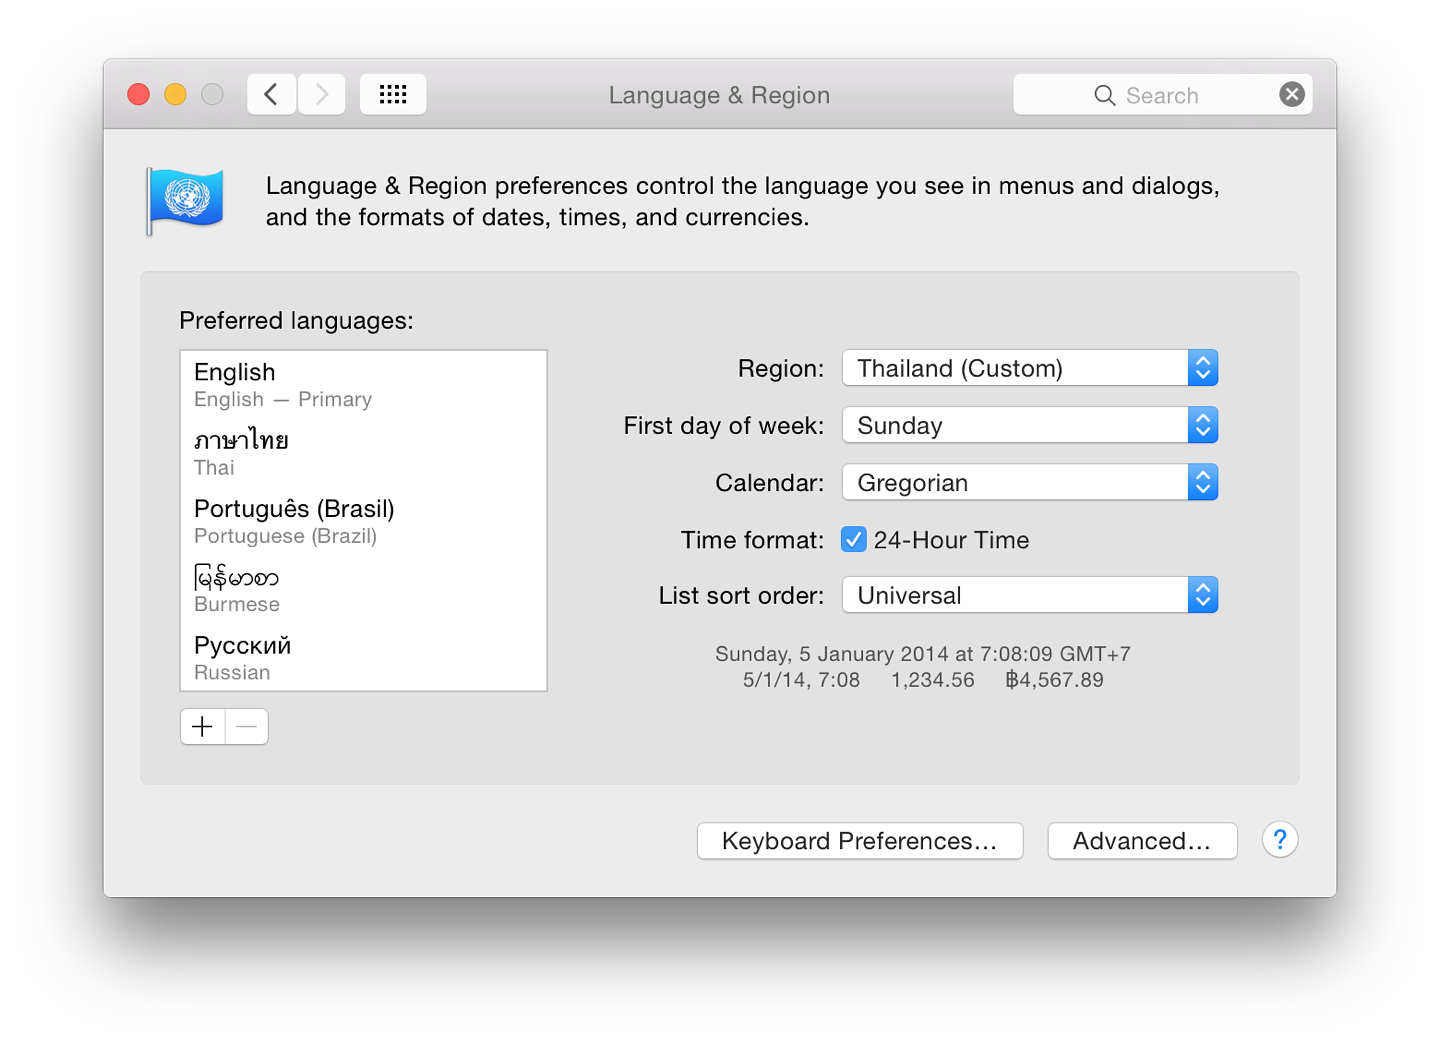
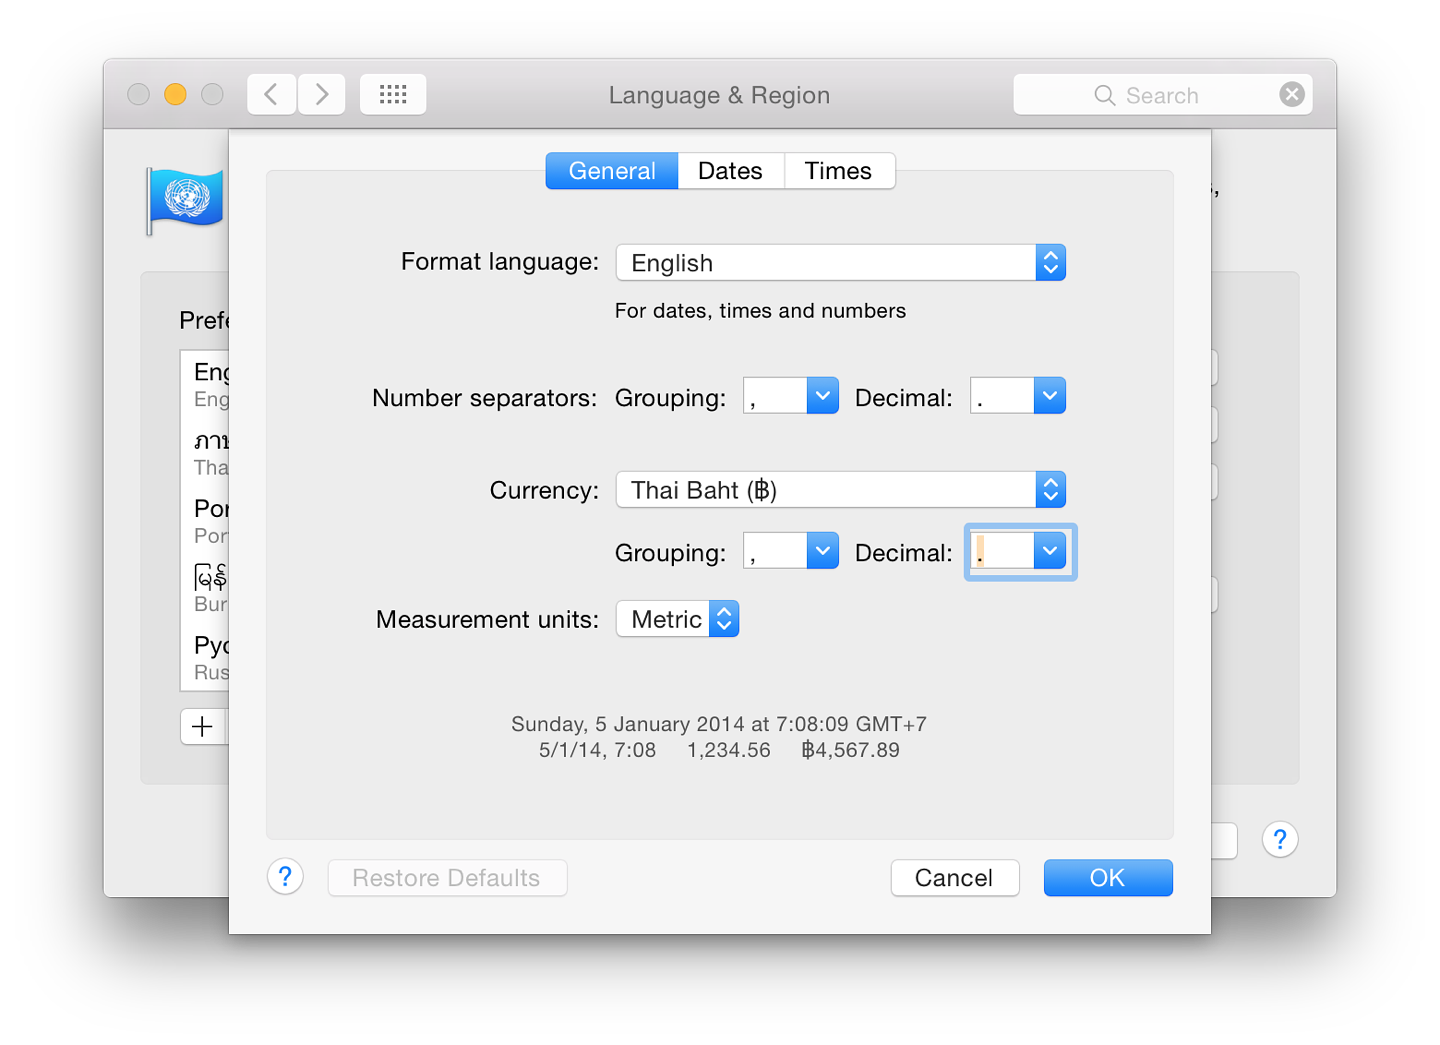
As with the main panel there is a display showing examples of the way information (dates times, numbers and currency) is to be displayed.
When any setting is changed (e.g from Metric to US) a Restore Defaults button at bottom left becomes live. If there are no changes, or if the settings are returned to the original, the button is greyed out.
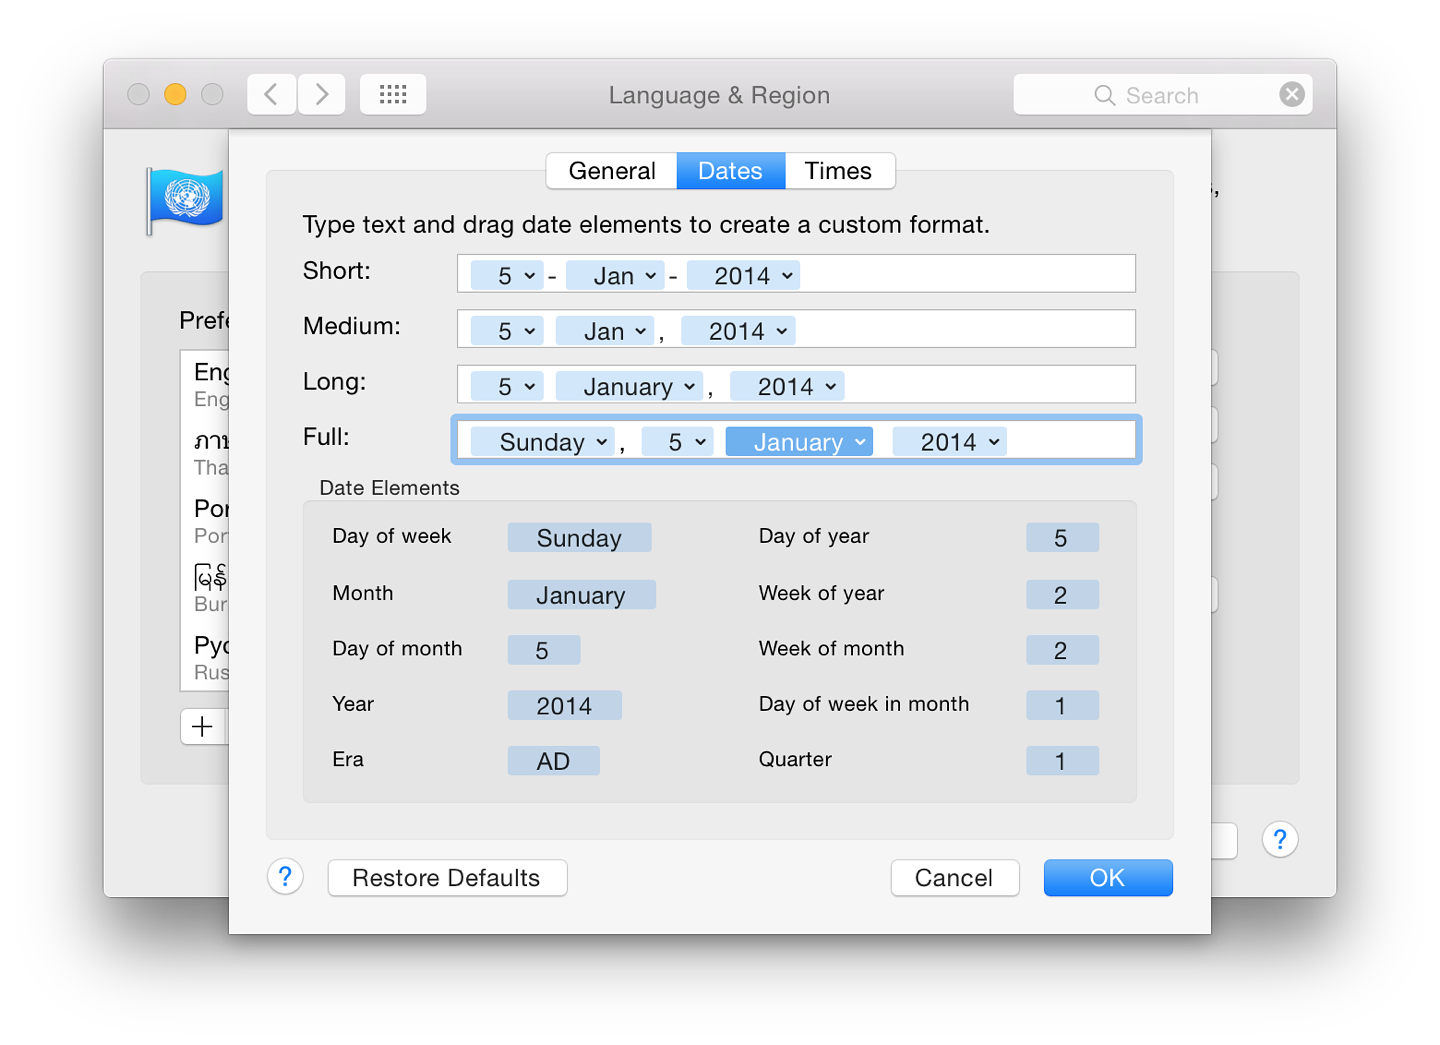
Each element in a display type and its order can be changed to suit the user. This is done by clicking on the icon to the left of each blue panel. As an example, January can be changed to Jan, J, 01 or 1. Separators may also be changed simply by deleting or typing a new option (- for /). Elements may be dragged to change their positions.
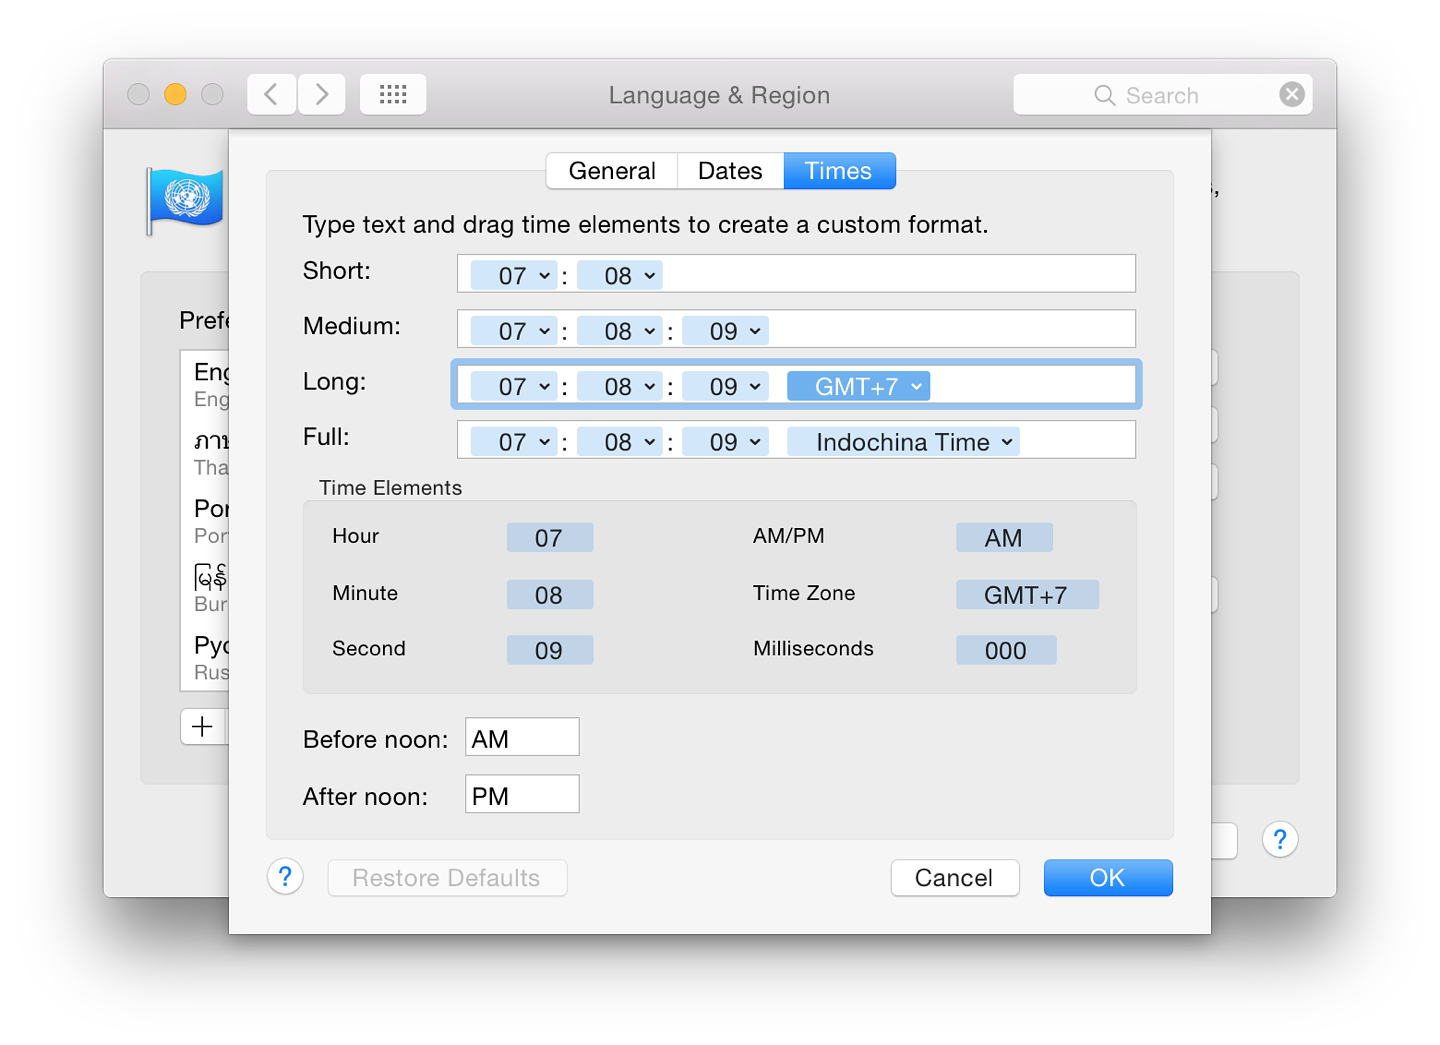
System Preferences in OS X 10.10, Yosemite: Mission Control |
|
![]()
Apart from the icons and interfacing, changes to most System Preferences in OS X 10.10, Yosemite, have been small. The preferences pane for Mission Control has been changed. Mission Control provides settings to give users an overview of all open windows, applications and Dashboard.
What was called Exposé & Spaces in earlier versions of OS X was replaced by Mission Control. This has a single panel, in two sections. At the top are checkboxes for Mission Control and Dashboard as before. This has had one checkbox that affected the way displays are used, removed. At the bottom are (unchanged) Keyboard and Mouse Shortcuts, with a button for Hot Corners at bottom left.
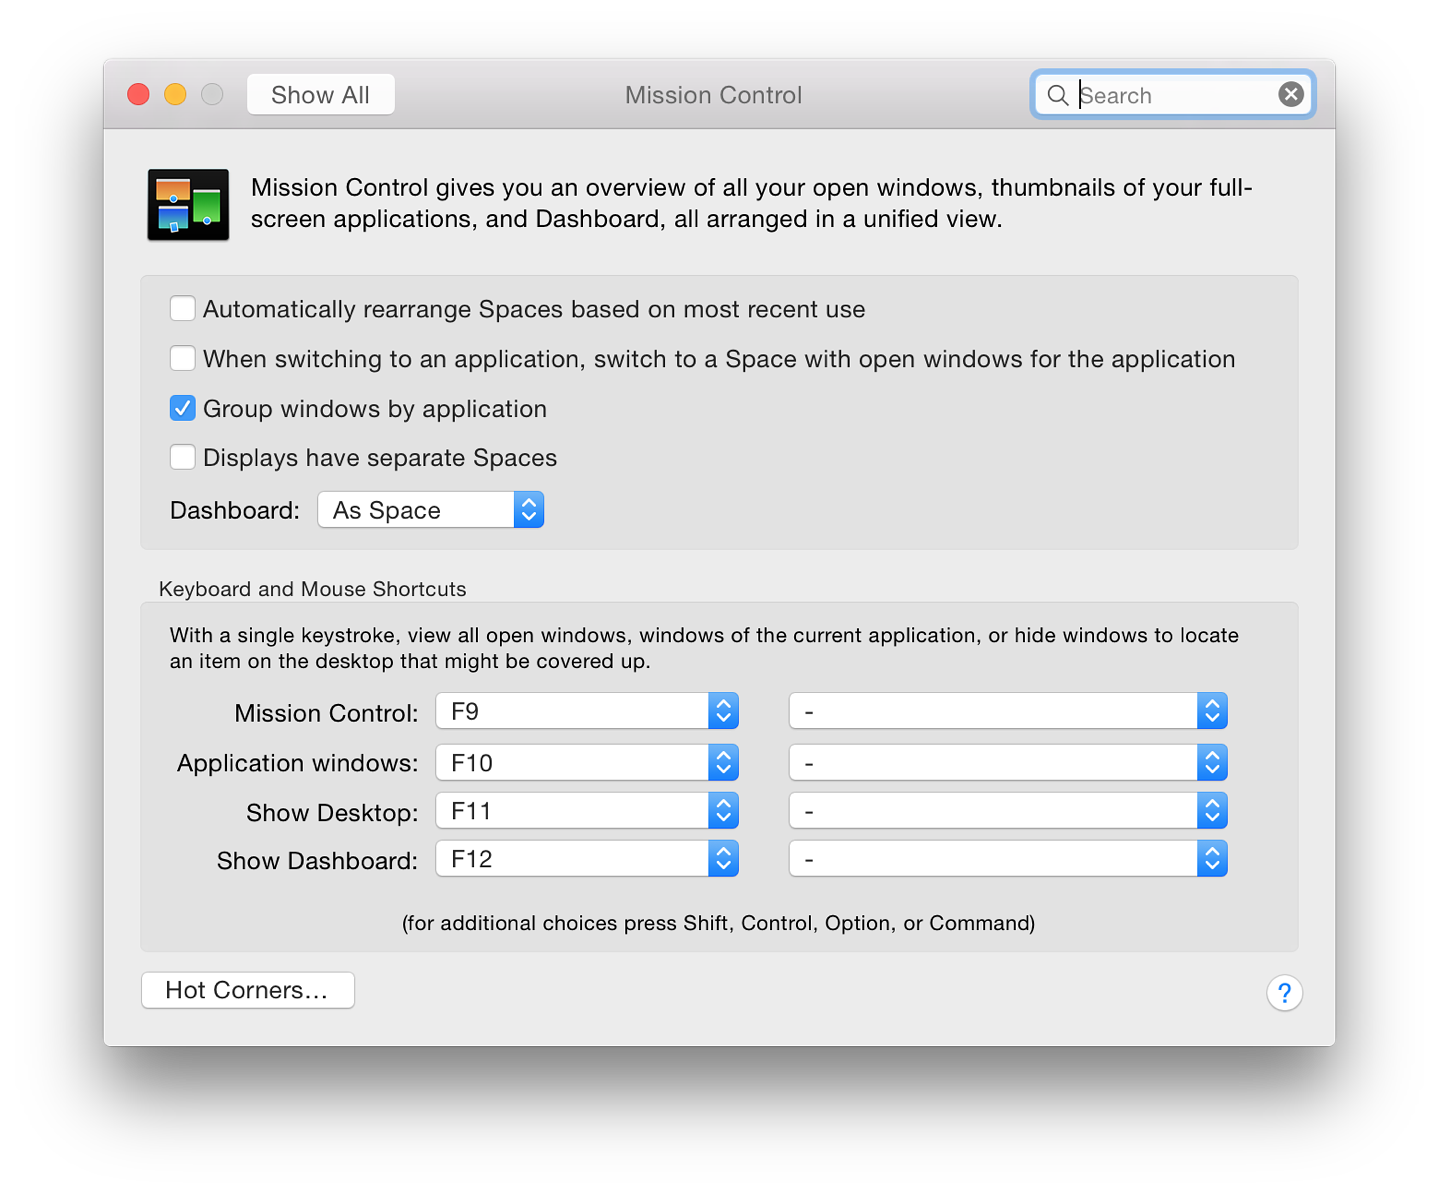
The option of "Show Dashboard as a Space" has been removed and replaced by a button beneath the checkboxes. By default, when Mission Control is used, a thumbnail display of Dashboard is shown to the left of the thumbnails of any desktops that are active.
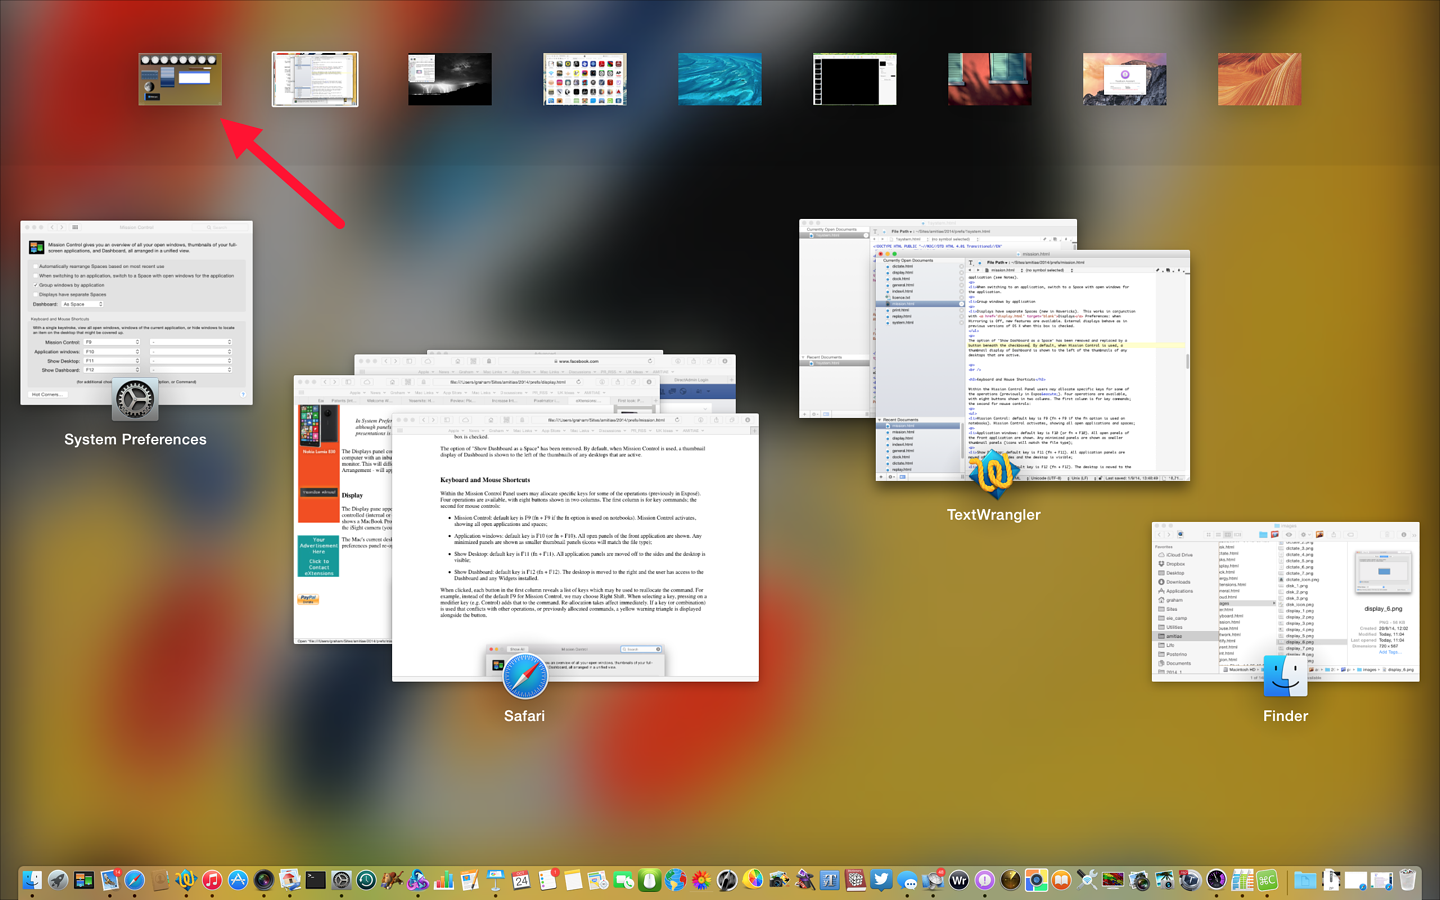
The button allows three options: As Space, As Overlay, OFF. With the Space (like before) pressing F12 (or fn + F12) opens the Dashboard screen with its widgets. Overlay makes the screen appear in a semi-transparent mode over the current display, which may be more convenient for some users.
There is an eXtensions widget available on the Apple site.
When clicked, each button in the first column reveals a list of keys which may be used to reallocate the command. For example, instead of the default F9 for Mission Control, we may choose Right Shift.
When selecting a key, pressing on a modifier key (e.g. Control) adds that to the command. Re-allocation takes affect immediately. If a key (or combination) is used that conflicts with other operations, or previously allocated commands, a yellow warning triangle is displayed alongside the button.
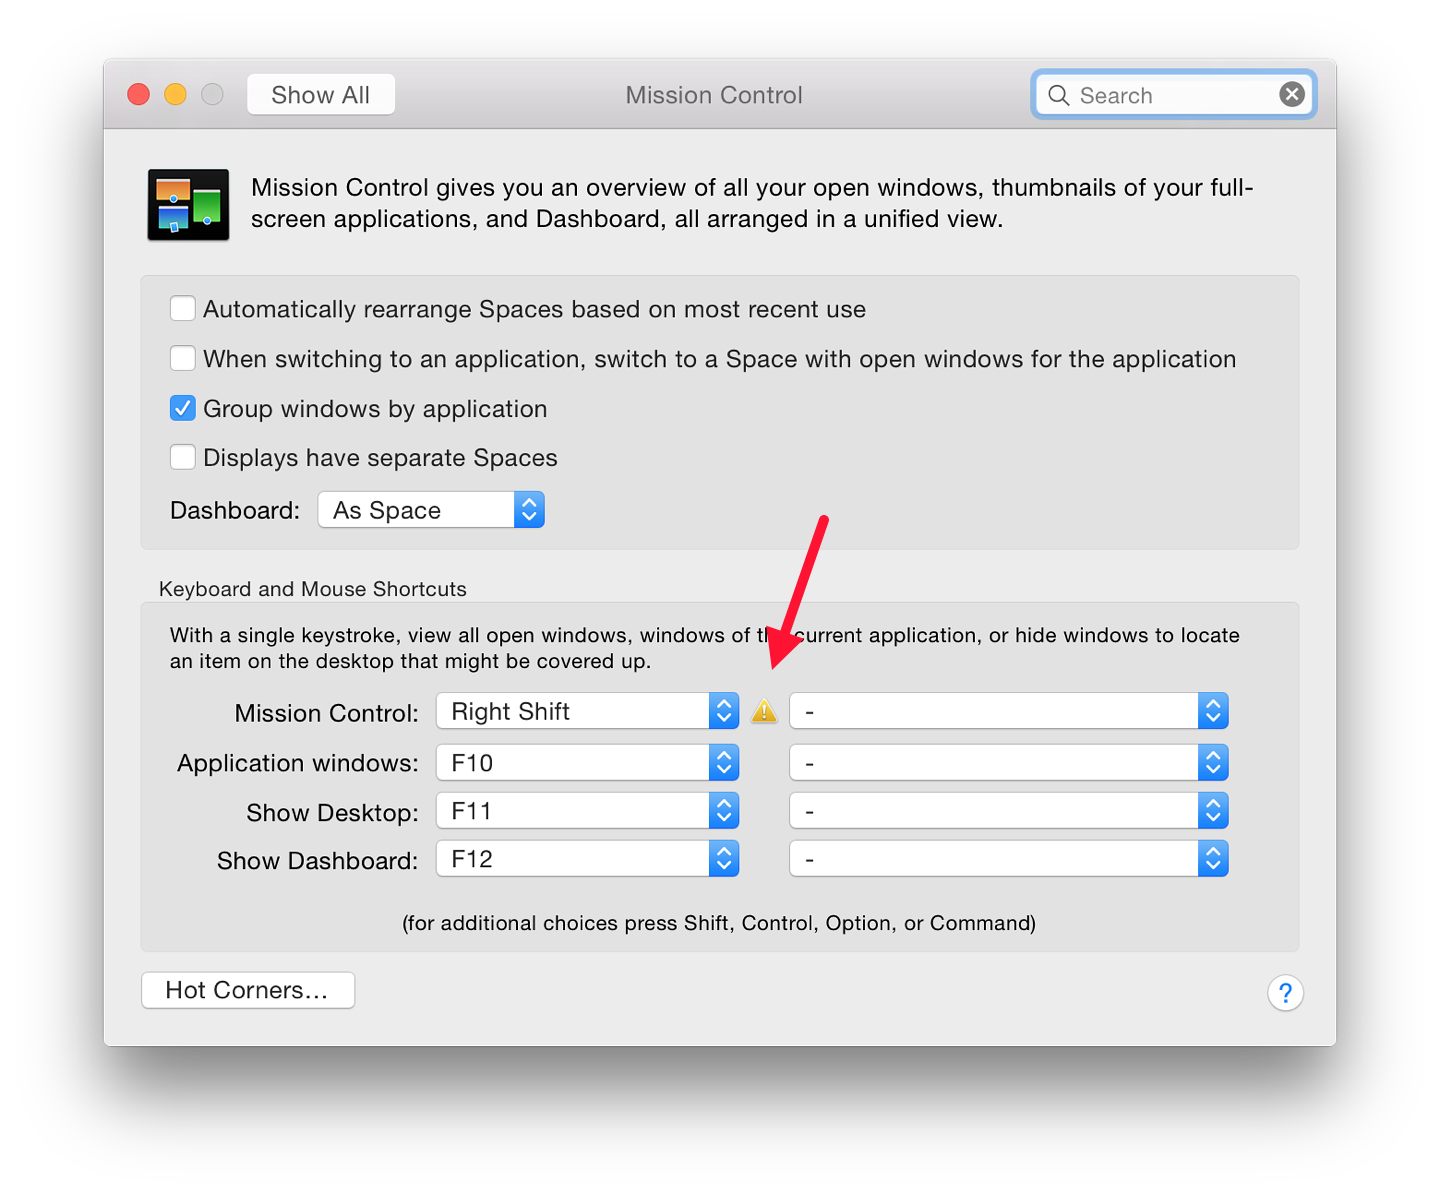
Buttons in the second column for using the mouse as a means of control are initially unallocated. A dash is shown. Users may choose to have one or more of the above features activated with a mouse click. On my installation I may choose only Secondary Mouse Button or Middle Mouse Button. Connecting a mouse with more buttons and controls did not make any further options available.
If any of the control keys (Shift, Control, Option, Command) is pressed - alone or in combination - these also appear in the menu. They are accepted (or removed) by clicking the mouse.

New Spaces can be added when Mission Control is being used - click the icon in the Dock - by moving the cursor towards the top right of the screen. A new, semi-transparent Space appears (using the desktop image from Space 1). By clicking in that new Space, it becomes active and is allocated a consecutive number (e.g. Desktop 7). This then also appears in Key Commands.
To remove a Space, slide the cursor towards the Space display when Mission Control is being used. An X will appear at the top left of the Space thumbnail. Clicking on this removes the Space.
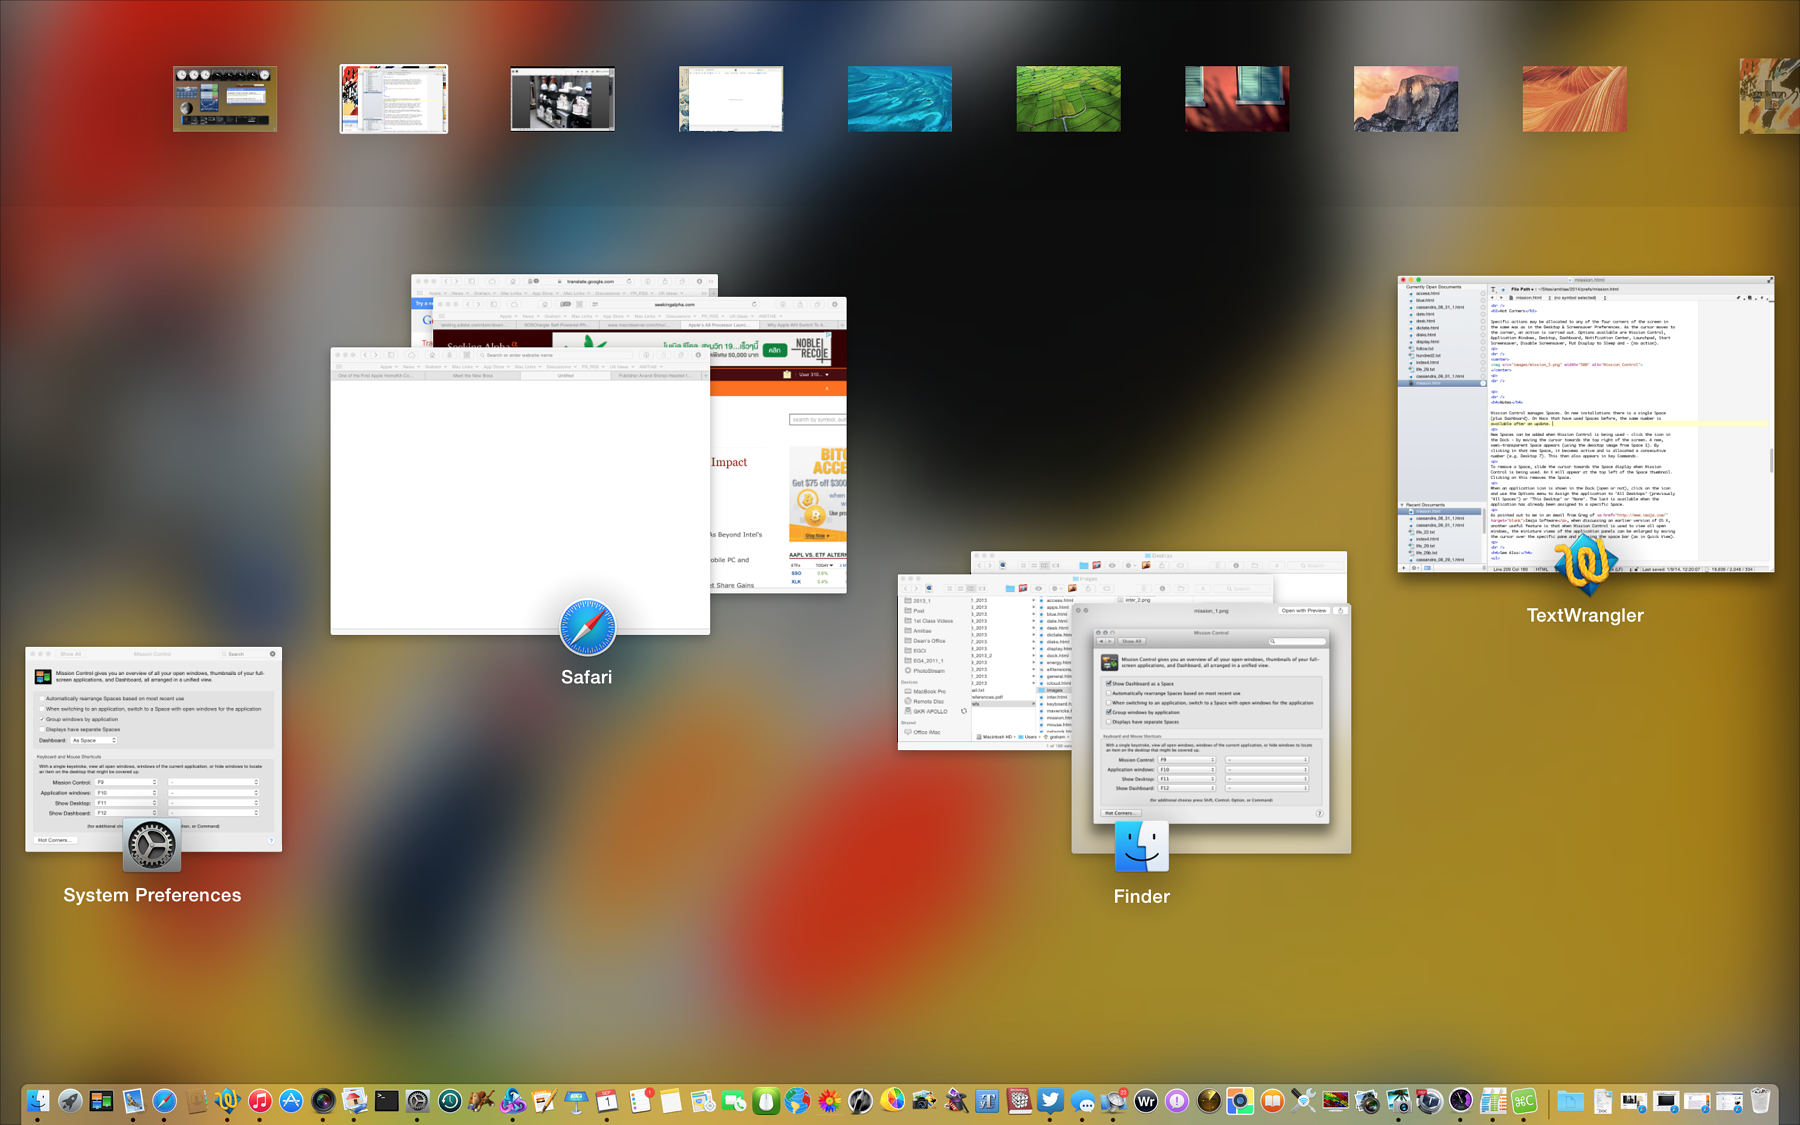
When an application icon is shown in the Dock (open or not), click on the icon and use the Options menu to Assign the application to "All Desktops" (previously "All Spaces") or "This Desktop" or "None" (default).
As pointed out to me in an email from Greg of Imaja Software, when discussing an earlier version of OS X, another useful feature is that when Mission Control is used to view all open windows, the miniature views of the application panels can be enlarged by moving the cursor over the specific pane and pressing the space bar (as in Quick View).
System Preferences in OS X 10.10, Yosemite: Mouse |
|
![]()
System Preferences in OS X has had some changes with the update to version 10.10, Mavericks. The Mouse preferences panel which has different displays depending on the type of mouse that is attached, has retained the same content as before although gestures for the Magic Mouse have been updated and of course the overall look of OS X panels has been revised.
Mouse preferences evolved in the last few releases of OS X from the earlier Keyboard & Mouse preferences. The preferences panel will change depending on the type of mouse connected. On the MacBook Pro which has an in-built trackpad, the Mouse panel opens with a generic image of a mouse displayed. A similar panel is seen when a new desktop Mac is started for the first time and it searches for a mouse (see below - Magic Mouse).
As before, a caption indicates that the system is searching for a Bluetooth mouse, or asks that a USB mouse be attached. Added text advice in the panel suggests that if the Bluetooth mouse does not appear, a user should check that it has batteries and is turned on.
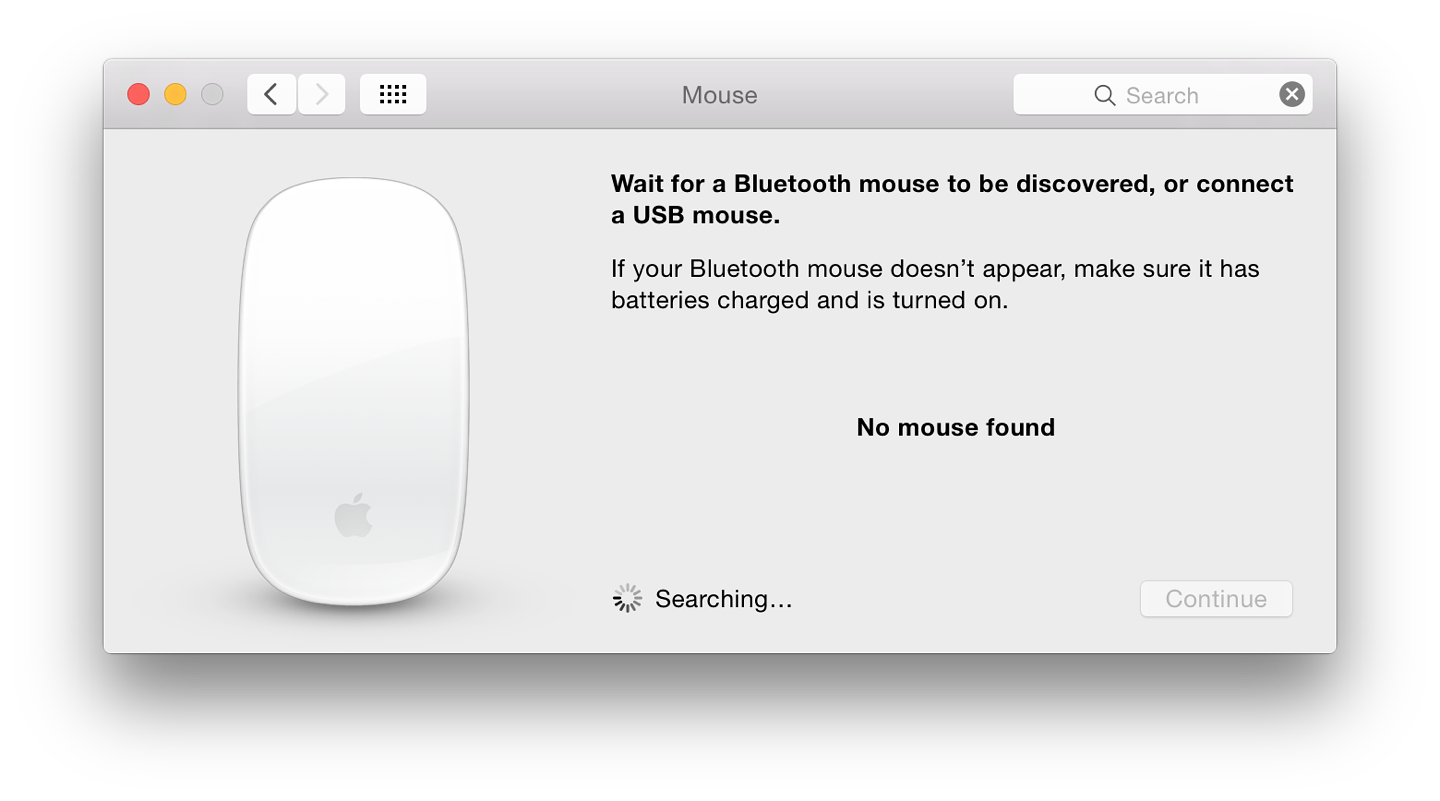
When the panel is open with no mouse connected, a gear-wheel spins near the bottom. Alongside is the word, "Searching. . . ." Displayed in bold in the center of the panel are the words, "No mouse found." When any mouse is connected to the computer, the panel changes. The new image and information display will depend on the type of mouse connected.
Two controls are available: sliders for Tracking speed and Double-Click speed. Below is a button for setting up a Bluetooth Mouse. This appears in every Mouse Preferences panel.
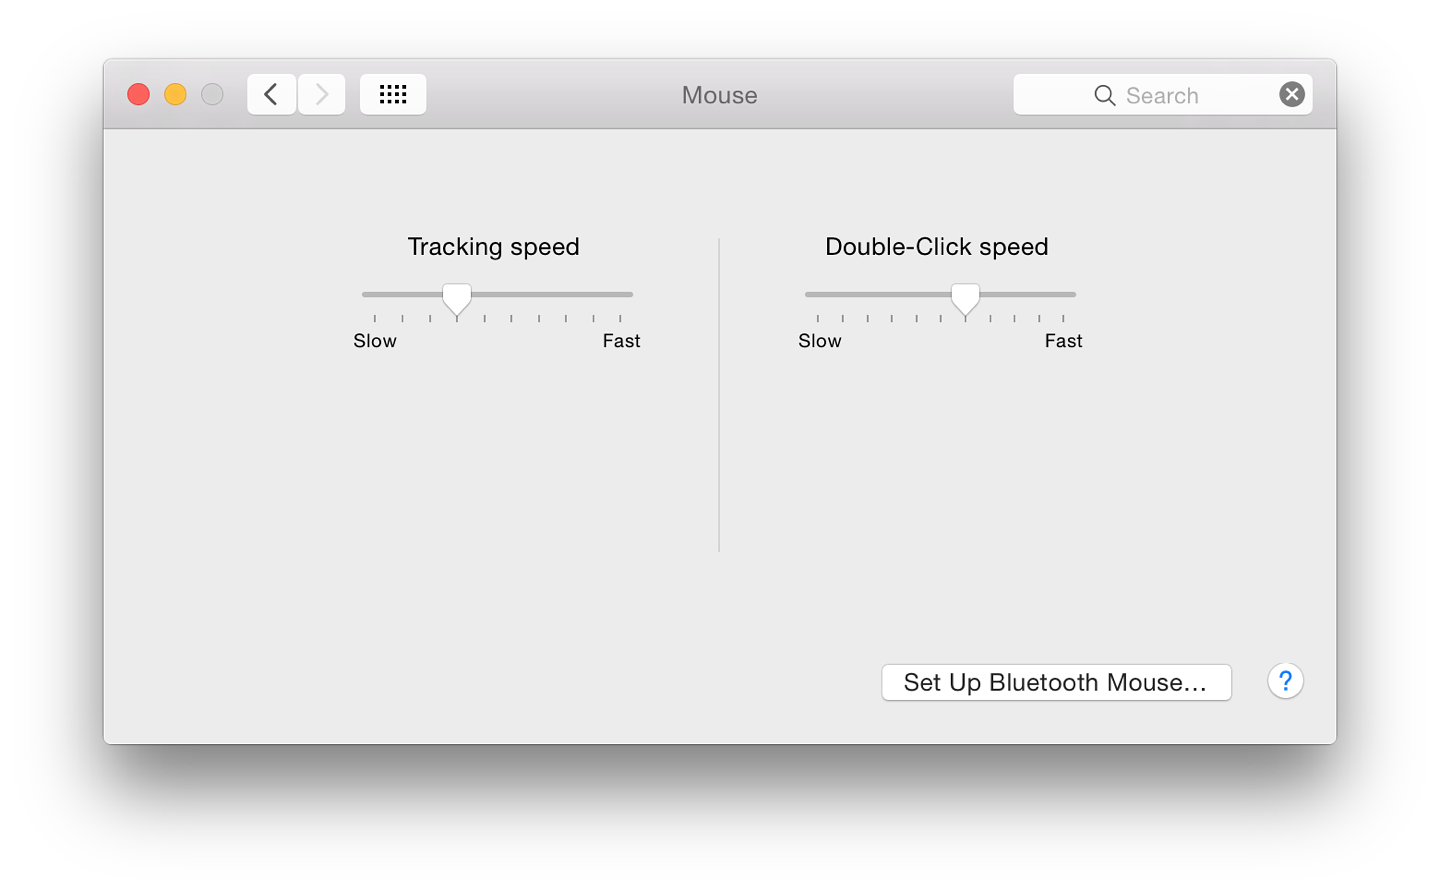
If users wish to use such a 3rd party mouse I suggest they try connecting it first before installing any additional driver software, which itself may cause conflicts initially (or later when the operating system is updated). I have tried several 3rd party (e.g. Logitech, Microsoft) and generic devices, none of which has needed a driver to be installed.
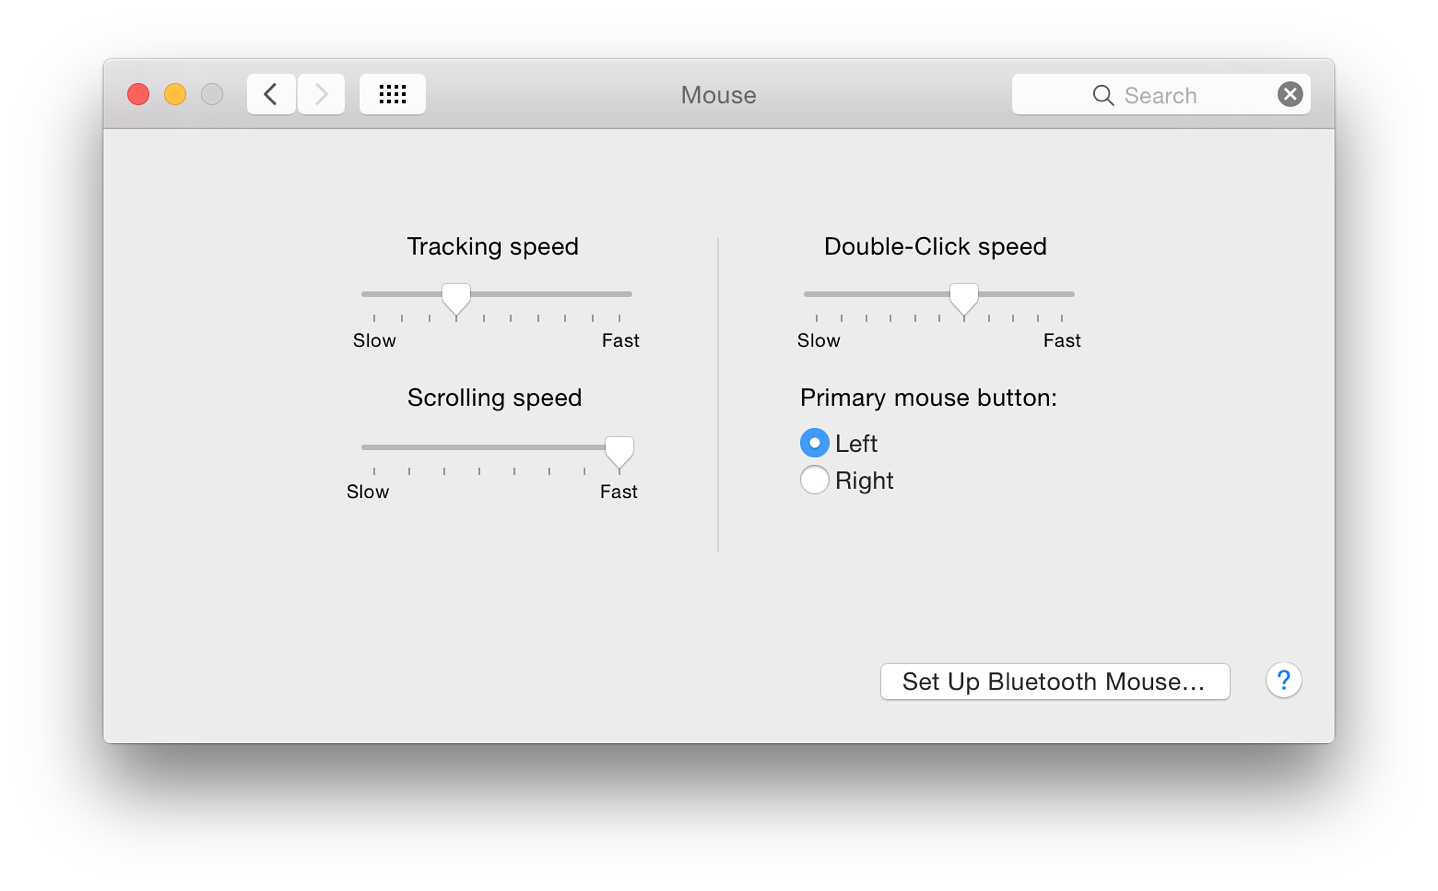
There are two sliders to the left of the panel for Tracking speed and Scrolling speed (Slow - Fast), while on the right of the panel is a single slider for Double-click speed.
Below the Double-click speed slider are radio buttons for selection of the Primary mouse button. Some prefer this to be the Left click, while others prefer the Right click. As with the single-button mouse, additional features are available by pressing the Control key before the mouse click.
The ability to zoom using the scroll wheel (and a specified key - e.g. Control) as an option is not available using this panel. As with the trackpad, this is turned on in Accessibility preferences (Vision - Zoom).
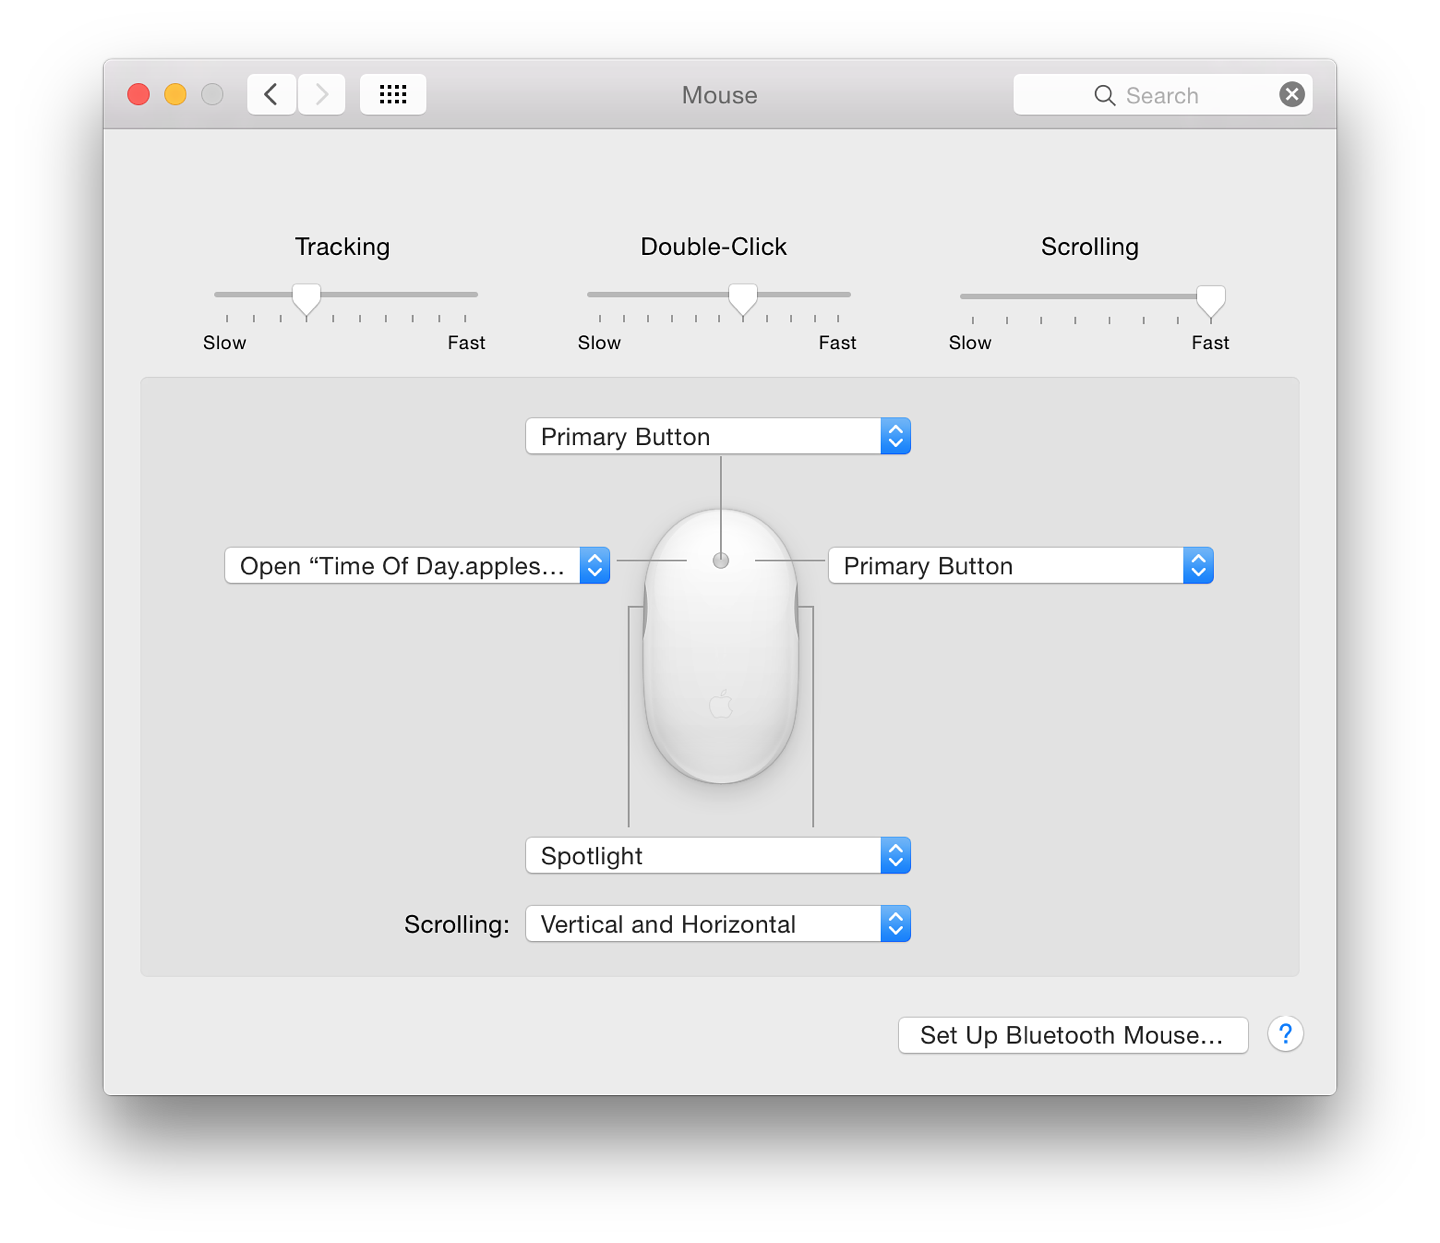
There are buttons both sides of the waist section of the mouse. When pressed - the action is like squeezing - this behaves like one button. This does not have Primary or Secondary button options, but the other selections (such as Mission Control) are available plus Other, Button 4 and Off.
Good afternoon how are you todayIt's looking to the InternationaleHow are you today to the international of the Internet stop
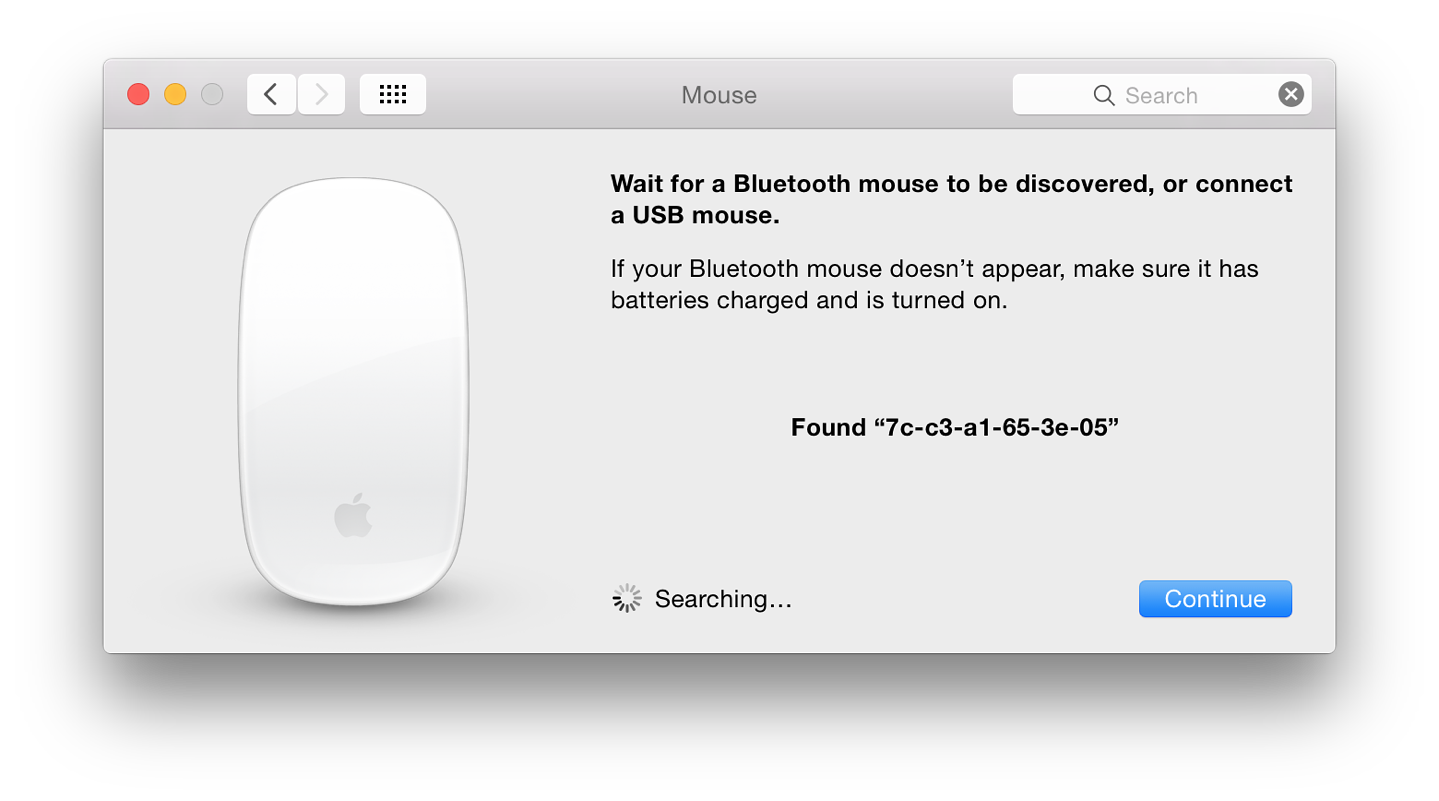
A panel appears with a display that shows mouse functions and options for gestures. The pane is in two parts: Point & Click; and More gestures.
Point and Click has three checkboxes to the left of the panel for options:
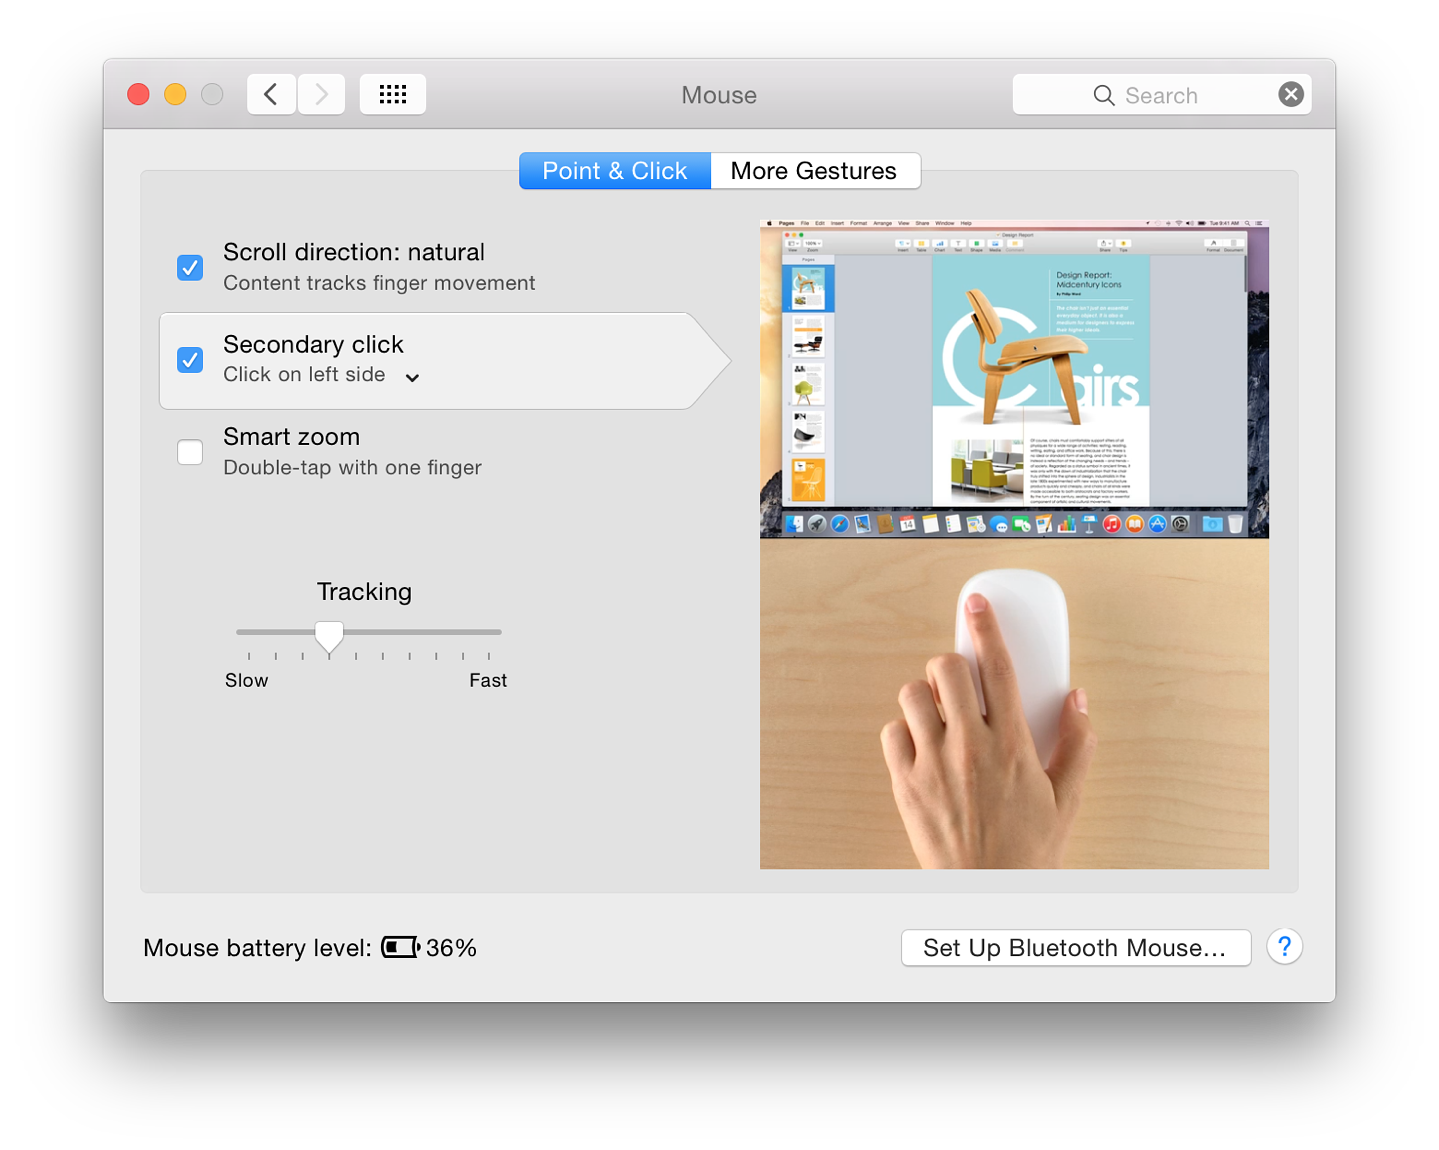
More Gestures has three checkbox options:
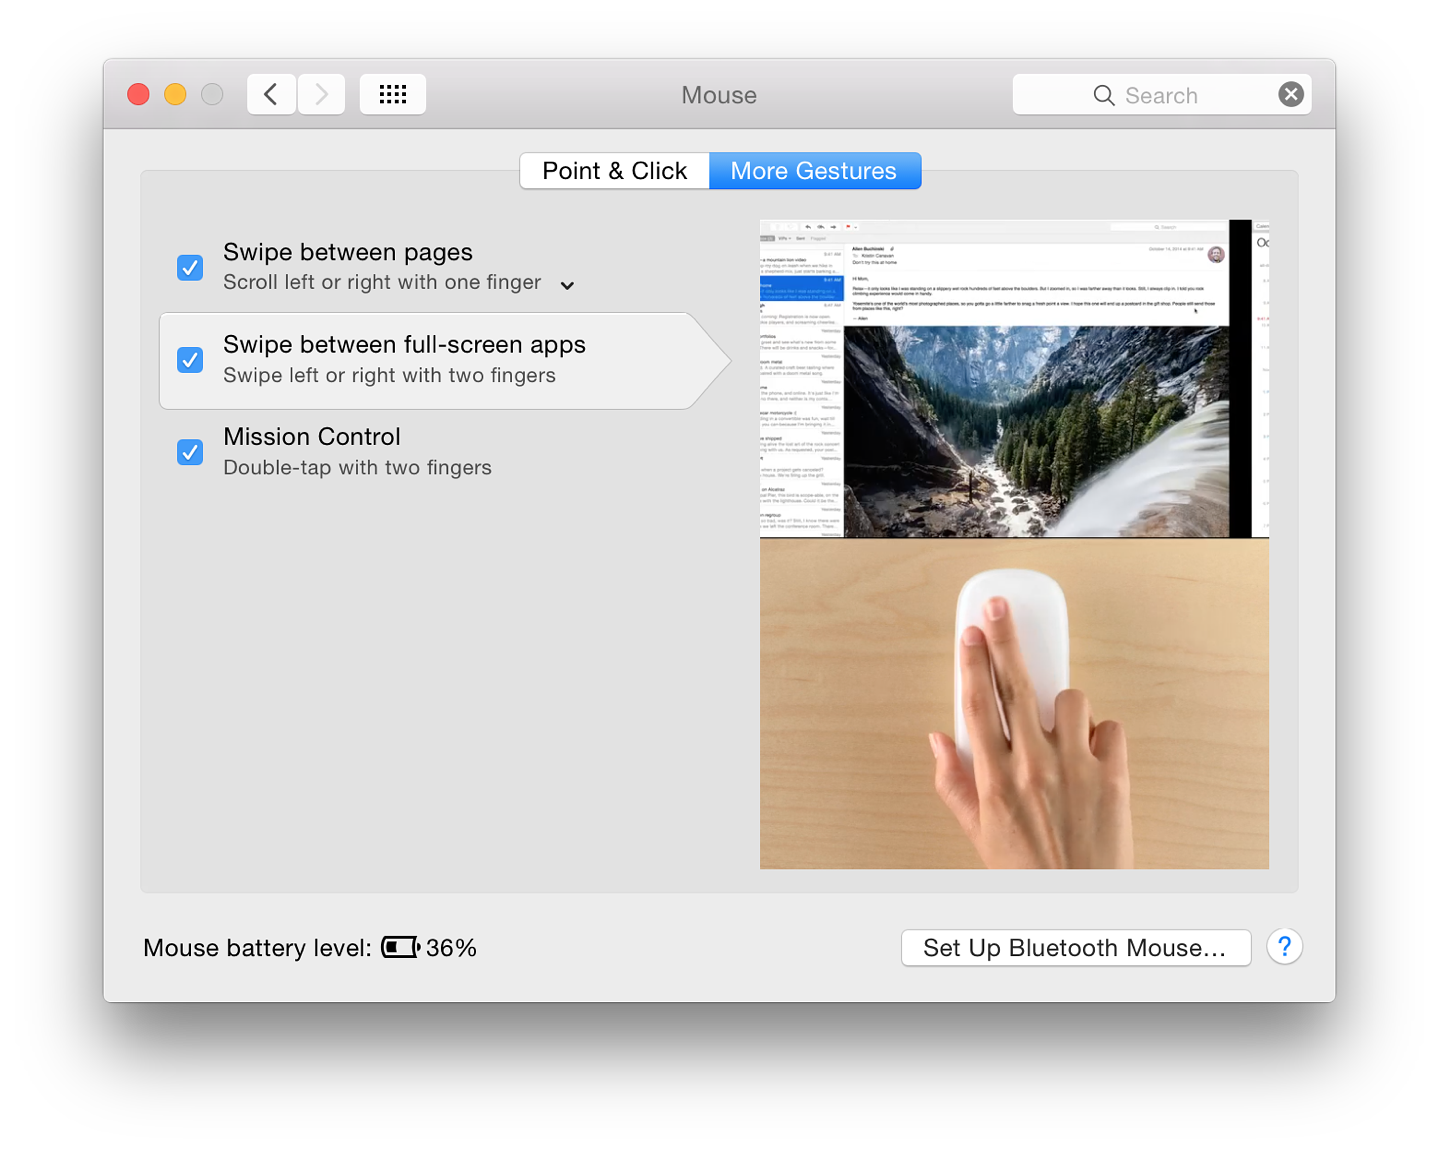
At the bottom of both panes there is a display to indicate the power remaining in the batteries of the mouse. If this is low the figure displayed changes to red. A user will need to change the AA batteries.
A button at bottom left, like on other panels, is available to set up a Bluetooth mouse. This brings up a small panel in which any nearby units are identified and may be selected.
System Preferences in OS X 10.10, Yosemite: Network |
|
![]()
Changes to System Preferences in OS X 10.10, Yosemite have mainly been cosmetic. Although underlying technologies have been updated, the user will still have many familiarities in panels. Network preferences provides ways to set up and control the way links to wifi and other connection types are made. The panel has been changed slightly in terms of connection types. As there is potential for problems, care should be taken when making changes.
As with the other system preferences I have written on (and those to come), I have examined the panels and their actions on my own Macs: a late 2013 13" MacBook Pro with Retina display and a 2010 iMac. The information here is based on what I observed with those machines. There may be slight differences for other devices, but in general most of the points here will apply.
The Network preference panel displays three sections when opened: a button to change Location; connections for a particular Location; and details of connections. Changes made in any account (needing Admin password) are applied in all user accounts on a computer.
With Macs and OS X, the default location is "Automatic", but those who use a computer in a number of places - home, office, hotels - may want to add specific settings for each. This is strongly suggested. Settings change depending on the connection being used and there is no one-size-fits-all.
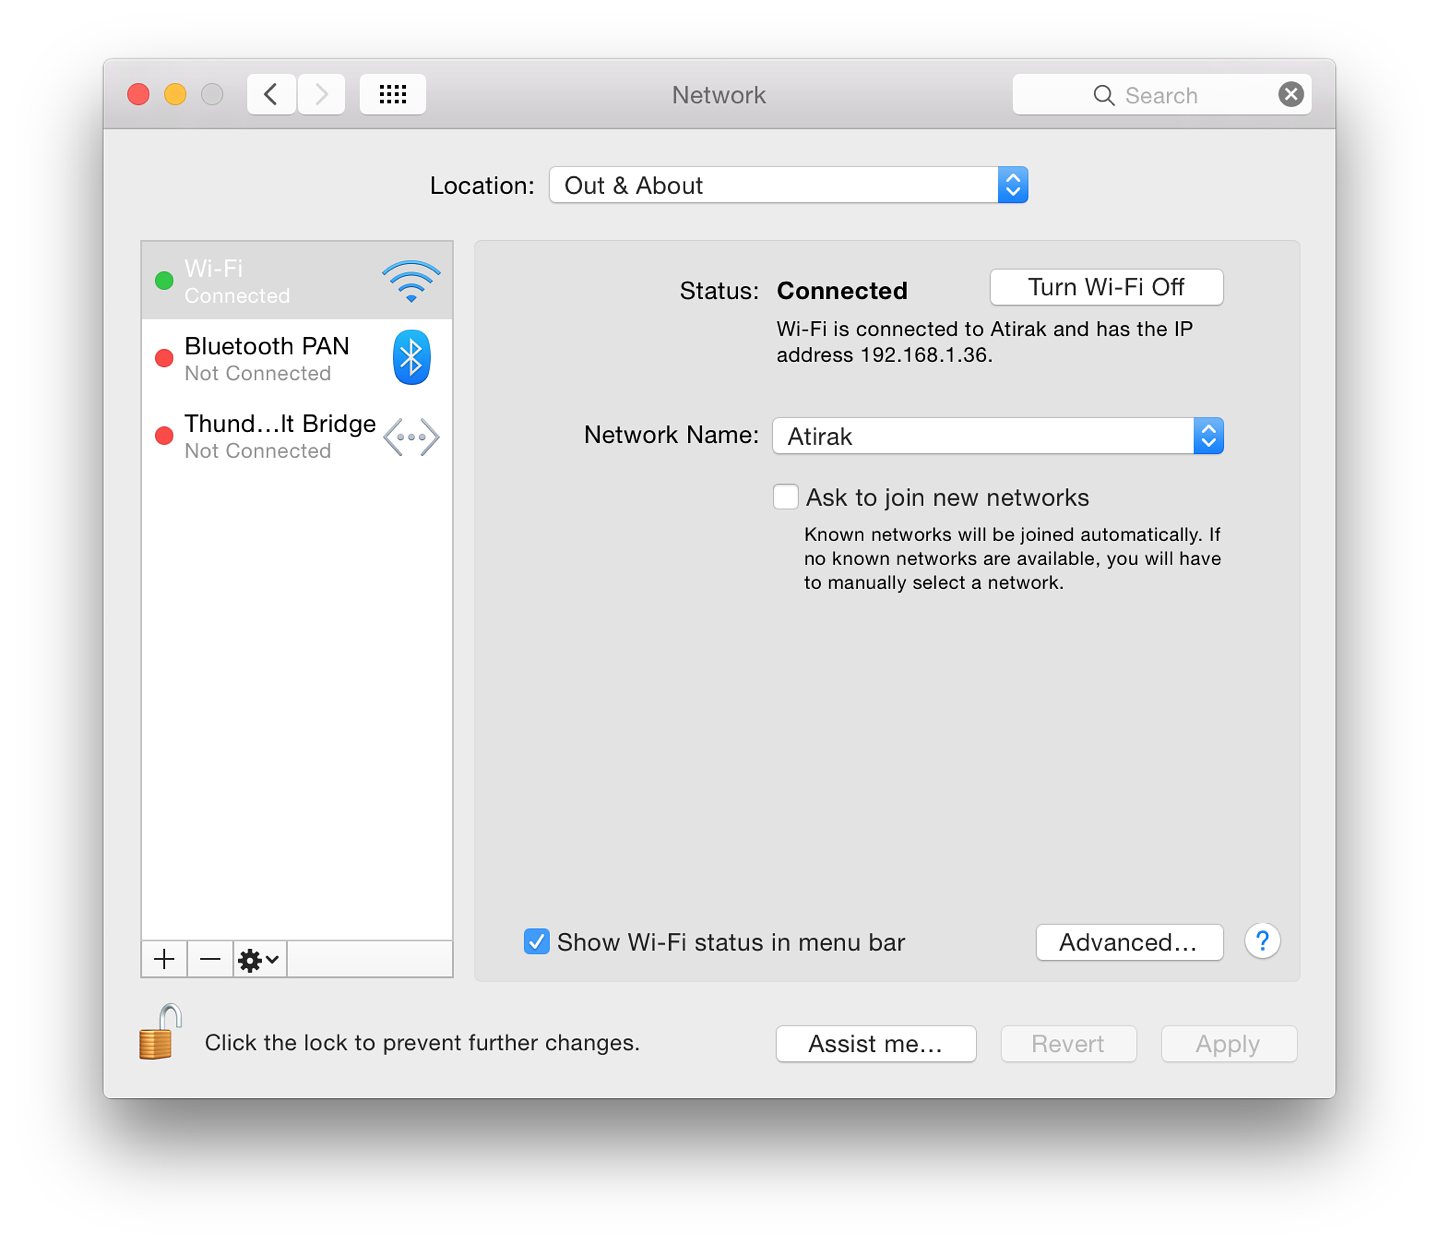
The Location button at the top of the Network preferences panel has the locations list plus "Edit Locations". That section allows users to remove, rename or duplicate a location set or to add a new Location. This is especially useful, for example, for those who use home and work connections. These will require different settings, particularly with proxy settings at a place of work. It is easier to change the location than enter new settings each time.
Once created, the new location is activated either by using the Location button or (more easily) by an item in the Apple menu (top left of the menu bar). Once these are added, that menu shows locations, plus a link to Network Preferences.
Each connection type has a colored "light" alongside: either red (off), green (connected) or yellow (on but not connected). We see the yellow when WiFi is turned on but not linked to a system, for example; or if an Ethernet cable is connected but the router has not allocated an IP number. The yellow light will also appear when the Location has just been changed and the wifi is trying to connect.
The bottom of the panel has three small icons: + (Add), - (Remove) and a gear-wheel for changes to be made. When any changes are made to this or any other setting, the "Apply" button on the main Network Preferences panel becomes active and must be pressed before changes take effect.
The + icon allows a user to create (and name) a new service. A text box is available for a service name. Service option types have been updated and are now Thunderbolt Bridge, Thunderbolt 2, Thunderbolt 1, Bluetooth PAN, Wifi, Thunderbolt Firewire, Bluetooth DUN (Dial-up networking). The specific options will depend on the hardware. Some older computers may also show Firewire and Ethernet.
Below a dividing line in the Service types panel are three other types VPN (virtual private network), PPPoE (Point to point protocol over Ethernet) and 6 to 4 - a transition method for migrating from IPv4 to IPv6. It is advisable to check with the service provider or a system administrator if users are unsure of which method to use.
For information on Thunderbolt, the article by Iljitsch van Beijnum in Ars Technica will provide some useful general information, even though it was written for users of OS X, 10.9, Mavericks.
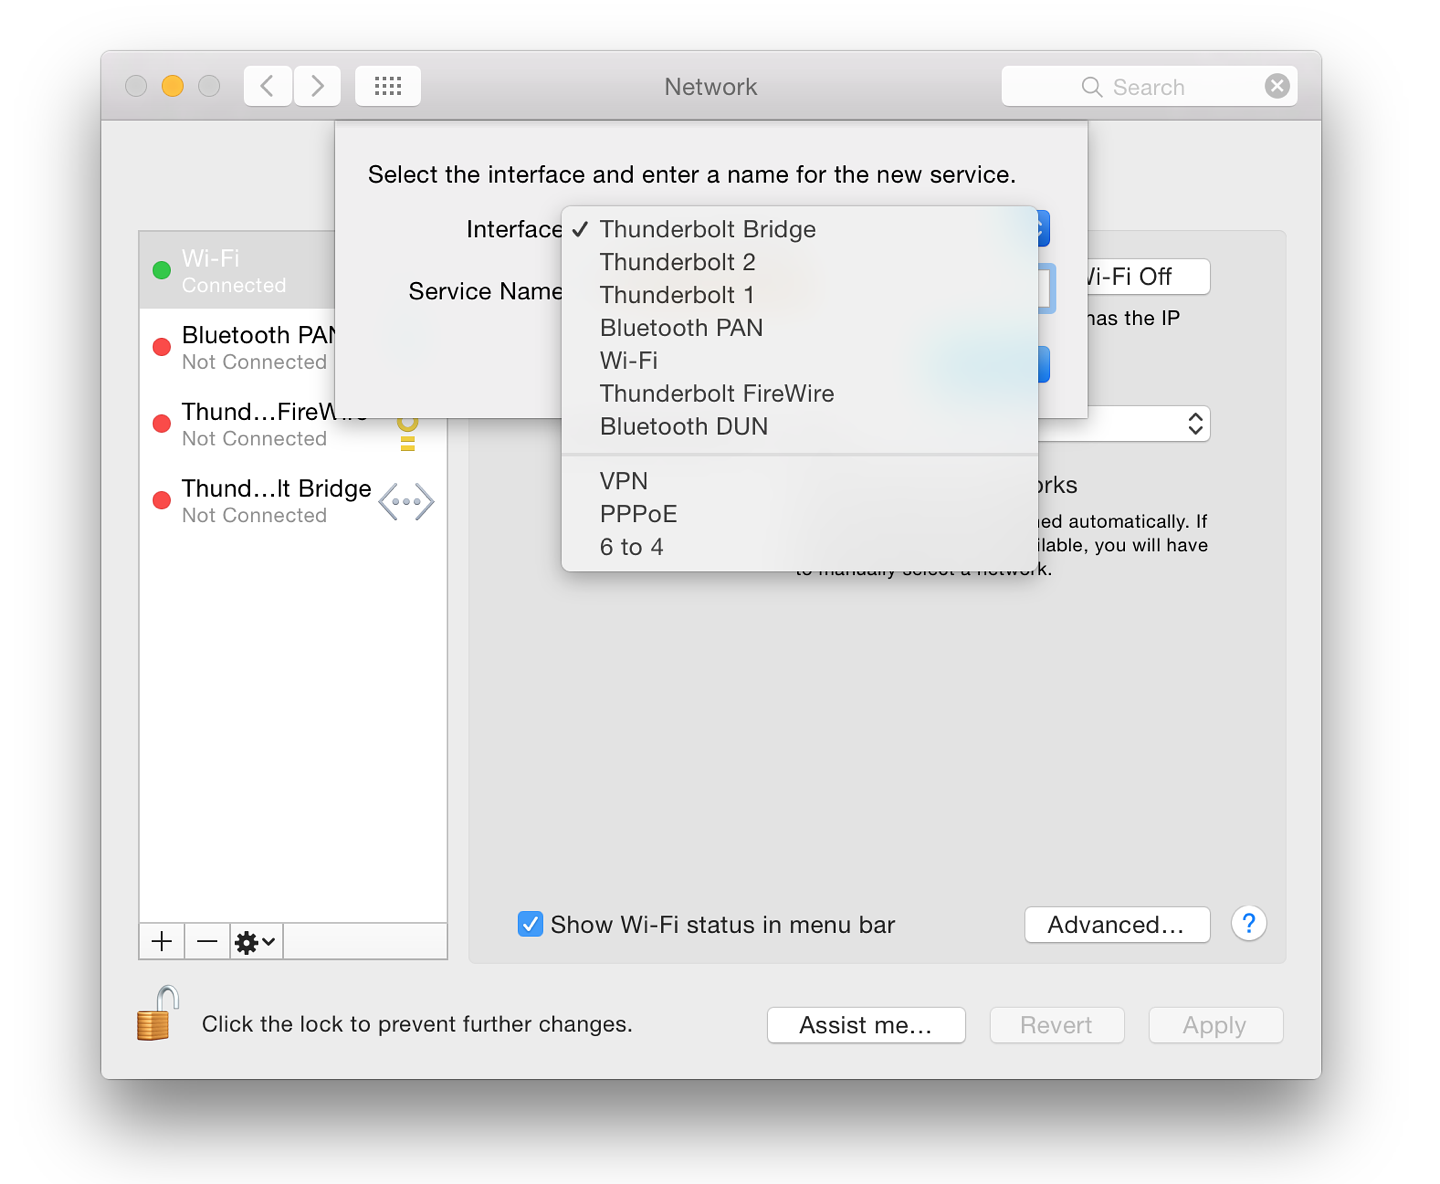
Once a connection method is selected, a name is typed in the box below and the Create button pressed. There is also a button marked Cancel.
The - icon will remove a highlighted service: immediately and with no warning (Admin password is not needed). Fortunately, the Revert button beneath the main panel will restore the setting.
The gearwheel icon has several useful functions:
As with other significant changes to the system, it is unwise to tamper with Network settings if you are not sure.
A short description of the service is below and displays the method of configuration (which can be changed) and basic details of the connection, such as IP numbers.
To the right of the WiFi Status display is a button marked Turn Wi-Fi Off (or Turn Wi-Fi On). In versions of OS X before 10.8 this used the proprietary term, "Airport". Apple now refers to Wi-Fi.
With the Wi-Fi connection, a button shows the Network Name. A menu revealed by the button shows a menu with a list of detected Wi-Fi networks. At the bottom are: "Join Other Network".
The "Create Network," option for a computer-to-computer link (sometimes referred to as an ad hoc network) is no longer available, but this feature can be accessed using the Wi-Fi menu in the menu bar, where at times a pre-configured iPhone network can be seen .
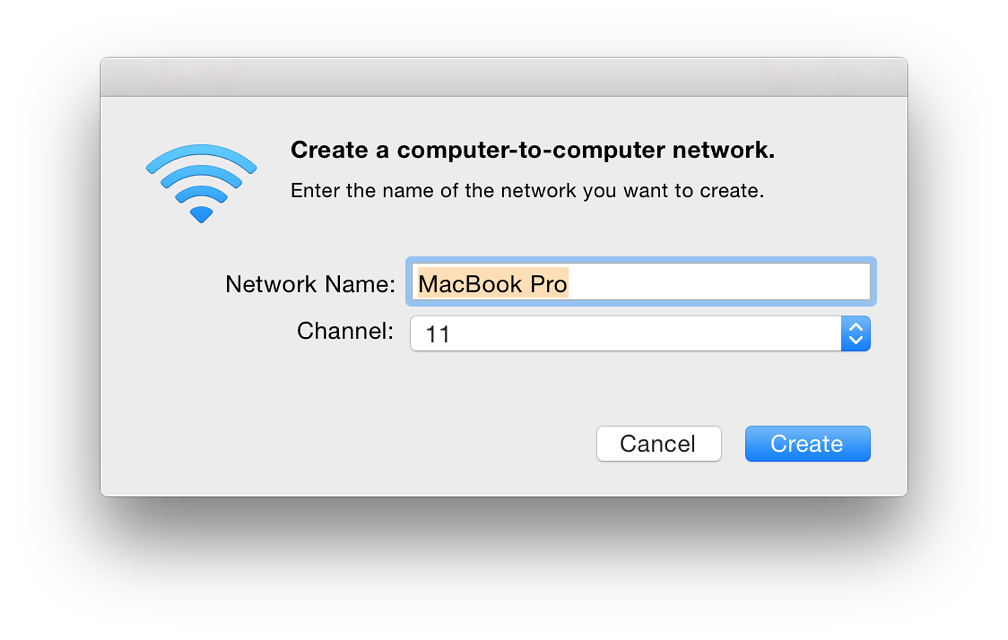
|
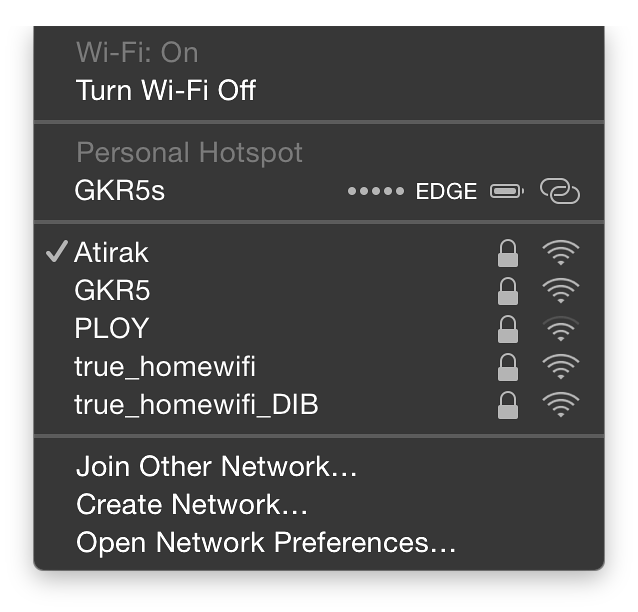
|
What is displayed below in the main panel will depend on the type of service highlighted (not necessarily the one in use).
A checkbox offers a user the option to be informed when connecting to a new network. If checked, known networks will be joined automatically otherwise a user will be asked.
Near the bottom of the panel is a checkbox that allows Wi-Fi status to be displayed in the menu bar. This gives quick access to a list of available networks as well as providing other menu items: Turn Wi-Fi Off, Join Other Network, Create Network, and Open Network Preferences.
To the right of the checkbox is a button marked, "Advanced."
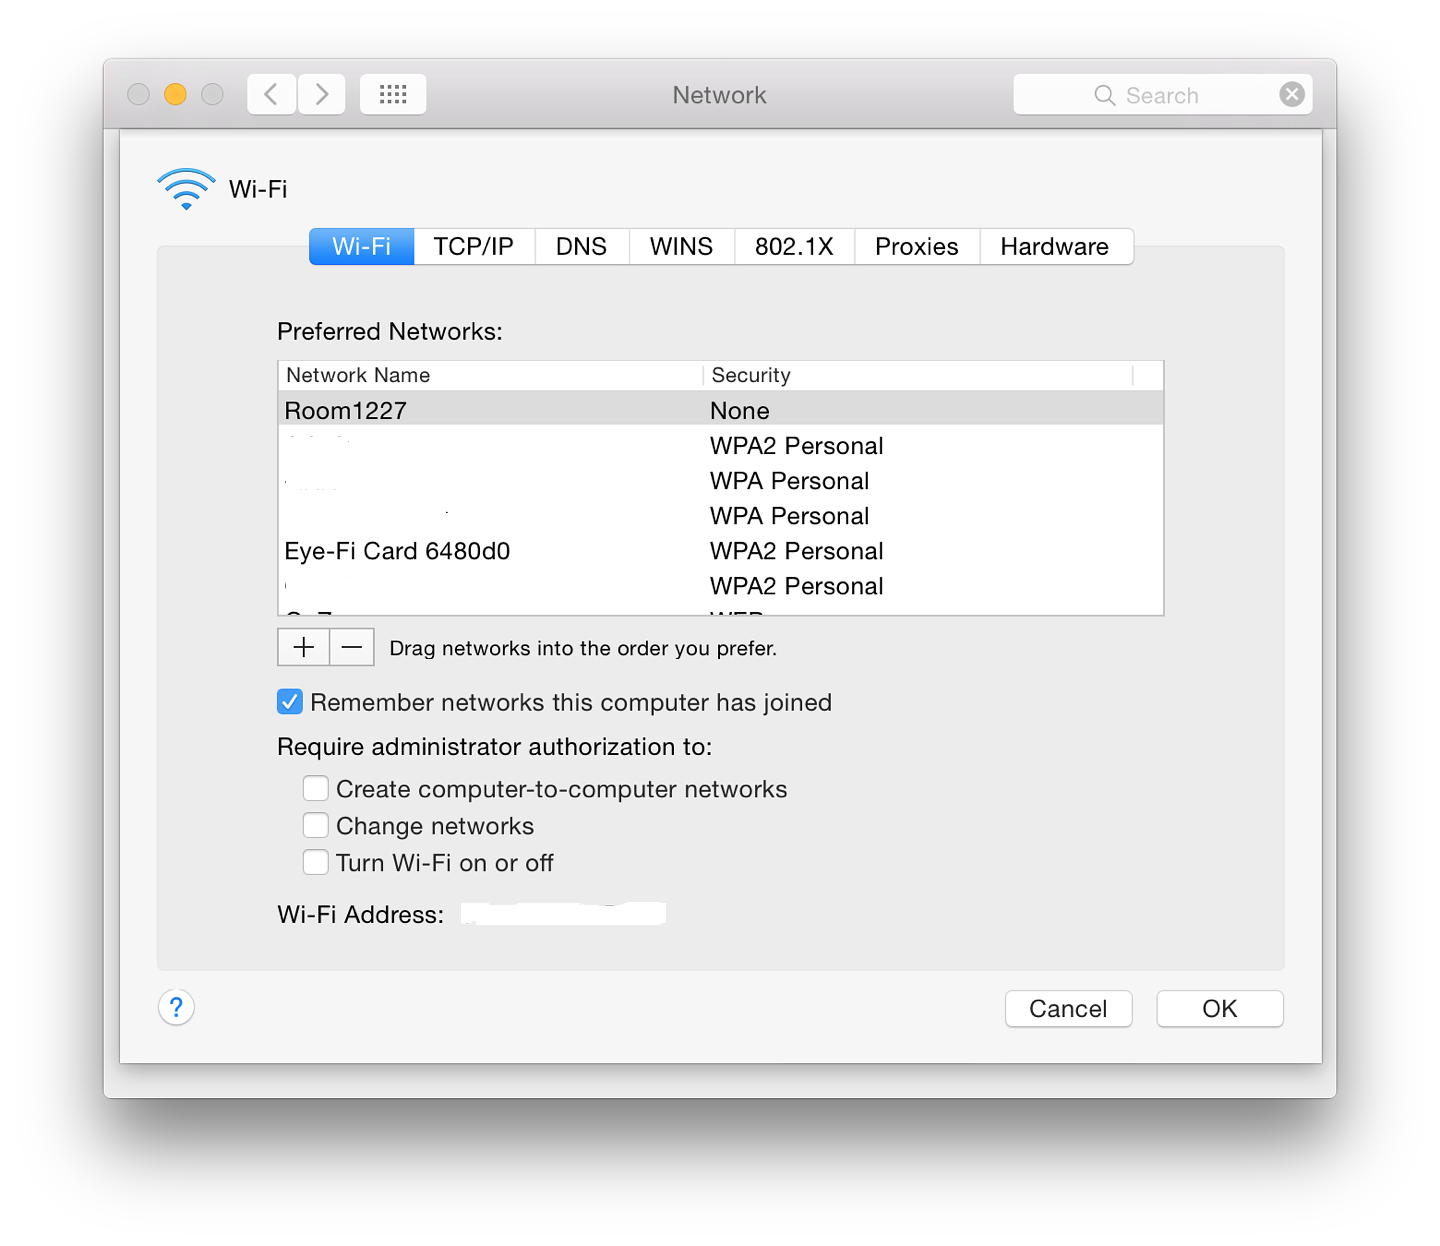
The Wi-Fi pane displays a list of preferred networks or networks that the computer has connected to. As users connect to different Wi-Fi routers (at hotels for example) or other places where the internet is accessed, the list will grow.
If the user's home network is not at the top (click and drag), the system will search through all others before making a connection. This will take time and may delay (or prevent) proper access. When writing this item, I found connections for my previous iPhone as well as several connections I had used in Malaysia months ago. I also needed to change the order of connections for greater efficiency. There are + and - icons below the list to add or remove networks. It is useful (particularly for those who travel) to cull the list occasionally.
A checkbox below, "Remember networks this computer has joined", is useful in that a speedier connection may be created when using a regular link, but (see above) there is a negative side to this. A series of checkboxes below will make it necessary to have Administrator authorization to:
This may be useful when inexperienced users have access to an account.
At the bottom of this panel is a display of the Wi-Fi Address (also called the MAC number - see Hardware, below). A button marked OK accepts any changes. There is also a Cancel button.
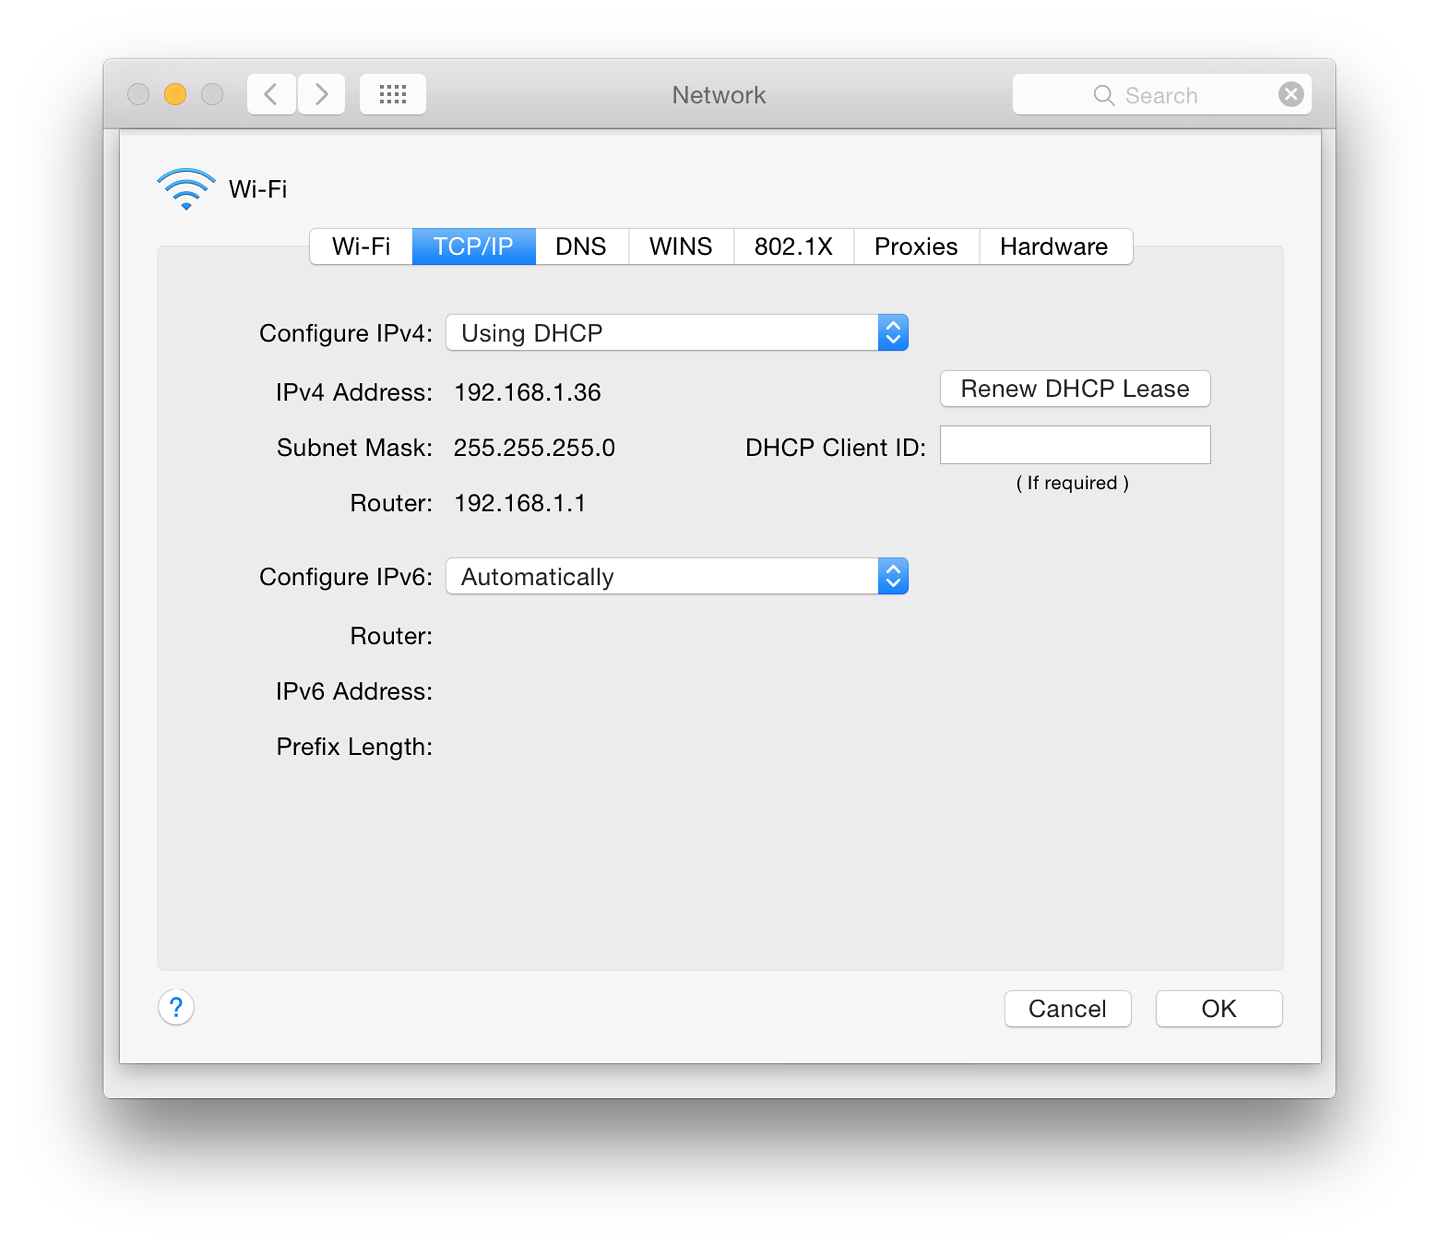
This now indicates either IPv4 or IPv6 addresses may be entered. The service provider should have settings available for users. There are other numbers that may be suggested, including OpenDNS. If there are difficulties connecting to some sites, consider changing or adding DNS numbers.
Depending on the carrier, some DNS numbers may be more or less effective. In the DNS pane, the left panel lists any DNS server numbers entered. The right panel is for search domains that a user wishes to include. Clicking the + icon reveals a text box in which either an IP number or a domain name may be entered. These are servers on the internet that direct DNS searches (not Google searches).
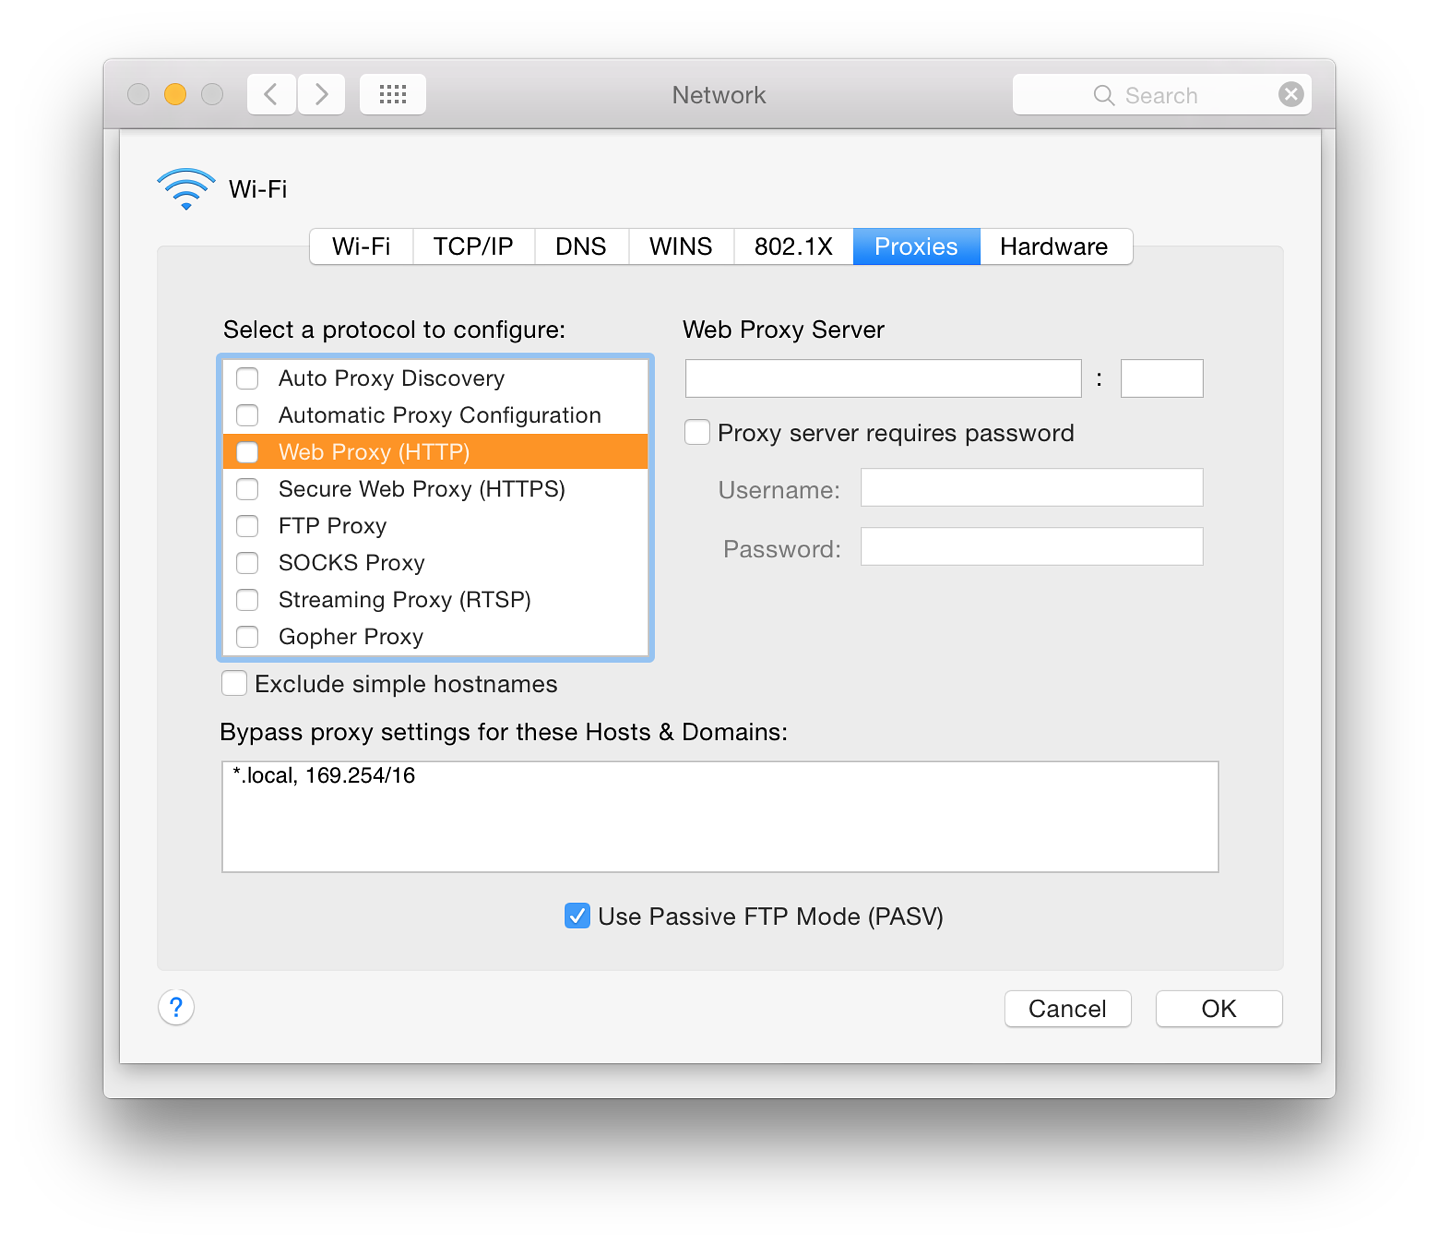
Some settings will require authorization to ensure that the connection is being made by a user with a legitimate reason to access via the service. Highlighting (or checking) items in the list reveals text boxes to the right in which a user may enter relevant information. Details may include a URL and a specific port number (like 8080). Items available are:
A checkbox is also available should a service provider require password authentication for specific services and when checked these details may be entered in the boxes provided.
A checkbox at the bottom of the panel for Passive mode FTP connections is used to determine how connections are established. Depending on the FTP application (if used) this box would normally be checked.
The usual health warning applies here.
When settings in the Advanced panel are changed users should click OK to accept and return to the main panel. To have the changes take effect we also then press the Apply button at the bottom of the main panel. Two other buttons are available, Revert, and Assist Me. Revert (as this implies) should remove the last change.
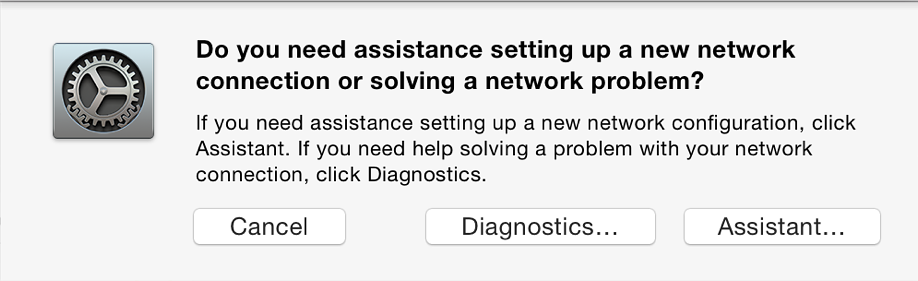
System Preferences in OS X 10.10, Yosemite: Notifications |
|
![]()
System Preferences in OS X has had a number of changes with the update to version 10.10, Yosemite. Notifications has had a number of revisions. It displays incoming information in a similar way to Notifications on iOS devices. As with other preferences, the services that use this feature have been expanded in this release and include many more links to applications from 3rd party developers.
The purpose of Notifications - originally introduced with the iOS 5 update - is to provide a user with onscreen input of incoming information without interruption to ongoing tasks or when the display is off. There are however several differences to the way this works on Macs. As with iOS, the Notifications display is in two parts: Today, and Notifications.
The items displayed in the Today section are controlled in the relevant section in the Extensions Preferences panel.
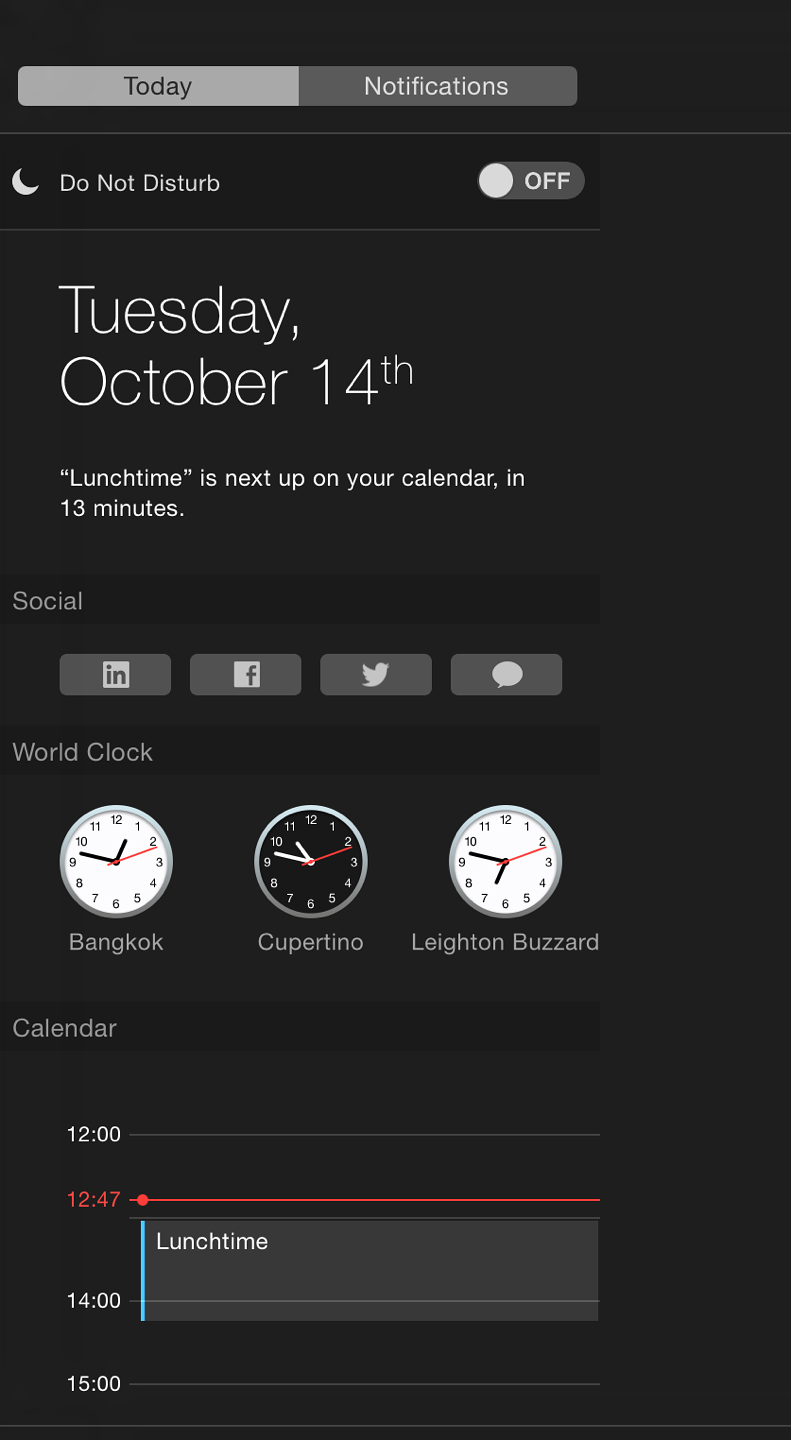
|

|
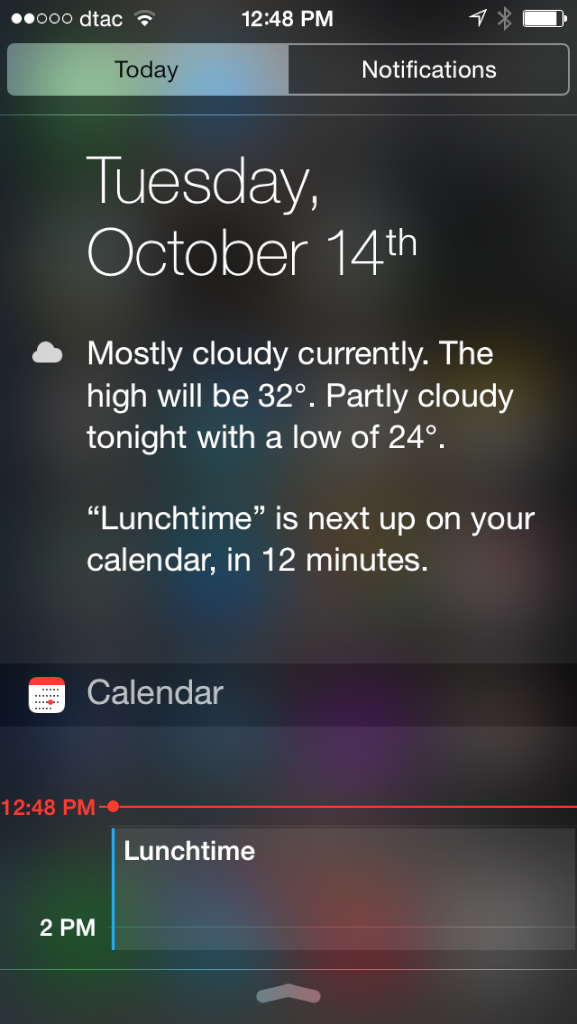
|
Instead of the semi-transparent full-screen display (iPhone) or a large panel (iPad) the notifications panel is a thin screen display to the right of the monitor that slides away when not in use. It is opened and closed by clicking on the 3-line icon at the extreme right of the menu bar. It may also be opened with a gesture (2 fingers, leftwards from right side of the trackpad) when this is turned on in Trackpad Preferences.
The Notifications preferences panel is in three parts: a text explanation at the top, with information displays below. To the left is a list of apps or services that use the Notification Center; to the right are controls for the specific apps. These will differ depending on the app highlighted in the left-hand column.
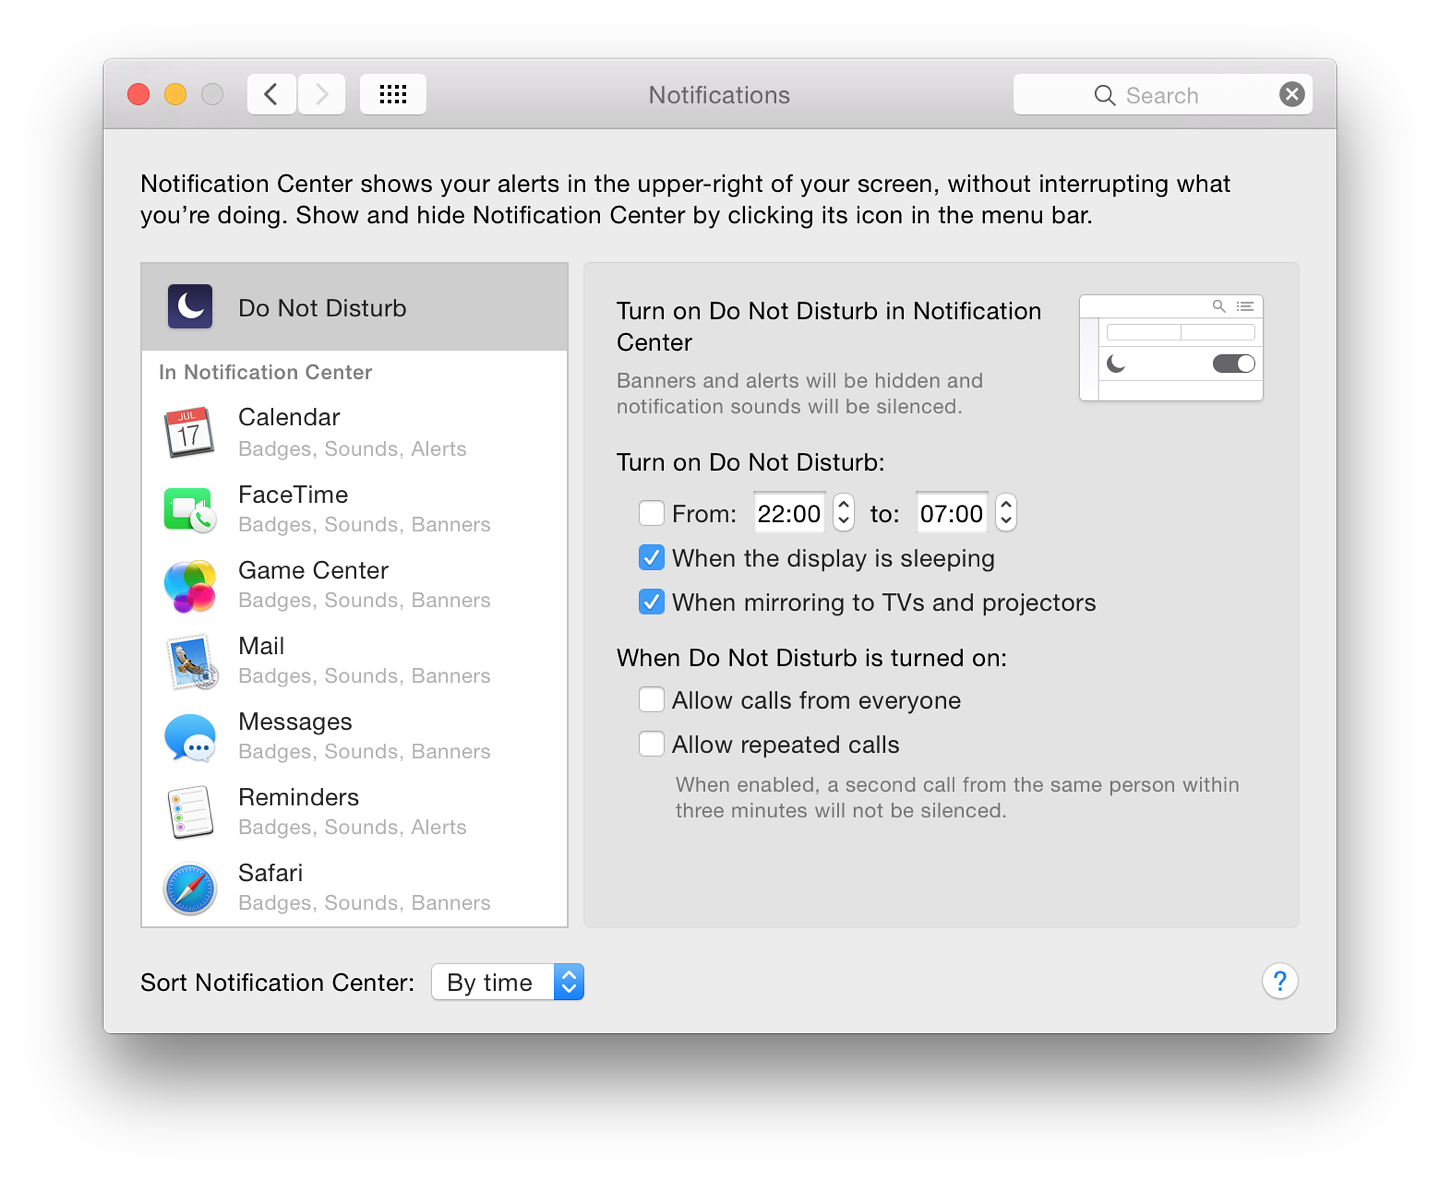
When first used, the apps listed to the left were Apple only items, such as Calendar, FaceTime and Mail. These were in a section marked, "In Notification Center." Above the apps is Do Not Disturb.
Do Not Disturb may be turned on by scrolling down in the Notification Center. There is an On/Off button. In System preferences, specific times may be selected, for example to allow for when the user is asleep. Checkbox allow the feature to be activated when the display is asleep or when using a projector or connecting to a TV. That would prevent private messages being flashed on a screen when making a presentation, for example.
Two additional checkboxes in the preferences panel control
[Note that with iOS 8 and Yosemite, calls arriving on an iPhone will also be announced (and can be taken) on a Mac.]
The number of apps now available in the Notifications Center has been expanded considerably. As apps or services become available for the Notifications Center - through download or update, for example - they are automatically added to the list.
At the bottom of the list is a further section, "Not in Notification Center." If any apps listed are deactivated - deselecting the "Show in Notifications Center" checkbox - they move from the top section to this inactive area. They are returned to the active area by checking the box again.
Items in the list in System Preferences are displayed in the same top to bottom order in the Notifications panel when viewed. Items may be clicked and dragged into the preferred order in the preferences panel. Changes are immediate
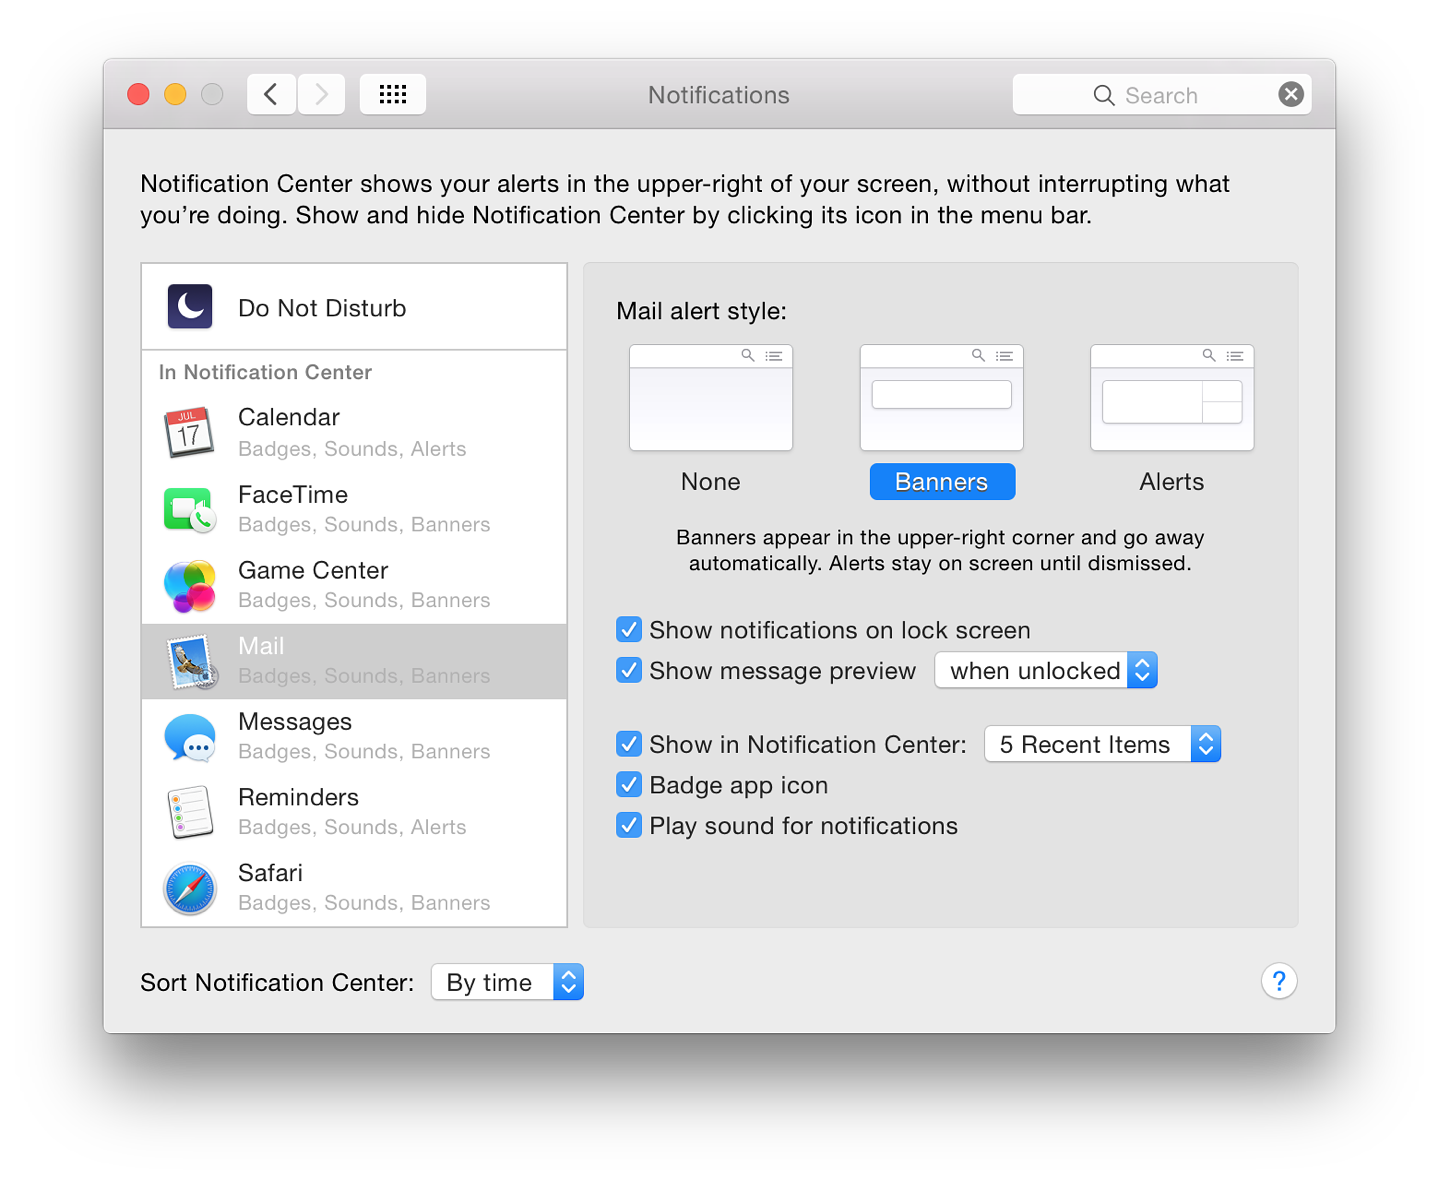
Each item in the list has settings which offer options as to how the incoming data is displayed. To the top of this options panel is the alert style: None, Banners or Alerts. Text below explains that Banners appear in the upper-right corner and go away automatically. Alerts stay on screen until dismissed. Each app will have its own specific settings using checkboxes and buttons.
The banner is thin and contains the basic information. Alerts are broader and have two buttons (e.g. "Delete" and "Reply" for Mail). The system voice can also announce the arrival of such notifications.
At the bottom half of the panel are up to five checkboxes (see comment below):
Some of the applications listed may not show all of these checkboxes when highlighted.
At the bottom of the panel is a button which allows sorting of the Notification Center by time or manually.
System Preferences in OS X 10.10, Yosemite: Parental Controls |
|
![]()
Some changes to System Preferences in OS X 10.10, Yosemite, have been subtle, while other preferences have seen major changes. The preferences pane for Parental Control has been changed slightly and there is a new icon. The panel provides settings to allow parents and others in control of younger users to limit what can be done, and when.
Parental Controls is an important section that has a number of uses over and above allowing mothers and fathers to apply any protections they see fit. It may also be used in a school or even an office environment to restrict access to applications and to internet use, so has a wider value. Research suggests that limiting the number of hours each day a young person can access a computer is beneficial (Shields and Behrman, Princeton).
The abilities to limit user access in earlier versions of OS X, were beefed up considerably with the arrival of Parental Controls in OS X, 10.4, Tiger. There has been some refining since then.
As well as the ability to prevent use of certain applications now, the limits that may be set to URLs include both specifics and types of sites (including online multiplayer games); email access (sending and receiving) can also be controlled. Logs of activities can be monitored. There is also the ability to limit the number of hours that an account is used, including beginning and end times. This may help families with those addicted to playing games non-stop.
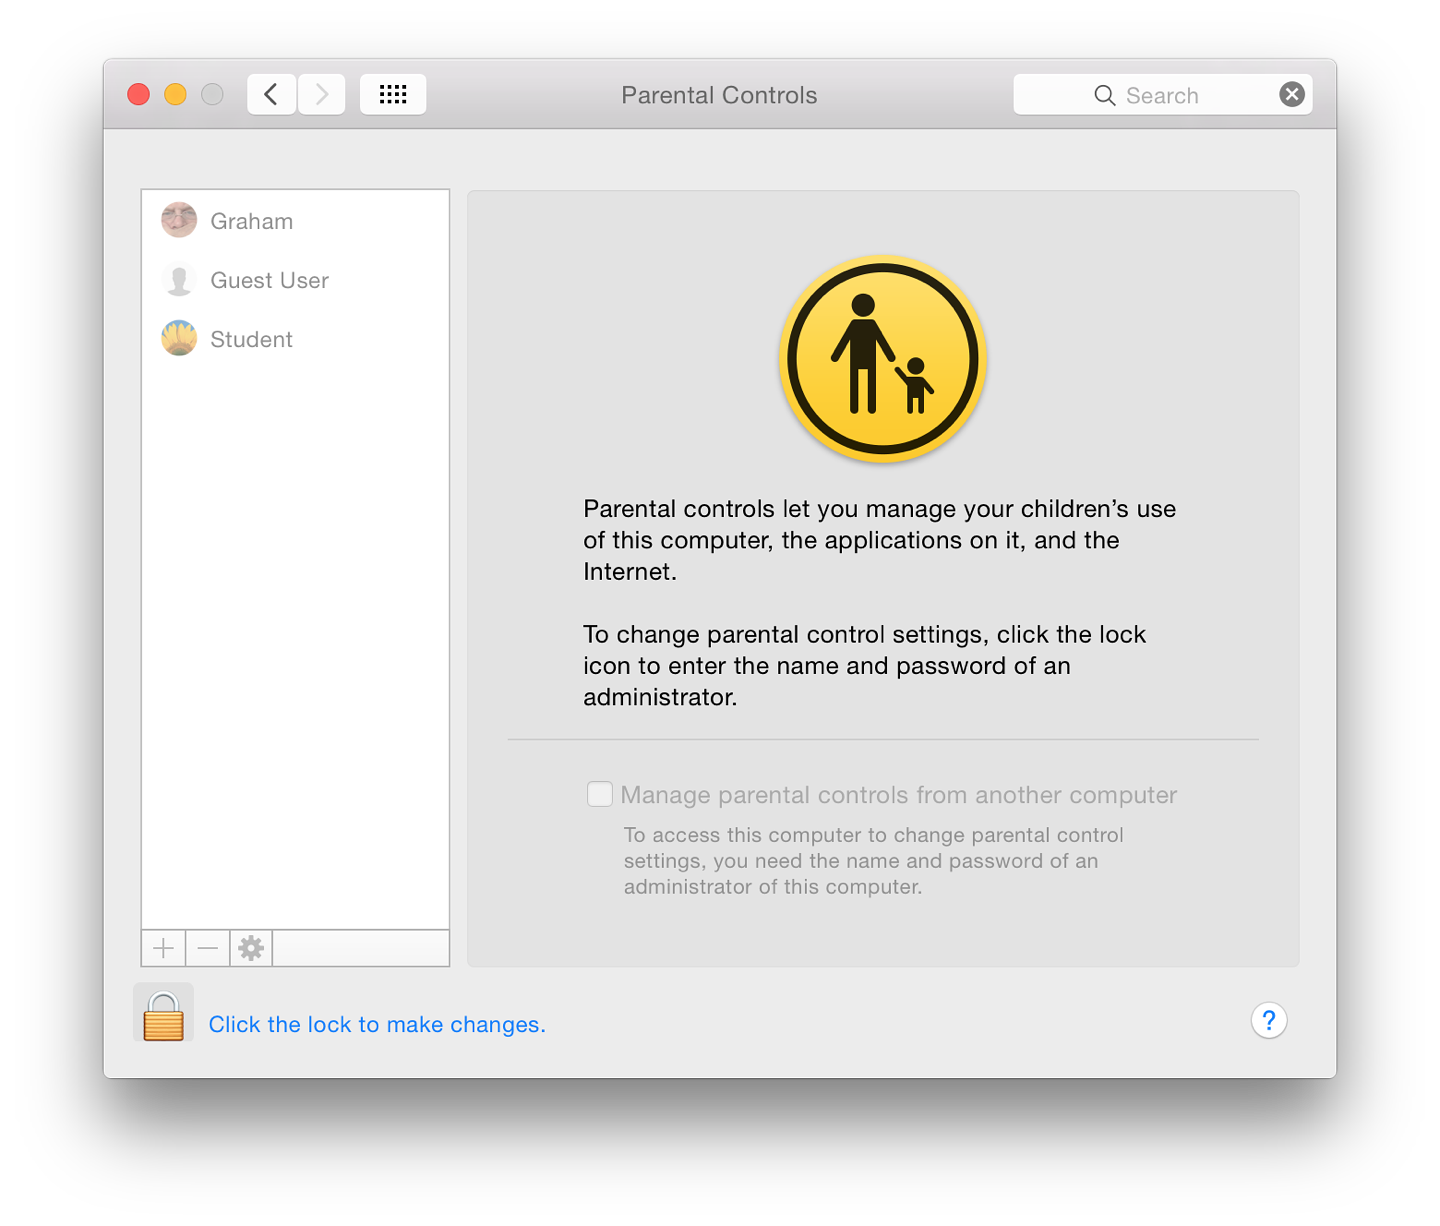
Parental Controls is off by default and cannot be used with an Administrator account. To use the settings, it may be necessary to unlock the padlock (bottom left) which will need Administrator privileges. When the preference panel is opened, user accounts are shown in a panel.
When one of these accounts is selected, the controls can be activated. The panel then displays five tabs: Apps, Web, People, Time Limits and Other. It is also possible to create a new (controlled) user account directly from within the panel with the + icon under the users list
This will add (create) a new account. A simple panel appears asking for Username, Account name and Password (plus Verify) and a password hint. An account is created and the Parental Controls panel appears.
The - (delete) will offer to delete a highlighted account. This is not to turn off Parental Controls. If an active account is deleted, the system offers to save the Home folder as a disk image in the same way as deleting an account in Users & Groups. This delete feature should be used carefully.
Using the "gear" icon reveals a menu with shortcuts for actions: settings for one account can be copied and pasted to another; parental controls may be turned off for any specific account; and Allow Remote Setup may also be activated here.
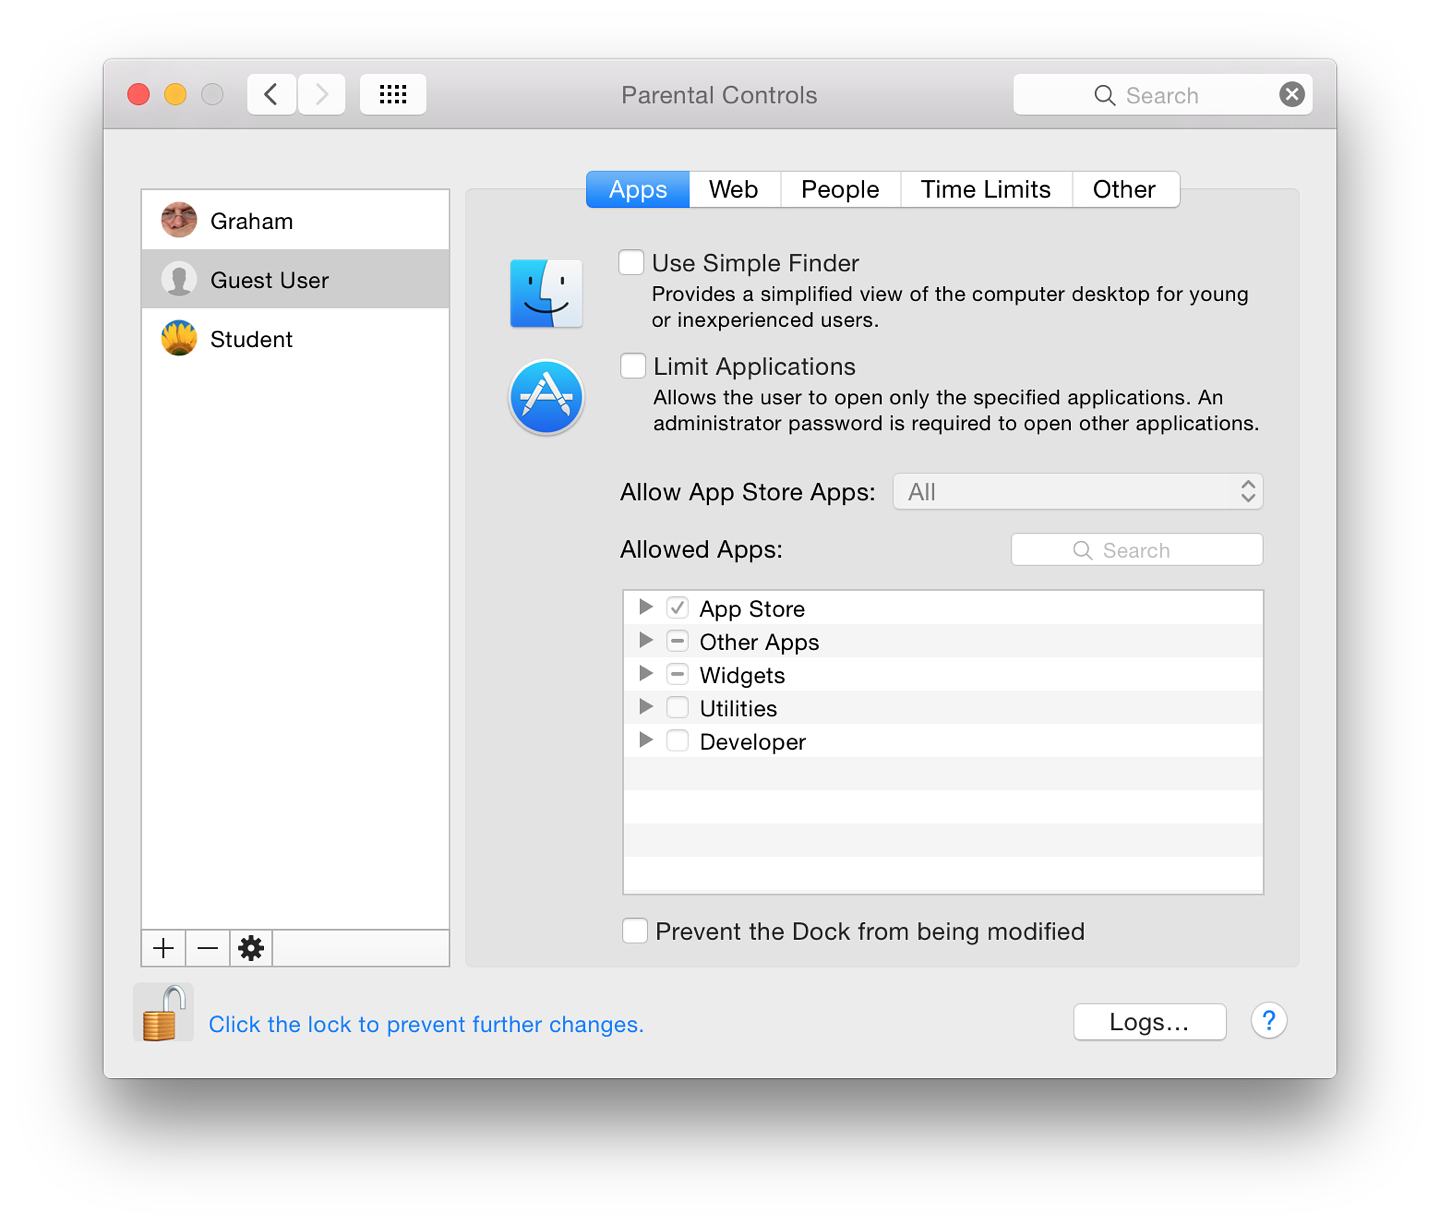
The upper part of the panel displays a checkbox to turn on a simple Finder. If this is used, in the account a basic panel will display icons for permitted applications. When parents work in that account, they can turn on the full Finder with an Admin password.
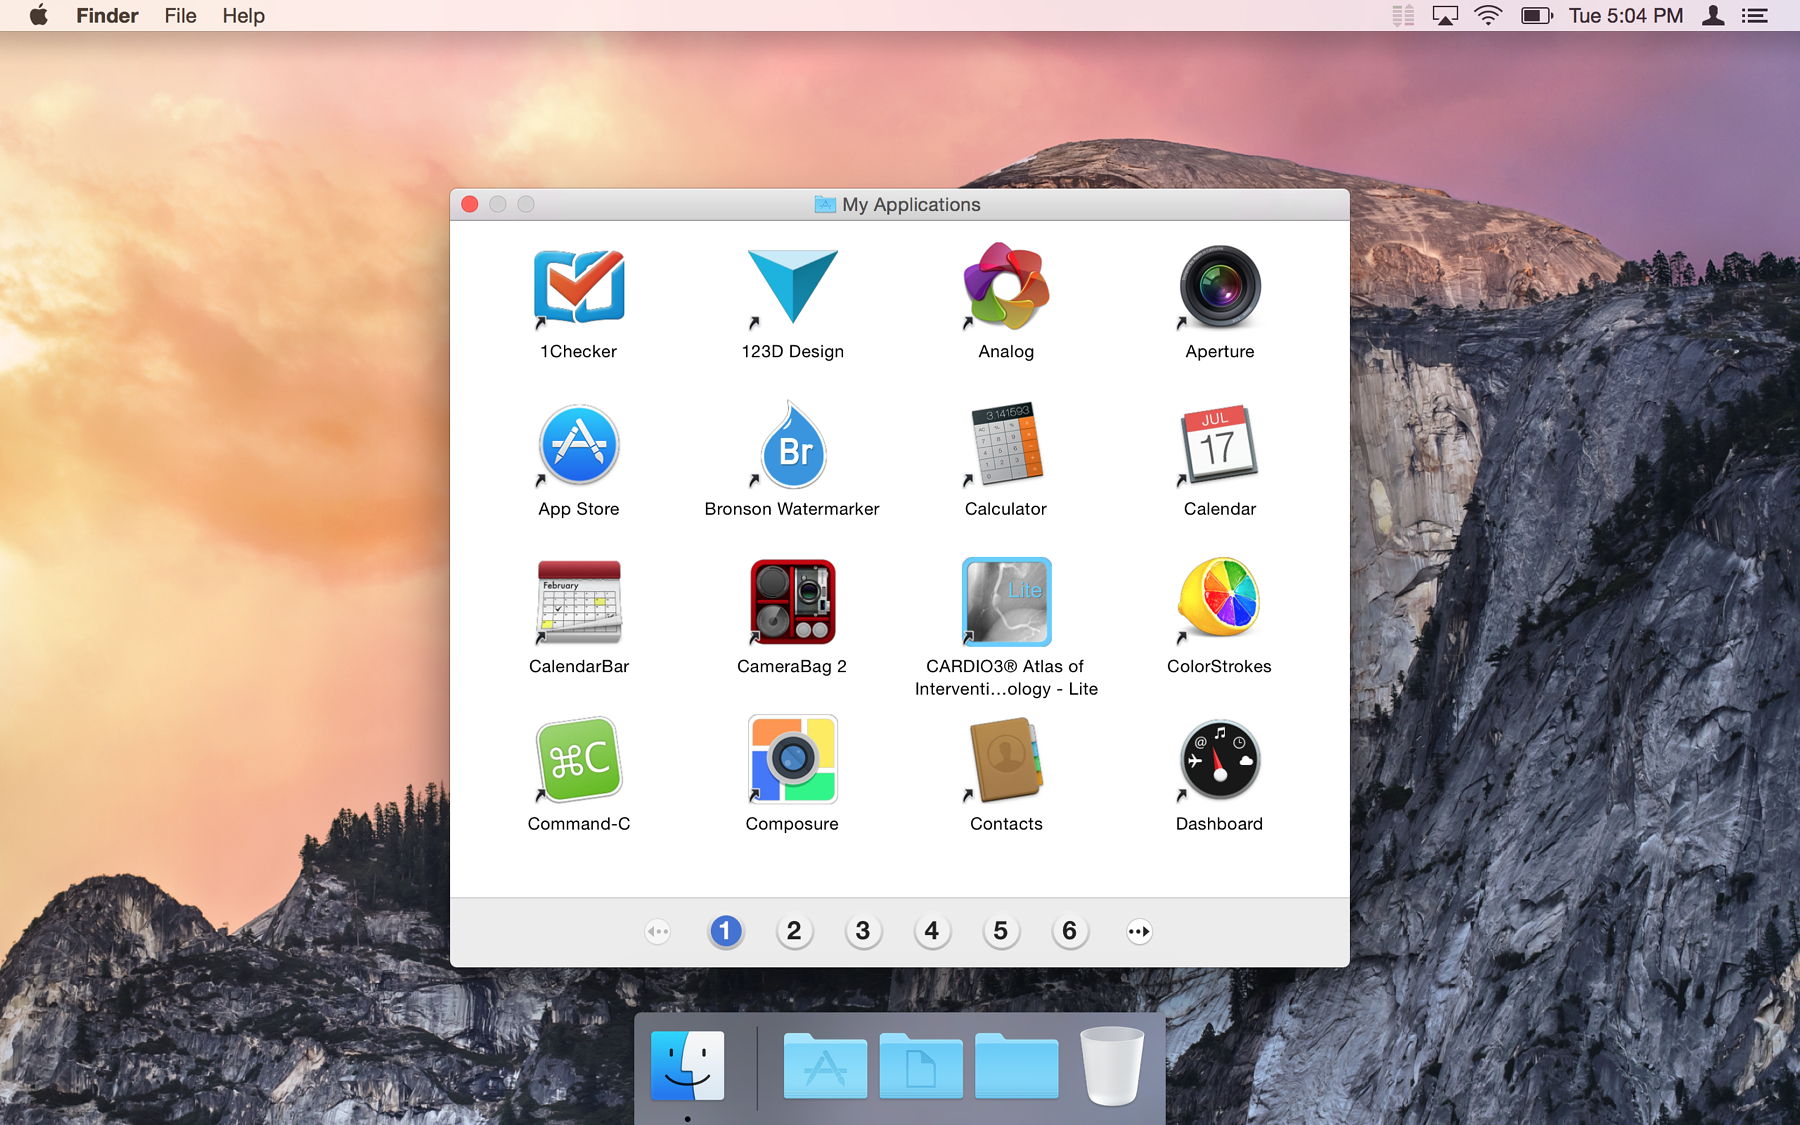
A second checkbox is marked Limit Applications: the user in that controlled account may only open specified applications. When this is on, a button marked Allow App Store apps is live, with selections from "All" to "Don't Allow" with age limits between: Up to 4+, 9+, 12+ and 17+ as before.
The panel below this is only live when the Limit Applications box is checked. It controls applications that may be used (with or without the simple Finder). By default, only some are allowed. By checking/unchecking boxes in each of the groups, any or all may be selected or deselected.
At the bottom of this panel is a checkbox to control Dock use. The wording has been changed. If selected, the user is prevented from modifying the Dock.
A button (available for Apps, as well as Web, People, Time Limits and Other) reveals activity logs in the account (see below).
The second button - for controlling limited access - tries to use recognized content filters. A Customize button allows access to certain sites that are erroneously blocked, or blocks those that have been wrongly allowed, with two panels: Always allow these websites; and Never allow these websites.
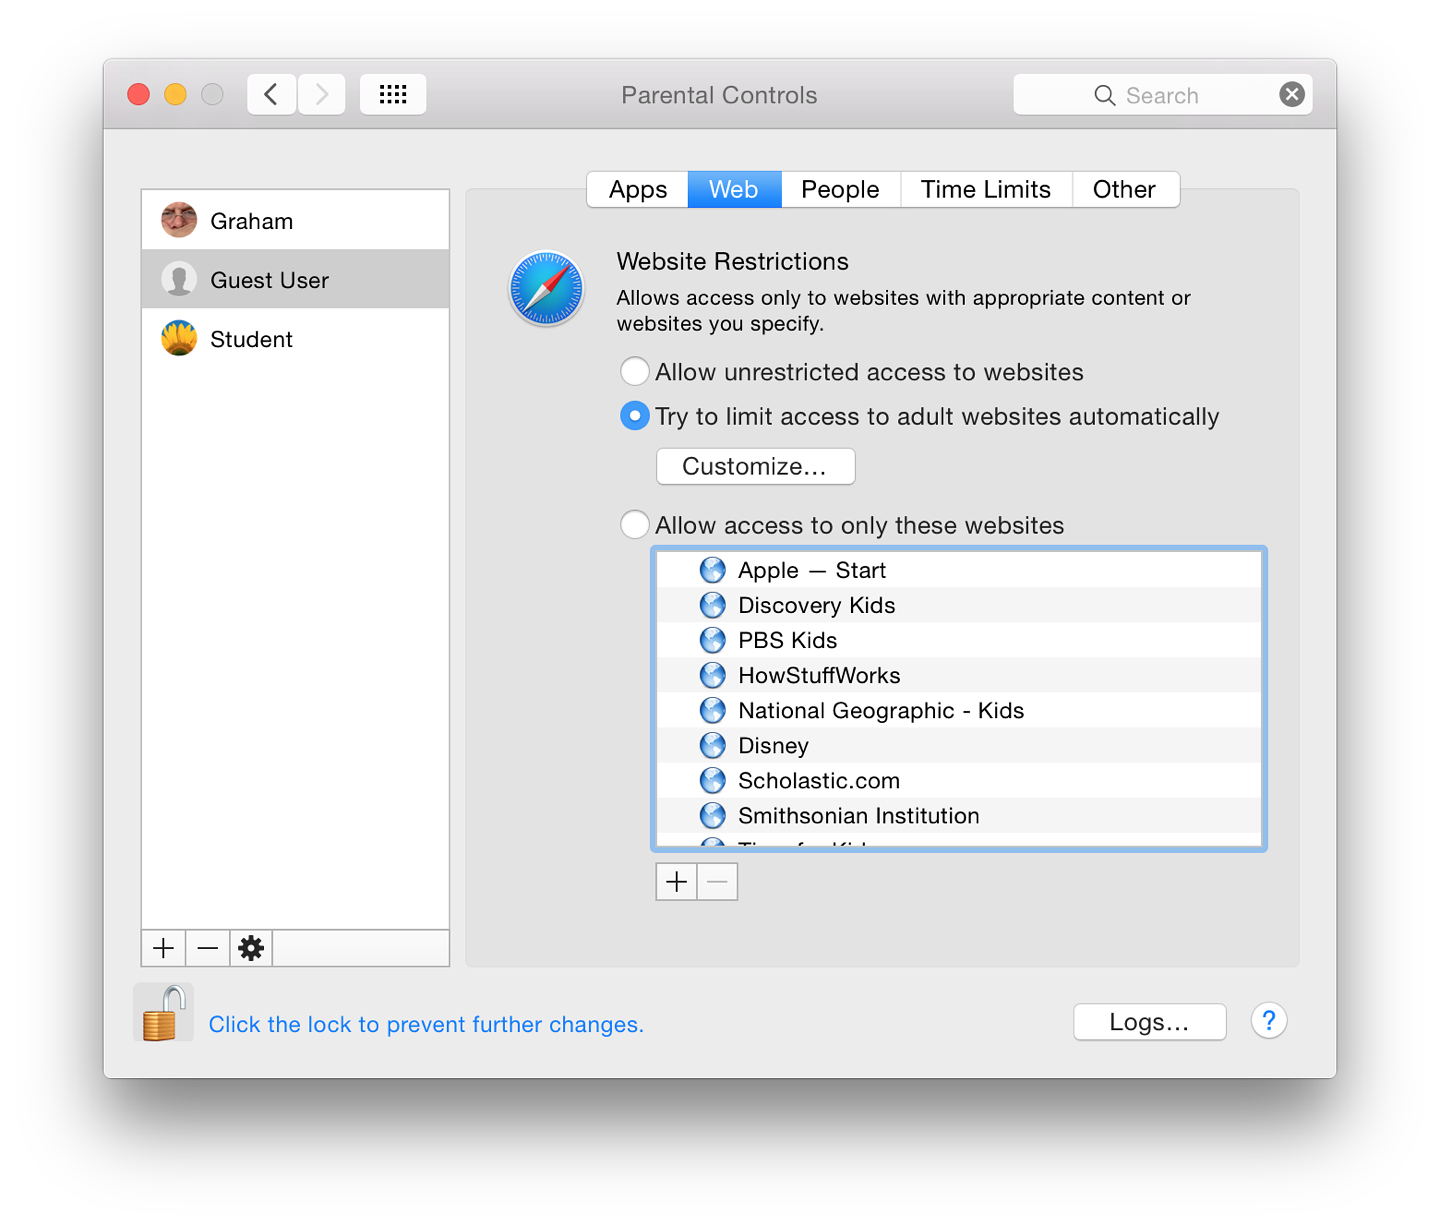
The third option allows access only to specific sites (a "whitelist"). The whitelist already contains a number of sites considered safe, such as the Apple start page, National Geographic, Disney and the Smithsonian Institution.
At the bottom of the panel are + and - icons so that parents may add suitable bookmarks or folders. Any sites on the list may be removed.

Controls on using e-mail and messaging are as important as any limits to websites. With a checkbox, the parent can specify addresses which a child can send to, or receive emails from. If this is live, there is also a checkbox option for vetting requests in or out: these are forwarded to a nominated email address. Another checkbox below, applies address restrictions to Messages services.
If either of the services is restricted by activating the checkbox, a panel is available in which allowed contacts may be added. When entering such information, a panel appears that requires first name, last name and account details including account name and type of service (email or AIM). A triangle beside the last name opens a contacts panel, allowing one-click adding.
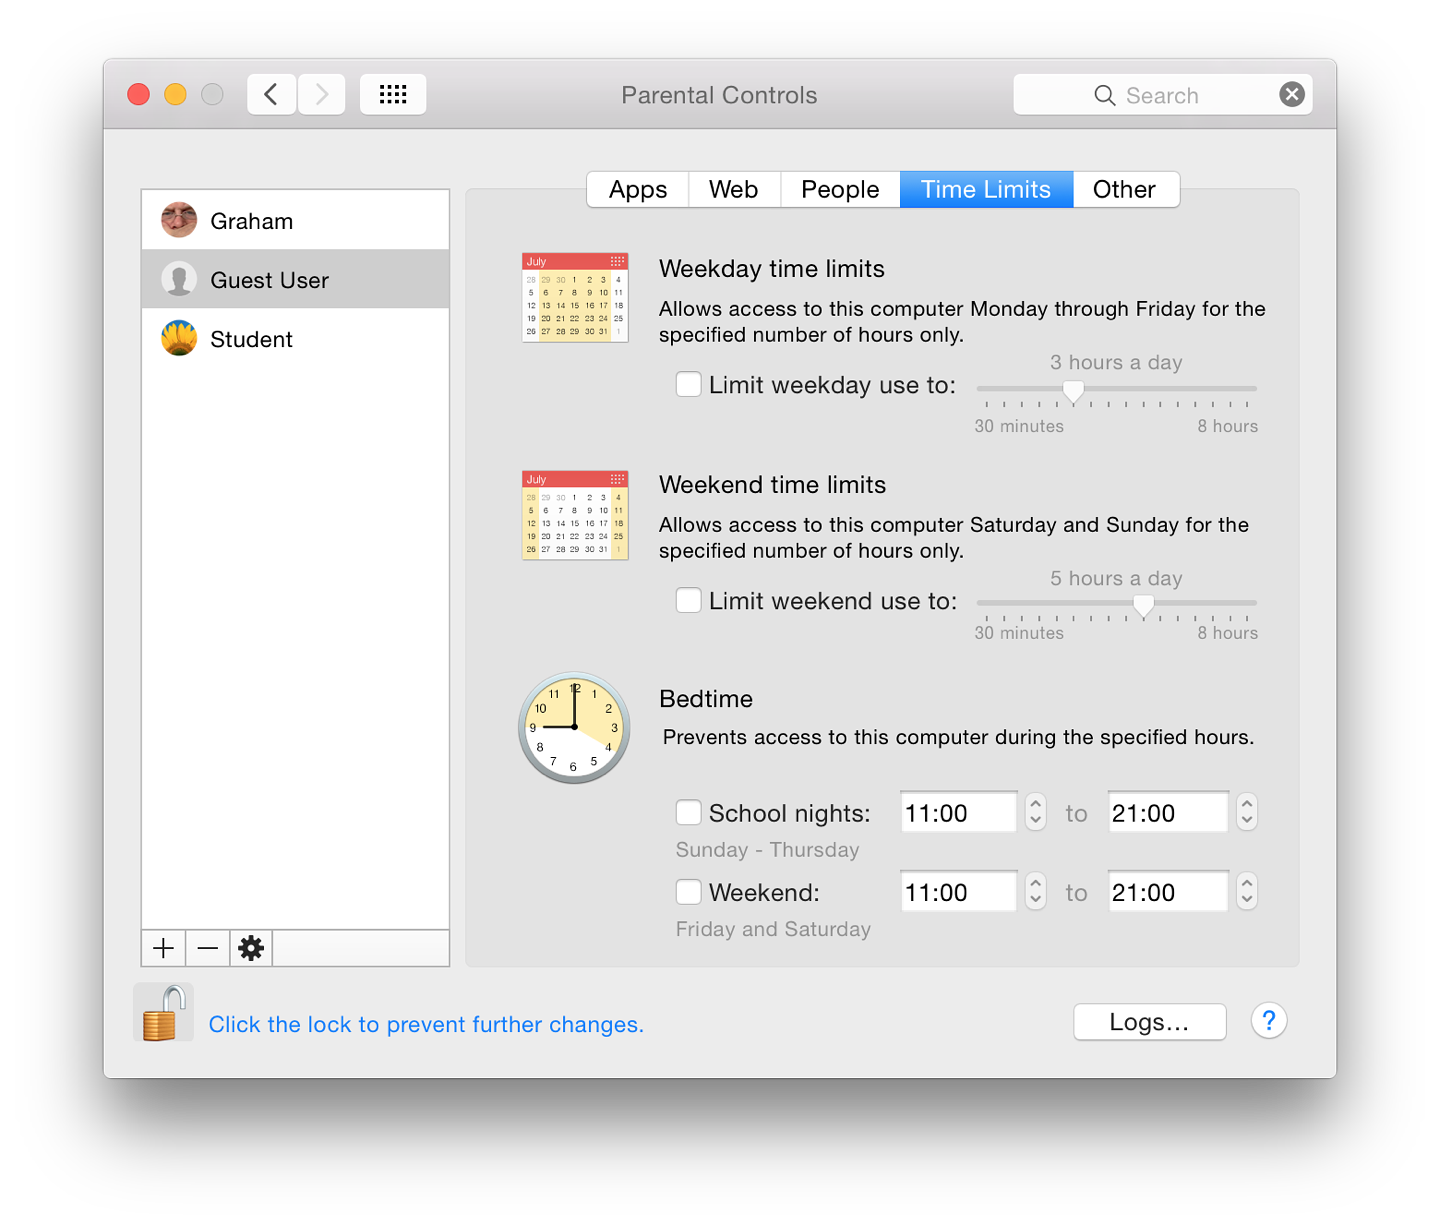
As before, this section does not take into account that some cultures do not have a Saturday/Sunday weekend.
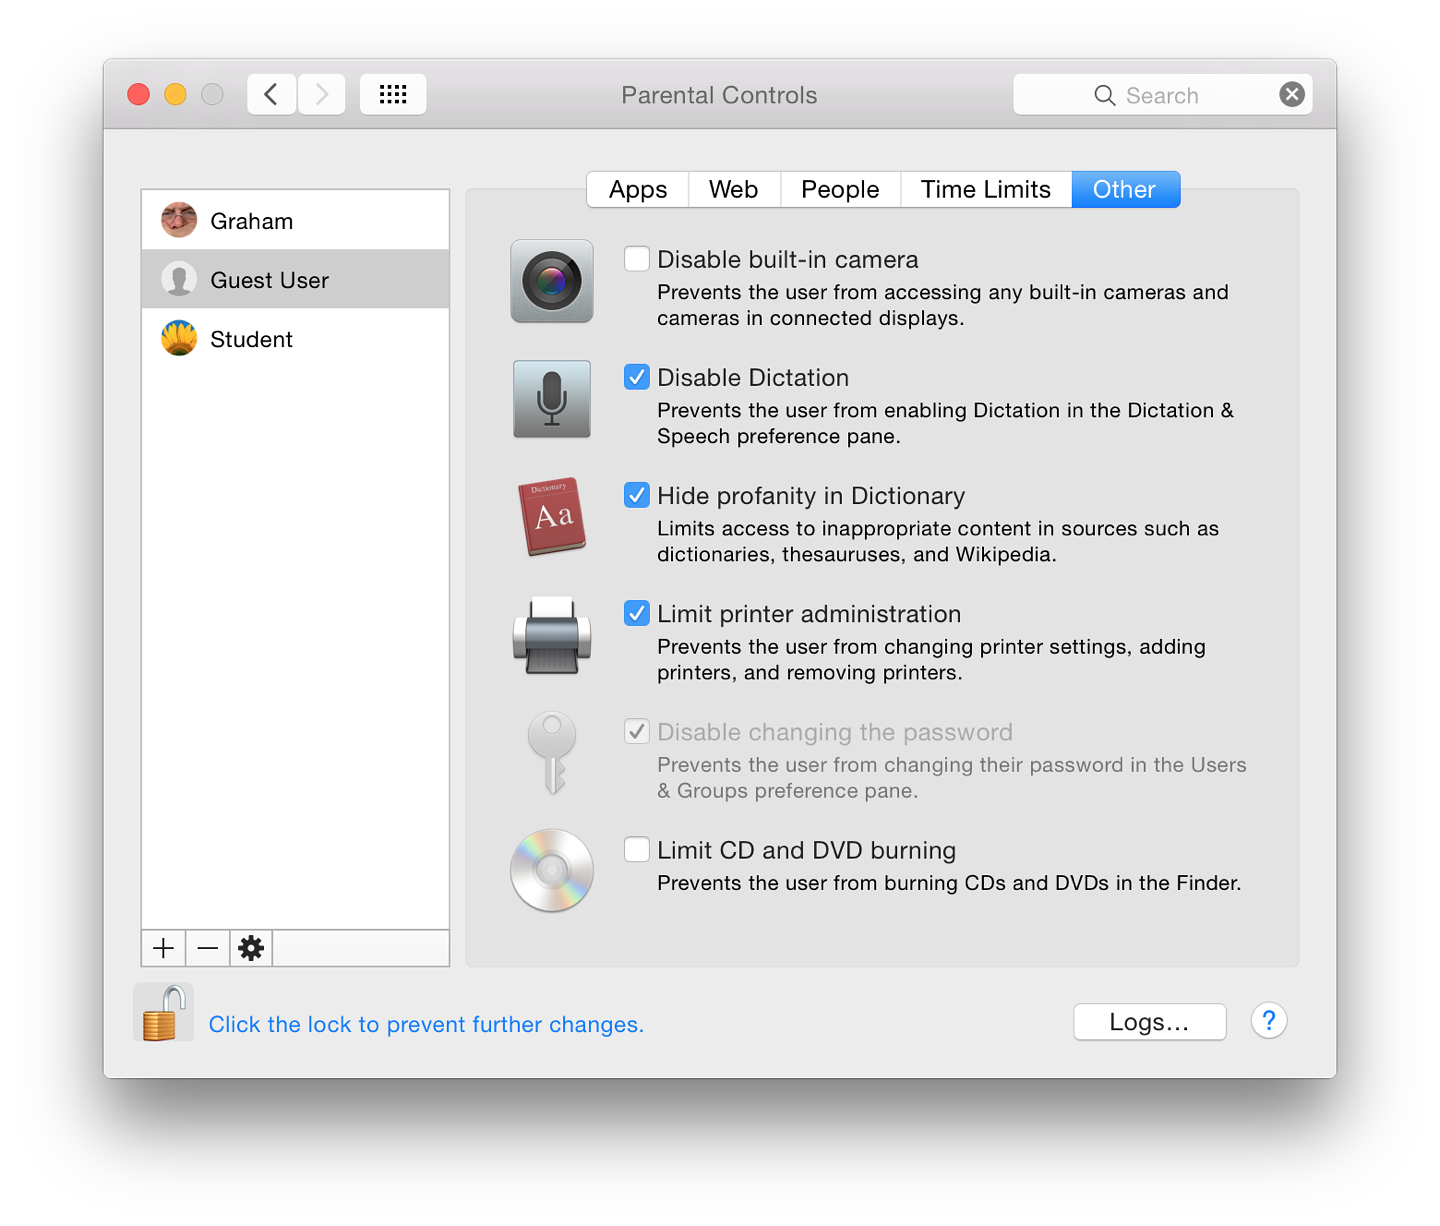
The full list of features is:
Any data recorded here will provide a detailed report of activity in the restricted account. A button at the top of the panel allows the administrator to select a time limit for retention of any logs: Today, One week (default), One month, Three months, Six months, One year, and All. A second button allows activity to be grouped by Website or by Date.
An entry in the list may be viewed or blocked using buttons at the bottom of the panel.
We are reminded of the Peter Steiner cartoon from New Yorker, "On the Internet nobody knows you're a dog." There have been other, more recent reminders (such as the movie, Trust) of how at risk young people can be, as well as many real-life reports, although recent revelations suggest users may have more to fear from certain governments.
While parents should work with the very young in their online discoveries, those who are older value their independence and privacy. They can feel inhibited and resentful if they sense that they are under observation. Parents have to perform a balancing act between that freedom and the protection needed.
The big bad wolf is real.
System Preferences in OS X 10.10, Yosemite: Printers & Scanners |
|
![]()
Apple's Mac OS X was recently updated to version 10.10, Yosemite. There have been some changes to System Preferences. Printers & Scanners preferences has a panel similar to the one in the last two versions of OS X. The way printers may be connected uses simple methods for home users, while there are features available for those with more complex needs, such as in offices.
The Printer & Scanners preferences panel allows users to control the setting up and use of printers, scanners and suitable fax machines attached to the computer (or that the computer may access via a network). Settings may be different depending on computers, networks and printer being used.
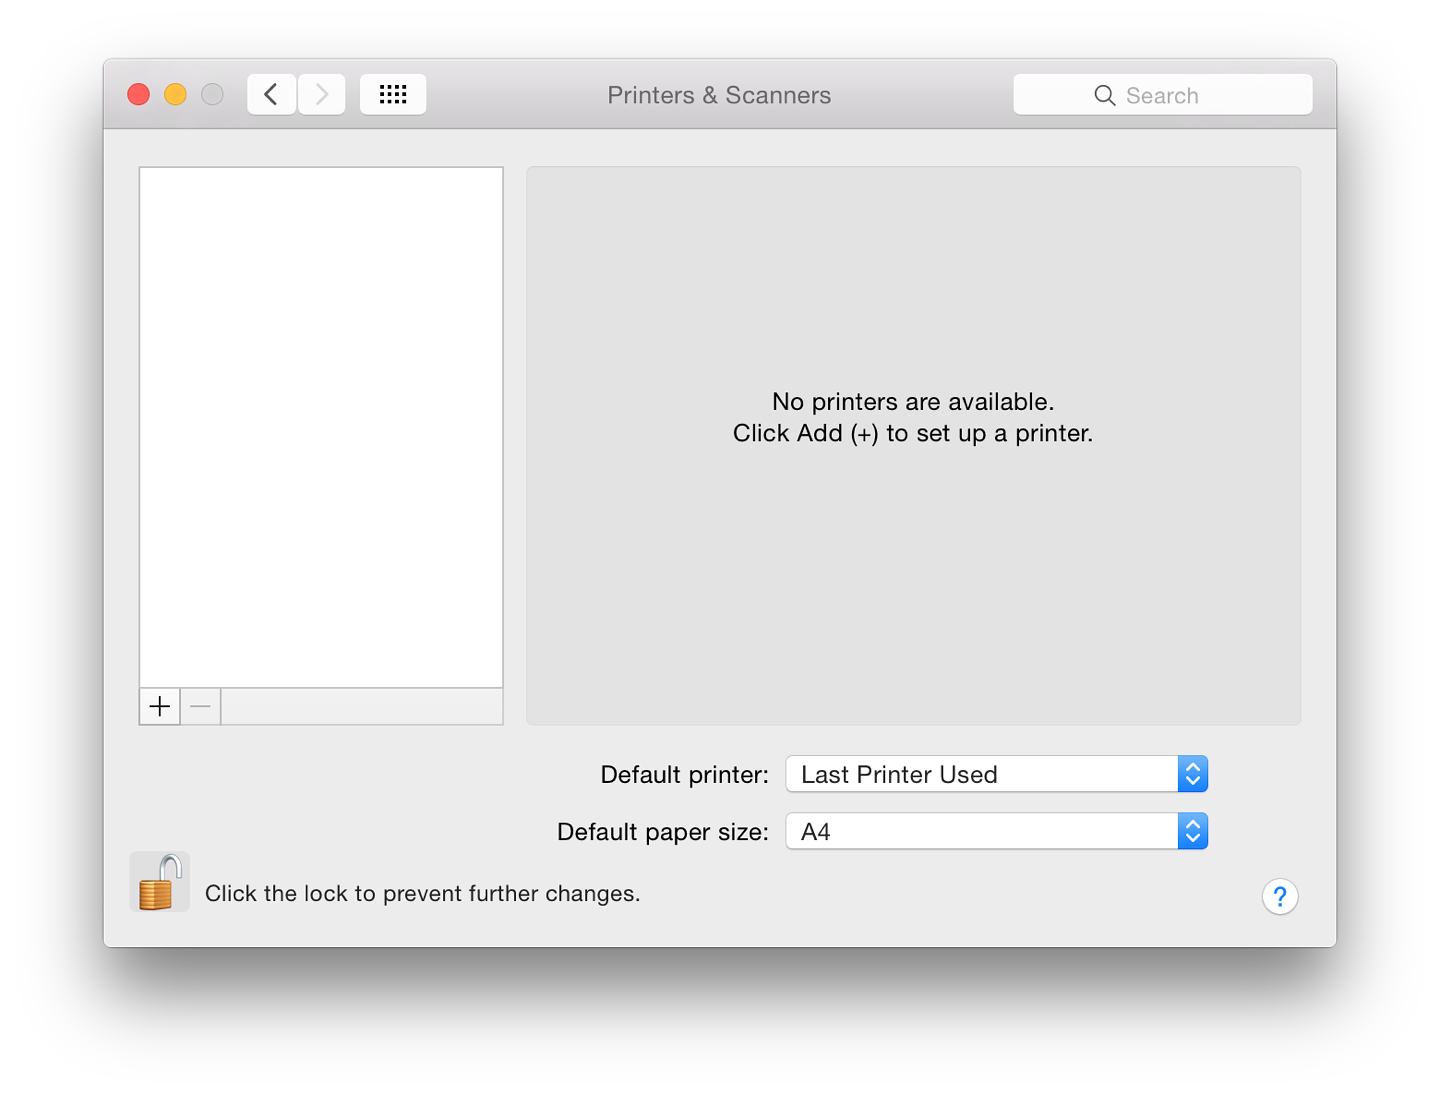
Clicking on the printer icon in System Preferences reveals a 3-part panel. On a new installation, no devices are identified. To the left is a pane that will show any installed printer; the main section provides details of printers highlighted in the left-hand pane.

As part of that information, two buttons are available: "Open Print Queue" and "Options & Supplies. . ." which will display information including ink levels. At the bottom of the panel are a button to select the default printer and a button to select the default paper size. On a new installation this may show US Legal so may need to be changed to A4 for those users in other regions.

To add a printer (or other suitable device), click on the + icon at the bottom left when the printer is connected. Depending on the installation, either a simple menu appears or a panel that shows different types of connection.
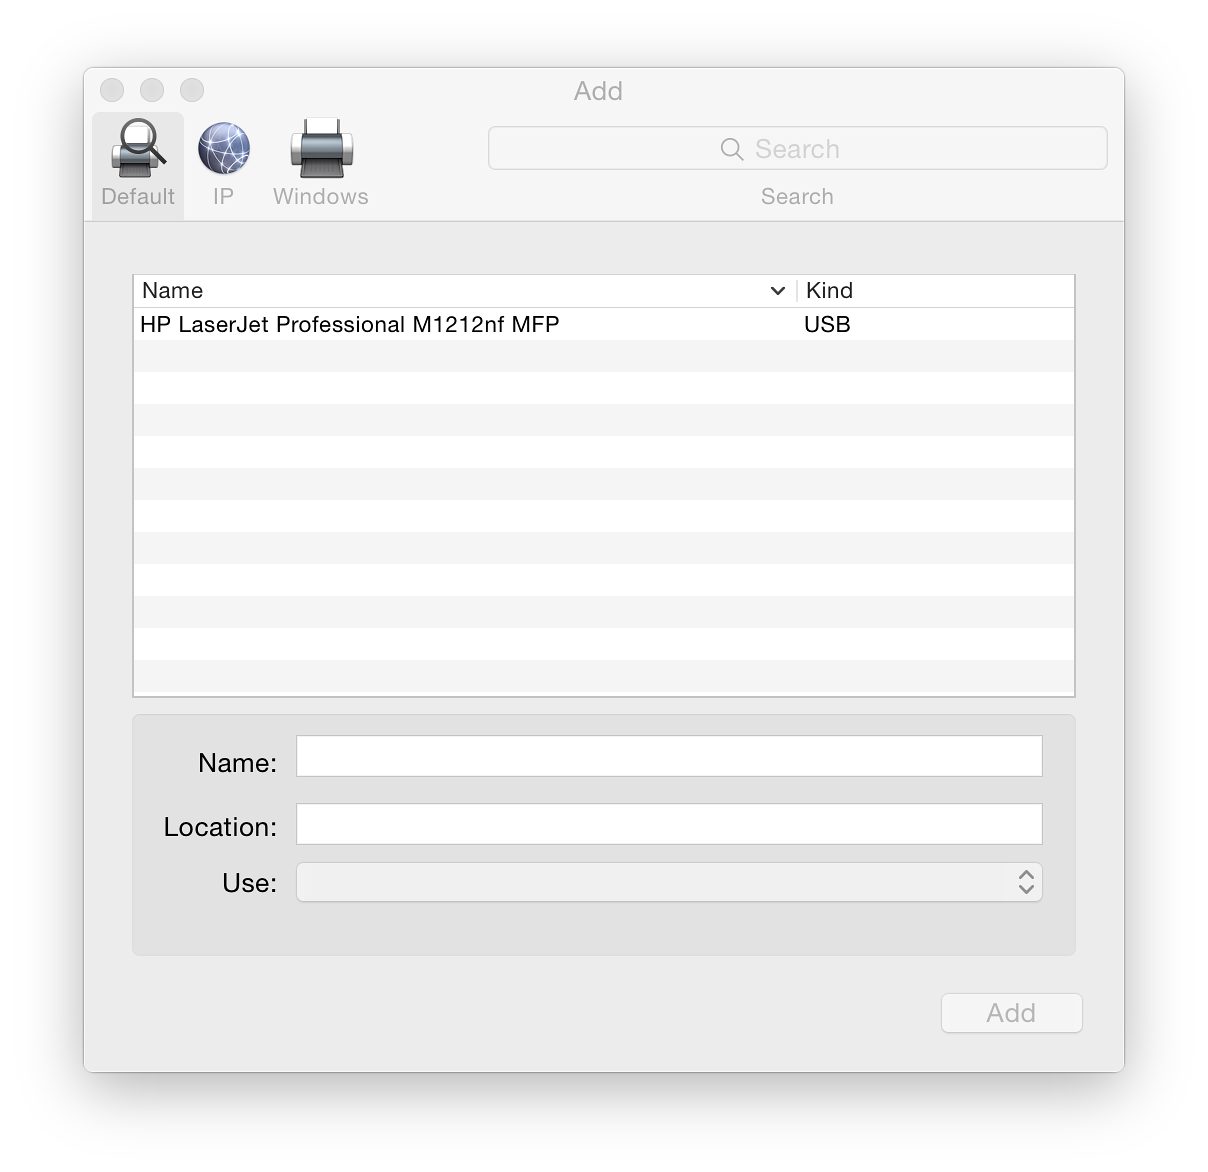
The simple menu will identify any printers available either linked by cable or on the same network (Nearby). The 3 section panel shows Default, IP and Windows. Default shows any printers that may be shared or are already installed, including USB printers.
The panel marked IP has two sections. At the top is a box for entering a printer IP number. This can be found in the settings of a suitable printer (or by asking a technician). Below is a button for selecting which protocol to use: LPD or Line Printer Daemon (default on my computers), Internet Printing Protocol (IPP), or HP Jetdirect - Socket.
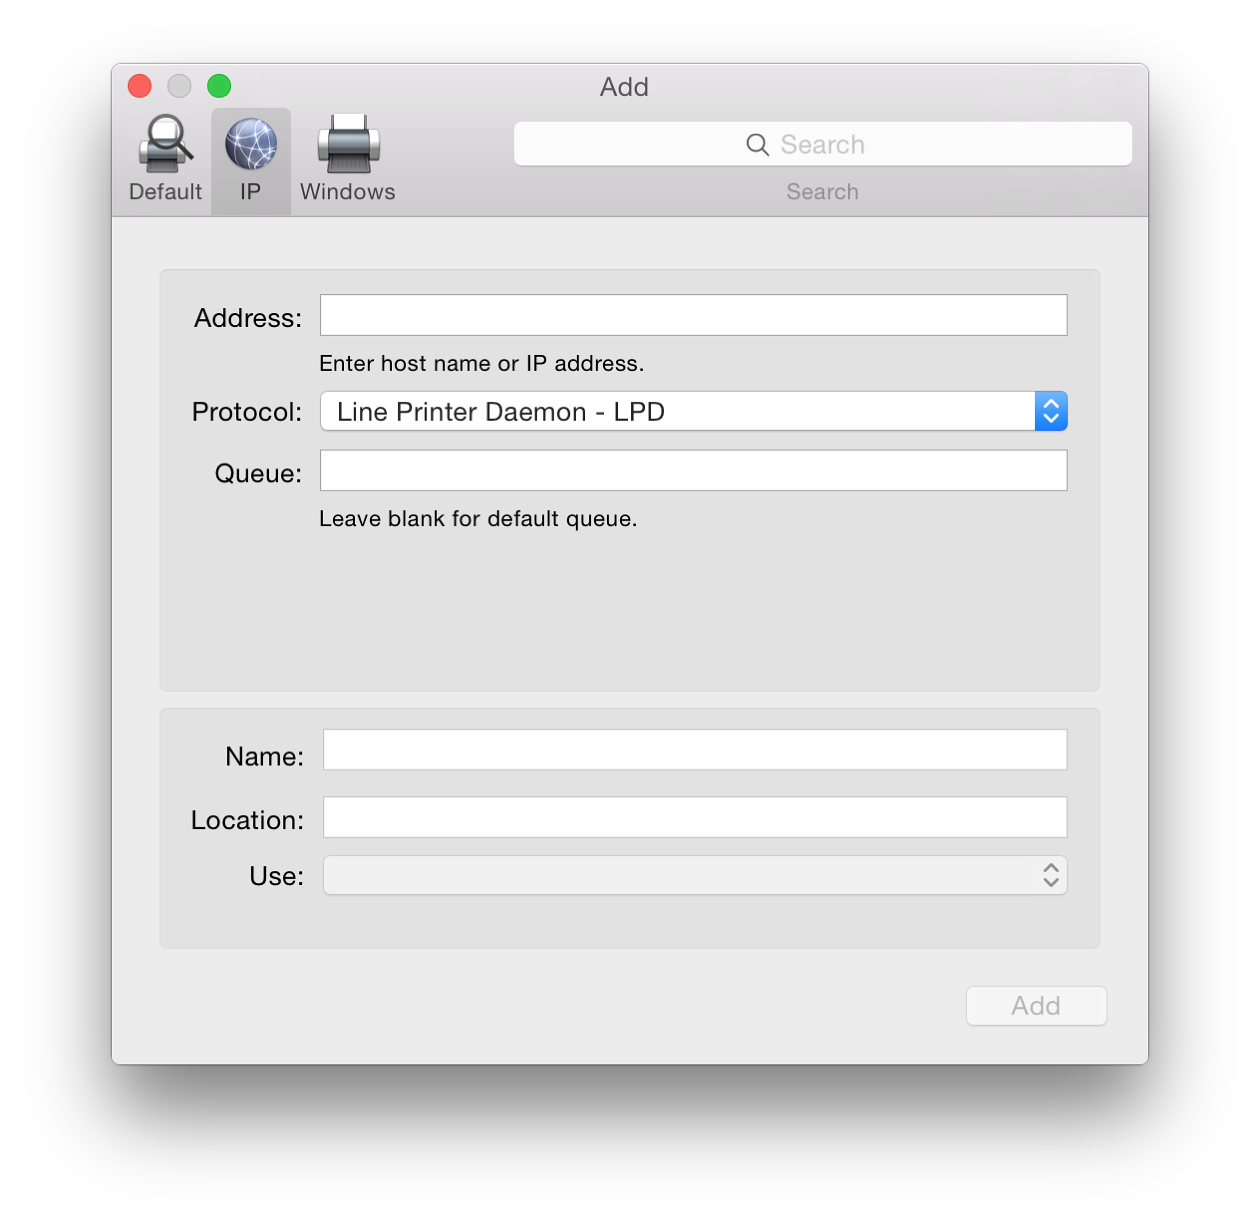
Below is a text box for "Queue" which is left blank for the default queue. The lower half of the panel has spaces for name/location of the printer
The final installation method, Windows, is for working with printers installed in a Windows workgroup environment. The panel has 2 panels for entering information.
When I connected to a WiFi network, other printers were identified and I was able to add them. If the software is unavailable, OS X may offer to install generic printer software instead or will use the already installed Gutenprint drivers.
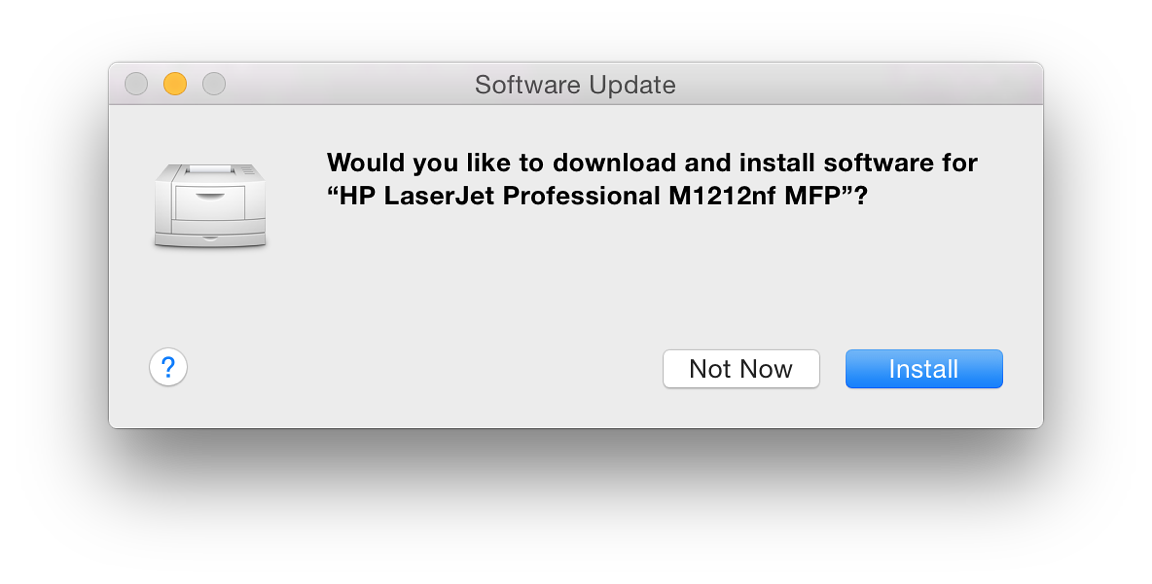
At the bottom of the information panel of Printer preferences are buttons allowing users to open the Print Queue and "Supply Levels" (see below). Also available are buttons to select the default printer and the default paper size. The default printer may be set to "Last Printer Used" or switched to any device recognised.
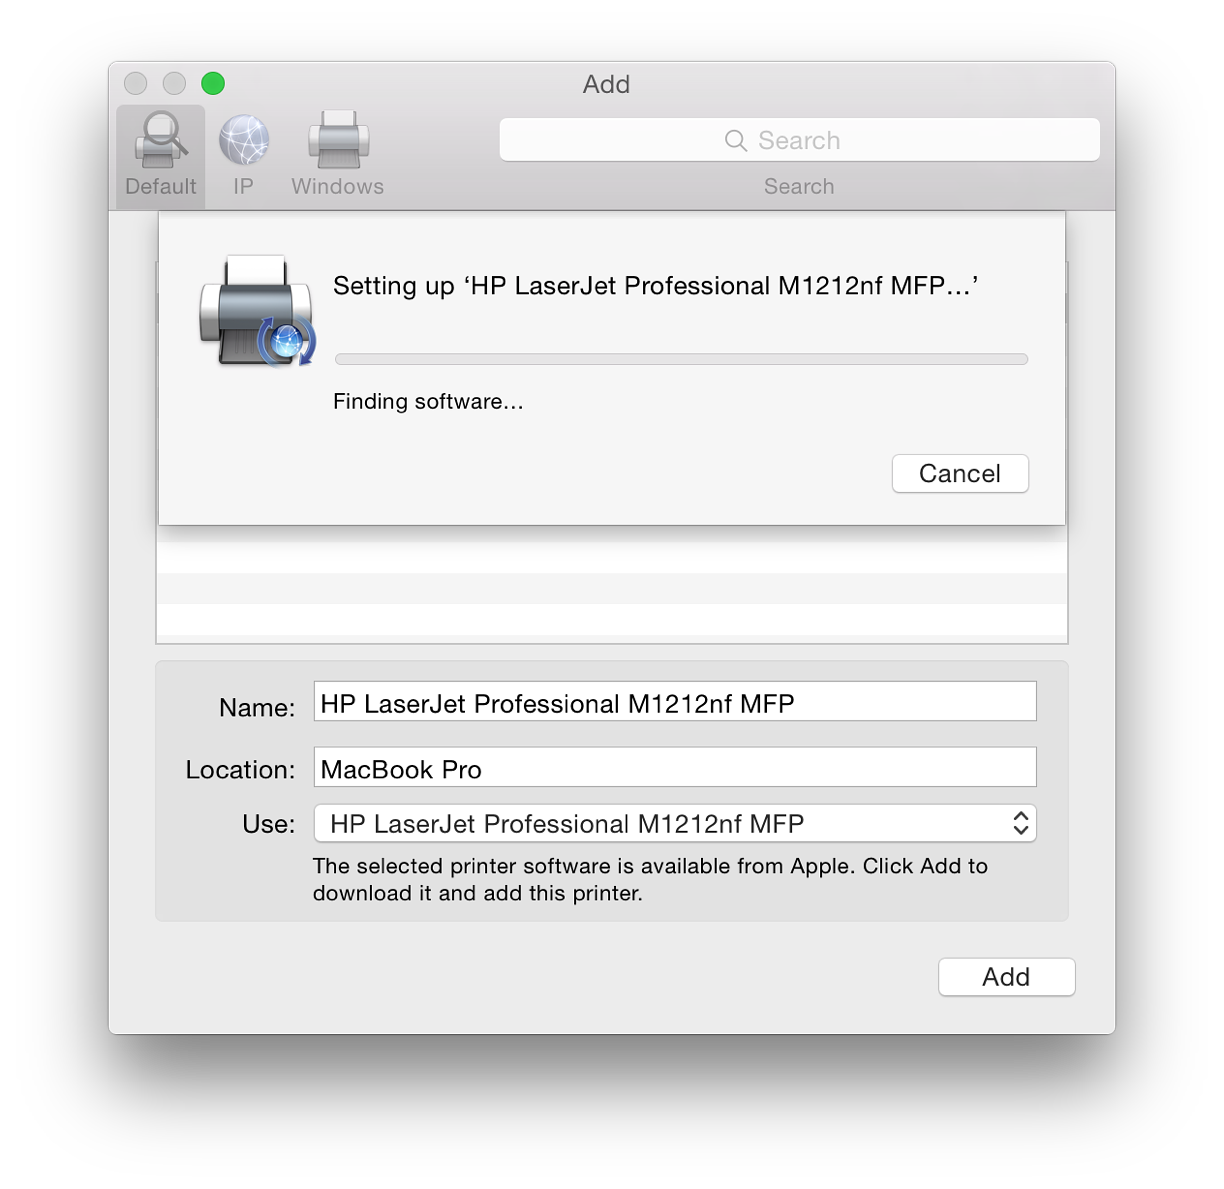
When a printer is highlighted in the main Printers & Scanners panel, we may access two buttons: Open Print Queue and Options & Supplies. The first reveals a panel with icons for device management: Pause and Settings. This is greatly simplified from earlier. The panel also indicates if the printer is available or not connected.
Supply Levels has different panes depending on the printer highlighted. These may include General, with information about the printer; and Supply Levels, such as ink (also available in the Open Print Queue panel). Other options include Driver, which shows any available information about the current driver; and Utility which has a button that opens a separate printer-specific application when pressed. Not all printers will have this.
Note: some users have reported that when trying to add a printer in a user account, a dialogue panel appears asking for Admin name and Password to be entered, but that it is not possible to add any text. This may be resolved by Cancelling the action and quitting System Preferences. In the Admin account, open Printers & Scanners preferences; delete any printers no longer needed; and add the new one. Log out of the Admin account and return to normal working in the user account.
Some users may also wish to try the CUPS software that is installed with all Macs. This was open source, but was purchased by Apple a couple of years ago. By entering 127.0.0.1:631 in a browser (if enabled) a printer management system is made available. CUPS may not be available on a new installation. A user would need to run the command,
in Terminal first.
System Preferences in OS X 10.10, Yosemite: Security & Privacy |
|
![]()
The update of OS X to version 10.10, Yosemite, has seen a number of changes to System Preferences. The Security & Privacy Preferences is similar to what was available in OS X 10.9, Mavericks. There are additions to the apps that now interact with the operating system. These are to be found in the Privacy pane.
Security should be a priority for all users. While Mac users claim that OS X is more secure than alternative operating systems, there is no reason for complacency, particularly after recent revelations concerning data-sharing and government surveillance.
The Security & Privacy Preferences section works with other parts of System Preferences (like Accessibility, Sharing, and Users & Groups) for a safer environment. The Security Preference pane has four sections: General, FileVault, Firewall and Privacy. There are some minor changes here.
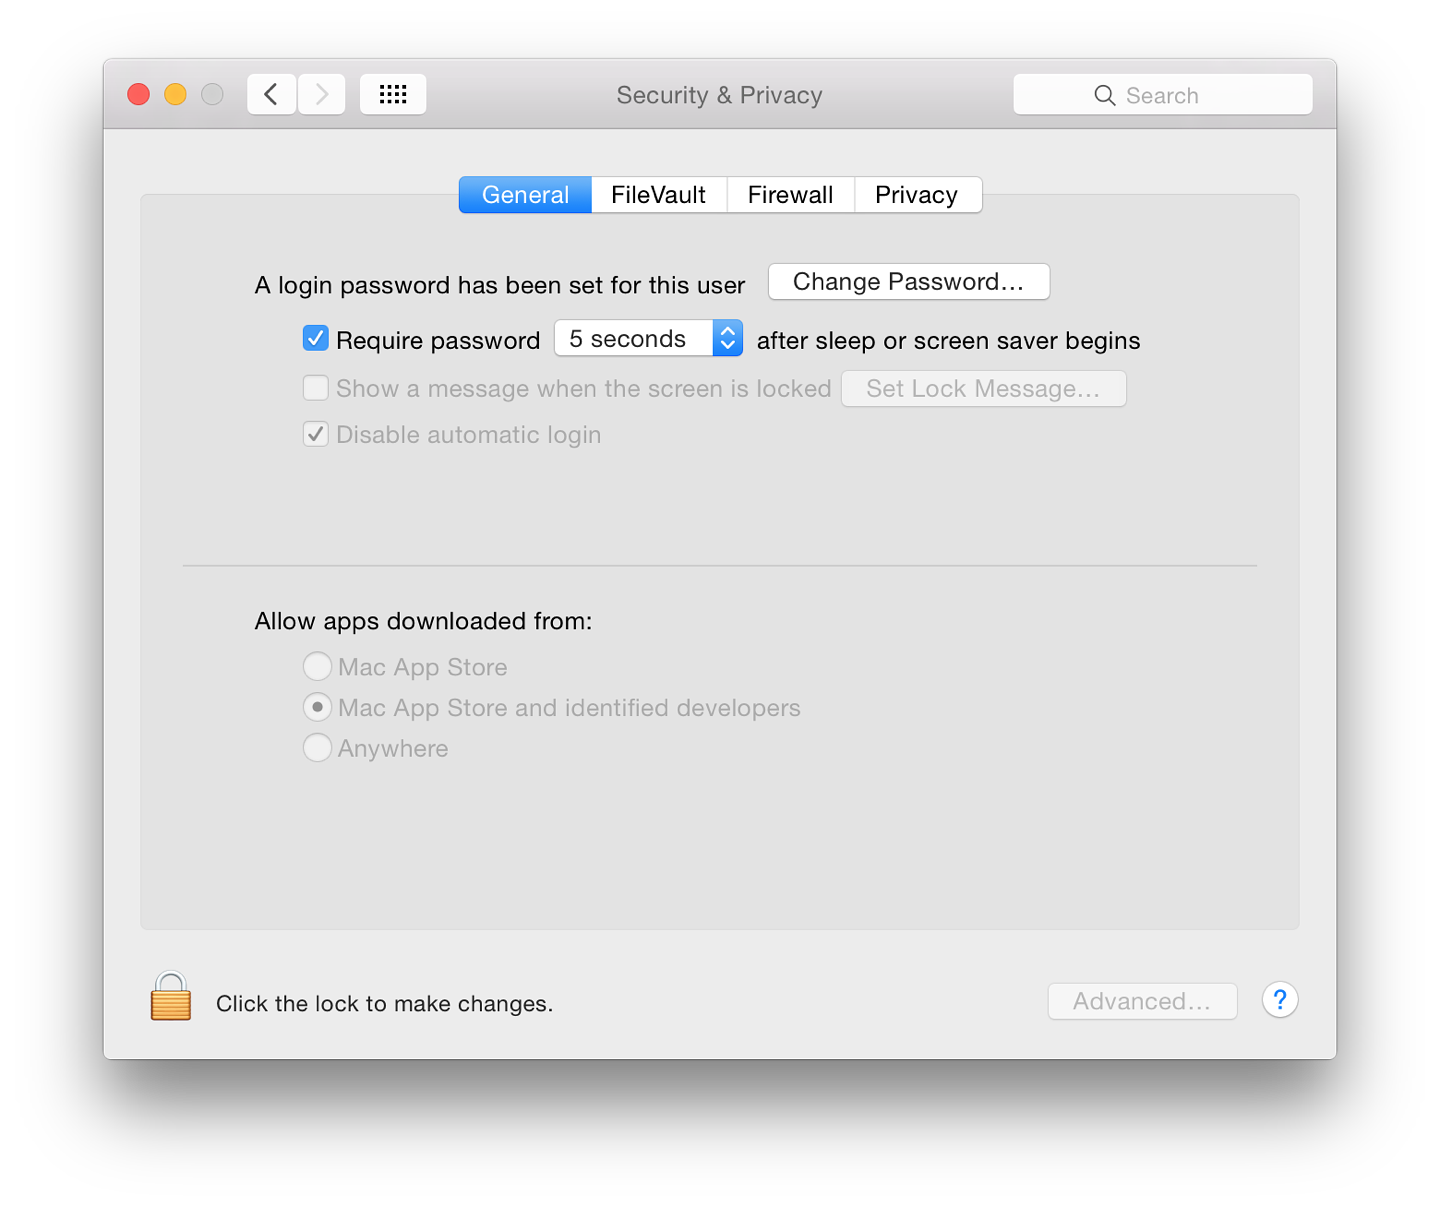
If the "Change Password" button is pressed, a panel appears that requires the old password, new password (+ verify), with a panel at the bottom for a password hint.
There are three checkboxes below the Change Password button:
This is controlled by a button that allows the selection of a time when the screen saver begins. "Immediately" will give the best security, but if hot corners are used the screen saver may be activated accidentally, so an option of 5 seconds is available. Other settings here are 1 minute, 5 minutes, 15 minutes, 1 hour, 4 hours and 8 hours (new).
Note, with newer Macs the way to reset the Firmware Password Utility, if the password has been forgotten, has been changed and may require several days work at an Apple authorised agent. It is recommended that if Firmware Password Utility is used, the password is written down and locked away.
In the lower half of the General panel are controls connected to the sandboxing of apps that Apple introduced a while ago: Gatekeeper. There are 3 settings: Allow apps downloaded from
With App Store only apps, there is a built-in secure process for developers to follow before their apps can be authorised for sale: these apps are supposed to be completely secure for users to install.
Identified Developers have registered with Apple and while their apps are not sold via the Mac App Store, the registration with Apple should give users a relative peace of mind as to the safety of the apps. This may apply also to developers who sell via the Mac App Store but who make available trial or beta versions of their software.
By selecting the third option, it is possible to install any downloaded app, but this may have unacceptable levels of risk for some. There are certain developers, however, whose products are worthy but who have not registered with Apple for this. Users may still want to download and install these while maintaining a higher level of security.
If a user tries to install any such App from an unrecognised developer a warning panel will appear. To install, the user should find the icon in the Applications folder. Control click on the icon and select Open. For those who work in a user account, this needs Admin privileges. Once the password is entered the app will open.
Information on Gatekeeper and other aspects of Security, is available from the Apple OS X pages.
At the bottom right of all panels in Security & Privacy preferences there is a button marked "Advanced...". This has 2 checkbox options (reduced from 4 in Mountain Lion and 3 in Mavericks) as well as wording changes:
The FileVault icon (a house with a safe dial superimposed) signifies the ability to lock the users Home folder by way of encryption. If activated, files are decrypted and encrypted while working. A user enters the account as normal, using the password.
To start this, users press the single button, "Turn On FileVault" at the top of the pane. The text description to its left is unchanged: "FileVault secures the data on your disk by encrypting its contents automatically."
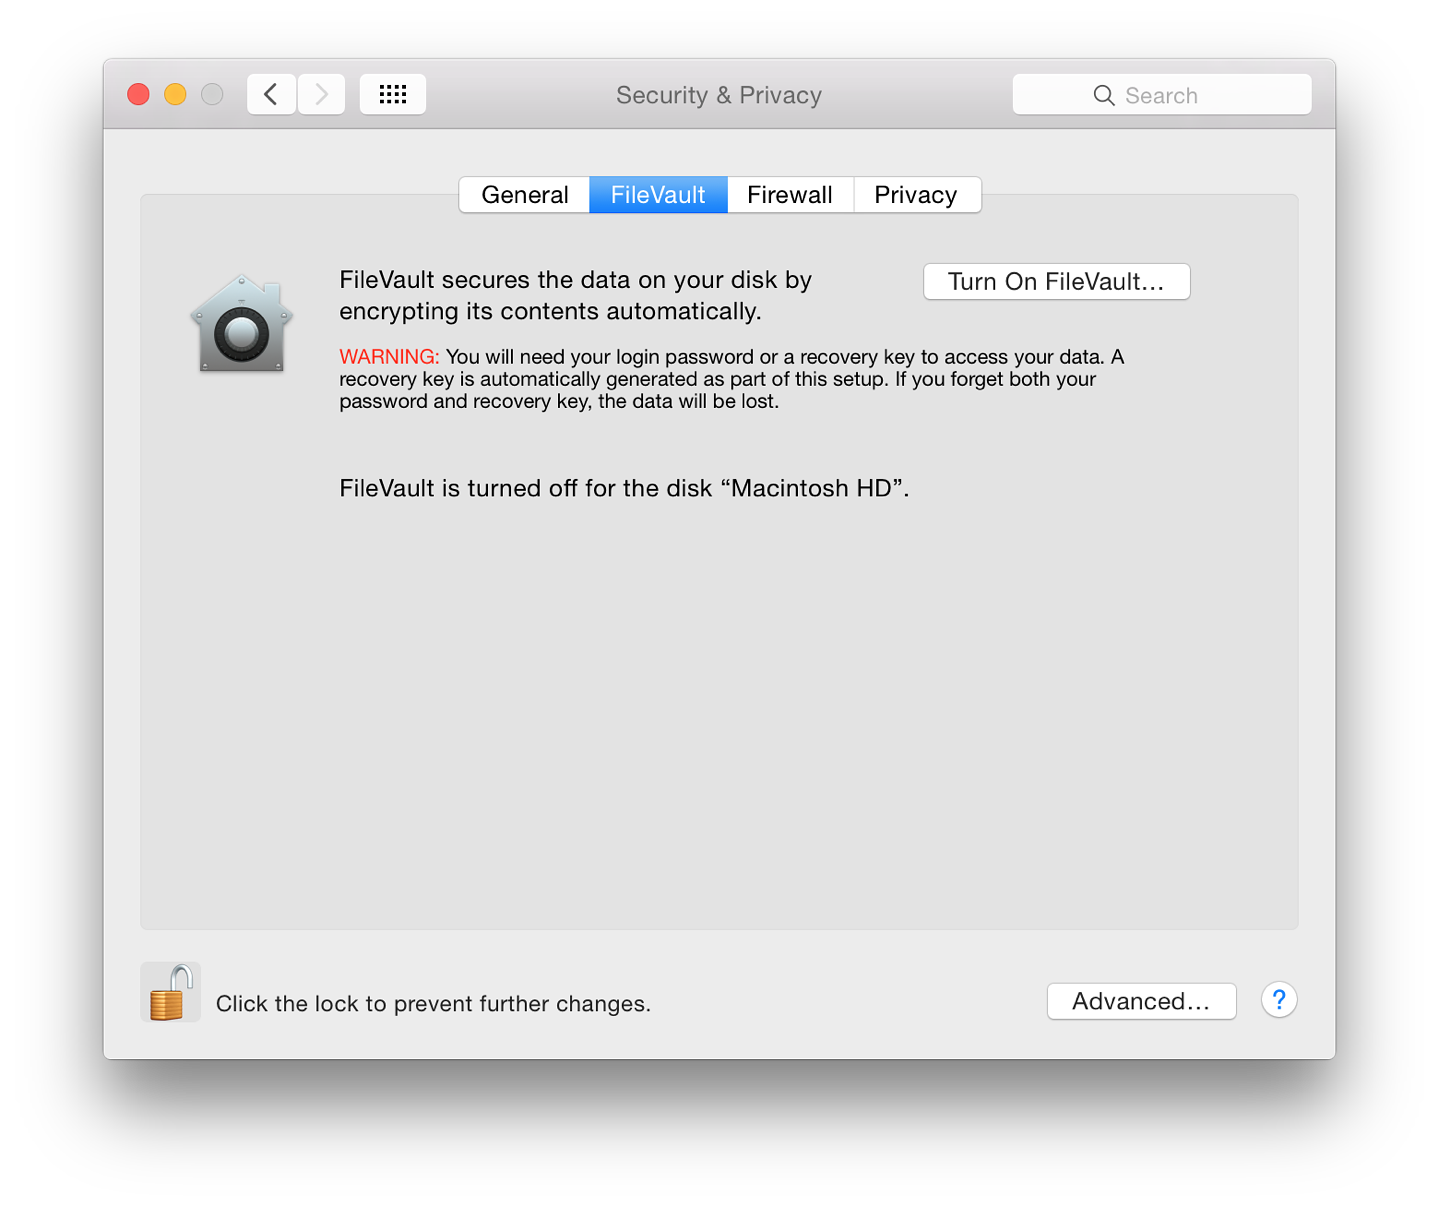
There are two parts to this feature: the file vault protection itself, which will need disk space for the file swapping that will occur; and the Master Password. This is a safety net as it will allow unlocking of any File Vault account. If this master password is lost, then you can kiss good-bye to your data.
Text beneath indicates if the feature is on or off for the disk.
An extended discussion of FileVault is available online at the O'Reilly Mac Devcenter site: An Unencrypted Look at FileVault, by FJ de Kermadec. This dates from 2003, but the ideas and comments are still valid.
The Firewall pane has basic information for the user and two buttons: Turn On Firewall (or Turn Off Firewall if it is ON) and Firewall Options... The buttons can be used only if the security padlock icon is open.
The Options panel has three checkboxes. Above the main (applications) list is "Block all incoming connections". If this is selected only essential services (DHCP, Bonjour, IPSec) will be able to use internet access.
Applications in the list panel are allowed the access needed, instead of specifying port numbers as was the case earlier. Above the application list are several OS X features that may have been activated in other preferences, such as DVD or CD Sharing, Screen Sharing or Remote Logion (SSH).
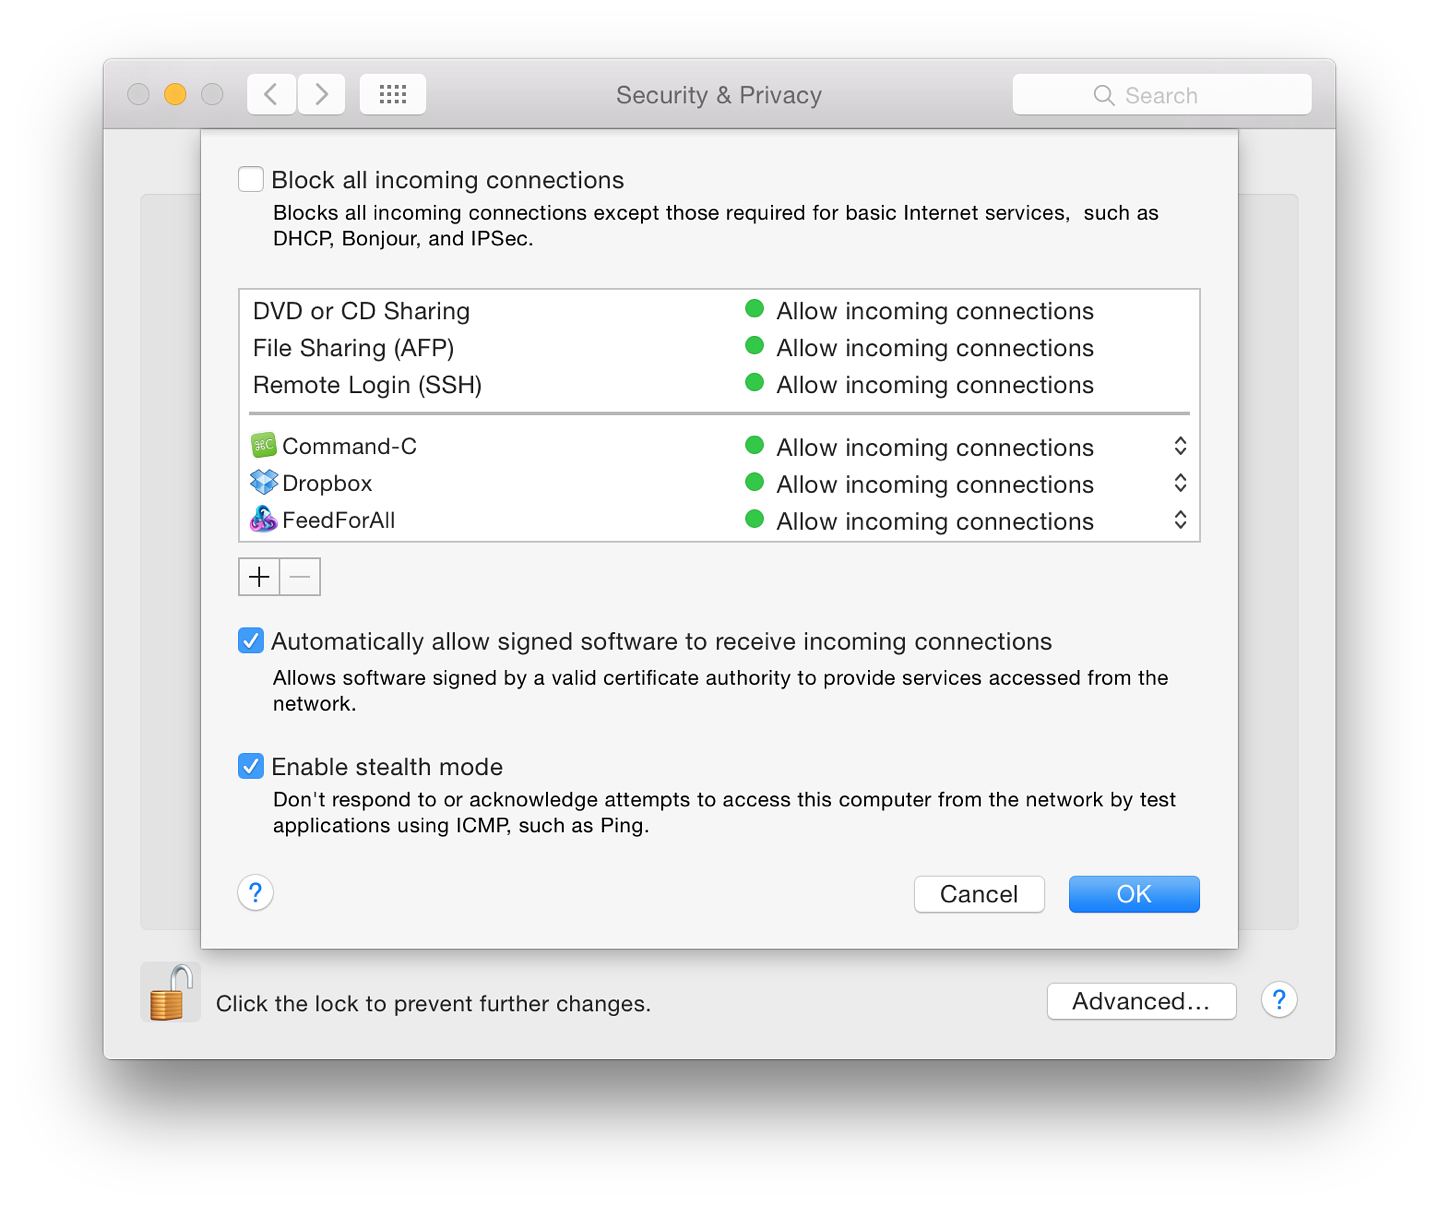
At the bottom of the panel are two icons (+/-) for adding applications to or removing them from the list. Pressing the Add (+) reveals a Finder panel which allows us to choose an item to be included. This adding is usually carried out automatically, however, when software is installed. Pressing the remove (-) deletes an app from the list with no warning, although the Cancel button will replace a deleted app. Pressing OK will complete the action.
Below the panel are two checkboxes:
To the left is a panel that shows any apps or services that are permitted to access specific types of data. Highlighting each will show in the main panel any apps affected and the type of access allowed. A user will be asked to permit such access when setting up OS X or after installing some applications.
To the left is a panel that shows any apps or services that are permitted to access specific types of data. Highlighting each will show in the main panel any apps affected and the type of access allowed. A user will be asked to permit such access when setting up OS X or after installing some applications.
With Yosemite, the list has been expanded (in the same way as in Internet Accounts and Notifications. Those listed include Accessibility
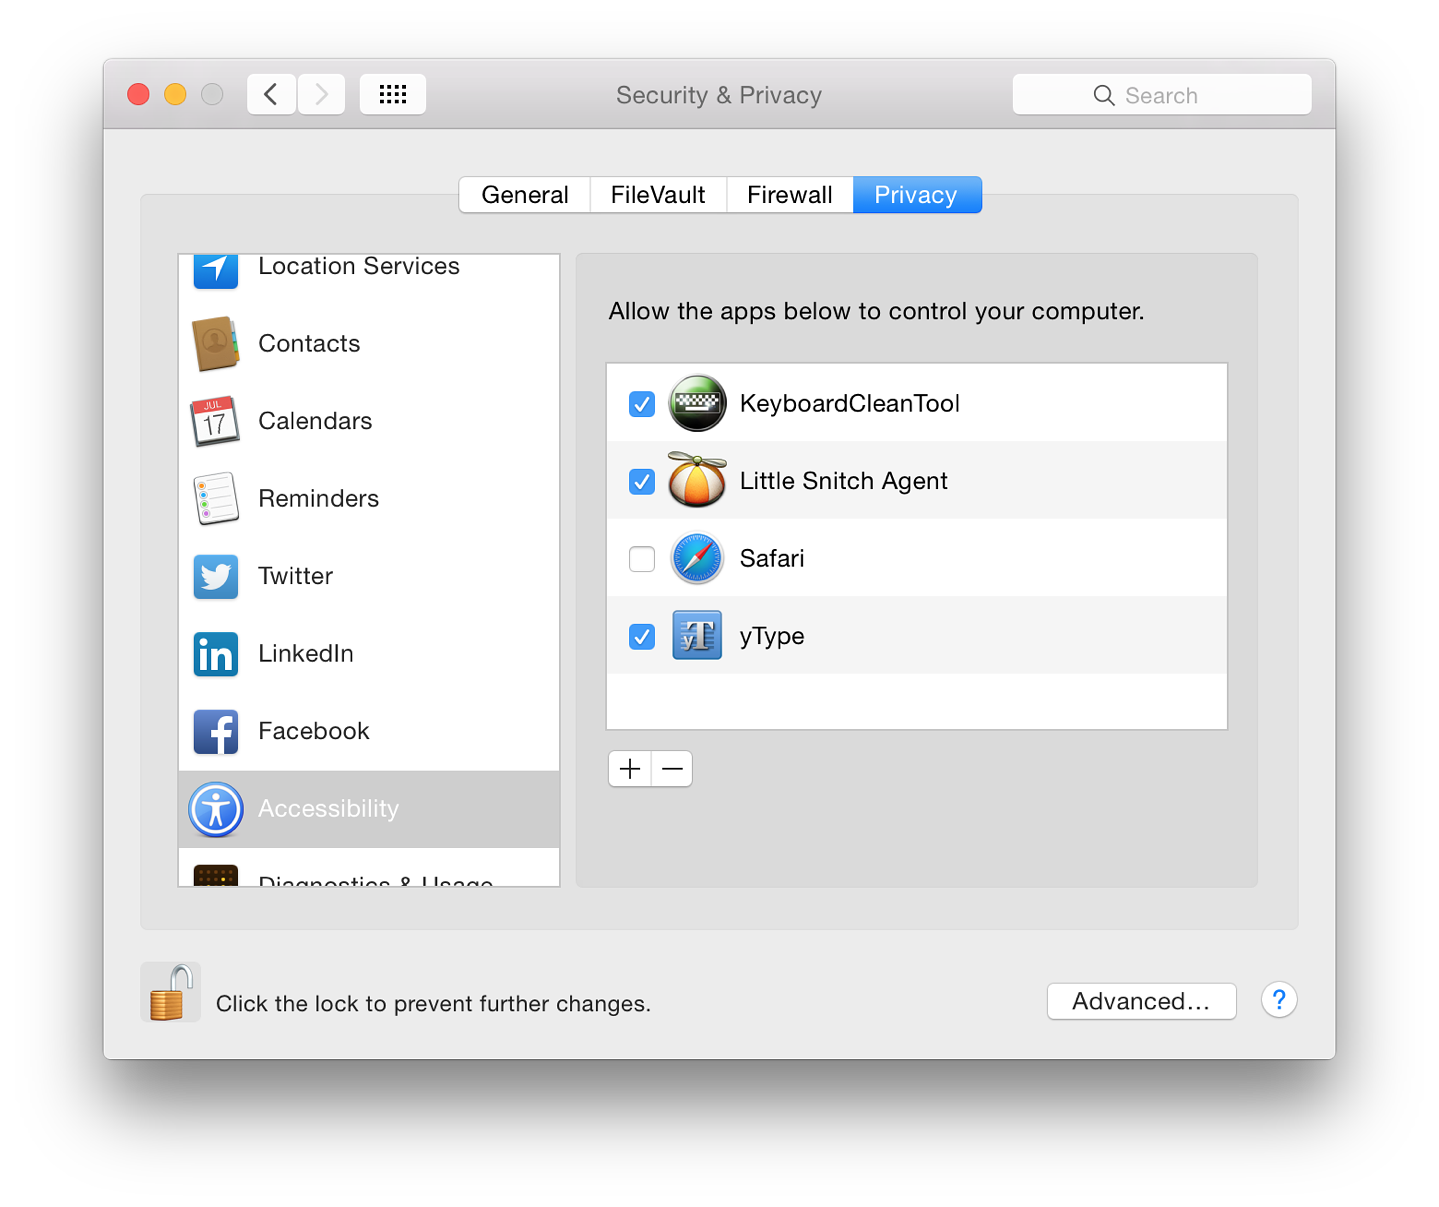
The list of apps will differ with each user. In addition, a number of system applications and services are shown:
Calendars, Facebook, Linkedin, Reminders, Twitter have no apps listed that have requested access to them so far.
System Preferences in OS X 10.10, Yosemite: Sharing |
|
![]()
There have been several changes to System Preferences in the latest version of OS X: 10.9, Mavericks. The preferences pane for Sharing has seen little change. Sharing provides settings for users to control access to and from other devices.
The preference panel for Sharing retains the updated interface with the update to OS X 10.10, with similar content and features as before. Depending on the computer, some features may not be available. All of these preferences work with Security & Privacy (and other) Preferences to enable specific connection methods to be used and to activate the necessary links when needed: for example, when we join networks and link to devices, like printers.
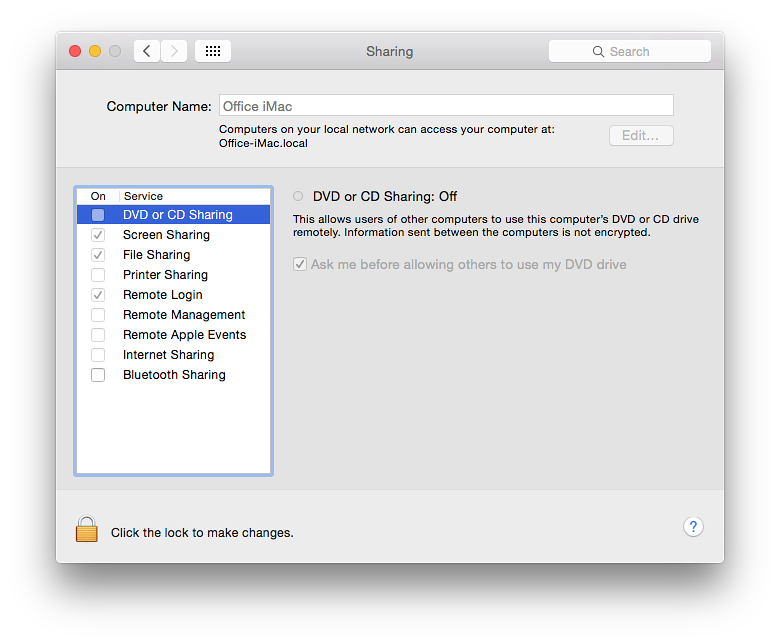
This item was originally added after the Mac Book Air was released: a disk in a computer could be used by someone on another networked computer. There is a check-box in the information section to ensure that this facility is used only with permission: "Ask me before allowing others to use my DVD drive." Other information notes that data sent between two computers in this way is not encrypted.
With the shift to Wi-Fi downloads of applications and OS X, such an option may no longer be needed on newer machines.
When the checkbox is selected, a green light is shown in the information panel and details of how to connect (IP number and Computer name) are shown. A "Computer Settings" button allows a user to limit access to the computer using this type of connection.
Connections are made by clicking on the computer name if it can be seen in the Finder panel (or using the IP number of the computer with a VNC prefix (e.g. vnc://172.102.0.241 - my office network) in the "Go" menu, Connect to Server), I can work on the target computer as if it were my own: exactly as if I am sitting in front of that computer.
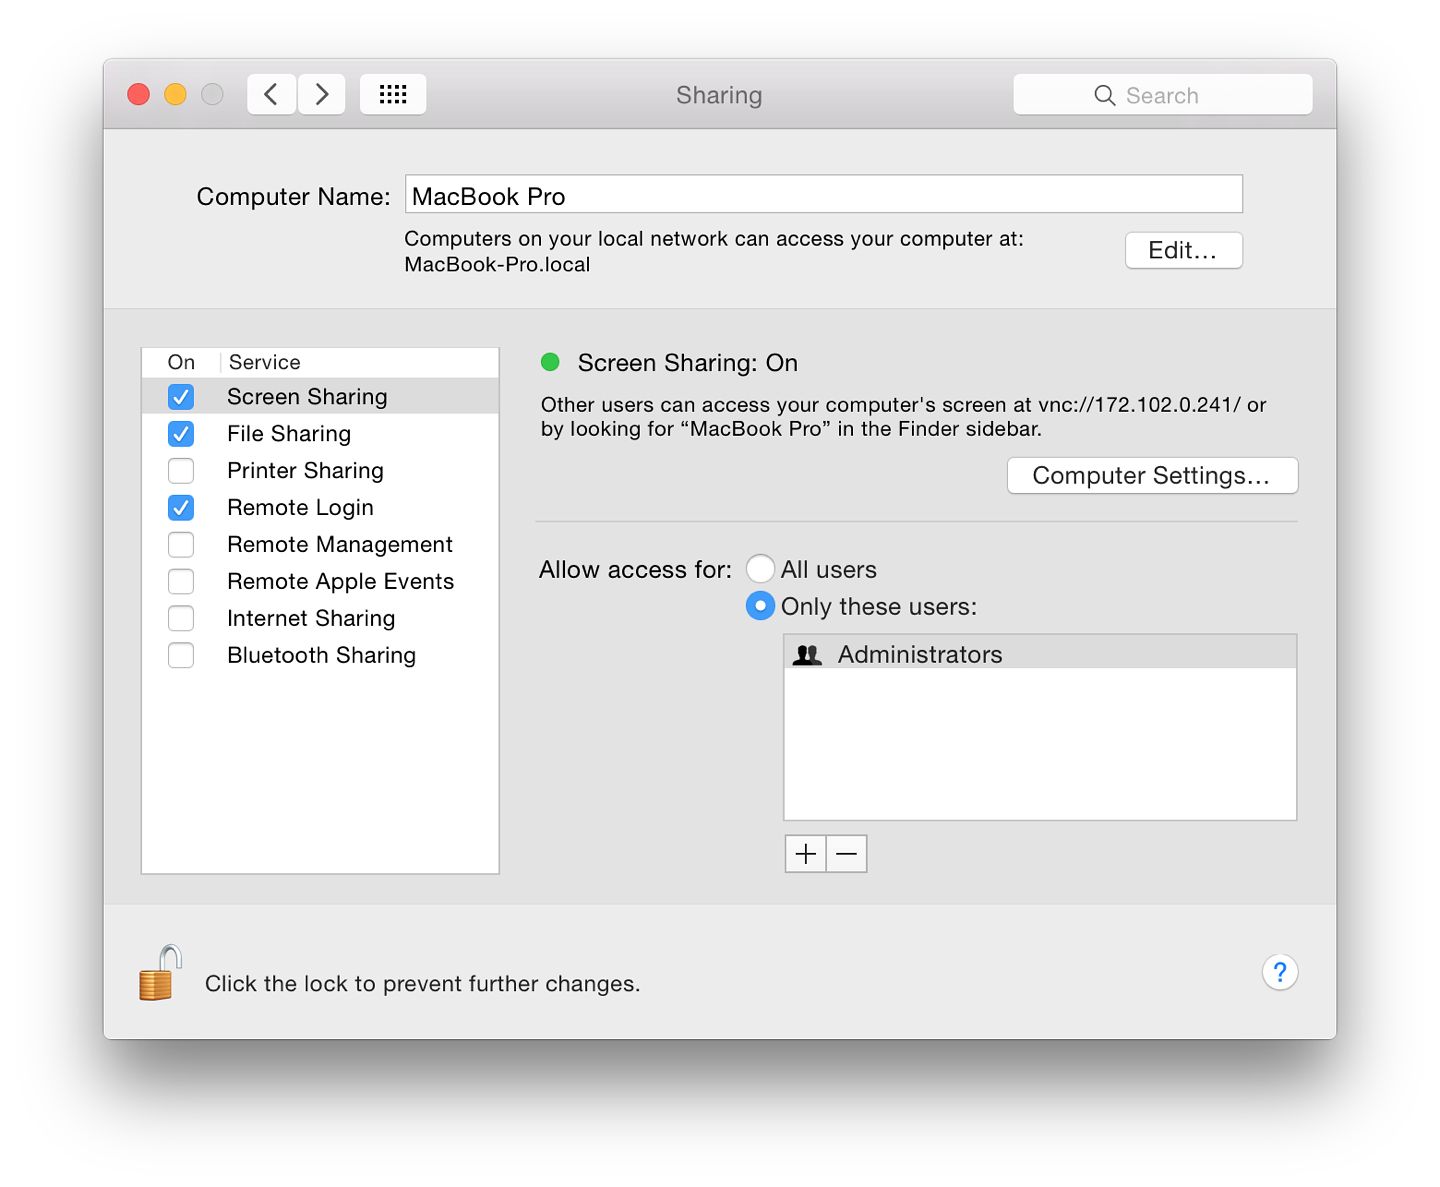
Sharing a screen requires the permission of the second user (or settings to be left open). The full desktop of the remote machine appears on the master computer and all operations can be run from there. A Screen Sharing icon also appears in the Dock and the connection can be quit using this.
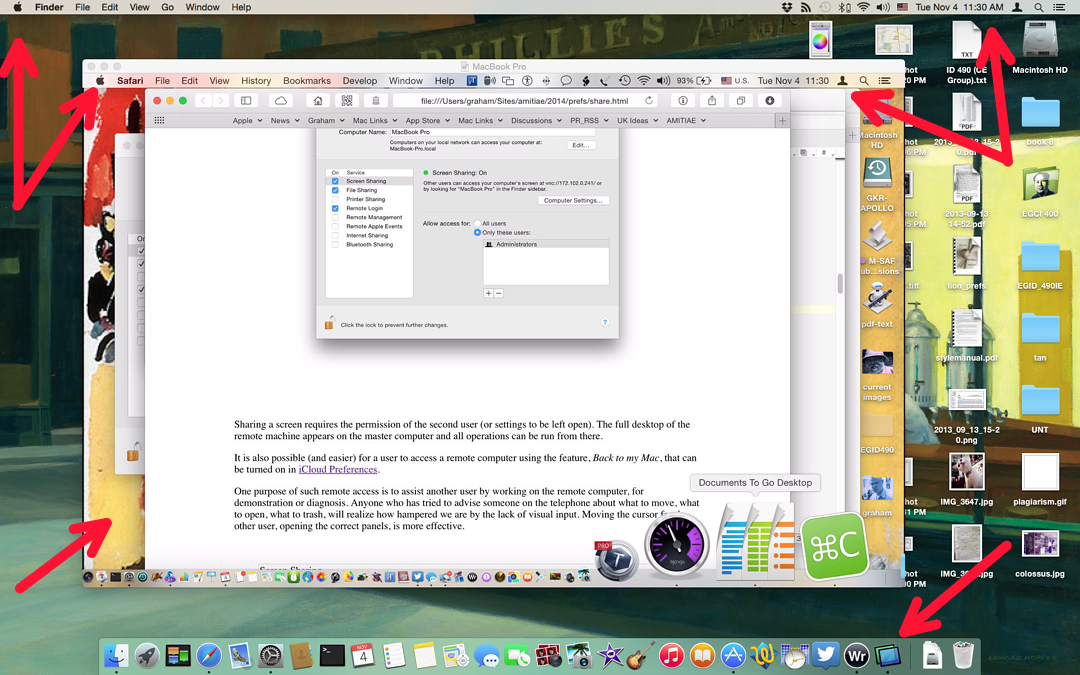
It is also possible (and easier) for a user to access a remote computer using the feature, Back to my Mac, that can be turned on in iCloud Preferences.
One purpose of such remote access is to assist another user by working on the remote computer, for demonstration or diagnosis. Anyone who has tried to advise someone on the telephone about what to move, what to open, what to trash, will realize how hampered we are by the lack of visual input. Moving the cursor for the other user, opening the correct panels, is more effective.
This preference does not allow files to be dragged from the target screen to the desktop or vice versa. However, it is possible to send the contents of the Clipboard. That data could be pasted into a file on the remote computer (by the demonstrator) and displayed. An example might be an image of settings to allow comparison by the second user. Far easier these days, however, is the use of Airdrop if using two computers that are so-equipped.
To stop the connection we use the Screen Sharing menu and Quit. See also Remote Management (below). I normally keep this item unchecked (in Sharing and in iCloud) for reasons of security and access the feature only when needed. For simple file transfers between computers, I prefer to use the Public folder (see below).
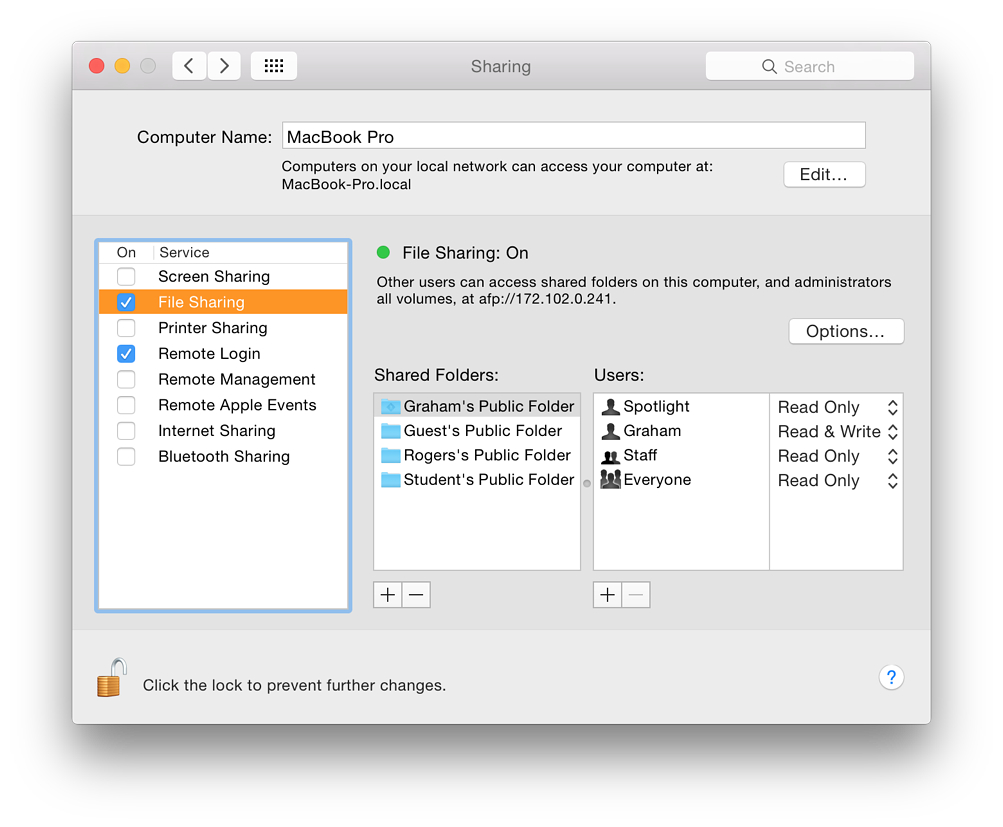
An Options button brings up a panel with the types of connection that are available: AFP and SMB. These are made active using checkboxes. There is no longer a warning concerning password use with SMB. Activating this for any account needs the password for that specific account. There is a warning about use of Windows users' account passwords on the Mac.
The main panel lists the users and the type of access (Read & Write, Read Only, Write Only). It is possible to add new folders, new users and new groups using the + and - icons below. Spotlight is shown as a User in the list. This has Read Only access.
Printer Sharing allows users to have a single printer, for example attached to my iMac using USB and to print via the LAN. The Printer Sharing option was turned on for the iMac. A button near the top of the pane allows direct access to the Printer & Scanner preferences panel.
Two data panels list any printers that are connected. More may be added using a checkbox. The second panel lists those who are allowed access. In my case, Everyone is shown, but I may add a specific account or user (or other) using the panel revealed by pressing the + icon.
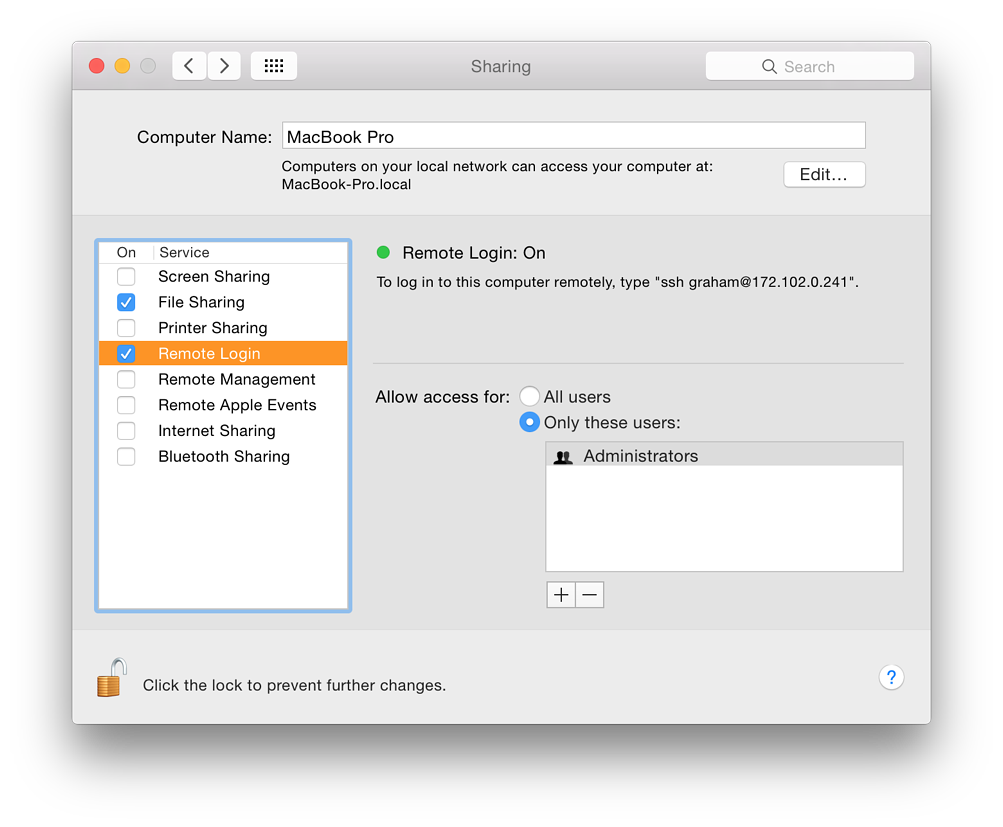
The Finder "Go" menu uses several ways to connect quickly to folders on the user's computer or to remote devices using "Connect to Server" (Command + K) which reveals a panel.
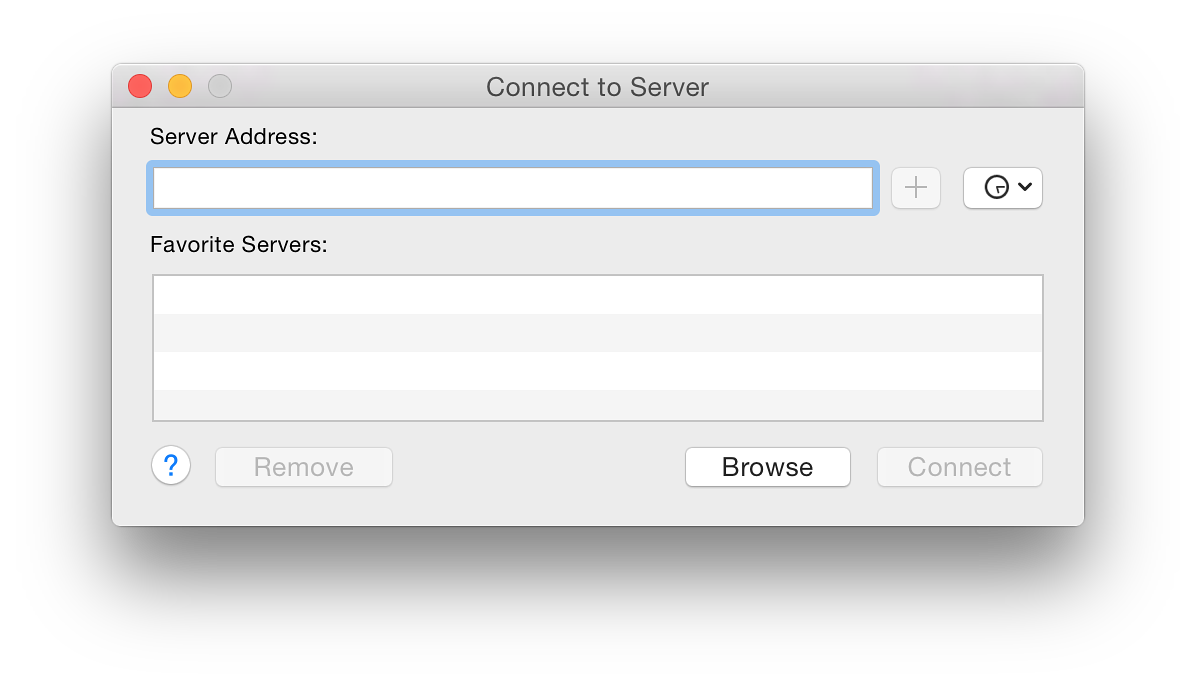
We may then browse for another computer using SSH with the user name plus the IP number (e.g. ssh graham@192.168.10.10). With recent changes to the operating system, it is now easier to use "Shared Devices" in the Finder menu. Over the years, I have found this feature really useful when running a couple of Macs on a network, giving me the ability quickly to access, copy or transfer files between the computers.
When Remote Management is first selected, a panel is opened automatically (it may also be seen by pressing the Options button) that allows a user to select certain functions. This supersedes Screen Sharing and Screen Sharing is disabled if selected.
A button in the top half of the information screen is marked Computer Settings. This reveals a panel with several options, including Screen sharing items. There are three checkboxes:
Four boxes below allow entering of computer information for display in a System Overview report.
Like Screen Sharing, in the lower section of the information panel a user may select to allow either All or Only specific users to be granted access. Users can be added or removed using + and - icons beneath the user-list panel.
Events can be initiated by programs or Apple Scripts and are a way to use the resources of one computer from another, such as shutting down or opening a file. A simple example from the past is the command to print (this now has a specific Sharing panel). This type of feature would be more common in an office where several Macs are used and the sharing of data and resources is integrated into operations.
A 2006 document on AppleScript by William R. Cook et al (available online as a PDF), contains several pages (9-13) that may provide some useful background.
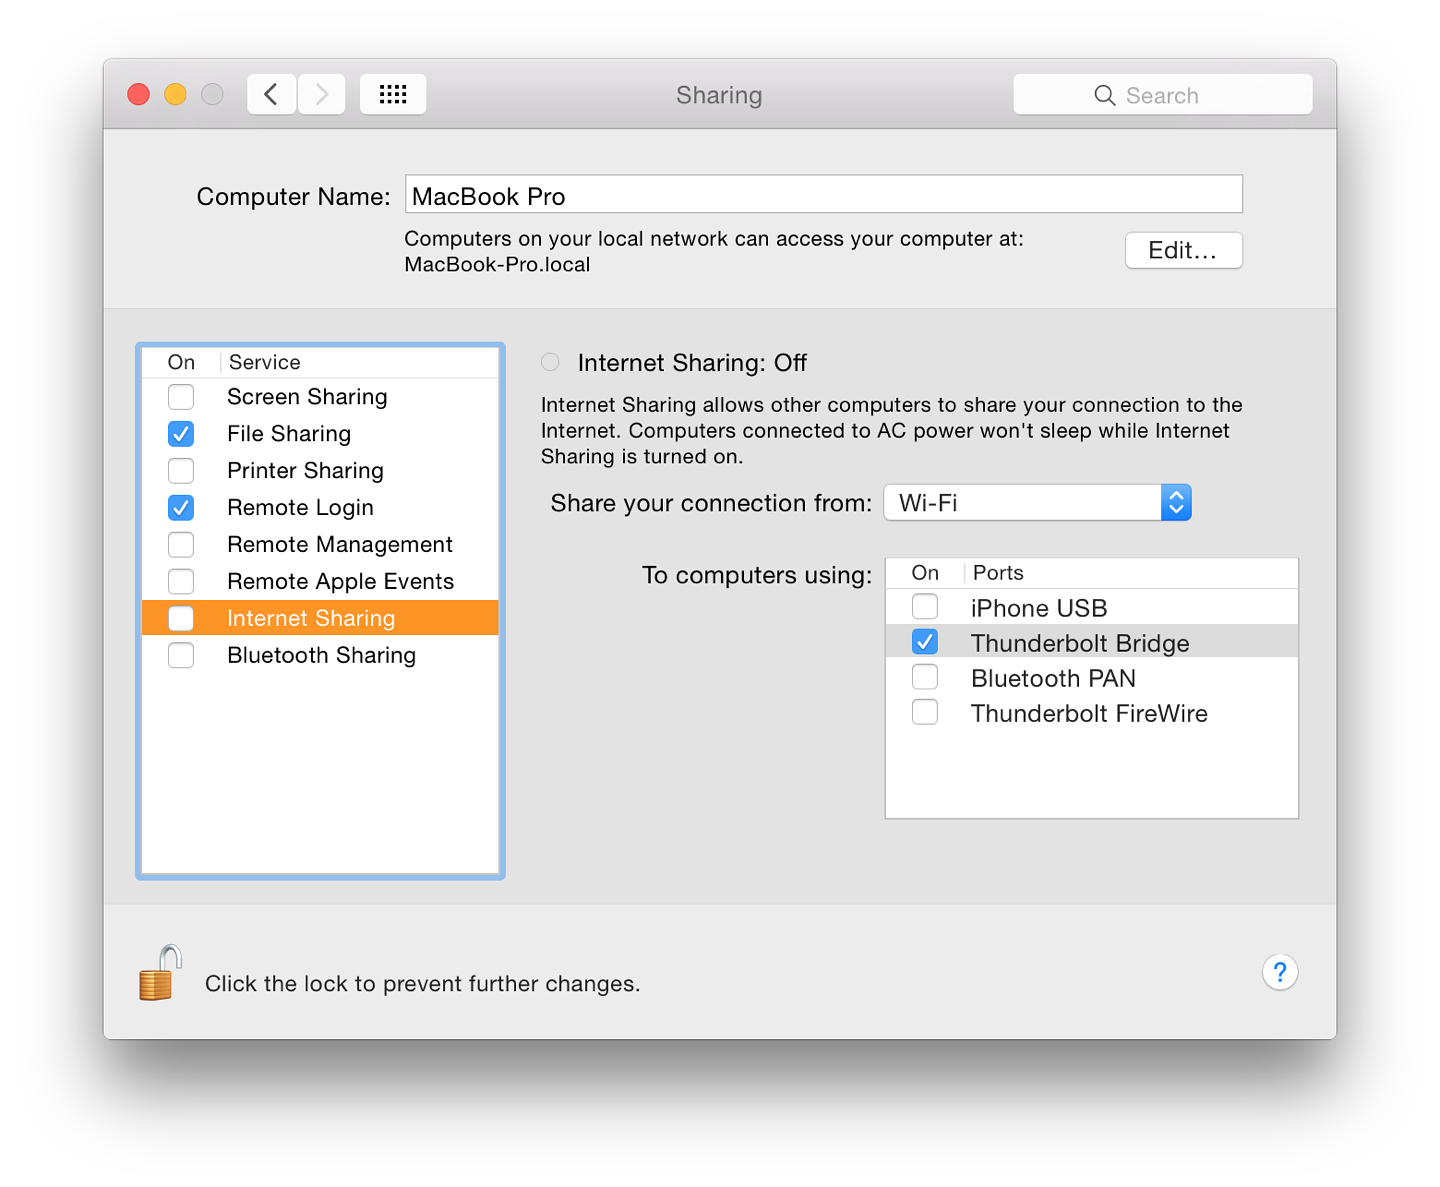
That incoming signal can be routed to another device - as Output - via a port that is different from Input.
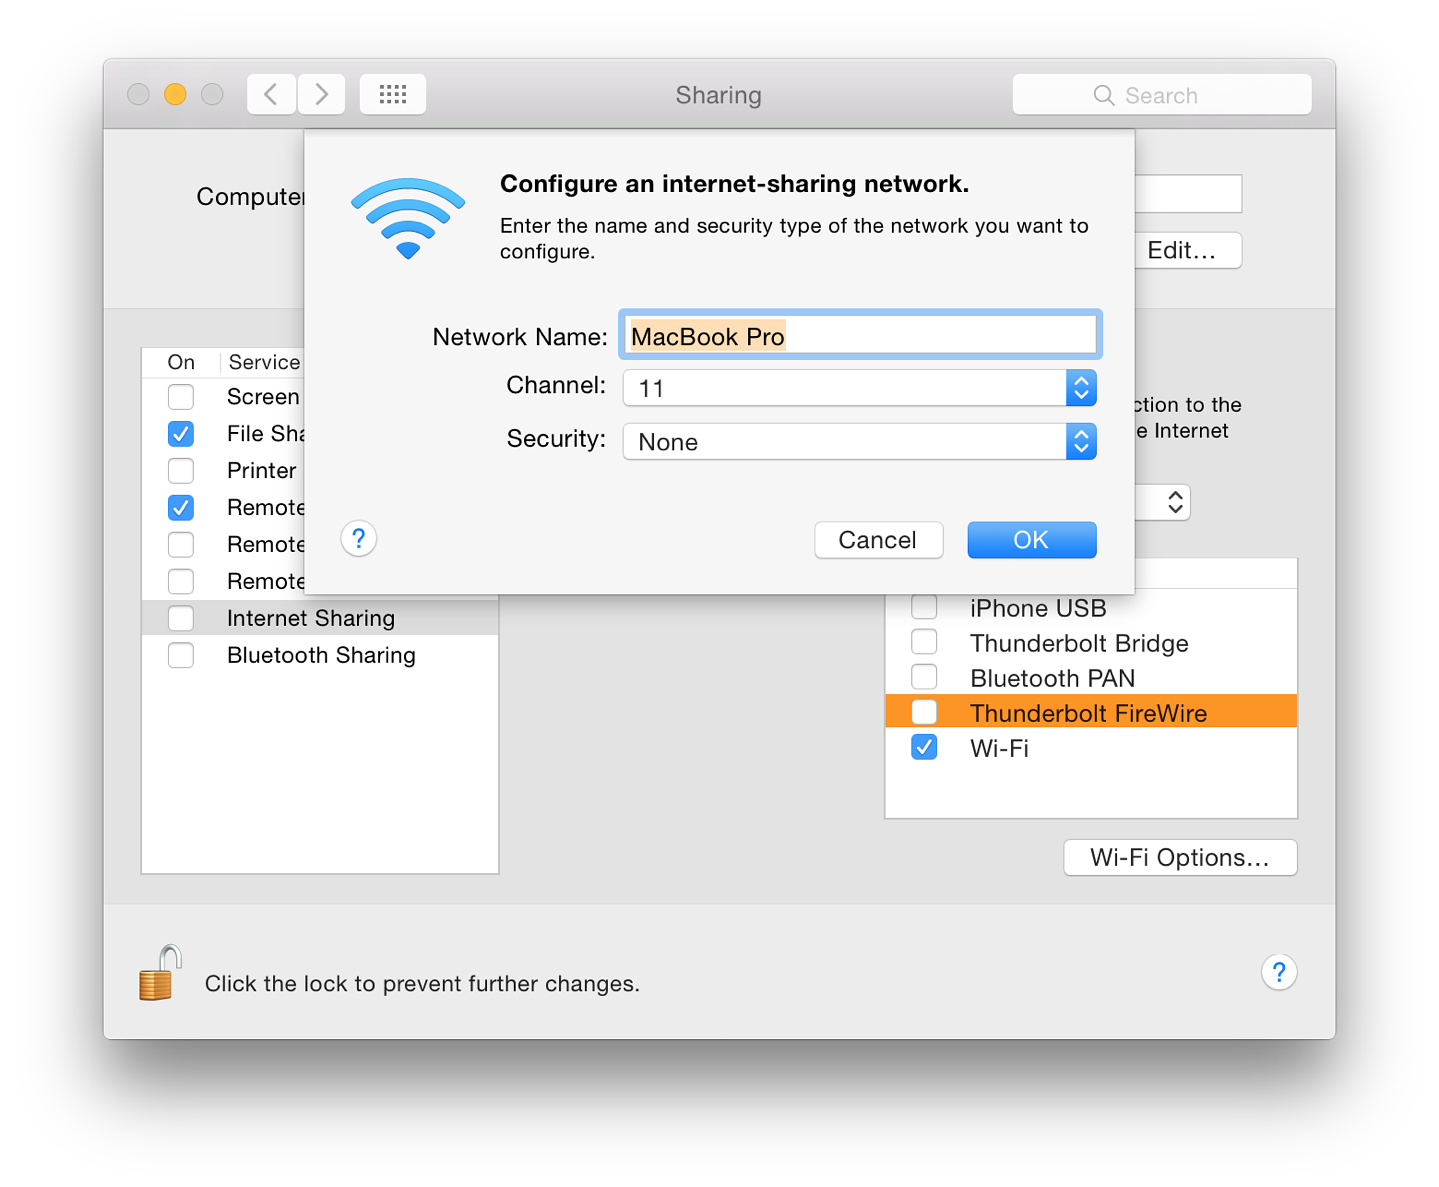
When any Wi-Fi output is selected a Button for Options becomes live and a panel opens to allow configuration of the network: Name, Channel (from 1 - 11), and Security (None, WPA2 Personal).
When the Internet Sharing checkbox is selected a panel warns users of possible settings changes.
A possible scenario is that a computer with no wifi can be connected to a machine that has a wifi antenna (data in) using a direct Ethernet cable. Also, in the past, when I was testing a computer with wifi, but had no spare cable in the room I was using, I could connect my computer to the router with an Ethernet cable and then create a wifi network on that Mac that the second computer could link to.
More up to date, for some users of course, is the use of iOS devices and turning on Personal Hotspot. The Mac will link to this and it behaves like a Wi-Fi network.
As one part of the changes to OS X 10.10, Yosemite, the Wi-Fi menu in the menu bar now also displays a specific iPhone item if a suitable device is available. See also Network Preferences.
There are two main parts to the panel. The top section deals with file transfers and has a button with options about actions to be taken (Ask, Accept and Save, Accept and Open, Never Allow). A second button enables the selection of a folder for transfers. The default folder is Downloads, but there is an option for Other, allowing a user to select any suitable location.
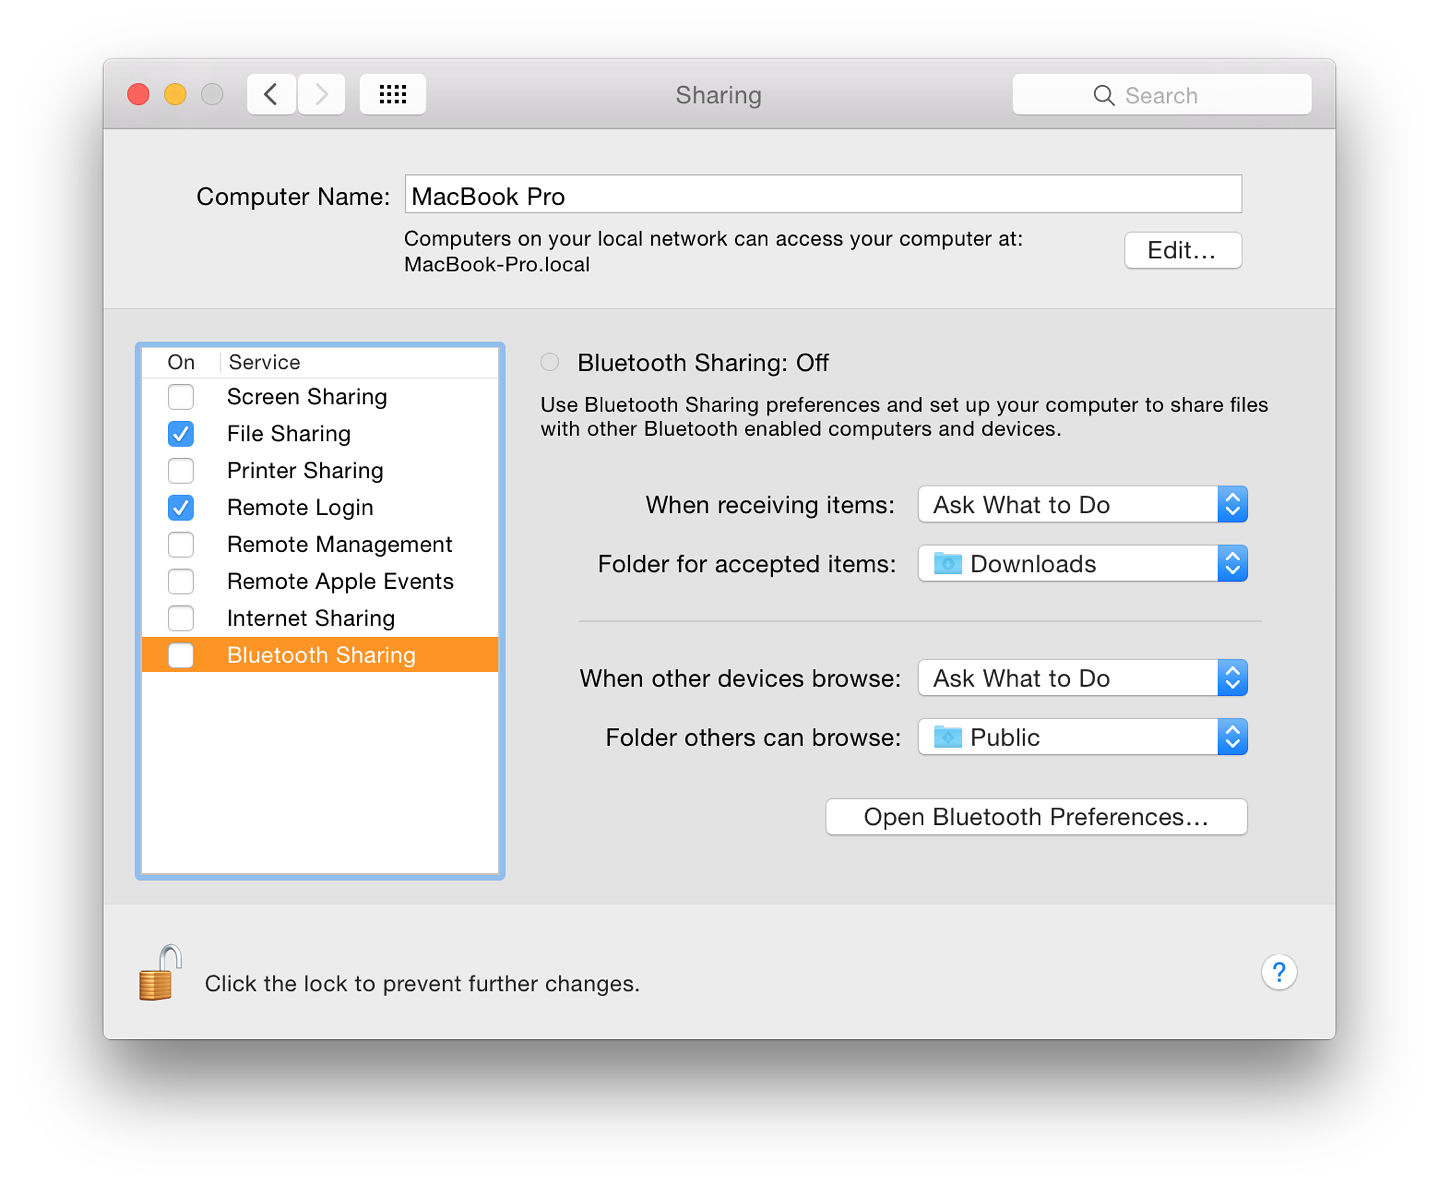
The other part of the main panel is for users to decide on actions when other Bluetooth devices browse the computer. A button has the default, Ask What to Do with options of Always Allow and Never Allow. A second button indicates the folder that such browsing devices may access. The default is Public (see File Sharing above) with an Option for Other, allowing a user to select any suitable location.
A button at the bottom of the panel allows a user to open the Bluetooth preferences panel.
System Preferences in OS X 10.10, Yosemite: Sound |
|
![]()
Some of the System Preferences in the recent update of OS X to 10.10, Mavericks, have seen little change. For example, the preferences pane for Sound appears the same as it has since OS X 10.7, although with Yosemite there have been a number of cosmetic changes. Sound provides settings for effects used by OS X and for control of input and output devices.
The Sound preferences panel is in three sections: Sound Effects, Output and Input. These appear identical to what had been available in earlier versions of OS X.
At the top of the panel is a list of 14 sounds available. To the left is the name of each effect. These sounds are shown (to the right) as "Built-in". Some of the sounds have been used on Macs for several years and were available pre-OS X. As a sound is highlighted, so the user will hear it played.
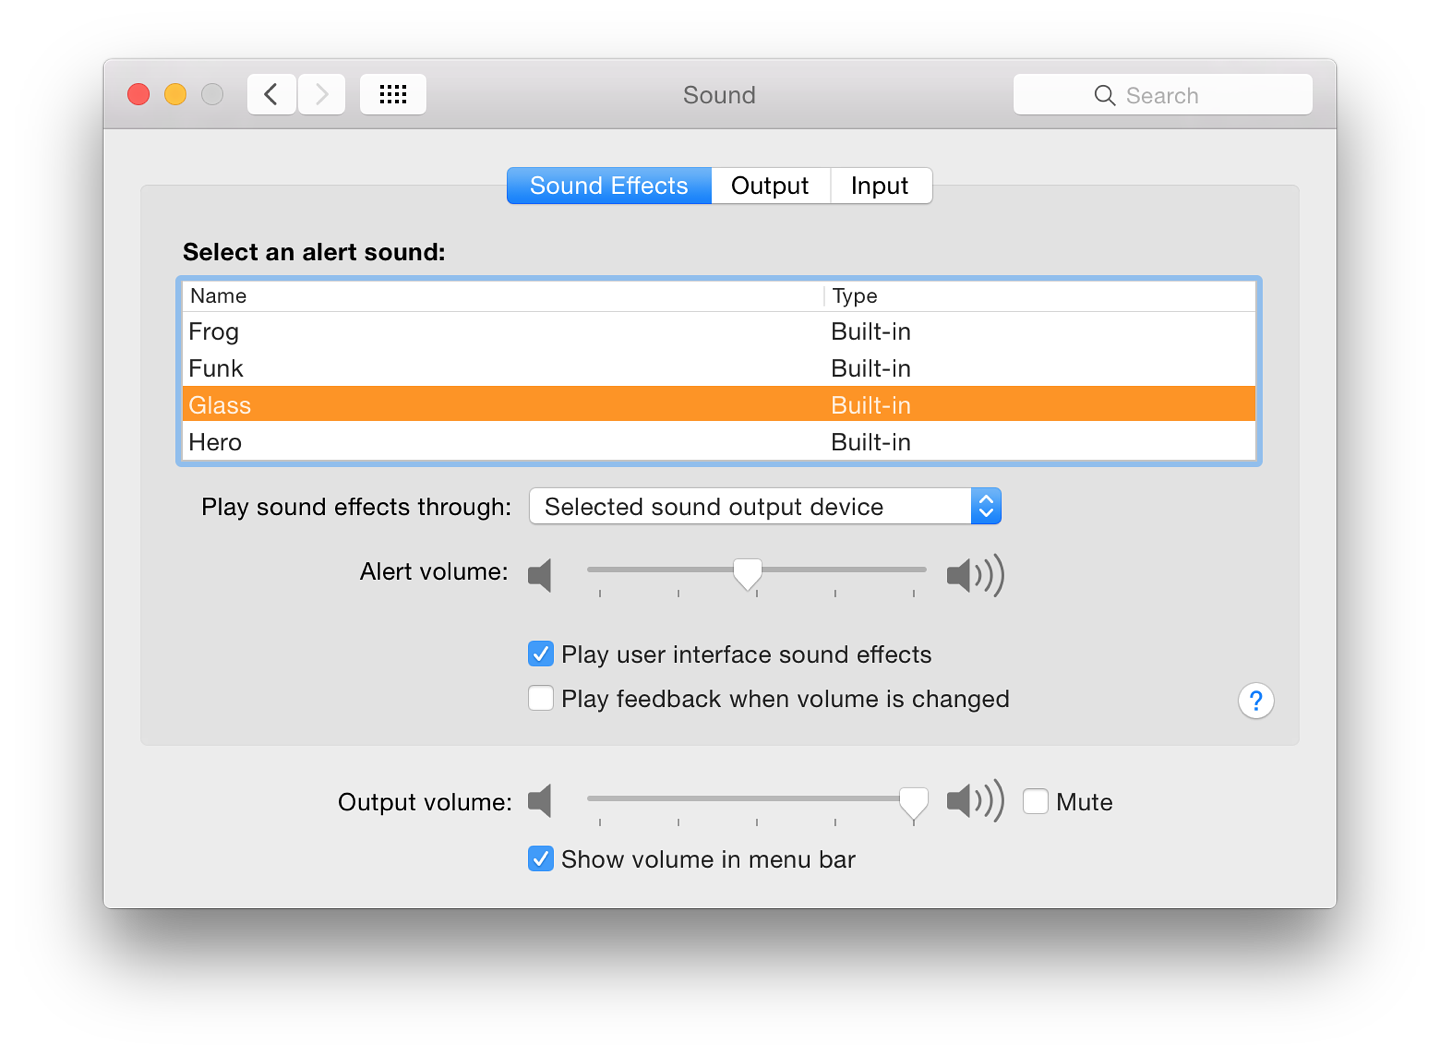
A button below the panel selects which speaker is used for the sound output. By default it is marked Selected sound output device and will list any options available, with Intermal Speakers always shown. This is the default. Attaching external speakers or headphones will change the device name as OS X identifies the type of output.
Below the button is a slider to adjust the volume of the alert when played. This is independent of the Output volume (for example of music) which is controlled by a separate slider near the bottom of all panes in Sound preferences. Between the two sliders are checkboxes for Play user interface sound effects; and Play feedback when volume is changed (a separate alert sound is used).
 Alongside the Output volume slider is a box that can be checked to Mute all sounds (including alerts). Pressing the F10 key (or Fn F10) will also mute the sounds. When that key is pressed, the Mute box is also checked.
At the bottom of the panel is a checkbox marked, "Show volume in menu bar." This shows as a small speaker icon in the menu bar which indicates speaker output volume by the number of bars. Pressing the icon reveals a (vertical) slider which is used to adjust the voume.
The alert sound files are contained in a Sounds folder inside the System > Library folder of the disk. They are in AIFF format with sample rates of 44,100 or 22,050 and time duration of a second (or less). Dropping a suitable file into the folder, then restarting System Preferences, will make the new sound available in the list as "Built-in".
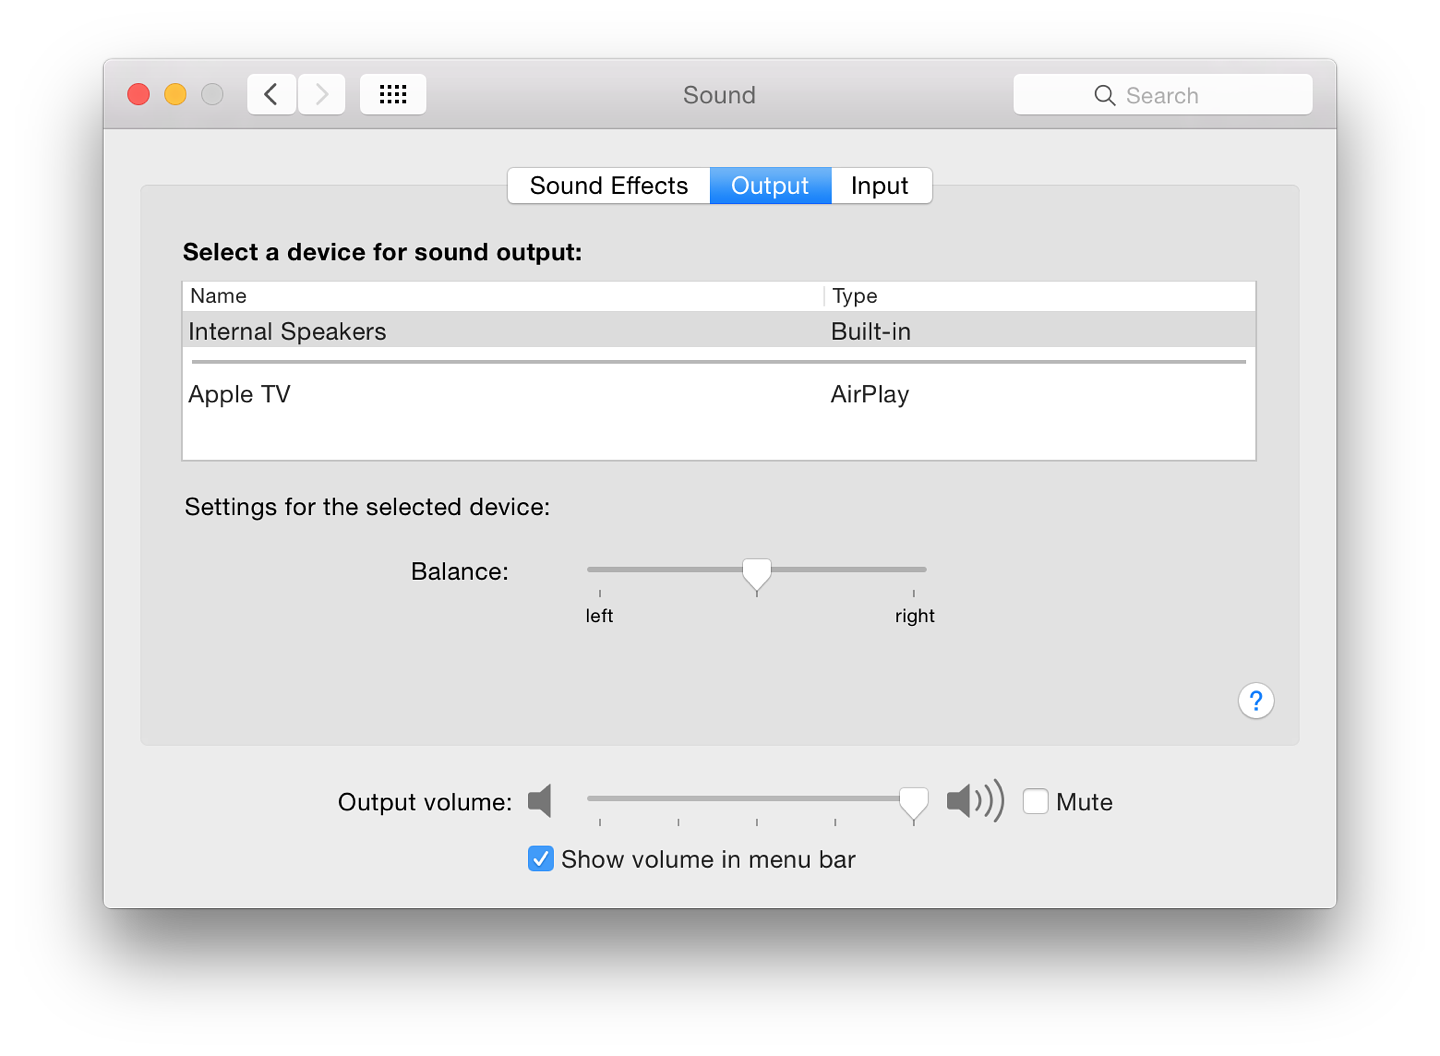
Adjusting the Balance slider also makes the same system alert sound as the volume adjuster (also displayed in this panel) to show that changes are being made. When additional output devices are added, the panel changes to show these.
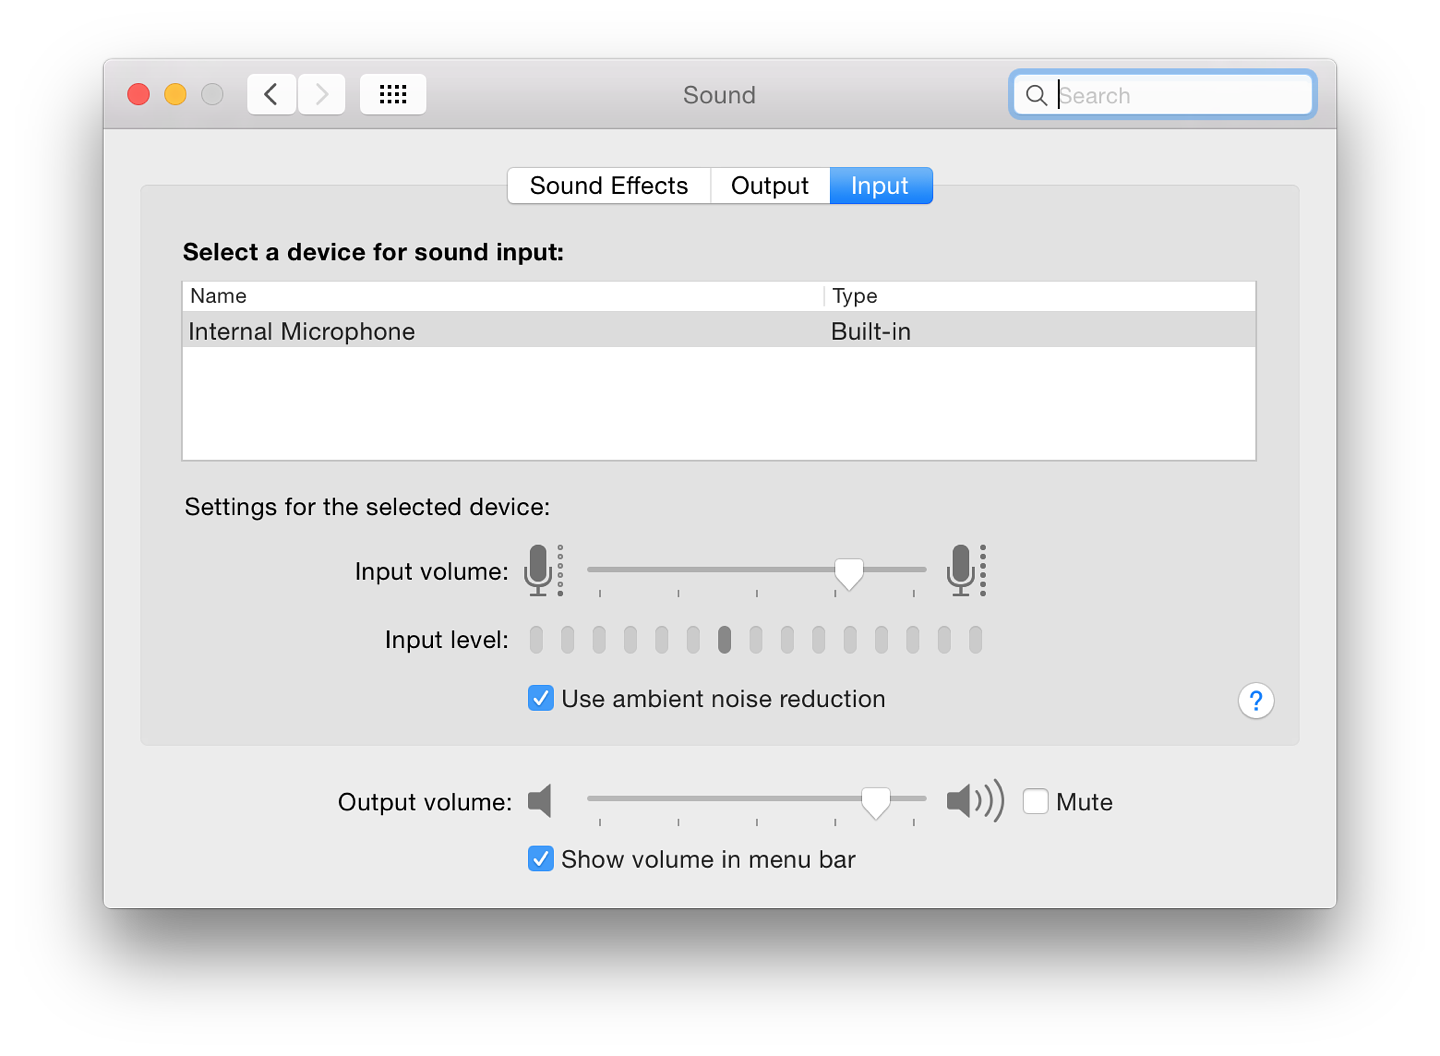
Below these items are an Input volume slider and Input level indicators which light up as the volume increases. There is also a check box marked "Use ambient noise reduction". This may not be available for all devices. With the built-in microphone this is available. However, with my G-Track USB microphone, this check box is no longer available; and the input volume slider is also missing. As with the other panels, the volume slider and its menu-bar check box are shown on the Input pane.

System Preferences in OS X 10.10, Yosemite: Spotlight |
|
![]()
In the recent update of OS X to 10.10, Yosemite, some of the System Preferences have seen subtle changes. Content in the preferences pane for Spotlight has had some small changes. The interface has also been considerably changed. Spotlight is a search facility that helps users find things on the computer quickly. New features for online searching may not be available in some regions.
Spotlight is a search facility that was introduced originally with OS X 10.4. It uses HFS (hierarchical file system) to find information on a user's disk and integrates with the Finder. In theory, any data recorded on the disk, including text, file names and file metadata, are indexed by Spotlight. It is possible to prevent such indexing with the Privacy settings.
There is also a facility for searching online using sources such as Wikipedia, Google and Bing (and more). This may not be available in some regions (see Notes below).
The main panel is in two parts: Search Results and Privacy.
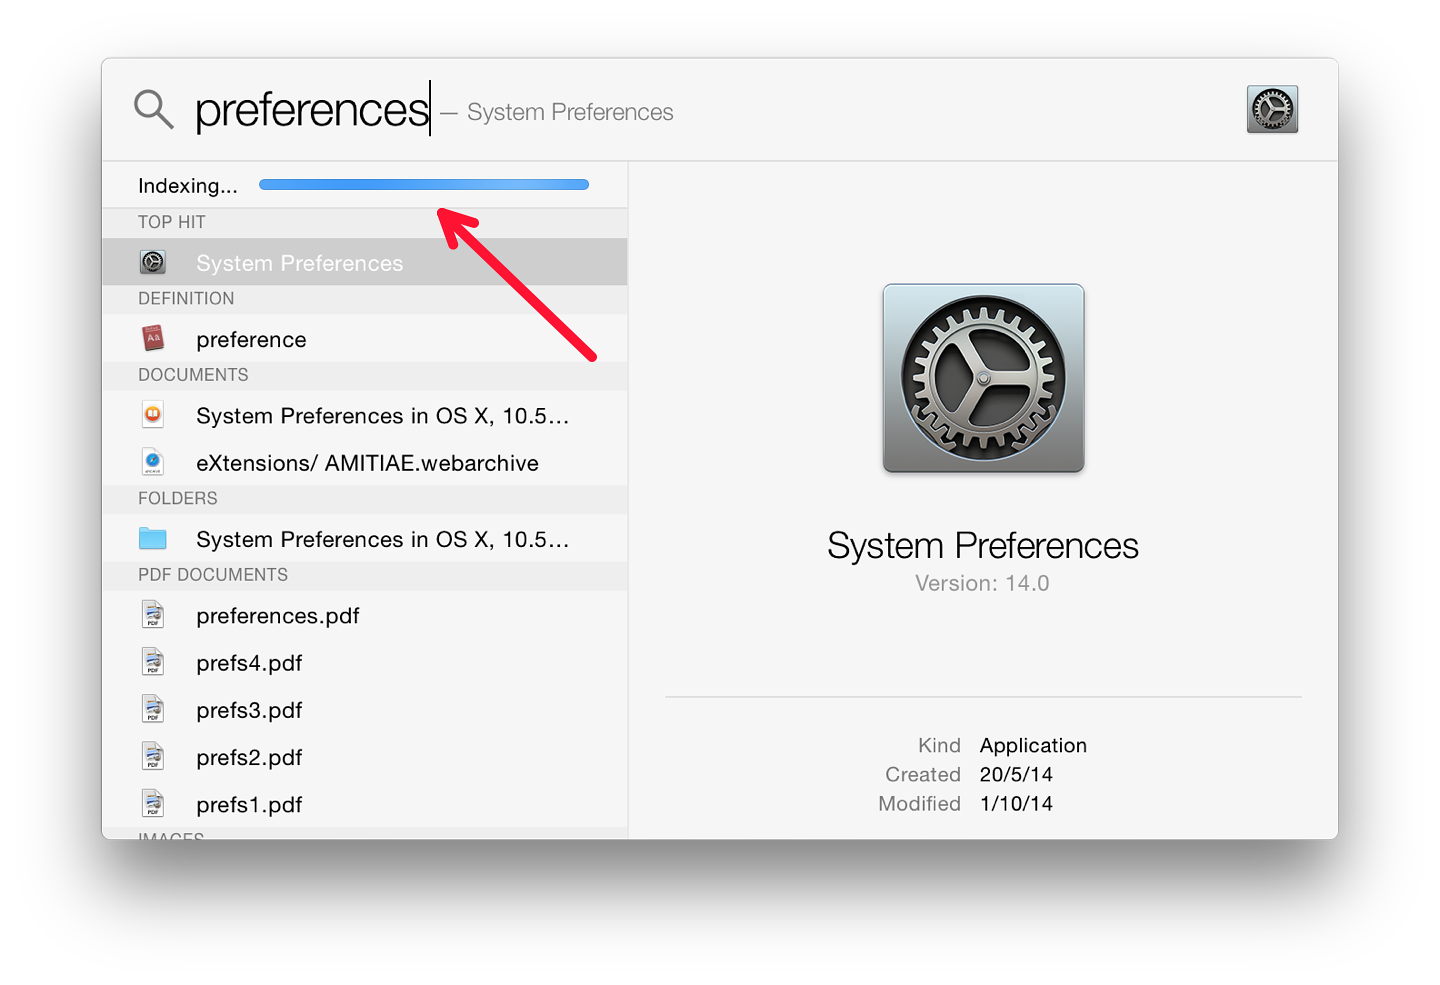
Spotlight now uses 22 categories in searches. These are shown in the Spotlight preference, "Search Results" panel. There are a number of additions and changes here. There are now no icons used in the categories listing. The Spotlight search may offer several results, some of which might not be related to the user's search needs.
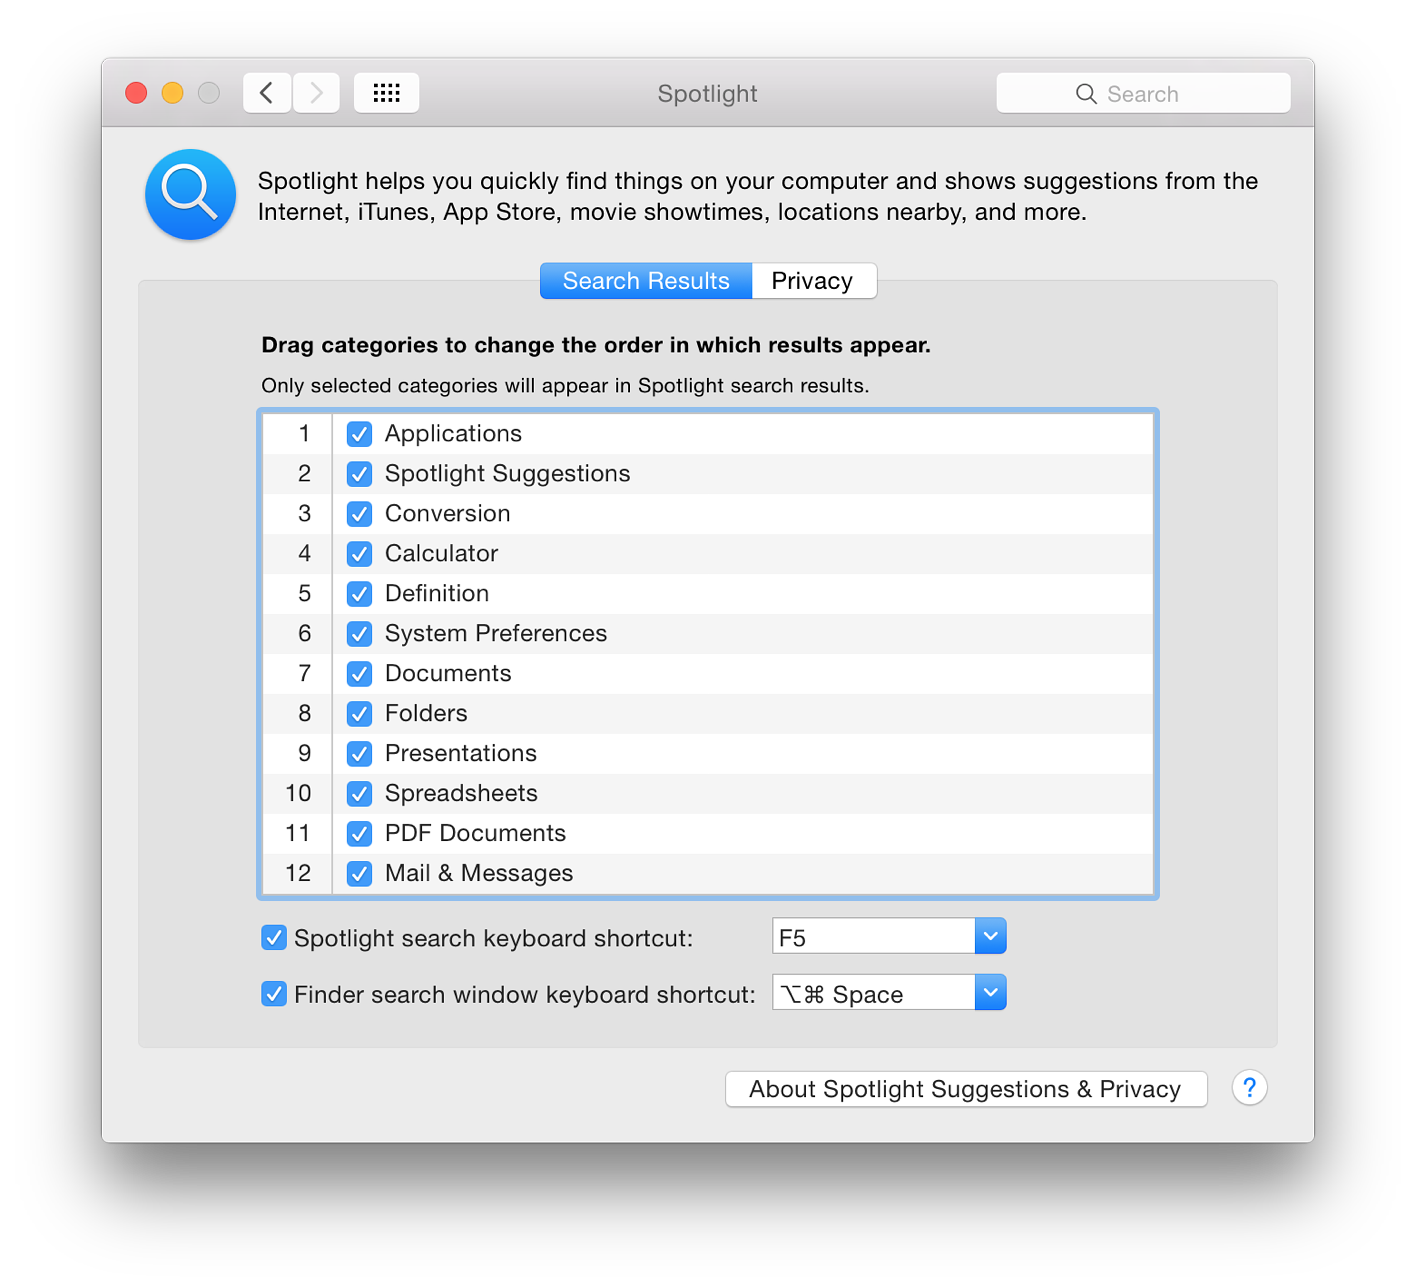
Each item has a check box so can be deselected. A category can be dragged up or down the list to change the priority of results. In my user account, "Documents" is the top category, followed by "Presentations", with "Developer" last. I leave "Fonts" unchecked, so this is not included in any Spotlight search.
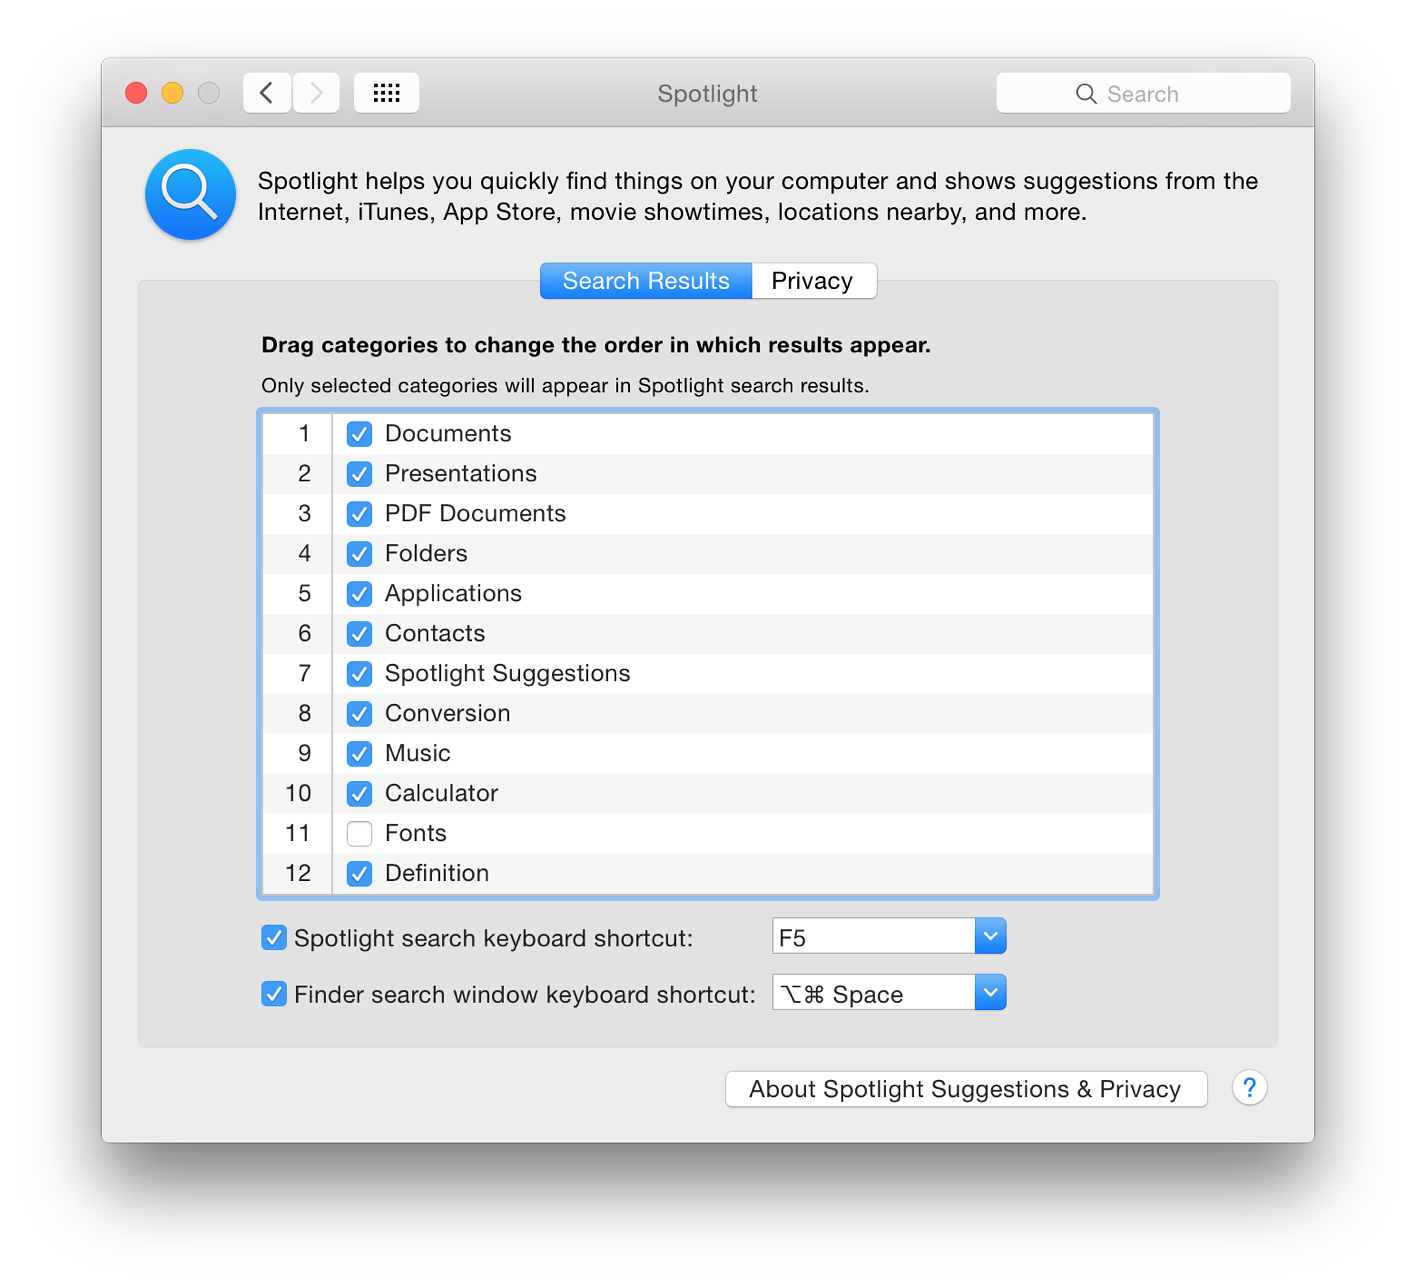
Updating Spotlight should occur immediately a file is saved. If I search for that last sentence, my text file should be the top hit: it is a Document and, chronologically, the most recent. If not, using "Show all in Finder" should reveal the file in a refined search.
At the bottom of the Search Results panel, there are two checkboxes. The first is for the menu keyboard shortcut. The default is Command + Space. Earlier this was greyed out on my MacBook Pro as I use this key combination to switch keyboards. However, in the most recent installations, the key now allocated (for my use) is shown as F5 (Fn + F5 is used).
The second checkbox is for the Spotlight window shortcut. When this is used (in my case Option + Command + Space) a Finder search window is opened. This is the same window as when the "Show all in Finder" command is used in a basic Spotlight search.
By pressing a button at the side of each of the text boxes, a number other key commands are made available as options. If one is selected that is already allocated to another feature, a yellow warning triangle will appear to the right. With the text box open, it is possible to type in another key combination, although not all are accepted.
In previous versions of OS X, these buttons were also available in the Privacy pane. That is no longer the case.
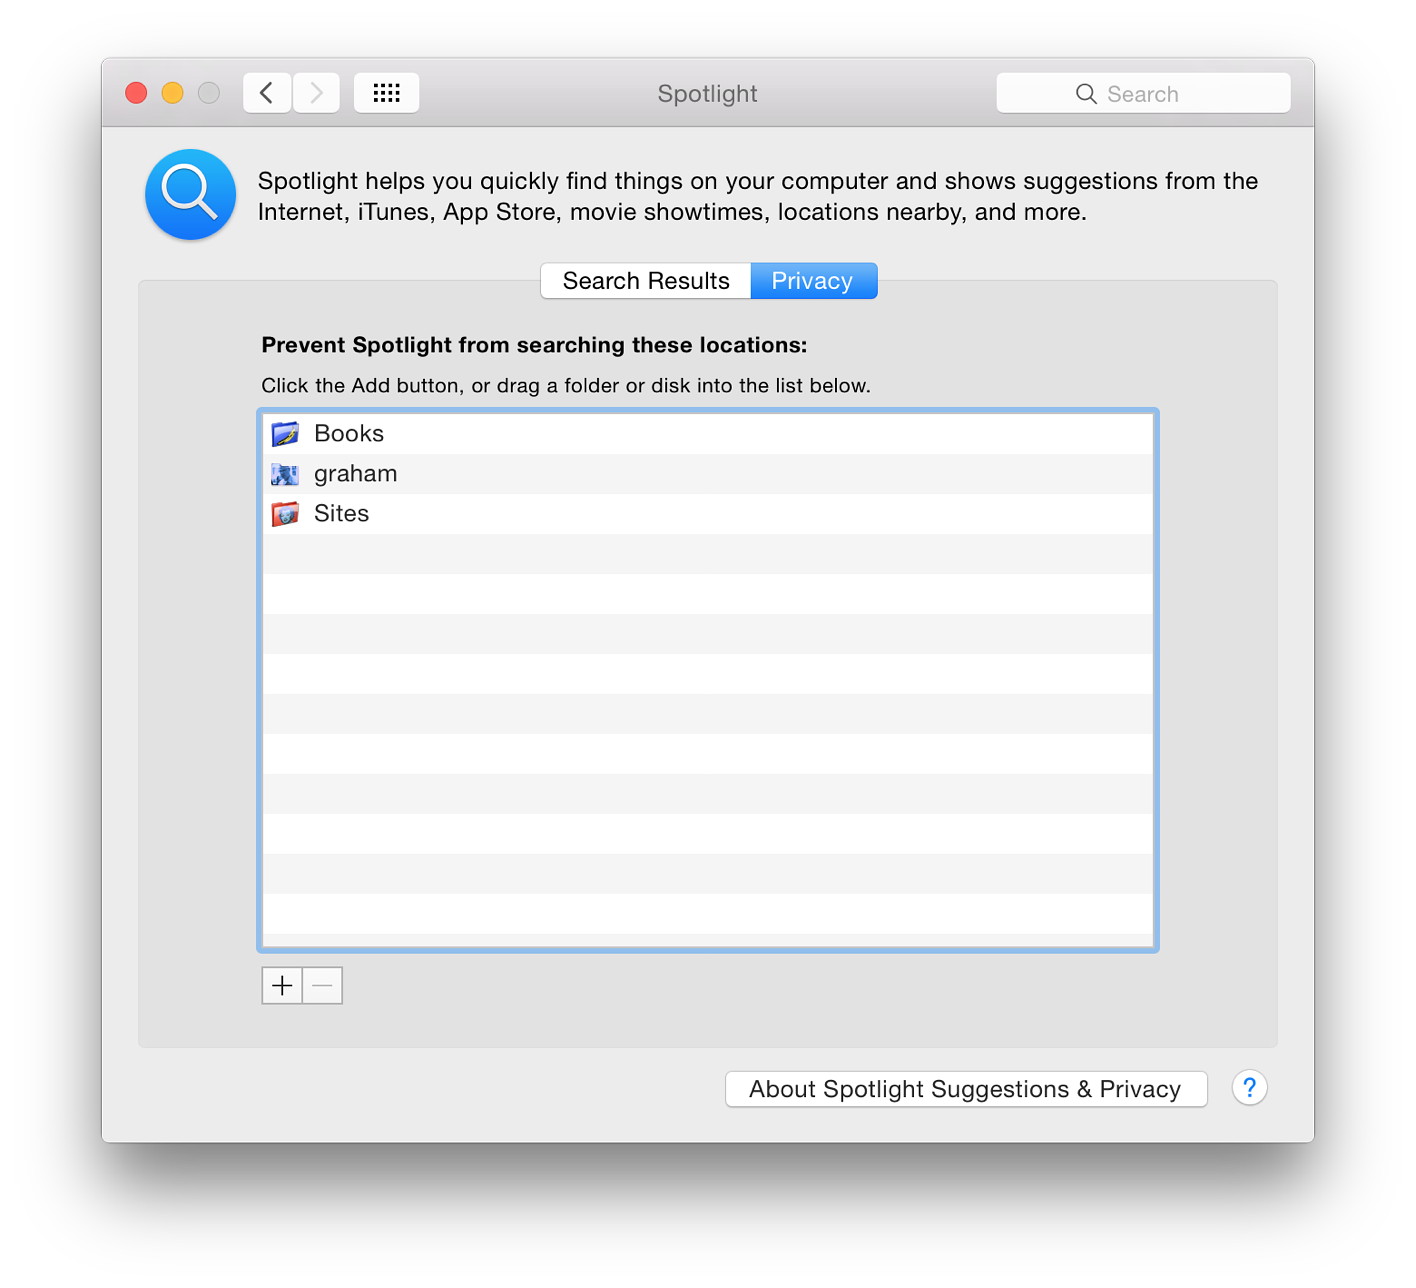
This panel has another valuable function for updating the Spotlight database. If a folder or disk is dragged into the panel, then dragged out again, Spotlight will then re-index that location. This includes the computer's hard disk, so is a way to re-index the disk.
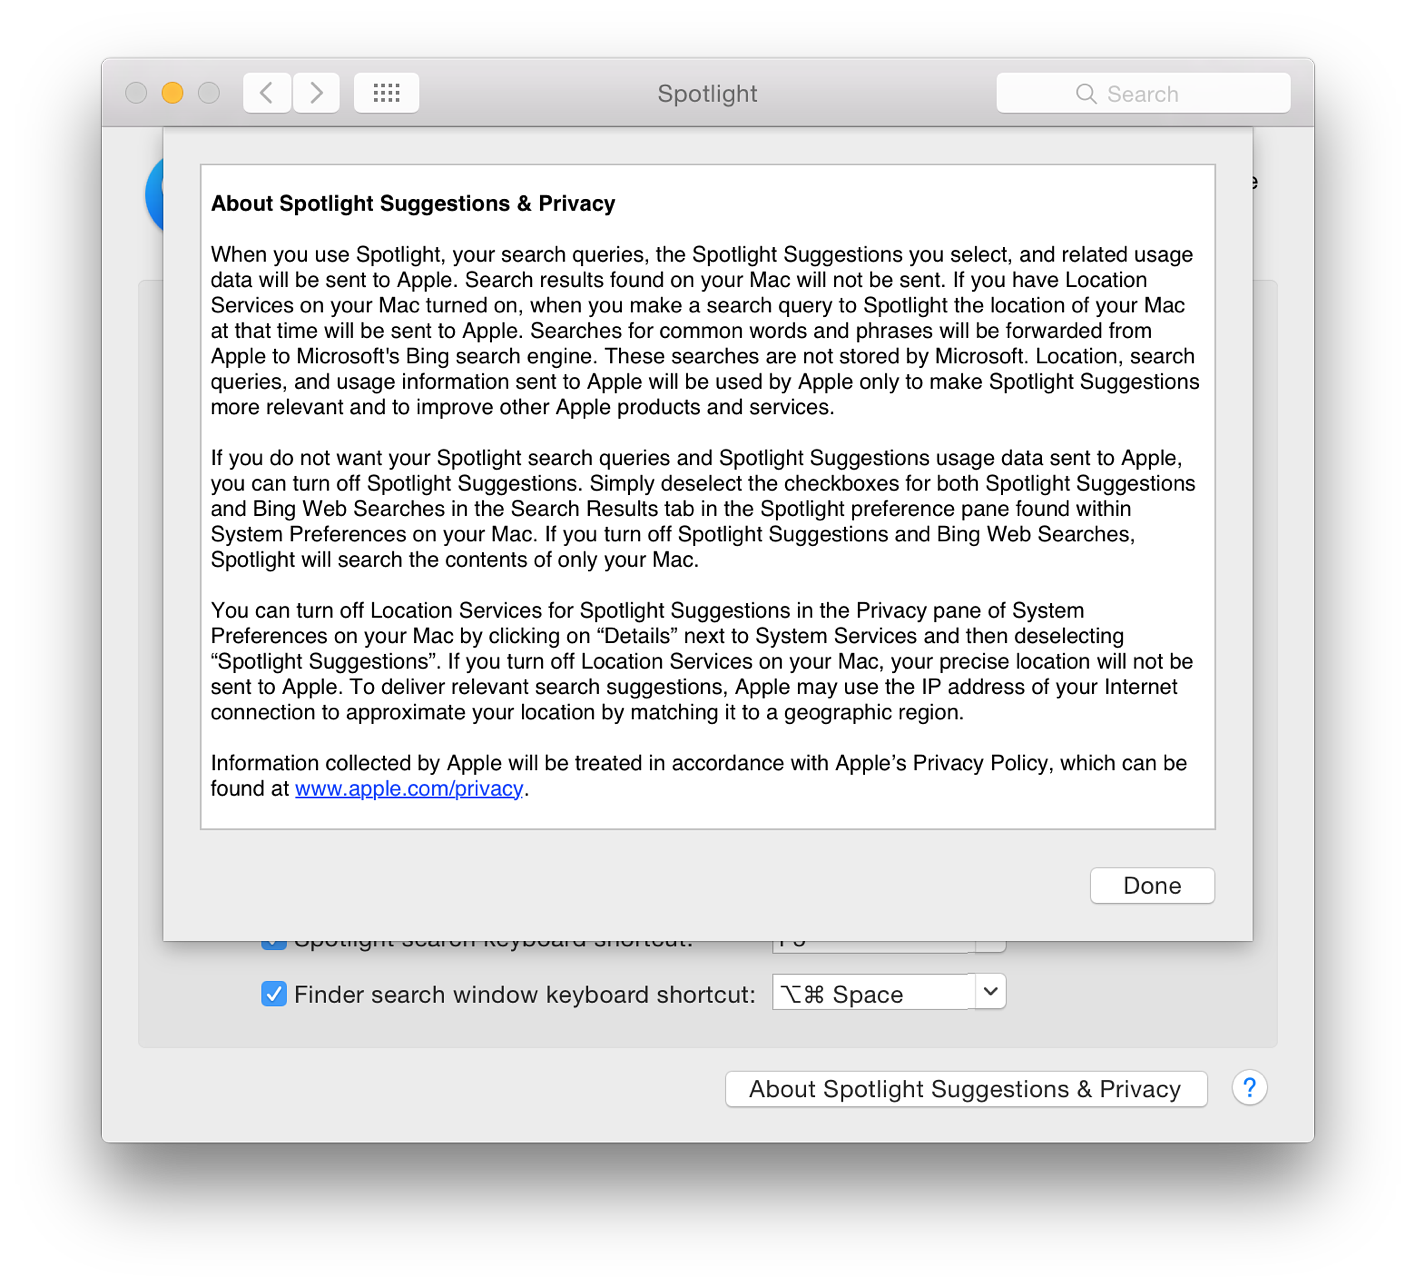
See also: Spotlight: Privacy Advocates Furious As Apple Feature Siphons Off Location Data of Yosemite And iOS 8 Users (Thomas Fox-Brewster, Forbes)
There is a similar display of information about these external features on the Yosemite pages, but readers should note the rather small caveat, "Spotlight Suggestions may not be available in all regions." Unlike the similar limitations of iOS Spotlight searches (see below), there is no indication of which countries may be in the select few.
The Yosemite limits are similar to the way in which Spotlight works in iOS 8. Apple's screenshots indicate results from several external links within the Spotlight search.
However if a search for (as example) Point Reyes is done on the iPhone, instead of the Wikipedia link and a thumbnail image, the user is offered, "Search Web" and Search Wikipedia" on the iPhone. With Yosemite, only references on the computer are shown. Entering Point Reyes in a browser gives several results making these limits seem all the more irritating.
A number of users in Thailand questioned this limitation. It was also found that users in Singapore - usually one of Apple's favoured nations - were similarly limited. For iOS 8, Apple provides a list of only 15 countries that are able to access the full featured Spotlight.
System Preferences in OS X 10.10, Yosemite: Startup Disk |
|
![]()
Many panels in System Preferences have seen changes with the update to OS X to 10.10, Yosemite. The Startup Disk preferences panel appears to have remained unchanged. Startup Disk is used to specify the disk or system to start a Mac. This may need to be changed when maintenance is needed, or when using the computer in Target Mode: as a slave to another Mac.
The Startup Disk preference panel allows users to change the disk that is used to start the computer, to ensure that the correct disk or partition is being used, or to restart the computer in Target Mode: as a slave disk. This is useful in analysis and repair.
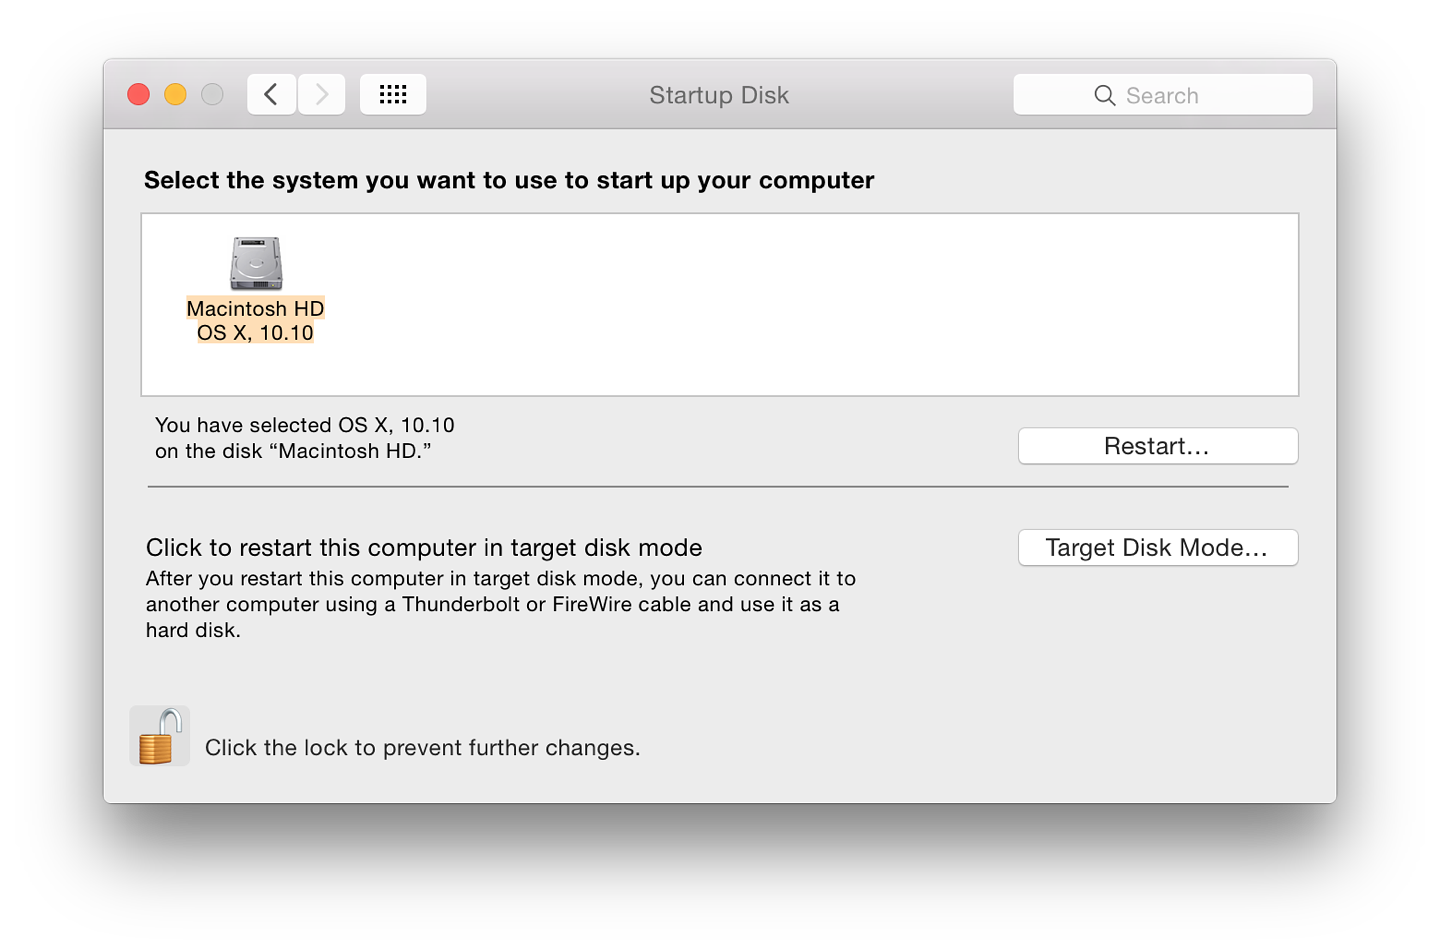
If a disk has more than one partition, only those with operating systems installed will be shown. External, bootable disks will also appear in the panel when attached. In the screen shot taken from a 2013 MacBook Pro, I am using (below), two disks are shown: an OS X 10.9.2 installation on a 16 GB flash drive; and the normal disk installed in the Mac with the current version of OS X.
If any other external disks with viable versions of OS X are connected, these will appear in the disks panel right away and may be selected. This includes optical disks on computers that still have suitable drives. In a User account, the preferences lock (bottom left) must be opened before a different disk can be selected. This will require use of the Admin name and password.
The disk icons display data concerning the version of the operating system installed. When the disk is highlighted, more detail of the disk, disk name and the version of OS X are displayed. If the cursor is held over the disk icon, a small panel appears with similar information, but also the specific build number of OS X.
Highlighting the disk should be done when switching startup disks to ensure the correct disk is being used. It may be better for the disk to be highlighted in normal working to ensure that there are no delays on a restart. OS X is usually good at finding a bootable disk, but has been known to lose the plot.
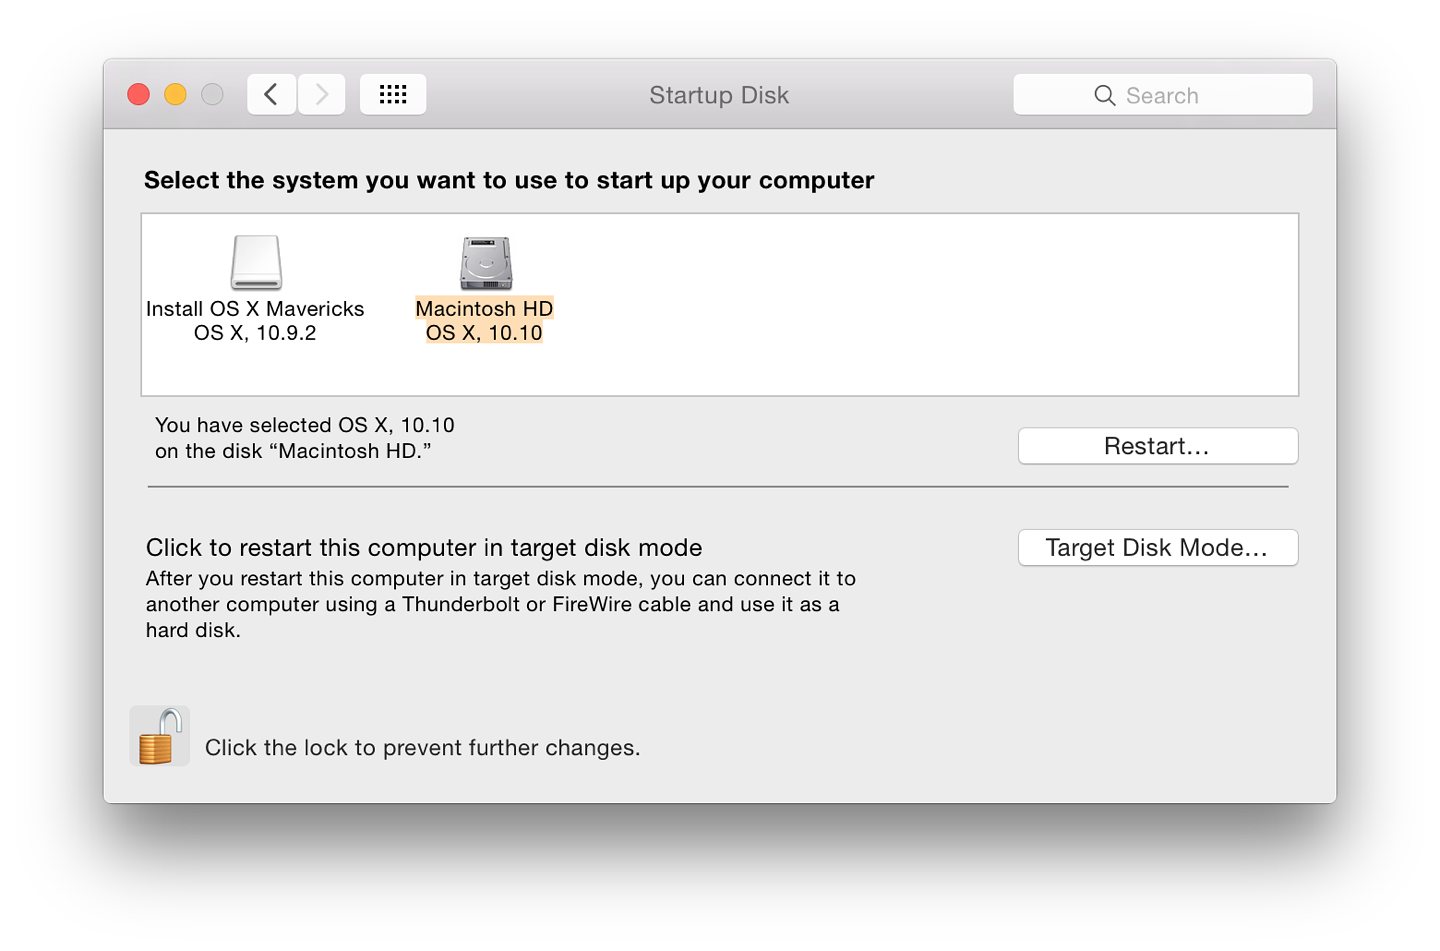
In this top part of the panel - to the right - there is also a button marked restart. For those computers with an optical drive, if a disk is inserted in the drive (like Disk Warrior), this can be selected instead of the main disk. We can restart directly using the preference pane or, when such an optical disk is used, by using the C key at startup.
Any disk with a usable operating system can be selected in this panel and the computer will restart from that. If the computer cannot be started in order to make such a selection, it may also be possible to find a bootable disk by restarting with the Option key pressed. I have more information on Startup Keys in an earlier article available online.
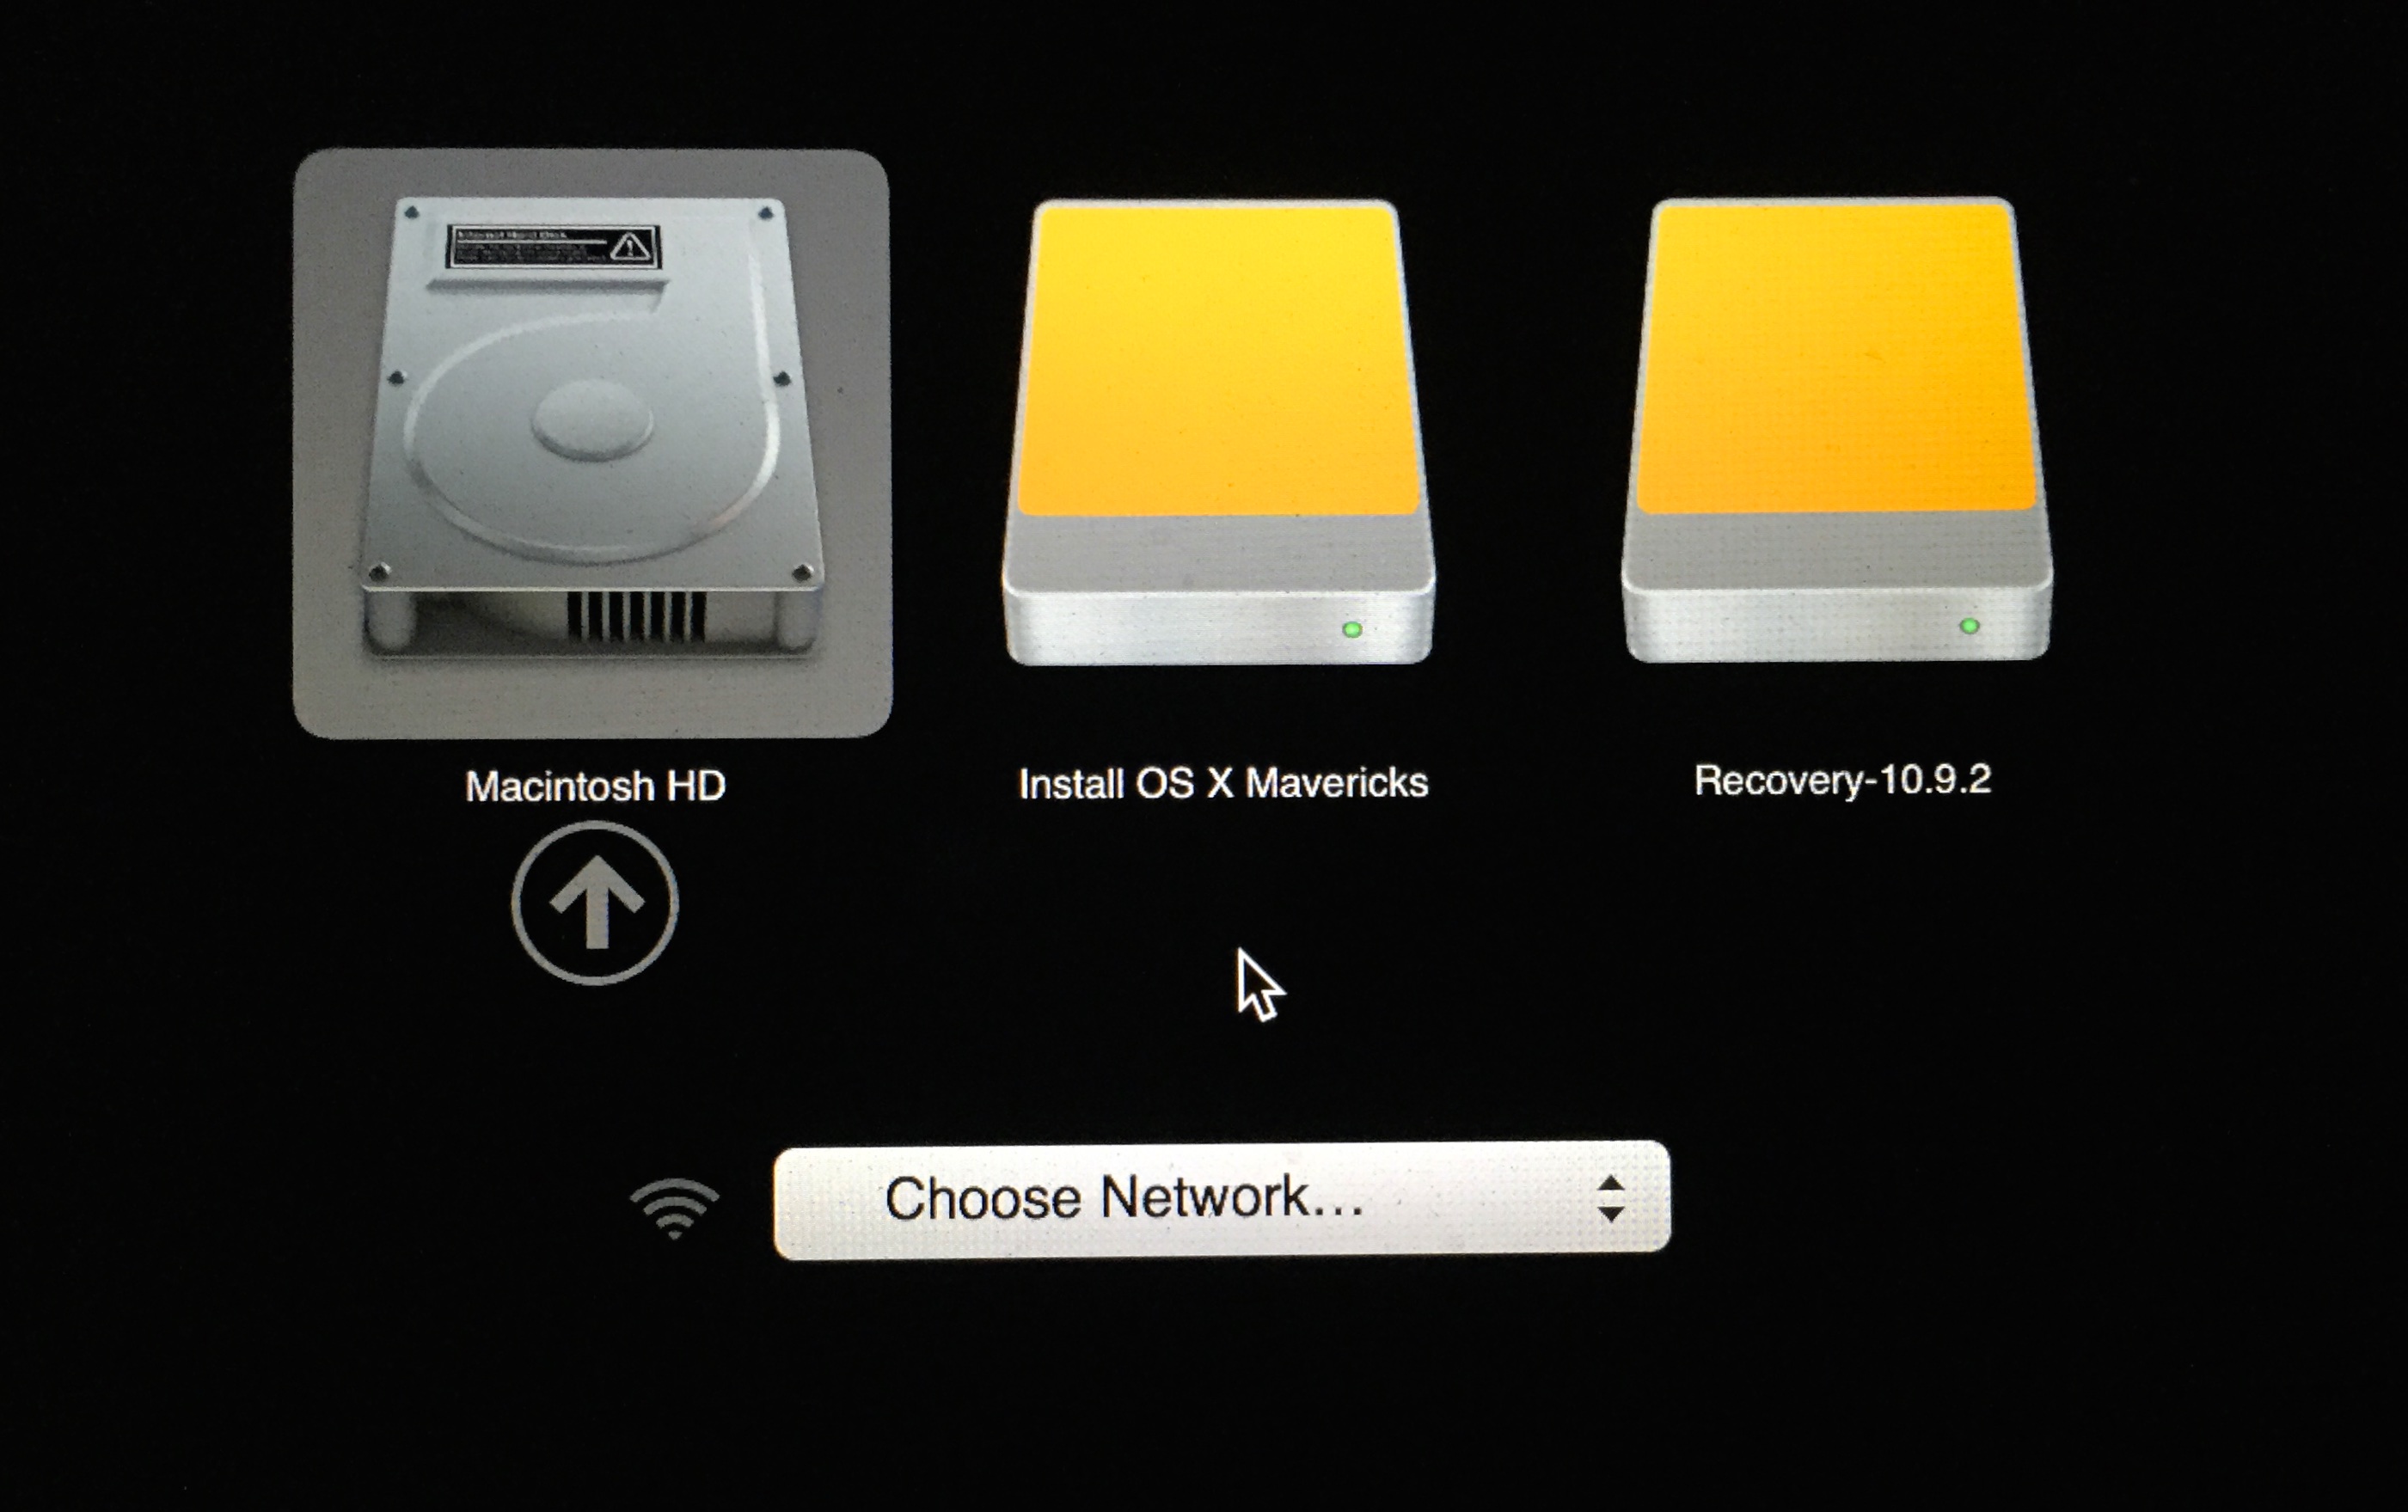
Target disk mode can help in diagnostics and repair. As an example I can run Disk Warrior on my MacBookPro to check and repair the disk on my iMac. It is also a method to transfer large quantities of data quite quickly.
The computer will start in Target disk mode when the button (bottom right) is pressed. The target Mac should be connected to a (master) computer before using Target mode. Target mode may also be activated by starting a computer with the T key pressed. The screen on a Mac being used in Target mode will display a large icon while used in this way. With the older Macs this is a Firewire icon. The latest Macs show the Thunderbolt symbol when in Target mode.
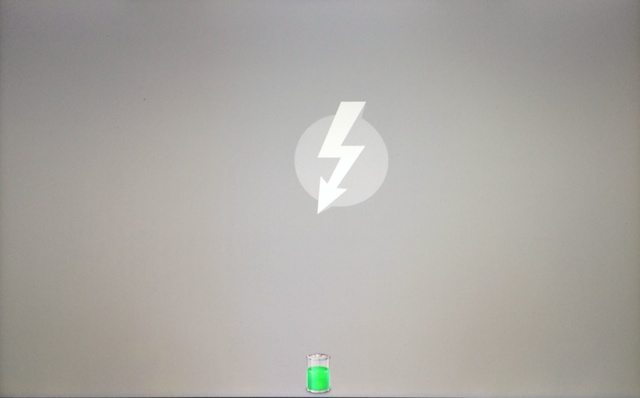
At the bottom of the Startup Disk panel, is the lock icon which requires an Admin password to open. This makes it less easy for someone to start the computer using an external disk. If used in conjunction with the Firmware Password Utility, the computer is considerably more secure. Since Mountain Lion the Firmware Password Utility feature is found in the repair utilities accessed by starting the computer using the Command + R keys.
System Preferences in OS X 10.10, Yosemite: Time Machine |
|
![]()
Few of the panels in System Preferences have been changed with the update of OS X to 10.10, Yosemite, although all have a different interface. The Time Machine preferences panel appears unchanged. Time Machine is used to backup a disk used by OS X on a Mac. It provides regular backups when a suitable disk is connected.
Time Machine enables backing up of the entire contents of an OS X system to a specified external disk. Apple expanded the function with Time Capsule: the addition of a disk to an Airport Extreme router. With OS X 10.7, Lion, Time Machine was altered to make day to day operations more efficient, including the ability to back up when a disk was not connected.
It is therefore now possible to view the Time Machine "Infinity" display whenever the Dock icon is pressed, once a Disk has been specified and set up. However, with no disk connected only limited recovery may be possible, if at all.
With Mountain Lion another useful option appeared - the ability to use more than one disk for backing up.
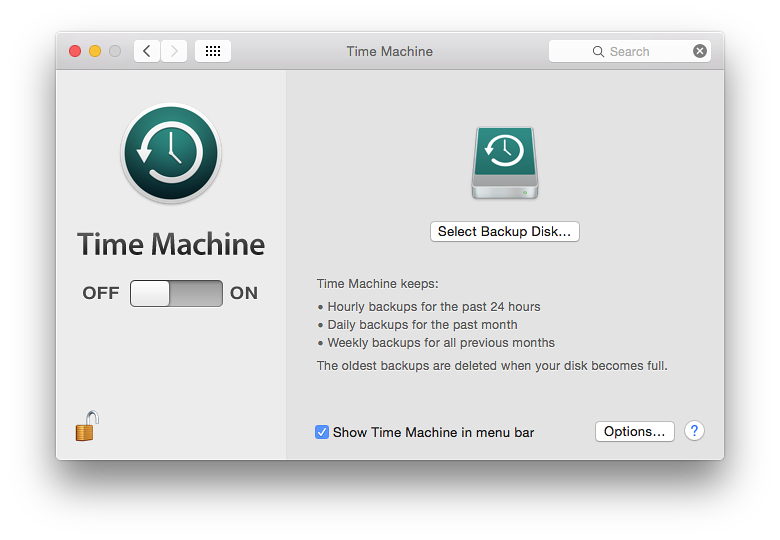
In this original setup condition, the main panel has a revised text description of the feature. At the bottom is a check box for display of the icon in the menu bar: this menu bar icon provides other controls when active. These are related to the Preferences, but are not identical.
Changing Off to On, or using the Add/Remove button at the bottom of the disks list (see below), reveals a panel in which a user may highlight a suitable disk for backups to use. Initially this also has an icon for Time Capsule - Apple's hard disk and Wi-Fi combination. Any suitable hard disk attached will also become visible.
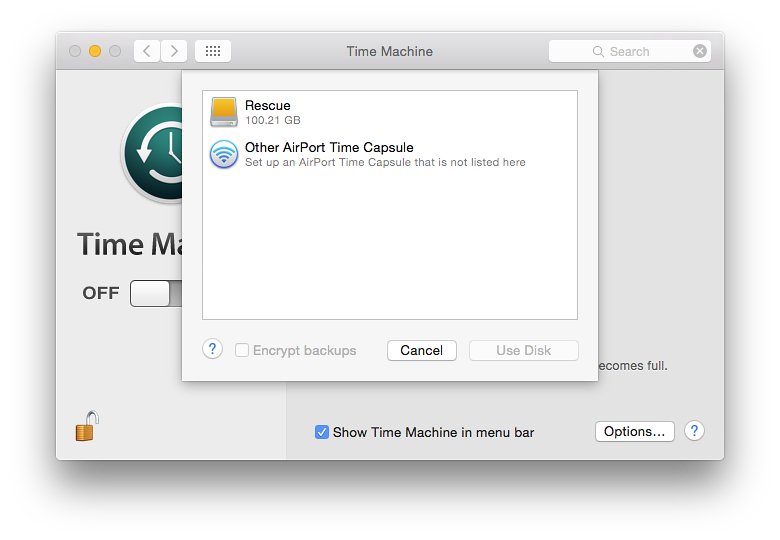
Suitable hard disks may include a flash drive if it is formatted as Mac OS (Extended) although for all practical purposes this may be too small. For suitable capacity, disks of at least 500 GB or more are essential.
When Select Disk is pressed, there are a number of options. Any usable disk connected is recognized. It may be selected by highlighting and pressing the "Use Disk" button. A second button enables a user to set up Time Capsule. Pressing that button opens the Airport Utility. See image (below) in Setting Up (2).
The panel revealed when selecting a disk for the feature will depend on the type of computer: a notebook, for example, will have a checkbox to allow use of the backup disk when using battery only. That window is also revealed by pressing the Options button at the bottom of the main Time Capsule panel (see below).
While Time Capsule is ready to run, a hard disk purchased from a store will probably need to be partitioned. However, while most disks in the past have been formatted ready for Windows systems, a few are now arriving ready formatted for OS X use. I never trust a disk out of the box and always format as a matter of course.The formatting may be done before use in Disk Utility (in Applications > Utilities) and choosing the Partition tab. Once the size of the partition (or partitions) is decided, the Options button should be pressed. A user should choose Apple Partition Map or GUID. However, when experimenting in Mountain Lion with a new disk that had a partition in the FAT 32 format, Time Machine set this up for me without the need for my intervention.
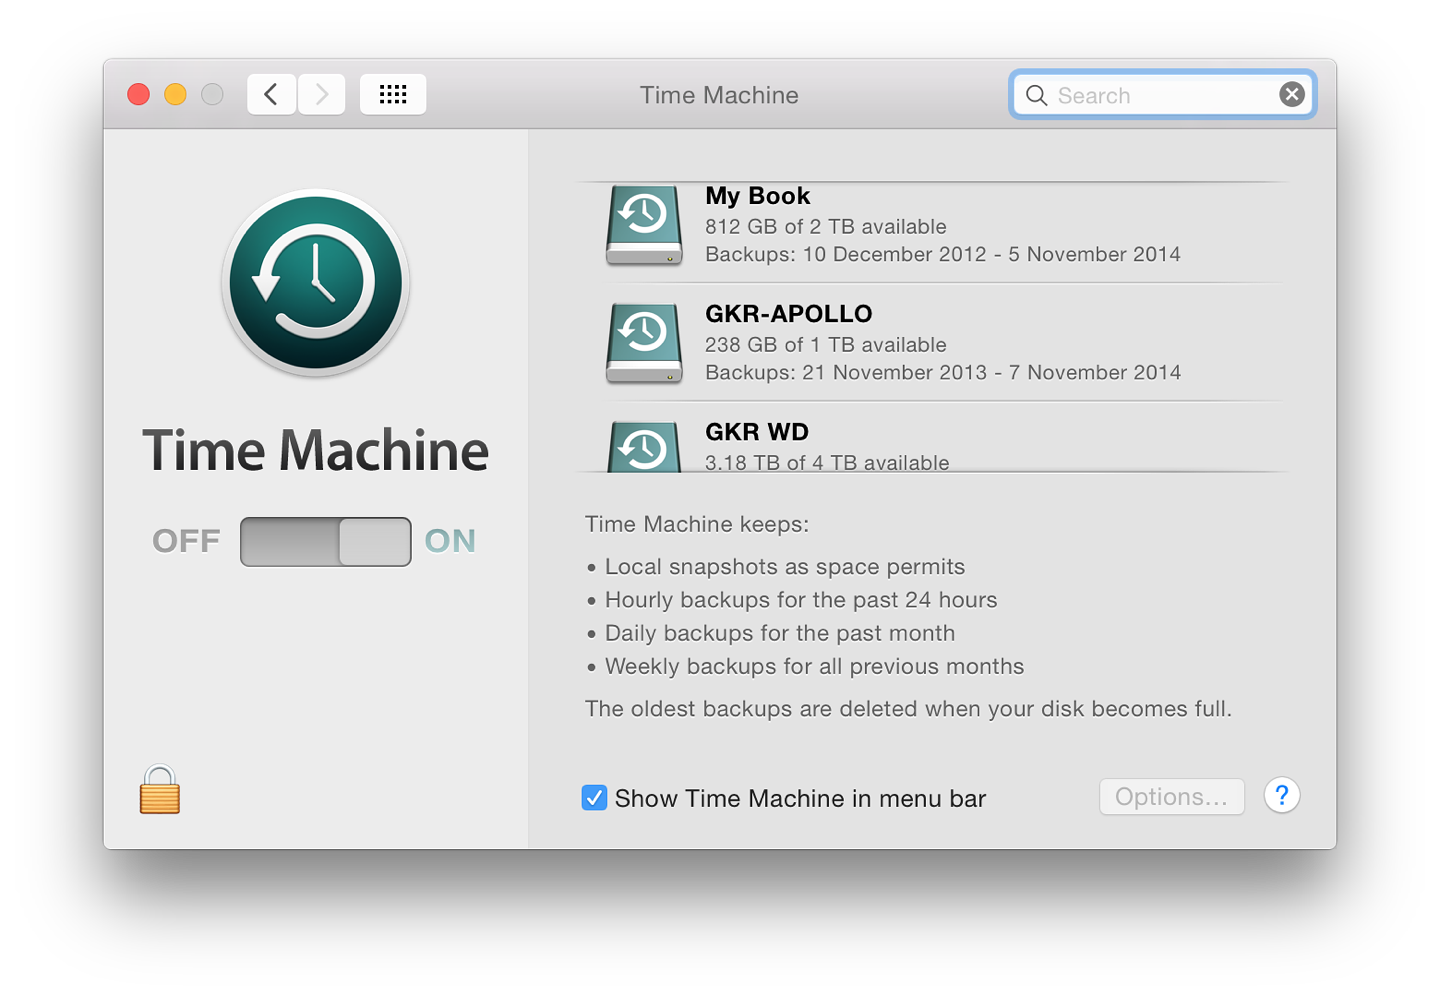
The system recognizes any disk made available and the main part of the panel changes. The disk icon is moved to the left and details of disks used are displayed: Name, disk space available, Backups from oldest to most recent. During backups, a progress bar is displayed: Preparing Backup, Backing up; and Cleaning up. With USB 2 disks, the Cleaning up process may take a long time, but may be ended by clicking on the X available to interrupt the backup process to the right of the individual disk display.

The ability to use more than one disk offers a number of possibilities, such as backup disks in separate locations; or an easy transition from a full disk to its replacement.

For example when adding a disk, a panel appeared asking me if I wanted to replace the current backup disk or Use Both. I selected the latter and the display in the main panel changed to indicate the new options.
A disk can be used to backup more than one Mac, although space will obviously become a consideration sooner or later. Backup files are stored on the external disk in a Backups folder. Inside that are separate folders for each Mac.
When a second disk has already been added, a disk icon below the nominated disks shows, "Add or remove backup disk." Pressing this reveals the same panel as above to allow another disk to be added (or one to be removed).
With two Time Machine backup disks at home, I also have a disk at my office, so I alternate use of these. However, when using the Time Machine icon in the Dock to access older backups or files, only those backups that are available on disks that are attached at the time the feature is used will be accessible.
Clicking on Finder panels or the date scale to the right of the screen will only show those backups that can be used. With my 3-disk setup, therefore, a proportion of the days may not be opened, depending which backup disks are available.
In earlier versions of OS X, whenever the disk was connected, the entire system was backed up every hour, every day and every week. Time Machine does not create a total clone. Any changes are recorded and Time Machine uses those for an incremental backup. The preferences panel does not have to be open for backups to occur.
When the disk is available, the information changes to a progress bar during a backup. Sometimes there will be a bar showing, "Preparing backup." This may be for a long time if there has been a problem or a gap in backing up: patience is the key here. After a backup there is another bar: Cleaning Up. This may also take a long time.
To force a backup, we can use the Backup Now item in the Dock or the menu bar icon menu. If a backup fails, information appears in red, with the letter i in a red circle alongside. The "i" can be clicked on to reveal more information about the problem. Trying again (or perhaps a restart if this is persistent) should clear the problem.
At the bottom of the main display the Options button reveals a panel with some extra features. We may prevent backing up of specific items (e.g folders, files) by use of a + icon below the main window, marked "Exclude these items from backups" (the - alongside will remove list items).
The disk being used for the Time Machine backup is also shown in the "exclusion" list but cannot be removed. This is only shown when a disk is connected.
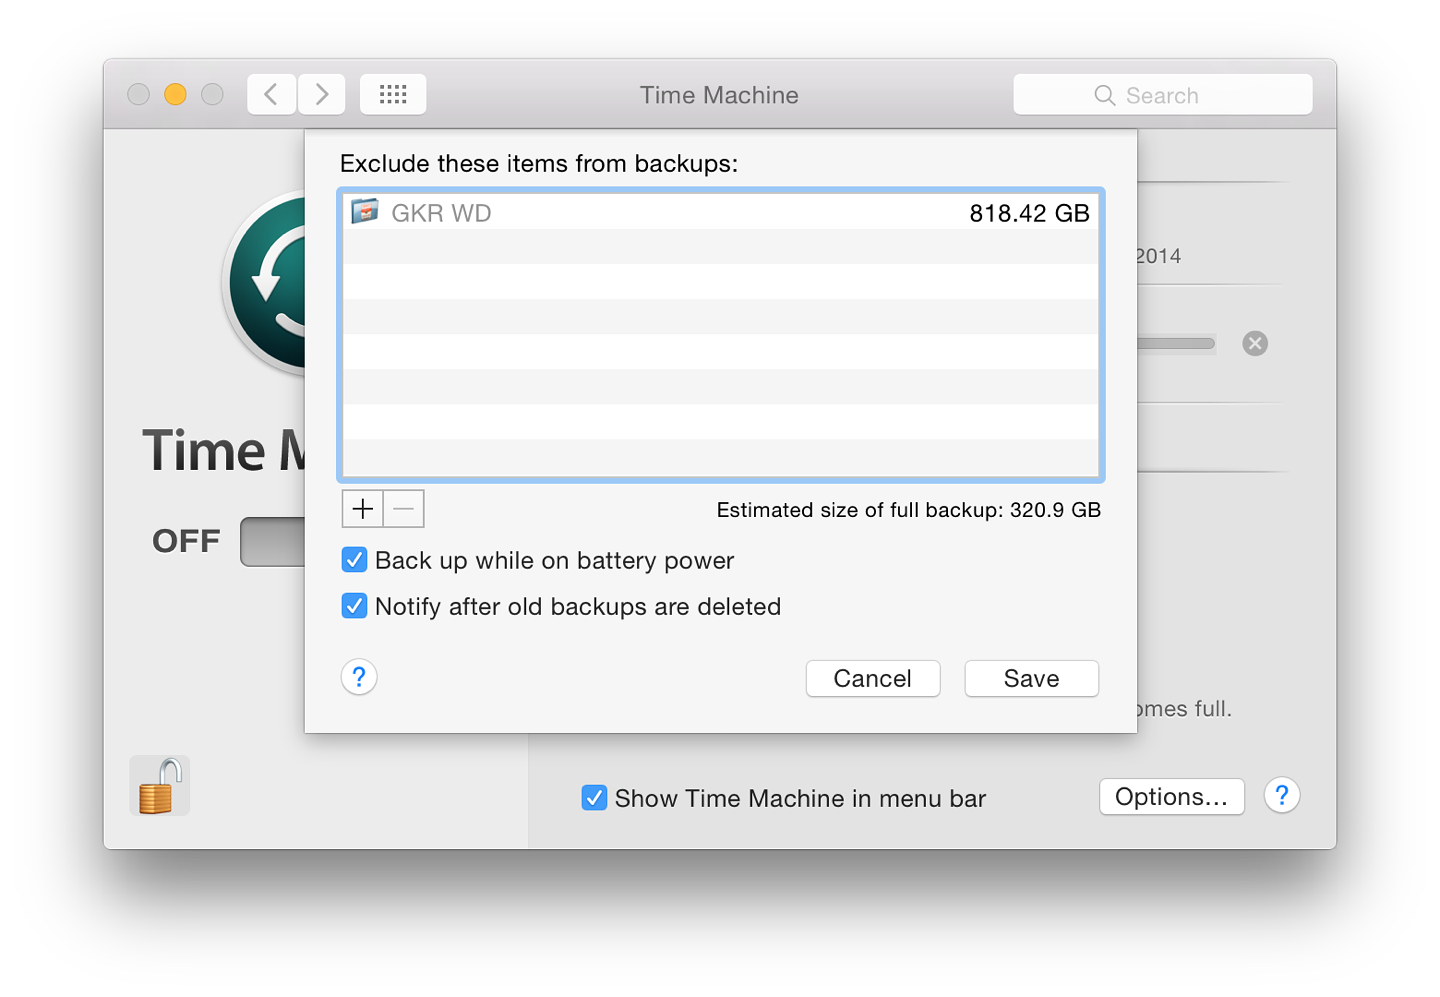
Pressing + opens a Finder window (by default mine opened in Applications as it had when I used Mountain Lion). There are two options here: Cancel and Exclude (default). At the bottom of that window is a checkbox marked, "Show invisible items".
Two checkboxes at the bottom of the "Exclude" panel are marked "Back up while on battery power" (not on desktop computers); and "Notify after old backups are deleted." As the disk becomes filled, so the earliest backup will be removed to make room for the current ones. This is a warning that it is time to obtain a new disk.
When a file is located we may click on Restore and the file will be moved to its earlier location. If a file of the same name already exists in that location, we are given the option to rename the file to be restored, or to save it elsewhere.
This feature works best when a disk is attached, but it will function up to a point without. In testing I have been able to return to previous file backups with no Time Machine disk attached. Even this can be a lifesaver, for example with a version of a file, or an item that was accidentally put in the Trash. When this feature of Time Machine is used without a disk attached, some of the Finder panels in the "Infinity" window are black instead of grey. These parts of the backup are unavailable until the specific disk that contains that backup is attached.
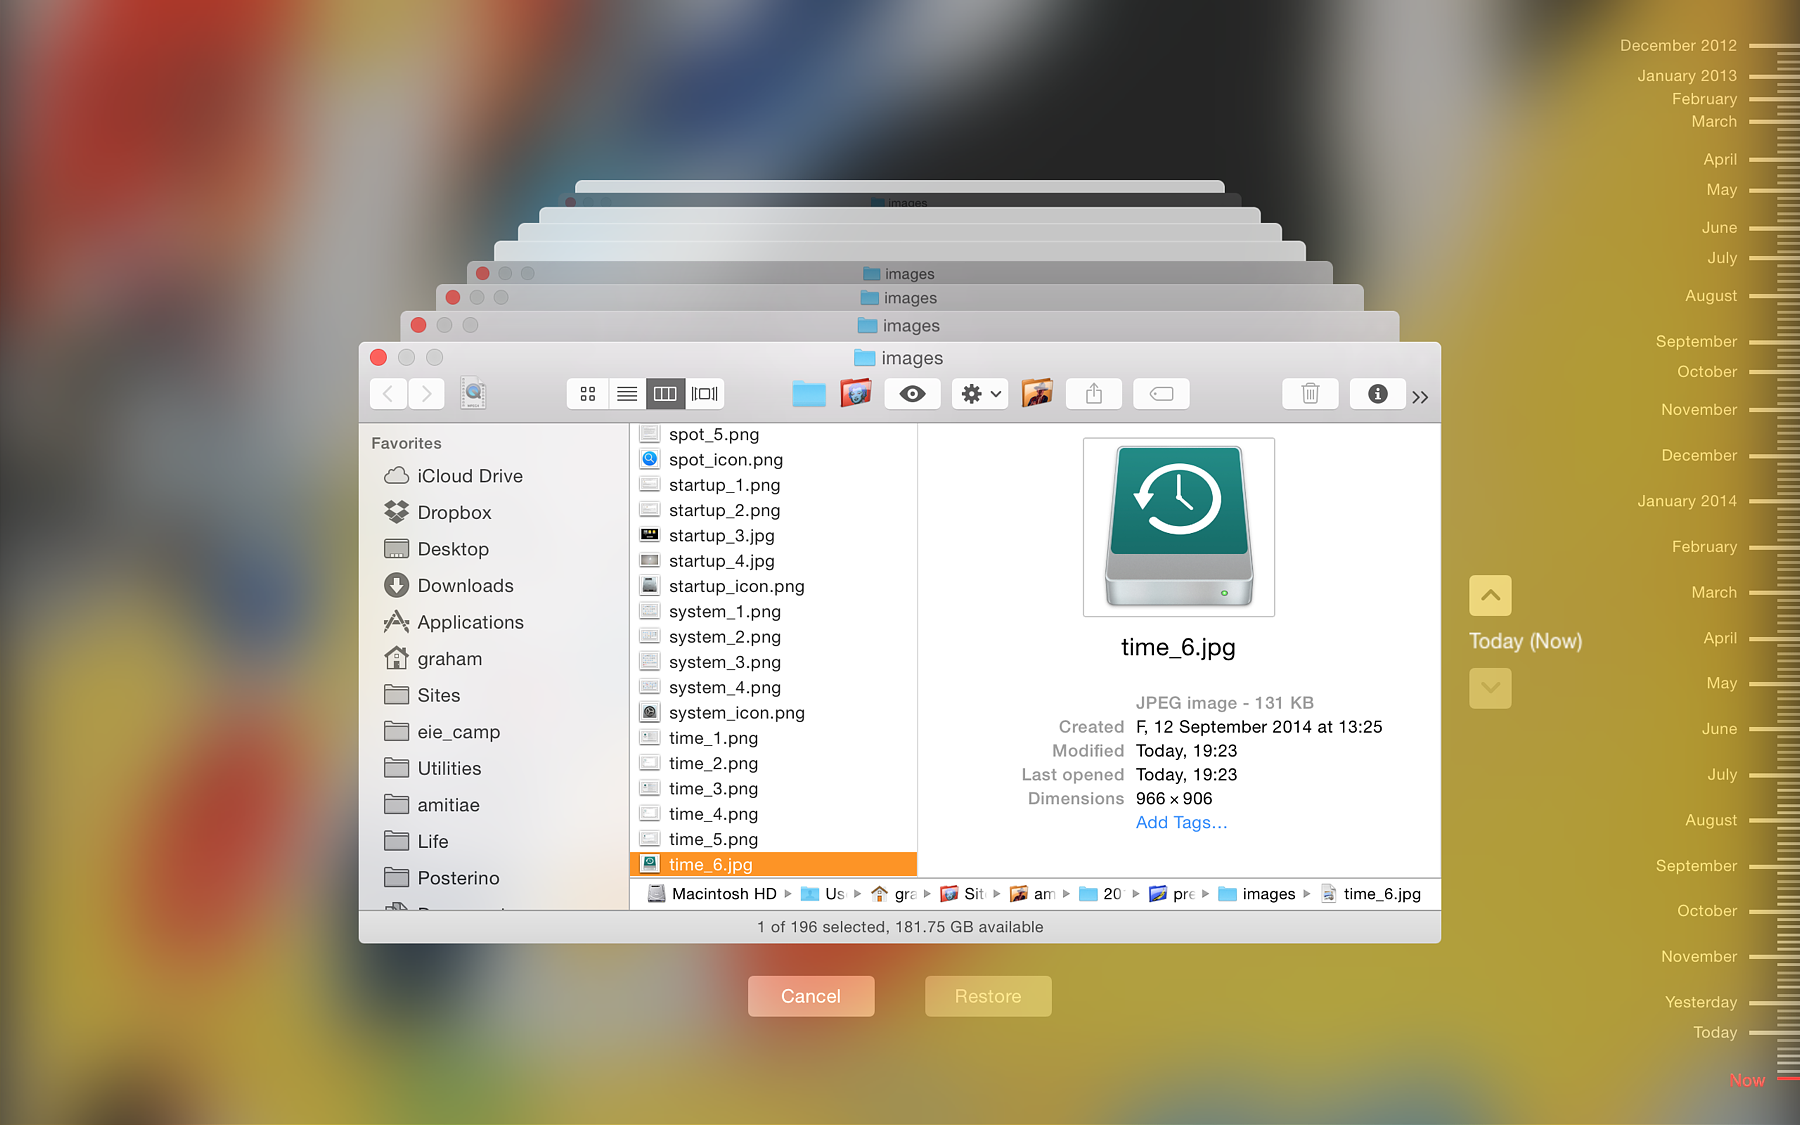
A complete system could be restored using "Restore from Time Machine" in the Rescue Partition that is available on all Macs running versions of OS X, since 10.7, Lion. In the event of a restore being necessary, we are able to use Command + R at startup to enter an invisible partition that has the tools necessary. There is a feature in here that allows a complete restore from the Time Machine backup.
This may also be done on a computer that already has OS X installed. Time Machine will replace all data, including settings and accounts. There are several warnings to inform us that taking this step will replace all the contents of the selected volume before this takes place.
Pressing Continue brings up a panel that shows any suitable disks available. To effect the backup, if not already in use, the disk that contains the Time Machine backup can be attached at this time.
When the disk is recognized and highlighted, pressing Continue gives a list of available backups. A full restore is likely to take a considerable time. Attaching a power supply is strongly suggested. When the process is complete the computer will restart with the restored system.
When using a Time Machine backup to setup a new computer, the Migration Assistant Utility must be used.
 With the update to Yosemite, I have found that my user account displays Time Machine disk icons that are of an older design, while other accounts on the computer have newer icons. Perhaps this is because the current installation was originally from a backup on an older Mac. There is no difference in performance.
Despite the availability of Time Machine and a number of other backup solutions, I am often reminded that people do not regard this as a necessary part of everyday computing.
I have had a burglary, two disk failures (different computers and 3 years apart) and in all but the first, I was able to recover. In the first disk failure, Time Machine helped me switch from a 15" to a 13" MacBook Pro and then when the repair was effected, back to the 15" - I hardly missed a beat and lost no data.
I asked a class of engineering students about this recently and was greeted by laughter. It is usually something that happens to other people.
There are frequent tales of stolen or lost computers (same thing really), broken machines, files over-written, accidental deletions and other causes of lost data.
A backup plan is essential.
System Preferences in OS X 10.10, Yosemite: Trackpad |
|
![]()
Some of the System Preferences in OS X have been revised with the update to version 10.10, Yosemite. However, in this latest update to Mac OS X, the Trackpad Preferences panel has remained unchanged apart from updated video displays.
Trackpad Preferences had a total revision with the arrival of OS X version 10.7 but the latest update (10.10, Yosemite) remains the same as in 10.8 (Mountain Lion). This preference panel assists with the fine-tuning of either a trackpad that is built in to a notebook computer or the Magic Trackpad that connects to a computer via Bluetooth to bring the same functions to a desktop computer.
The panel for Trackpad preferences is in three parts: Point & Click; Scroll & Zoom; and More Gestures. All gestures and options are illustrated with video clips to the right of the panel. These have been updated for Yosemite.
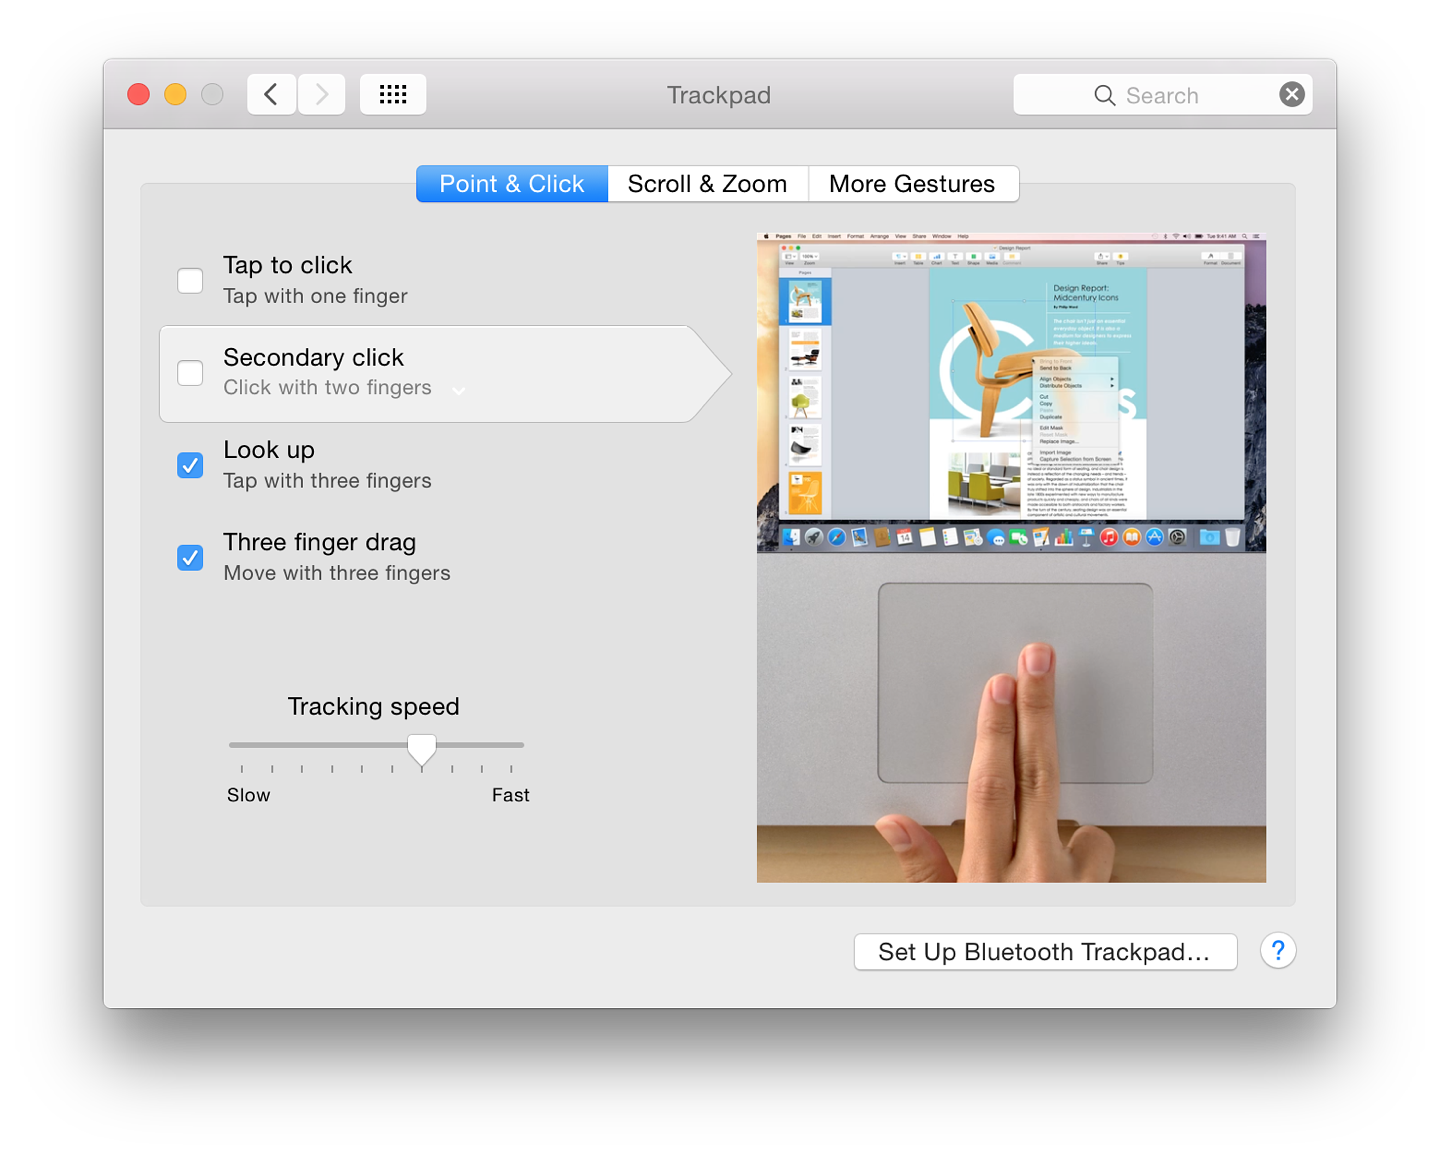

When Tap to click is not selected, the normal setting for two-finger input is shown as Click with two fingers. The video clip shows the demonstrator tapping on the trackpad. This may not work with all computers. However, clicking (not tapping) on the trackpad bar does act as a secondary click for my MacBook Pro.
When the one finger Tap to click is selected, this item changes to "Click or Tap with two fingers". This does work as demonstrated in the video clip.
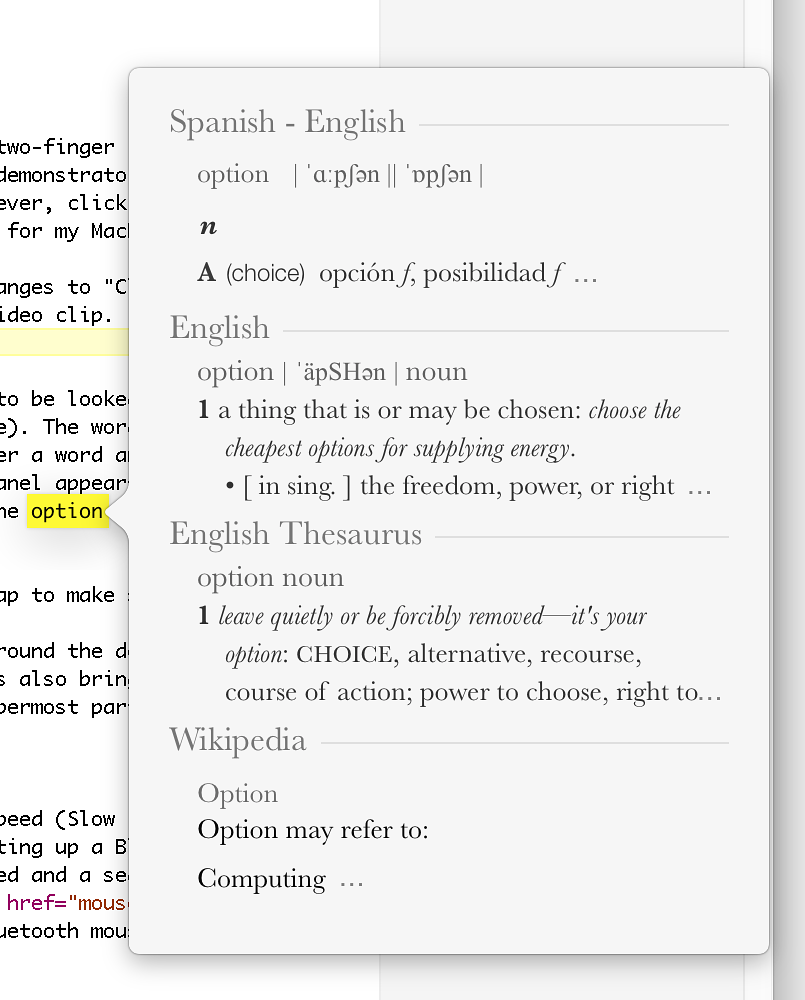
Highlighting is not always instant and may need a second tap to make sure.
At the bottom of this panel is a slider bar for tracking speed (Slow - Fast). Also at the bottom right of all panels is a button for setting up a Bluetooth Trackpad (such as Apple's Magic Trackpad). A panel is opened and a search for a suitable Bluetooth device starts in the same way as the Mouse Preferences would search for a Bluetooth mouse. The trackpad should be on and discoverable.
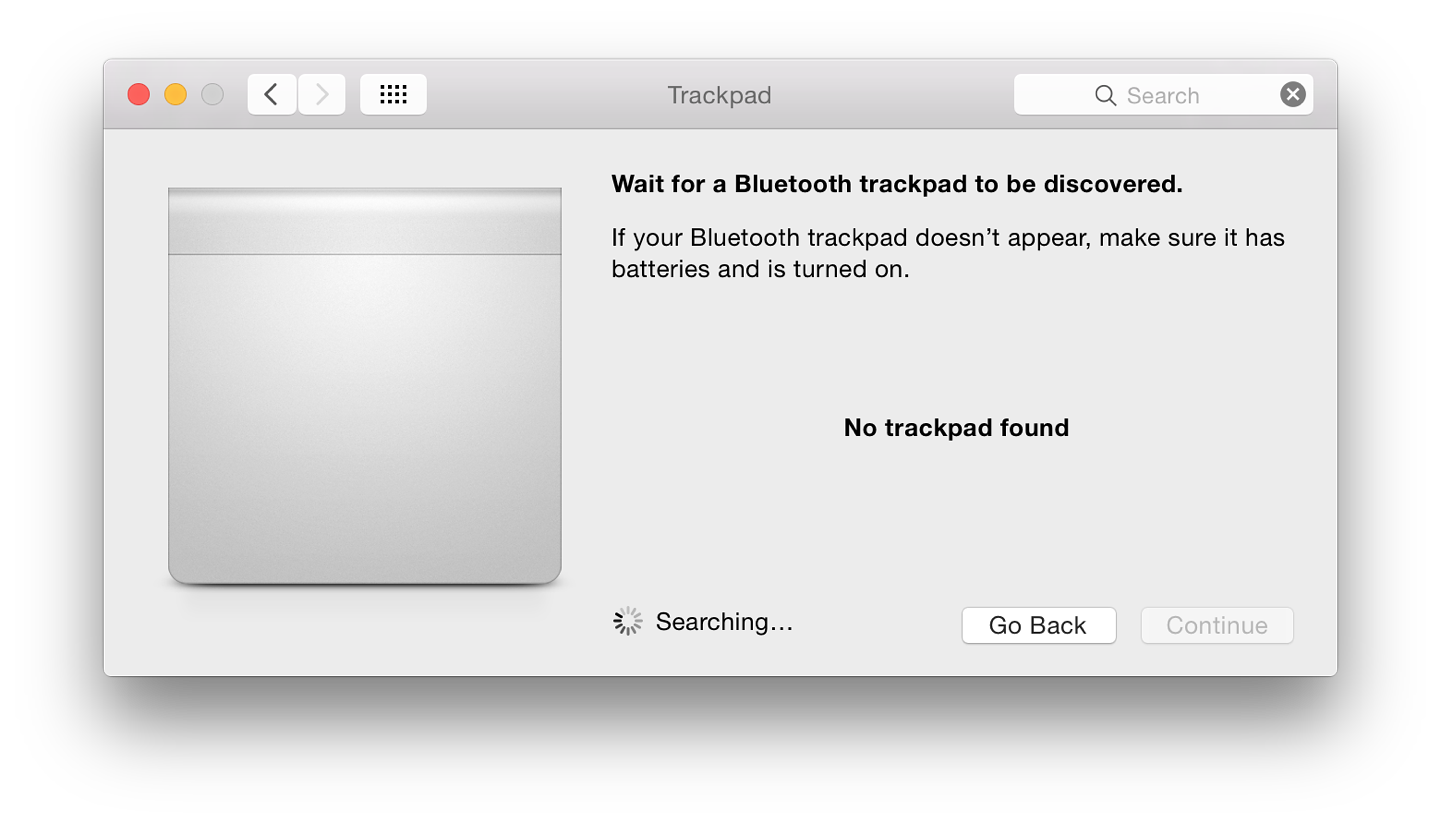
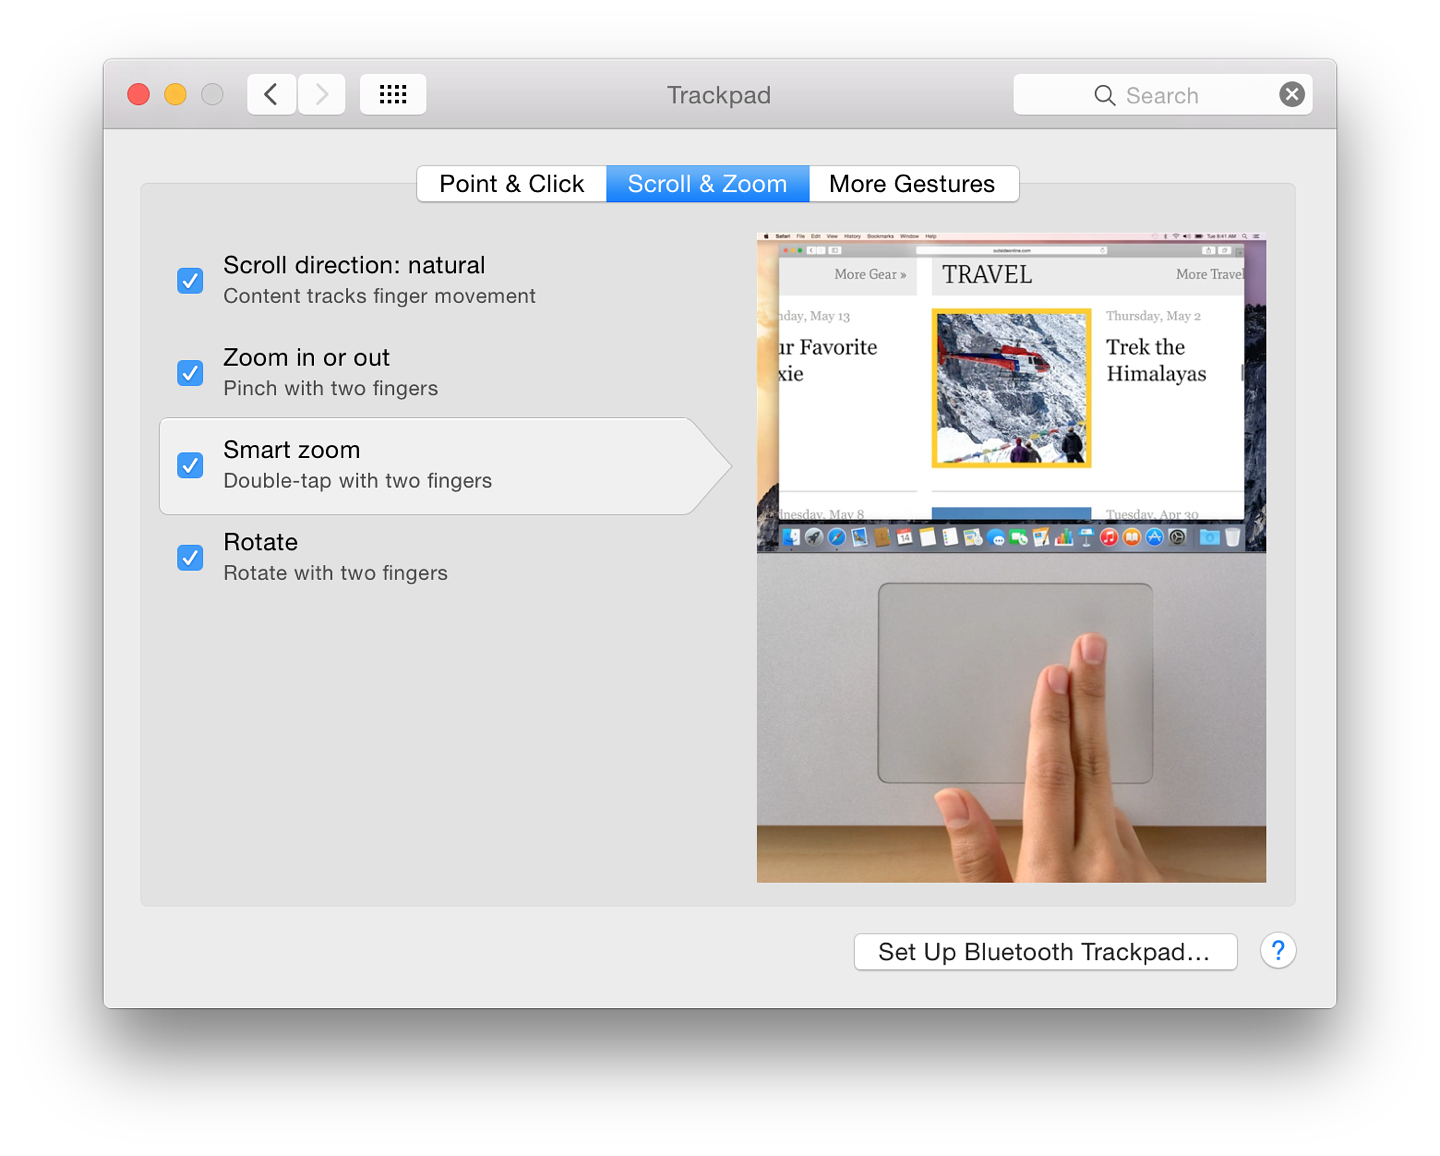
Options here are to swipe with three fingers (to the left or right), or swipe with two or three fingers.
If full-screen apps are not in use, the swipe allows any desktop space to be displayed, including Dashboard if that is selected as a space in the Mission Control preference pane.
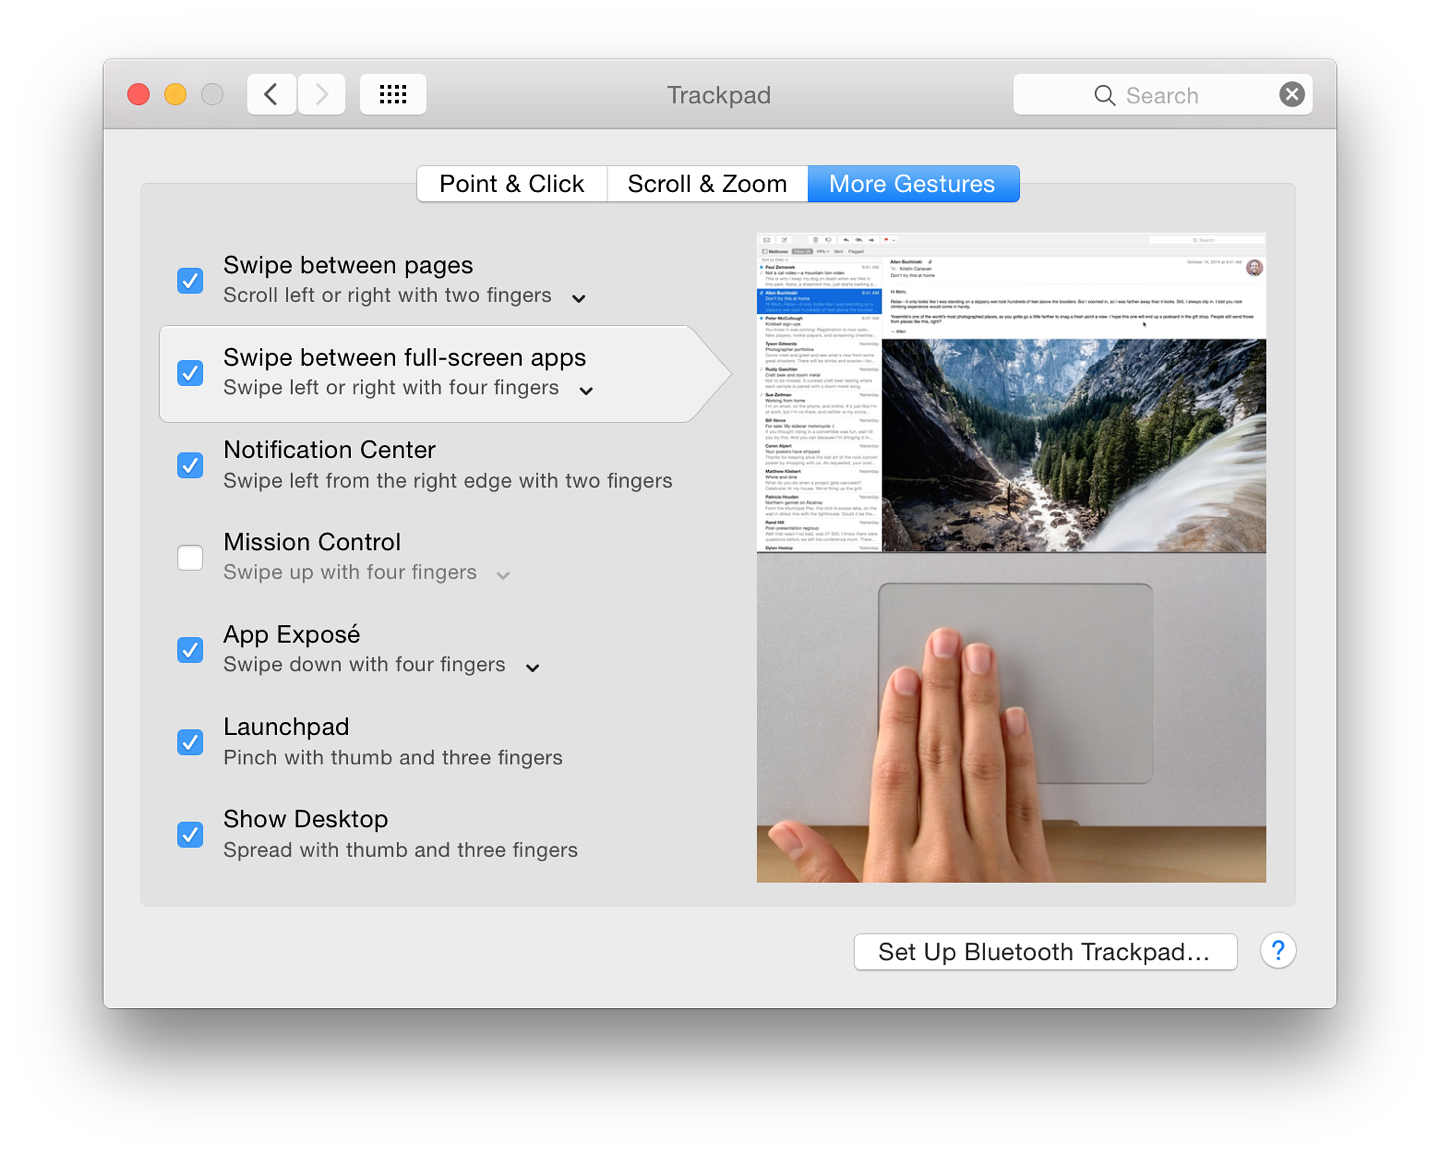
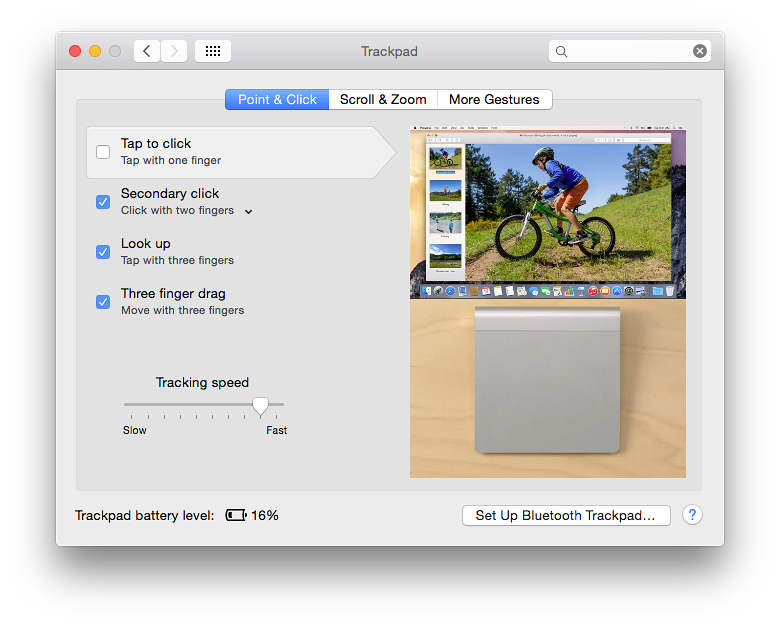
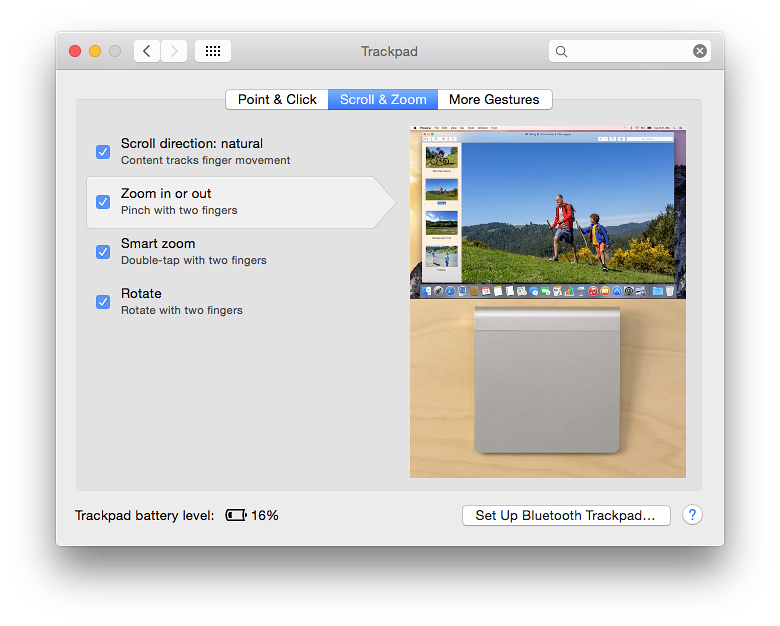
At the bottom of each of the three panes, to the left of the "Set Up Bluetooth Trackpad" button, is a battery level indicator. Like the Magic Mouse (and the wireless keyboard) the Magic Trackpad runs on AA batteries which do sometimes run out. When that happens, the user is given a notification. On earlier versions of OS X, there was a button marked, "Change Batteries" to the right of the level indication: that is no longer shown.
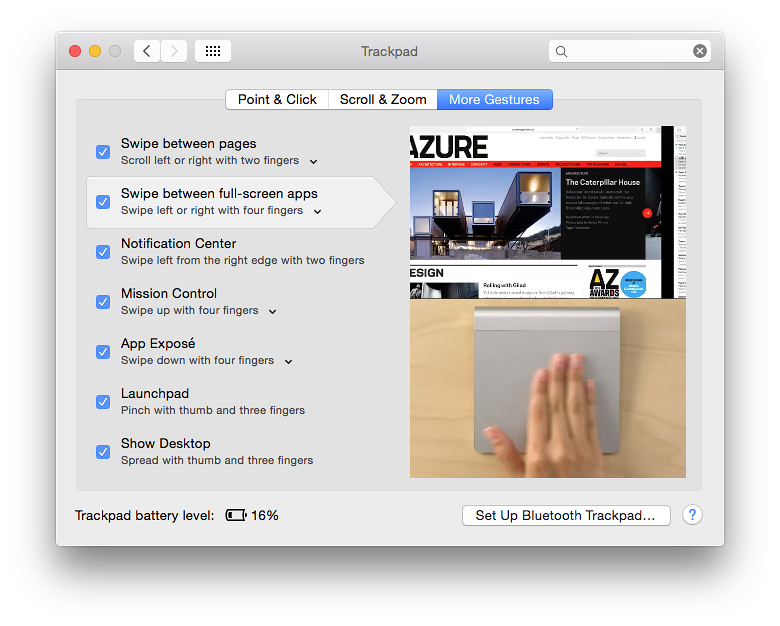
Older Macs with trackpads that do not support gestures will display a simpler trackpad preference panel.
Like other menubar items, using the Option key when clicking on the Bluetooth icon, brings up a menu with more information than is available normally. This may help with diagnostics.
System Preferences in OS X 10.10, Yosemite: Users & Groups |
|
![]()
Many of the panels in System Preferences remain unchanged with the update to OS X to 10.10, Yosemite, apart from the updated interface. The Users & Groups preferences have had a number of changes to panel design and the use of iCloud accounts. Users & Groups is used to create and control accounts used in OS X on a Mac including several security aspects as well as control of login items. The panel for Users & Groups preferences is the last in this alphabetical examination of System Preferences.
When a user opens the Users & Groups preference panel, the pane shows two main sections. The left part displays basic information of the user account (or accounts). Below the list of users there is a further data entry access: Login Options. As with many of the other preferences panels a padlock icon in the bottom left restricts access and we must have an Admin username and password to open this.
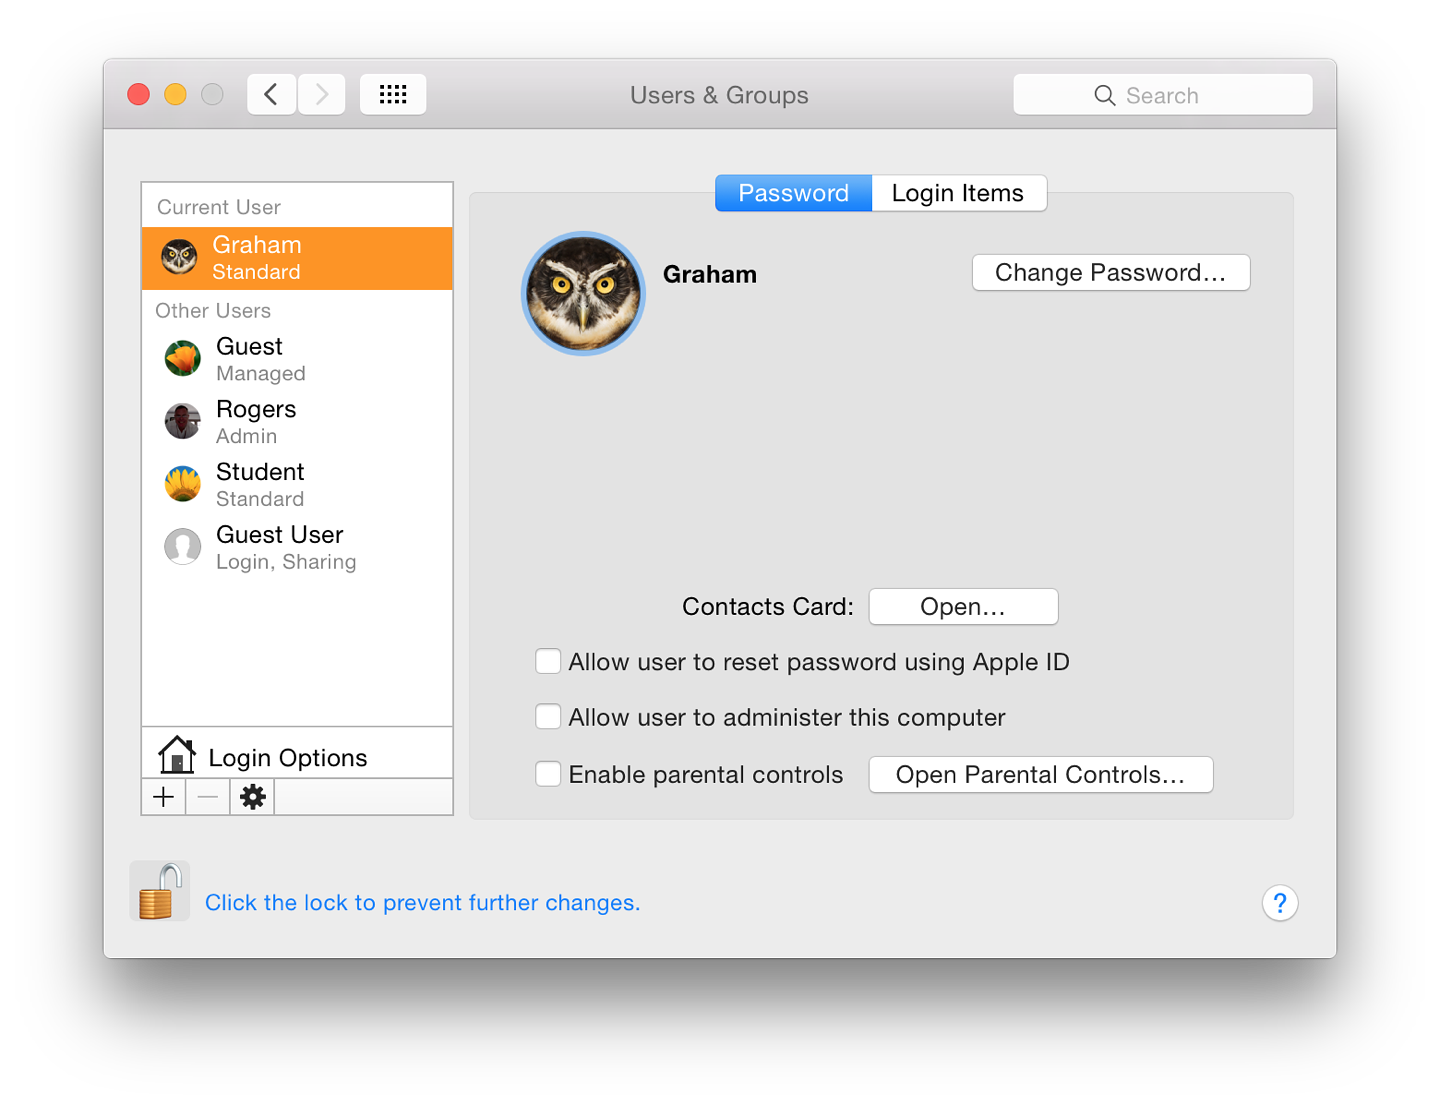
At the bottom of the left panel below the Login Options selector are plus (+) and minus (-) signs to add or delete accounts and a gearwheel icon to access a single item: Set Master Password. This is an overarching password for FileVault which is turned on in Security & Privacy Preferences. It allows access to FileVault if a user has lost or forgotten the password. If the Master Password is forgotten all data encrypted by FileVault will be inaccessible.
To the right is a panel containing information about the highlighted account, with buttons for additional account information. The display will differ, depending on whether the account highlighted is Admin, current User, other User account or Guest.
A user may click on the Add icon (+) to create a new account. This displays a panel with the type of account selected by a button and pull down menu. Options are Administrator, Standard, Managed with Parental Controls or Sharing only. A further item is available to create (or add) a group. It is also possible to create a managed account directly within Parental Controls.

Text boxes are available for Full Name and Account name. The full name may be anything the user wants. The Account name was formerly called the Short name. It is critical that, once entered and the account created, this is not changed.
 The Account name affects the behavior of the Home directory and any related functions, including access to data. This is the name the system will use. It will appear as the name beside the Home icon.
A password is entered at this time and needs to be verified. There are now two choices: Use iCloud Password; and Use separate password.
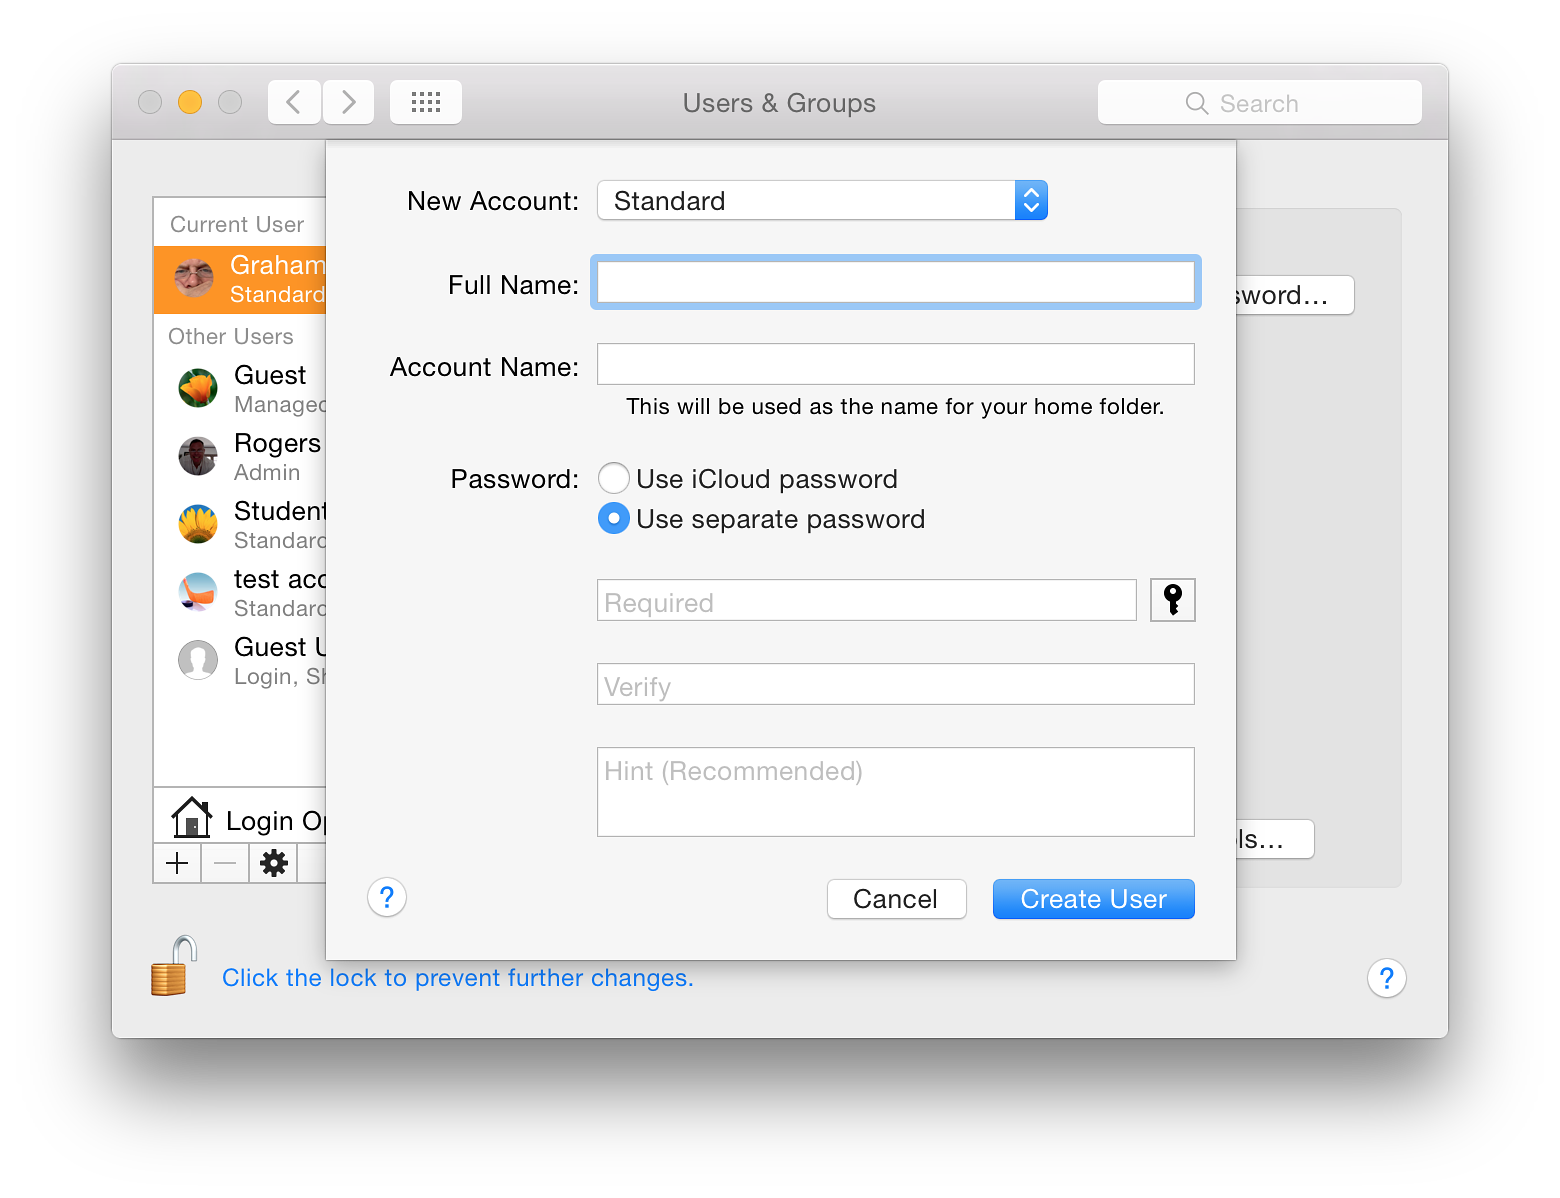
 If the new account is to use a separate password, there are two panels for the characters to be entered (password and confirmation). To the right of this sub-panel is a small key icon, which brings up a utility that can help a user select a password from the simple to highly complex (see below). A color bar indicates a security rating from red (poor) to green.
Below the password boxes is a text panel that allows a hint to be entered should the user forget the password. The hint appears if the wrong password is entered three consecutive times. A Support Document (PH18653) is available for help in ways to reset the password if it has been forgotten.
The Password Assistant panel helps a user to choose a password that is somewhat stronger than ABC123 (a common choice). There are five types of password (as well as Manual): Memorable, Letters & Numbers, Numbers Only, Random and FIPS 181 Compliant. This last creates a password that is to an acceptable Federal Information Processing Standard.
FIPS 181 paswords are all lower-case characters (no numbers) while Random introduces a number of numerical and other characters to the mix. The "Memorable" selection uses word-mixes that have some suggestions that may be easier to remember (e.g. causeways45440/antibiotic) although not too easy to crack.
A slider allows the length of the password to be adjusted, from 8 to 31 characters. Below is a color indicator that runs from red through yellow then green. Red is a weak password, while green is good. As the password is being created in the Assistant, so the data is entered in the Account password box.
Unfortunately some users try to use the Enter/Return key instead of a password. This is a dangerous way to try and avoid password use: a warning is given if this is used. I am aware that some users here, for whatever reason, ask the retail outlets to set up their computers. When this is done, the store will use the account name, Apple, and the Enter/Return key instead of a password.This weak account/password was used by a retail outlet here when my iMac had a hard disk replaced. However, I updated OS X immediately, set up two proper accounts and deleted the one named Apple. Many users do not change either of these, leaving their machines vulnerable.
At the bottom of the New Account type panel is the option, Group. If this is selected, the panel for creating a new account is reduced to Full Name only. Once created, a new panel is available with the accounts on the computer listed. Checkboxes beside each of these allow them to be added to membership of the group (see Notes - below). A new group panel shows any groups that already exist, so a group could itself be added to a new group.
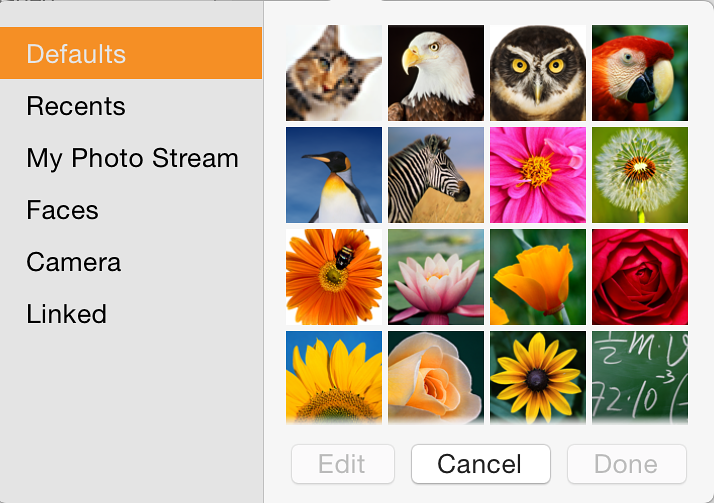
The panel for selection of an image or icon is now in six sections (listed to the left): Defaults, Recents, My Photo Stream (formerly iCloud), Faces, Camera and Linked. When any of the first two (and Faces) are selected, a panel appears with thumbnails of any suitable images shown. When one of these is selected as well as the Cancel and Done buttons, an Edit button is available. The Edit panel has a slider for adjustment of the size, and an icon will allow a user to apply an effect (from 47).
Selecting the Camera activates iSight and a picture can be taken after a 3 second countdown. Users also have the slider and effects options available here.
My Photo Stream asks users to take a photo with an iOS device or manually add images from iPhoto or Aperture. Linked images are those that have been associated with the account in some way. For example, one image shown as "linked" for my User account was used as the account picture some weeks earlier.
To the right of the user icon in the active account is a button marked Change Password. This brings down a panel that allows a change to be made. For other accounts, there is a similar button marked, Reset Password.
A button below is "Contacts Card". When pressed this opens at the user's card in the Contacts application. This can be used for entering data in forms.
Finally in the Password panel there are three checkboxes:
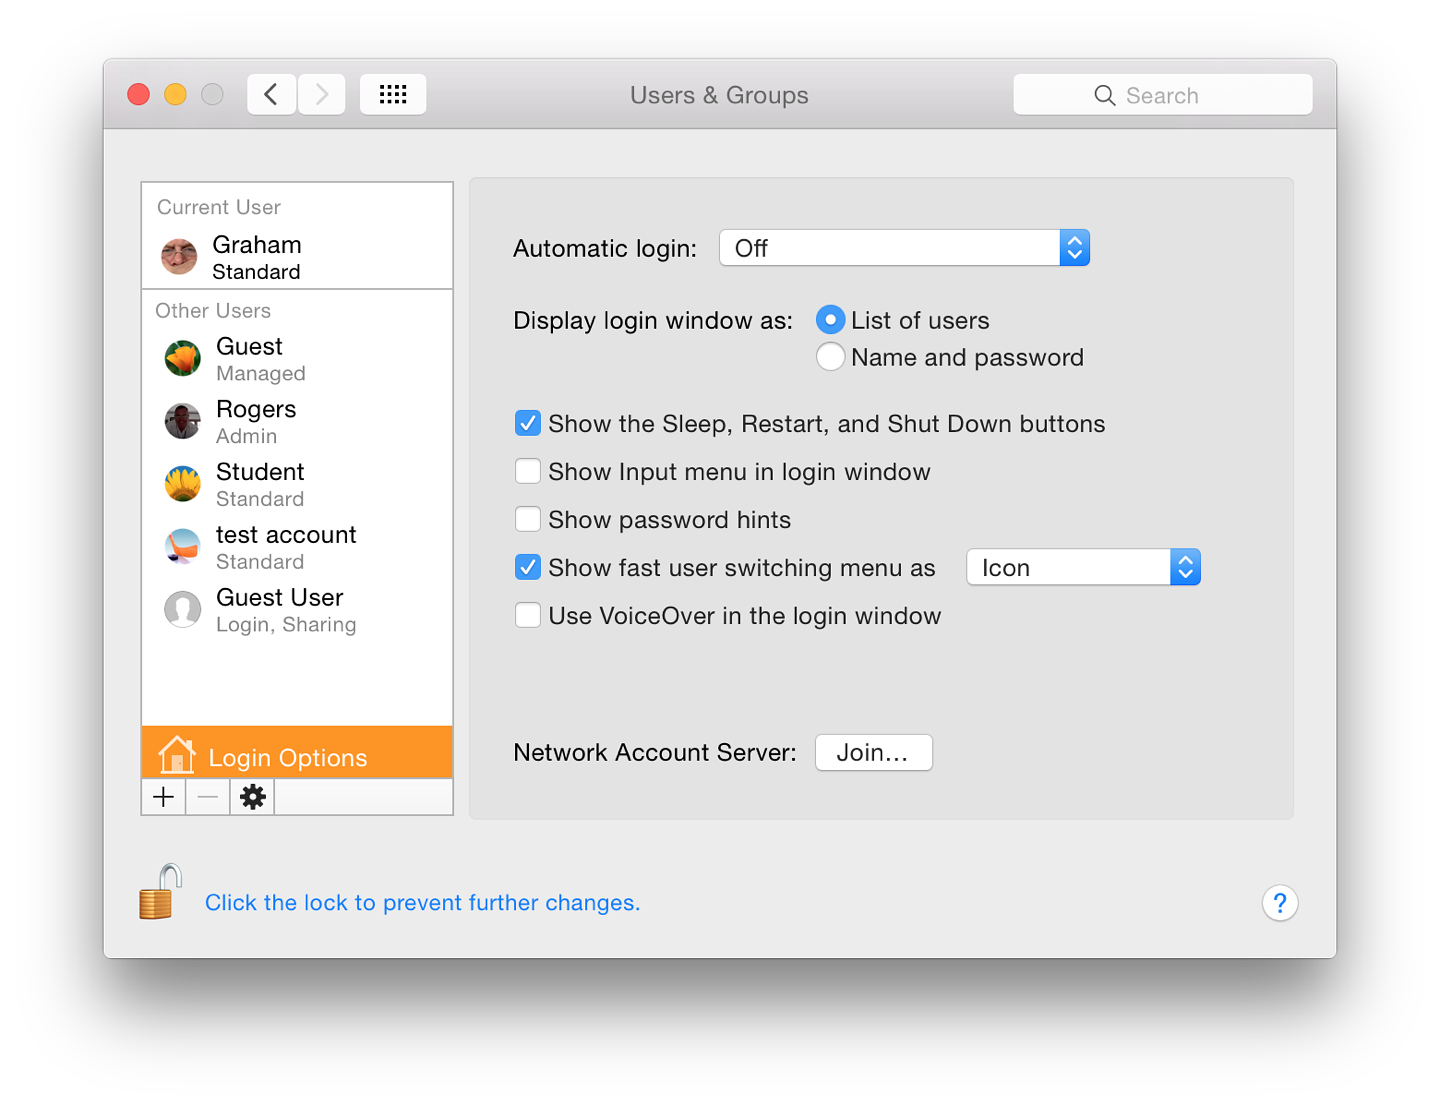
It may be selected for specific accounts, so that when a computer is turned on, that account is always opened. This could be a useful strategy for preventing access to accounts with sensitive or private data and drawing others to a safe account: a honeypot.
At login, we are able to select a display of names of users (and user icons) who have accounts on the computer or simple text boxes in which the name and password must be entered. The latter is more secure.
Below are five check boxes:
With fast user switching it is possible to switch between accounts without logging out or closing applications each time. A menu to effect the switch to another account is on the menu bar.
At the bottom of the panel, next to the words, Network Account Server, is a button marked, "Join". Pressing this opens a panel in which the user may specify either the address of an Open Directory Server or Active Directory Domain. When Server details are entered we press OK (or Cancel).
A button to the left of this panel opens Directory Utility, revealing panels with Services, Search Policy and a Directory Editor. Users should be careful of adding, altering or deleting any information in Directory Services unless they are fully aware of what they are doing. It is suggested that this is only used under the guidance of a System Administrator. Also see Notes, below.
Below are + and - icons. Pressing + brings up a Finder window and we may select an application or file (e.g. mp3) to open at startup. The - icon will delete a highlighted item.
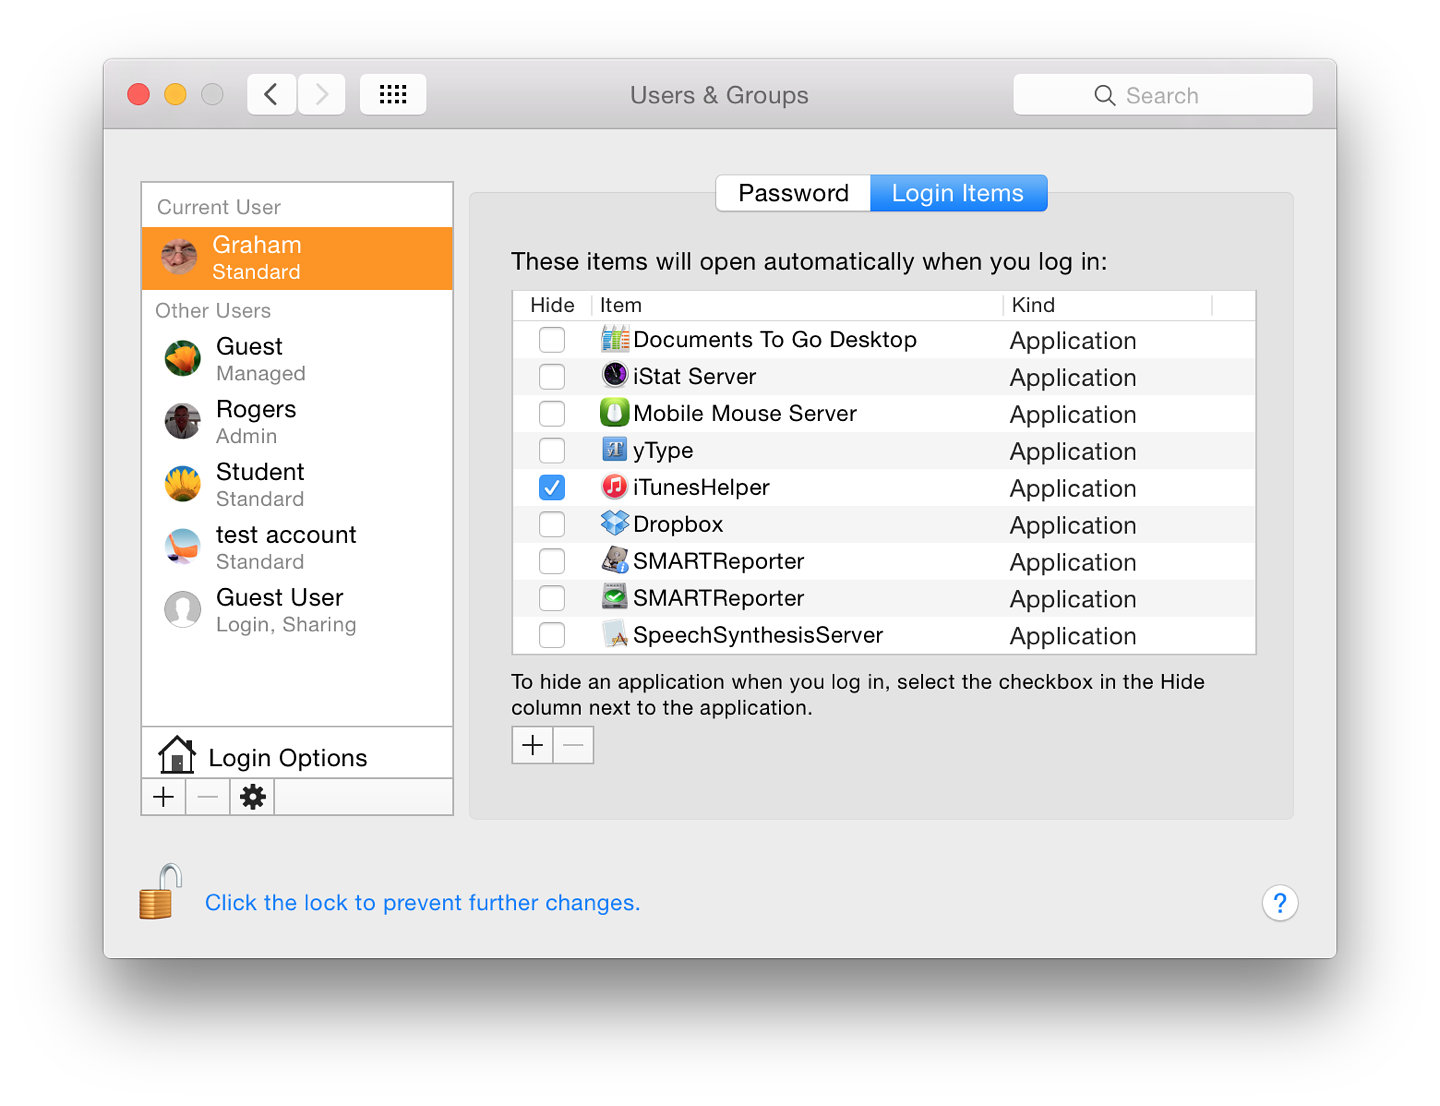

For further information, e-mail to
To
eXtensions - Macs in Bangkok
To eXtensions
Home Page