Automatic Panorama Photography on an iPhone: Pano 360 Camera

AMITIAE - Tuesday 10 January 2012
|
Automatic Panorama Photography on an iPhone: Pano 360 Camera |
|
|
|
By Graham K. Rogers
I rather like the idea of panorama photography, although for this to be done well, we need good equipment and first-rate software. The best results come from professionals who have the skills, time and resources for the task.
BackgroundA couple of years back, I looked at some ways that panoramic images could be produced. In November 2009 I wrote on the subject, combining three texts into one article. To recap, I began with Gigapan images, examined some applications for the Mac and ended with a look at the local Blue Pano site of Danai Chutinaton, currently displaying a number of excellent ways that panaoramas and 360° imaging can be used.On the way I tried the fairly traditional AutoStitch which was $1.99 at that time. This used images that had already been taken and were stored in the Photo Library on the iPhone. A good selection was useful to enable the software to complete a successful stitching of the images. It helped that I had experience of making such wide images using a number of applications, but the results were rather good. Some months later, I had a quick look at Pano which walks a user through the process of making a panorama by aligning the edge of one photograph with the next to be taken, so that we know when to press the "shutter button" Although this app went up in price slightly, it is now down to the original $1.99. I have now found a useful panorama app that takes the alignment concept a stage further and as soon as the iPhone is in the optimum position for the next part of the image, the photograph is taken automatically.
Panorama 360 CameraAfter the opening screen, Pano Camera 360 shows a grey screen with a white matrix. In the centre is a blue thumbnail display of the camera input and a red rectangle for the optimum image. As the two are aligned, the blue changes to green. An on-screen instruction explains this too. For the first image in a sequence, there is a camera icon at the bottom of the screen -- either in portrait or landscape mode. Pressing this starts the process.
With some practice this can produce a panorama (or 360° image) quite quickly, although a problem that even professionals have appeared with ghosting: if a person moves, the stitching of the adjacent images fails to give a sharp picture of the face or body. There are minimum controls: both good and bad. When starting the panorama process with a new image as well as the control rectangles, there are two icons: Lock and a resolution icon, marked 640 by default.
When the user has taken enough photographs (there is no minimum number), there are two choices, clearly marked on the screen: a green tick or a red X (use or discard). Discarding, takes us back to the start screen. Accept processes the image and an example is displayed. If it is wide enough we may scroll left and right. At the top of the screen are four options for type of output: a film strip for a straight image, a circle for surround, an icon for convex images and one for a concave product (looking like the output of a fisheye lens). Two control icons at the bottom are a file image for Save and an X for discard.
CommentsI tried a number of test runs with this app and the app was certainly easy to use. However, the insistence that a photograph was only possible when the app was held parallel to the ground was limiting in some ways, especially with that teasing grid. In a room full of people, when I held the iPhone at face level, I was only able to take an image of heads. I had to hold the iPhone lower down for more of the subjects' bodies to appear. Portrait mode would also be preferable for this type of image. Of course, a panorama is more often taken outside where there is scenery, and it may be better suited to this.

Apart from using the basic onscreen settings, it is not possible to make any other changes. As an example, alignment produces a slightly irritating chirp from the iPhone and it would be useful to be able to turn this off. As an inexpensive way to take panorama images -- it is only $0.99 -- this is a nice option, particularly as much of the work is done for the user.
Graham K. Rogers teaches at the Faculty of Engineering, Mahidol University in Thailand. He wrote in the Bangkok Post, Database supplement on IT subjects. For the last seven years of Database he wrote a column on Apple and Macs. |
|

For further information, e-mail to

|

|

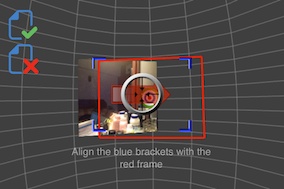 The coding of the app is smart enough so that we may turn the camera either to left or right, but once the direction is selected, we must continue. As the red aligns with the blue rectangle and then changes to green, the iPhone camera automatically takes the next image in the sequence.
 This may be changed to 1024 by a tap, but it reverts to the default next time. When the Lock icon is pressed it changes to Auto. It is unclear what this does: I found no difference with either setting.