|
Some suggestions for trouble-shooting OSX
|
By Graham K. Rogers
This is a page always in a state of development. More coming soon.
Updated 14 January 2005
I think that the first thing to do is to think: do not panic. Computers, and their operating systems, are man-made and I have faith that they can all be fixed. Magic it is not, although some so-called experts would have you think so.
To quote someone who has helped me fix my motorcycles on several occasions: "data". What happened: what did you do; what did you install; were there any warnings from the computer? Tracking these may help locate the problem.
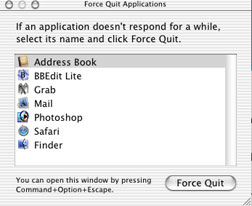 In the first instance, simply logging out, or restarting (or shutting down, waiting then restarting), may clear the problem. This may require a Force Quit of an application if the spinning rainbow wheel is being shown: sometimes the memory is insufficient and the program is unable to complete a task. To do this, put the cursor on the blue Apple symbol at the top left of the screen (or use the Command + Option + Esc keys -- the Command key is the one with the Apple symbol on it).
Highlight the menu item, "Force Quit" and release the mouse button. A panel will appear listing the applications that are open. Select the one giving trouble (if it is shown in red, the OS has already recognised that it is misbehaving) and click the button at the base of the panel.
Try not to shut down the computer by a forced method: turning off the power or using the reset button. Sometimes this is necessary if nothing responds. I would strongly suggest that immediate checks are made as to the integrity of the system.
Try simply restarting with the Shift key held down. This gives a "safe boot" and this may be enough. Once the Mac has started this way, a normal restart may setttle things down. In any case, you can use the safe boot to examine the disk and its settings.
I would also strongly recommend such action after a power cut. If OSX is not shut down properly, there may be several files misplaced (or corrupt) and this can lead to problems and even damage. Look at the method here, using a software utility (below), and also at the idea of repairing permissions.
To check deeper, you could either try to restart with the install disk and run the Disk Utility, or check with the inbuilt Unix utilities: the file-system check. When the computer restarts, hold down the Command (Apple) key and the letter "S". This will put the computer into "single user mode". After the grey Apple logo appears, the screen will go black and text will be displayed. When the text has finished scrolling down the screen, you will be left with a prompt -- you are working in Unix at a command line. Type in the following line
fsck -y
Note that there is a space between the letter "K" and the dash.
For those using Panther, by default the system is journaled and it may be better to use the CDROM startup, plus Disk Utility. A journaled disk needs the fille-system check to be forced, so the command here would be:
fsck -yf
(Alternatives to this could be fsck -y -f or fsck -fy)
This is a File and System ChecK and the "Y" switch tells the computer "Yes" to fix any problems it finds. If it does find something, run the command again. When all is well, it will report that it all "seems to be OK." I run it one more time to make sure. At this point you can either type in the command "exit" or "reboot". This will get you back to the familiar opening screens.
If while using the single user start up (above) and, in the text that scrolls down the screen, you read the words, "preposterous time" that is a fair indication that the PRAM battery has failed. This may also be an indicator as to the start cause of some problems.
Some are unhappy with the idea of working at the command line. Some long-time users are also unhappy with the idea of ordinary users working at the command line, because they believe that software utilities are (A) superior or (B) at least good enough, while (C) ordinary folks will break things. I work with both the command line and software utilities.
The basic tool that OSX users have is the Disk Utilities found on the install disks. To run this application, the computer must be restarted with the disk (#1) in the disk drive and while holding down the "C" key. It will appear to be starting the install procedure but it will stop and allow access to a menu, in which is the Disk Utility. Once started, select a disk to repair (it cannot repair the startup disk, this is why the utility must be run from the CDROM) and click on the "repair" button. If the disk finds and/or repairs a problem, run it again. If it reports that a problem cannot be fixed, you will need to use another utility (see below).
One of the stalwarts of pre-OSX systems was Norton Disk Doctor. That does not appear to be the case for OSX. Although some users still run Norton Utilities (as it now is), and others insist that it is efffective, I do not. I have seen too many messages that have "serious problem" and "Norton" in the same sentence. As an additional point, although it is still being sold, Symantec have ceased development on the OSX product. If you are having problems and Norton has been running on your hard disk, I suggest you get rid of it and use something else. I suggest that you do not use Norton Utilities.
Many users of OSX have recommended Tech Tool. I am unable to say if it is effective as I have never used it, but I hear nothing negative and several positive reports.
Alsoft's Disk Warrior is highly recommended and is an excellent investment. Like other utilities, it should not be run only when all appears to be lost, but is an effective method of keeping a system in good running order. It does not de-frag a disk, but will optimise the file and directory structure. For some disks that are badly damaged or need much optimisation, one can expect that the processs may take several hours (or even days). A normal check and optimisation of a disk in a fair condition, may take only 20 minutes.
If you do not buy a copy, or expect a disk from somewhere like Phantip Plaza to do a first rate job, you deserve what the computer gods dish out.
Additional Note: Disk Warrrior was updated with the changes to OSX with Panther: 3.02 is the currrent version. If you have 3.0 or 3.01, you can download an updater which will enable a bootable CDRoM to be made. Some people suggest running this utility fairly regularly to keep the disk in good order.
See also: An article on another rescue using Disk Warrior.
A repeating error, such as an application shutting down, may be due to a corrupted preference file. Apple used to put these in the system folder but with OSX, particularly as there may be several people with acounts on a computer, they are located in the individual users folders.
The preferences files are all located in a preferences folder, in the "library" folder. This is in the users>username folder. In my case, the location is users>gkrogers>Library>Preferences and you can find the username easily as this is the one that looks like a little house: the "home" folder (geddit?).
All the preferences files end wth the suffix "plist" and there are scores in the Preferences folder. Scroll down carefully until you find one that you can clearly identify as being the preference for the suspect application (some applications may have more than one). Do not worry, you can dump these in the Trash with impunity as the application will simply create a new one when it needs to. If ever it does not (and this is not something I have ever seen), the problem will lie deeper. You can even dump the Finder preference if there is misbehaviour with things like copying or reporting odd file sizes.
Regular maintenance is going to steer you away from many problems that might otherwise occur. Several local users have contacted me, and one of the first questions I ask is, "Have you done the maintenance procedures as I suggested." On the telephone this is usually followed by a moment's silence.
As OSX is a Unix operating system -- Unix is running underneath that familiar interface -- it is set up for the checks to be run automatically if the machine is on all of the time. Not many people do this and prefer to shut-down or send the computer into "sleep" mode. In these instances, the cleanup procedures will not be done.
If they are not carried out automatically by the operating system, then we need to find ways to make sure that they are done: either using 3rd party software or manually.
To the best of my knowledge, there are four appplications currently available that do the checks. They are each available for download from VersionTracker, which is a site chock full of really useful software.
The four applications are: Mac Janitor; Macaroni; Cocktail (which also runs several other utilities) and Onyx. In the absence of these programs, it is still possible to run the tasks using the Terminal application. This is located in Applications > Utilities (right at the bottom of the list).
Tom Harrington, who wrote Macaroni, adds a caveat for users
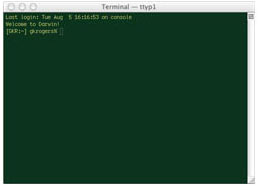 Terminal will open looking like a white rectangle with some black letters. You can change the colours if you want (I have in this image -- this reminds me of the original monochrome monitors that were almost universal when I first used computers).
Terminal is the OSX way to use a command line. It sounds odd for the Mac which pioneered the graphical interface, but (believe me) getting used to this has made my life a lot easier. The commands you need to run are really only for the Root user. Root is the owner of the system. Most of the time we do not use Root as it is dangerous. One wrong keystroke and you could lose everything. Being Unix, there is a way round. If we have an administration account we can pretend to be a substitute user by using the sudo command and then entering the neceesary text (note the spaces in the command):
sudo sh /etc/daily
Hit the Return key. The Terminal will first give a warning, and then it will ask for a password. Enter your password and again press the Return key. Let OSX do its stuff and then you will be back to the prompt.
As well as the daily command, there are weekly and monthly commands too. Either type in the command in full or press the UP key and then edit the last command, so you end up with
sudo sh /etc/weekly
Have faith with this one. It takes a long time: perhaps as long as ten minutes, depending on the size of the hard disk and the speed of the machine. I also regard this one as the most essential of the three cleanup routines as there are noticeable performance increases on a Saturday morning (it normally runs during the previous night).
Similarly, the monthly command is
sudo sh /etc/monthly
This cleans up the data about the month's logins (useful if you have a few acounts on the machine. To display the information without the cleanup, you could also enter the Unix command
last
From poster, macjack, on the Mac forums (20 Oct 2004), I copied this information to show what these scripts do:
Daily Script
- If the rwho system has been configured, clear out the old files in /var/rwho
- Clear out files old files and directories in the /tmp and /var/tmp directories
- Remove system messages older than 21 days
- If system accounting is on, process the accounting files and gather daily statistics
- Backup the NetInfo database
- Output the disk capacities and storage available
- Show which filesystems haven't had 'dump' performed on them in a while (archaic)
- Show accumulated network statistics and network uptime (ruptime)
- Rotate the system.log file and restart the syslog process
- Clear out the webserver log files older than a week
- Run the /etc/daily.local script if it exists
- Run a /etc/security check script if it exists
Weekly Script
- If the /usr/libexec/locate.updatedb database exists, update the 'locate' database
- If the /usr/libexec/makewhatis.local file exists, rebuilt the 'whatis' database
- Rotate the following log files: ftp.log, lookupd.log, lpr.log, mail.log, netinfo.log
- Restart the syslog process
- Run the /etc/weekly.local script if it exists
Monthly Script
- Run the login accounting process
- Rotate the wtmp log files
- Restart the syslog daemon
- Run the /etc/monthly.local script if it exists
It is easy to see why, if these scripts are not run, the data builds up: this can slow the system down after a while and even fill up the hard disk.
Repairing permissions is another of the tasks that can be run in both Macaroni and Cocktail. Each file on an OSX computer has three sets of permissions: the owner, group and "all". The permissions can be read only, read and write, execute and no access. Over the course of operations, one or two may sometimes get altered. Macaroni includes this task as part of its regular schedules. In Cocktail it has to be run from the "Extras" tab.
Repairing (or Fixing) Permissions can also be run in Terminal as, like many of the maintenance tasks, it is simply a Unix command:
sudo diskutil repairPermissions /
Note the spacing between parts of the command. After entering the command (sudo allows you to do tasks normally "owned" by Root) you will be asked for your password. Only a system administrator may use this method.
It is also part of OSX's own utilities and there are two ways to run it.
Enter the Applications > Utilities folder and start up the application named "Disk Utility." In the panel that opens, highlight the hard disk icon -- the second one that shows (it has the disk name) -- and click on the First Aid tab. As the disk is the startup disk, the only thing you can run is Verify, or Repair Permissions. This will take quite a while: perhaps up to 15 minutes. Have faith.
In Disk Utilities, the first disk in the list can also be used. There is an advantage to this: while the second disk shown (the partition) has information on files and space, the disk selection has, at the bottom of the panel (in Panther) the S.M.A.R.T. status. Normally it reads, "Verified". If you ever see the word, "Failing" (in red), then back up the data and expect that the disk life is limited: in hours rather than days.
The repair permissions utility can also be run from the OSX Install disk; and if you want to run the First Aid, "Repair Disk" application, you need to start up from this disk. Put the disk into the drive. Restart the computer holding down the "C" key. The installer set up will appear (quite slowly). Ignore the install procedure -- at this stage you are not reinstalling the OS -- and open the Install menu at the top left of the screen. In there you will find access to the First Aid application.
For those users with the maintenance utility, Macaroni, as mentioned above repairing permissions is run automatically, although Tom Harrington, who wrote it, adds a warning (below).
The Blue Screen is a problem that occurs sometimes when the startup procedure is almost complete: instead of displaying the log-in panel, you are left facing a clear (blue) screen. It is normal to have this for a couple of seconds, but usually the spinning rainbow appears. If it does not, you may be staring at the screen for ever. This blue screen event could also happen when someone logs out from the user account.
Any cure will need starting up with some external medium: a rescue disk, another computer attached via a firewire port, or an external (booting) hard disk.
There may be a number of causes for the problem. I find it odd that one may be a corrupted font in System 9. A Fonts folder may be found in the OS9 System folder. Move this to the desktop and try to restart.
Another problem may be with the login screen itself. There may be a couple of ways to deal with this; and again this will mean starting up in system 9 or with an external disk to get to the hard disk.
There may be a problem with one or more preferences. A likely location is in the Library>Preferences folder. Try removing the com.apple.loginwindow.plist file. A preference also exists in the users own library folder at Users>Username>Library>Preferences. It is named com.apple.LaunchServices.plist
Also in the main Library folder is a Caches folder. In this is a file named com.apple.LaunchServices.LocalCache.csstore and there is a similar file in the Users>Username>Library>Caches folder: com.apple.LaunchServices.UserCache.csstore -- try moving one (or both) to the Trash and restarting.
If this is not dealing with the problem, more work is needed. For example, it may be necessary to run a utility like Disk Warrior (see below) or even to reinstall the system.
Bluetooth is a valuable addition to the armoury but it does have some occasional problems. When linking with a phone that it is already paired with, for example, it may claim not to find the device. From the top, I try restarting the application, then pulling and replacing the Bluetooth adapter, logging out and maybe even restarting the computer. The telephone itself may be a culprit, and after pulling the adapter, I have had success by simply restarting the phone.
The most recent Macs have Bluetooth already installed (i.e. not as a plugged in adapter). With these, there is obviously no option to remove and replace the device. For a PowerBook, the procedure is to shut it down, disconnect the power and remove the battery. With no power and no battery, press Shift, Control, Option plus the power button for about 5 seconds. Put back the battery and connect the power, and restart. It is this sort of thing that confirms my feeling that the Dark Arts may be involved in using computers.
For articles on Bluetooth and its use return to the
eXtensions page.
Installing Panther, like the installation of any new operating system, needs to be done with a little care. Maintenance before and after is not just useful, but essential. After taking a long time to backup data, I began with a repairing of permissions: these always get changed during the course of normal operations, so making sure they are OK is a simple but necessary step. I take it a couple of stages further and restart into single user mode and run fsck -y (see In the first instance above). After that, I reboot which always runs another check. As a last point, I removed all of the USB connections, except for the keyboard and mouse. In goes the CDRoM and we let Apple take over.
There are a number of ways to install Panther: a clean install, which will initialise the disk and all data will be lost; Archive and Install, which keeps the data and the settings and installs the new system, but keeps a copy of the old one; and an upgrade.
There is also an option to customise the installation and it may be useful to think about deselecting the language options that will never be used. If you do not, the installation will take longer; but you can remove the unwanted languages later with software called Delocalizer (available on Versiontracker. Macaroni also includes this function in its latest versions.
Disk 1 installs the operating system; Disk 2 the applications and languages. If you have chosen other options in Customize, you may be asked for Disk 3 (you can install X11 later). Disk 4 is for the programmers and has the XCode tools.
When the installation is complete, the OS restarts and you have some details to fill in with Setup Assistant. If you are not online at the time (which is unlikely unless you are on a network), the data will be sent later. At this stage, I go to the Utilities folder and run repair Permissions again.
Updates of the operating system and installing new software also need care. Like the installing of the operating system (above), I like to run repair permissions before and after the software installation or OS upgrade.
A couple of problems occurred, mainly with Safari. I was unable to start Safari: it crashed every time. According to online information, most problems with Panther seem to have been down to third party applications, although one or two of the new Mac applications (like Font Book) were also candidates for suspicion.
These are some suggestions to deal with Safari:
Repair permissions (use First Aid in Utilities);
delete Safari preferences (com.apple.safari.plist) in the Users>username>Library>Preferences folder;
Remove Menubars;
Repair the Keychain (or make a new one);
Disable fonts in the (new) Font Book;
Remove the SIMBL folder in /library/application support folder. This contains data used by the kiosk application, Saft, and this is what did it for me.
A similar problem to the last item also occurred with the update to 10.3.9. Again, removing the current version of Saft (and any otgher Safari plugins) did the trick.
Journaling is now turned on by default which takes a small amount of resources but will help should there be a crash. With this turned on, it is not possible to run fsck -y like before (see In the first instance above). Instead you will be advised that you need to run the "f" option with fsck. There are two ways to do this: some have suggested
fsck -y -f
while I prefer to use
fsck -yf
just adding one switch to the first.
It is possible to turn journaling off. In Disk Utility, select a drive, open the File menu and choose "Disable Journaling" (or use the keys, cmd + j). Unless you are really comfortable with OSX and have absolute confidence in what you are doing, I would recommend leaving well alone. Journaling is there for a reason.
Some users may have a problem with a slow startup in 10.3.2 (the bug was fixed in 10.3.3). The following was posted in the Apple discussion forums on 26 December 2003 and is worth circulating in case anyone has this problem and does not access that valuable resource. I suggest that those using the commands pay careful attention to the spacing:
Posted by Alan Somers on 10:44pm Dec 26, 2003 CDT
Open a terminal and type the following command all on one line:
sudo cp /System/Library/Extensions/BootCache.kext/Contents/Resources/BootCacheControl /usr/sbin
Reboot twice. Startup performance should be back to normal.
Credit to whom it belongs: the solution from AppleSupport was originaly posted by Steven Minnick in this thread. this arcticle is just a copy with technical explanation.
Why does it work?
BootCacheControl is called during the startup process to create a cache of files needed to boot (up to the point were the login window is displayed).
In the 10.3.2 version the executable is called from the /etc/rc script twice:
- BootCacheControl
- BootCacheControl tag
both times its called using a shell variable set in /etc/rc which points to
/System/Library/Extensions/BootCache.kext/Contents/Resources/BootCacheControl
(and if this would not exist it would point to /usr/sbin/BootCacheControl.)
But there is another important call of the executable from the loginwindow process later:
- /usr/sbin/BootCacheControl autostop 15
Unfortunately the file /usr/sbin/BootCacheControl does not exist on a(ll) updated 10.3.2 system. The copy command above takes care of that problem.
Further to this, I have found two utilities that are helpful. The first, SpeedStart, may be downloaded from Macupdate, although this utility did not give me enough information: it just ran the script.
A much nicer utility was, fixslowstartup (seriously),written by Nico Rohrbach, a user from Switzerland who has other useful scripts on his site. It does not now appear on the web-page but in an e-mail (14 Jan 2005), Nico told me that he still has it available on the server. What was particularly useful about this, apart from the graphical interface, was the check that the script runs first. I found that on both the office G4 and the iMac at home, the necessary file was missing. Running the utility took a couple of seconds. The difference on the iMac was marked. I do not shut down (therefore do not restart) often, so the few times I had, it seemed, "sort of OK." It wasn't. Startup time is remarkably decreased.
Once or twice with Jaguar and initially with Panther, I suffered what has become known as the rolling disconnect. The modem does not seem to get a proper "busy" signal -- perhaps it is not that a number is busy but that the lines from the exchange are not connecting (or perhaps not sending a proper drop signal). The menubar indicator keeps running, and the modem is shown as "Disconnecting," but no amount of switching accounts, trying different access numbers, banging, or swearing allows the computer to use the modem, even though you can make phone calls with the same line. Although the 10.3.1 update fixed it for me, for many users, the only way out has been a restart. This is not satisfactory.
The modem needs to be tricked into stopping with a Unix "kill" command. Fortunately, Kurt Kauffman of Useful Software -- well-named, eh? -- has written a script to run the necessary command. It runs it five times actually. You can download it from Kurt's site as a compressed file (.sit.hqx) which should open automatically. This is still available (Jan 2005). You might want to leave the file on your Desktop and double-click if you suffer the rolling disconnect. It may be an idea to run it a couple of times. As ever, I take no responsibility for what may happen (and nor does Useful Software) but I have not had problems when I tested it.
If you are having problems with a modem, it may be useful to access these two other sites, where a number of scripts and other problem-solving suggestions can be found:
Some users have suggested that you can remove installer receipts to save disk space. Tom Harrington, who is responsible for the utility I use, Macaroni, felt strongly enough about this that he circulated all of his registered users. Please read what Tom wrote; and I would also recommend that these receipts are not deleted. As a note, I have added the links in the letter in agreement with Tom.
Sometimes we may need to reset basics to get back to square one.
One setting that is often cited is the PRAM, or the Parameter RAM (random access memory). Start the computer and, as soon as the startup sound is heard, press the following four keys: Command, Option, "P" and "R". Apple suggests waiting until you hear the sound again, but I was advised to let the chimes sound a couple of times. Release the keys and let it start normally. At this stage, you will have to go back in and fix your custom settings (such as memory, network, et al).
Another setting is called NVRAM. Be careful with this as wrong use of the command could break the computer. It has a slightly more complex approach for its reset. Start the computer and when you hear the chime hold the following keys: Command + Option + o + f. When the the grey screen appears . . .
type reset-nvram
Press Return
type reset-all
Press Return
NVRAM is a type of memory that retains its contents when power is turned off. One type of NVRAM is SRAM that is made non-volatile by connecting it to a constant power source such as a battery. Another type of NVRAM uses EEPROM chips to save its contents when power is turned off.
SRAM is short for static random access memory, and pronounced ess-ram. SRAM is a type of memory that is faster and more reliable than the more common DRAM (dynamic RAM). The term static is derived from the fact that it doesn't need to be refreshed like dynamic RAM.
EEPROM: Pronounced double-ee-prom or e-e-prom, short for electrically erasable programmable read-only memory. EEPROM is a special type of PROM that can be erased by exposing it to an electrical charge. Like other types of PROM, EEPROM retains its contents even when the power is turned off.
More information like this can be found online at the Webopedia Computer Dictionary.
There are a number of keystrokes that are useful when starting up. Already mentioned somewhere above, for example, is the "single-user" mode. I downloaded the list (from which these are taken) a while ago from an Apple forum: Posted by Judie Edwards on 04:49pm Jun 9, 2003 CST
Startup Keystrokes
- Press X during startup: Force Mac OS X startup
- Press Option-Command-Shift-Delete during startup: Bypass primary startup volume and seek a different startup volume (such as a CD or external disk). You might also try simply the Option key
- Press C during startup: Start up from a CD that has a system folder
- Press N during startup: Attempt to start up from a compatible network server (NetBoot)
- Press R during startup: Force PowerBook screen reset
- Press T during startup: Start up in FireWire Target Disk mode (see also Making the eMac Mine)
- Press Shift during startup: Start up in Safe Boot mode and temporarily disable login items and non-essential kernel extension files (Mac OS X 10.2 and later)
- Press Command-V during startup: Start up in Verbose mode (useful for simply observing the processes to help in trouble-shooting).
- Press Command-S during startup: Start up in Single-User mode (command line)
In April 2005, I managed to find a complete list of keystrokes that were highlighted on a MacOSXHints page. The pdf was interesting enough that I put a copy here with the permission of the writer (details on the pdf).
Apple also has available a list of the same at the Knowledge Base site.
Some sites cannot be opened unless,
according to the page displayed, one uses Internet Explorer 6. As IE
stopped development at 5.2.2, it would seem that OSX users are out of
luck. As there is no IE for Linux, those guys who bought the computers
under the Thai government scheme are really in trouble.
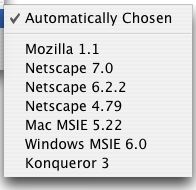 I do wish web developers would do the job properly and stick to World Wide Web Consortium standards instead of taking short-cuts and using page-creation software that favours one OS only: a standard should apply to all. Some help is at hand. For Safari users there are two applications (see below) that will assist by adding a "debug" menu to Safari.
By selecting this menu and choosing the item "User Agent" close to the bottom, one has a selection with which to convince the relevant web-pages that you really are using that browser. If you select the IE 5.22 (sic) setting it will still not let you see the page, so IE6 it must be.
For those using OmniWeb 4.5, it is possible to change the settings to allow the site to recognise OmniWeb as IE6 compatible. In Preferences, choose Compatability in the "Advanced" section and there is a button close to the top of the panel.
OmniWeb 5 is a little harder and needs selection of the Page Preferences (rather than "Preferences" per se). A half-panel opens and the right half of the top button allows access to the relevant selector.
There are two applications that can be used to fix Safari: from TinkerTools (or this alternative site), and Safari debugger 2.8 which is a small download from VersionTracker.
There is also (as ever) a command line fix. In Terminal, type the following:
defaults write com.apple.Safari IncludeDebugMenu 1
For Firefox the approach is a little different and involves the installation of an extension. In the menu, "Tools", click on the menu item "Extensions." A panel will be displayed with any extensions installed, and at the bottom of the panel (in blue) is a link to "Get More Extensions" which will take you to a page at the Mozilla Organization.
The page displays several extensions, but for the "spoof" extension, click on "Developer Tools" on the left-hand side menu. When that next page appears, make sure that the correct Operating system and version of Firefox appear in the boxes provided. When these are correct, press "Update".
About 10 items down is User Agent Switcher 0.6.1 by Chris Pederick. Select "Install". Once the process is complete -- like any incoming installation, you will need to acknowledge and accept it -- restart Firefox and the User Agent Switcher will appear in the Tools menu.
For further information, e-mail
to Graham K. Rogers.

Back to
eXtensions
To
eXtensions (Year One)
Back to homepage