Cassandra: The Goldilocks Setting - Exporting Images from Apple's Photos on the Mac

eXtensions - Saturday 13 May 2017
|
Cassandra: The Goldilocks Setting - Exporting Images from Apple's Photos on the Mac |
 |
|
|
By Graham K. Rogers
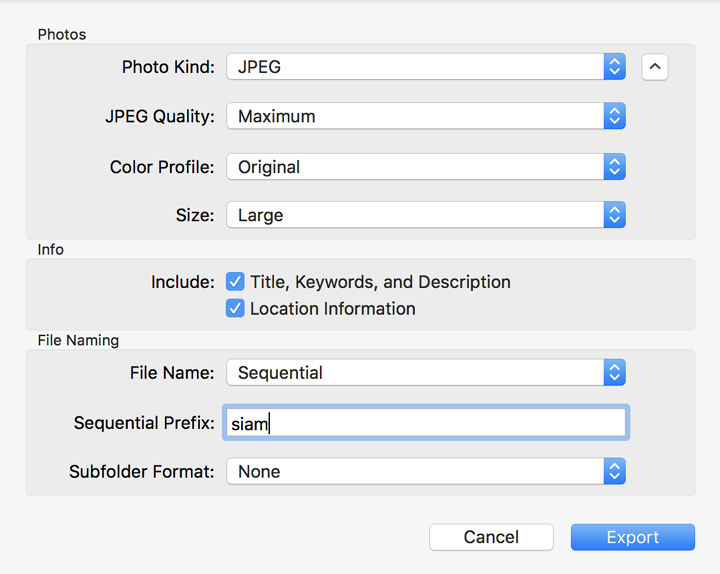
Almost all of my output these days is for my website with uploads to some social networking sites from time to time. While sites like Facebook and Twitter will adjust image uploads for their own purposes, I try to export images that are a compromise between sufficient quality so that they look good when viewed in a browser and size, so that downloads do not overwhelm download capabilities. When I take screen shots or use the files for app icons, I will export these in PNG format and use Lemke Software's Graphic Converter to adjust the image size. If I am exporting from Photos, I will usually go for JPG images, but the export menu in Photos only shows Small, Medium, Large and Full Size. Medium will work if I am using a couple of images set out in a table. Most of the time I like an image of around half to two-thirds of the browser page width, with some occasional variations if I want a good quality image to display full width. For these I will specify something between 90-100% for the width. For the other images, I favour 550 pixels, but sometimes will go down to 450 or up to 650, depending on circumstances. The cropped screenshots here are set at a width of 400. With any of these widths (when considering the download compromise) Medium is too small and Large is too big: this will often produce an exported image of 1.1 to 1.4 MB depending on post-editing. In Aperture I often used a specific size of image that I had set up for certain pages. Photos also has a Custom option.

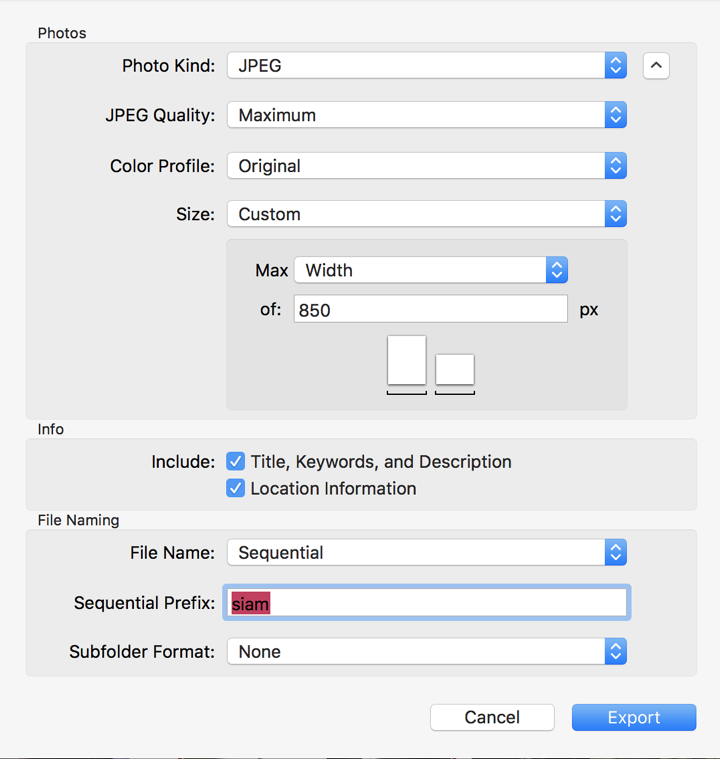
Selecting this reveals a dialogue panel. At the top is a Max setting, which can be applied to Width, Height, or (specified) Dimension. Each of these is illustrated by a small diagram showing portrait and landscape outlines just below. Between Max and the diagram is a box for a specific pixel setting (px). I use 850 as I think this gives me the best compromise for a web-intended export.

Graham K. Rogers teaches at the Faculty of Engineering, Mahidol University in Thailand. He wrote in the Bangkok Post, Database supplement on IT subjects. For the last seven years of Database he wrote a column on Apple and Macs. After 3 years writing a column in the Life supplement, he is now no longer associated with the Bangkok Post. He can be followed on Twitter (@extensions_th) |
|

For further information, e-mail to
Back to
eXtensions
Back to
Home Page