Using Disk Warrior for Preventative Maintenance on a Retina Display MacBook Pro With no Disk Drive

AMITIAE - Sunday 20 April 2014
|
Using Disk Warrior for Preventative Maintenance on a Retina Display MacBook Pro With no Disk Drive |
|
|
|
By Graham K. Rogers
This should be no different to the normal day-to-day situation. Unfortunately, it clearly is for many users. I back up my data daily using Time Machine (on different disks) and I also copy data, such as photo libraries onto disks, simply using the Finder. Regular maintenance may need a more hands-on approach. I do not shut down the computer every day, but once in a while, the Mac may become a little sluggish. A restart can perk things up a little. Many restart every day and they have a small advantage in that OS X carries out checks before the user can begin to work. If a startup is taking a long time, it may be that the checks are being repeated, which could indicate a problem.
Also in Disk Utility are two buttons for Verify and Repair. Repair is greyed out as a disk that is mounted and being used cannot be repaired. It has to be repaired from an external source (a disk or another computer), with a couple of exceptions.
Using the Computer ItselfThe Unix installation that OS X is built on has many utilities available. A file and system check can be carried out by starting the computer in Single User Mode: hold down Command + S at startup (to see what this looks like try Command + V - the Mac will then start as normal). This does not mount the disk, so a repair can be done. Unless you are happy working at the command line, this is not recommended.When the computer has started and all the text information has been displayed, there is a command line prompt. Here we type the command fsck -fy. That adds on two extra commands to the check
When the check is done and all is well, there is a report that the disk (it is named) "appears to be OK". If something is found to be wrong, it is fixed and the check automatically runs again. Some fixes may take a long time. I had to use this on an iMac that had a disk stuck in the drive (that gives some idea of the user's skills) and the number of repairs to specific files took a couple of hours. When the job is done, I use the command reboot to restart the computer and OS X appears as normal.
What we hope is that the disk is reported to be OK (just like with fsck) and our problems evaporate. The "OK" message is in green; but if there is a problem that Disk Utility cannot fix, the warning is in red. It would then be time for external methods of repair to be used.
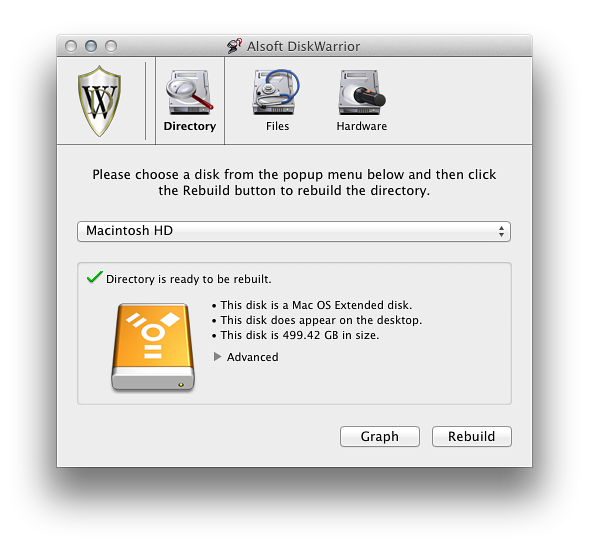
Using External MediaIf Disk Utility is not cutting it, there is little point in using the same application from an external source. There are stronger tools. Two in particular are considered superior for OS X fixes: Micromat's TechTool Pro 7; and Alsoft's Disk Warrior.I have no experience of TechTool Pro. Disk Warrior was recommended to me when I first used OS X and I have stuck with that. Some people swear by TechTool Pro which does have a real advantage now with its ability to create a bootable partition and run the repair from there. This was reviewed extensively by Chris Barylick on MacWorld a few months ago. The price is $100.
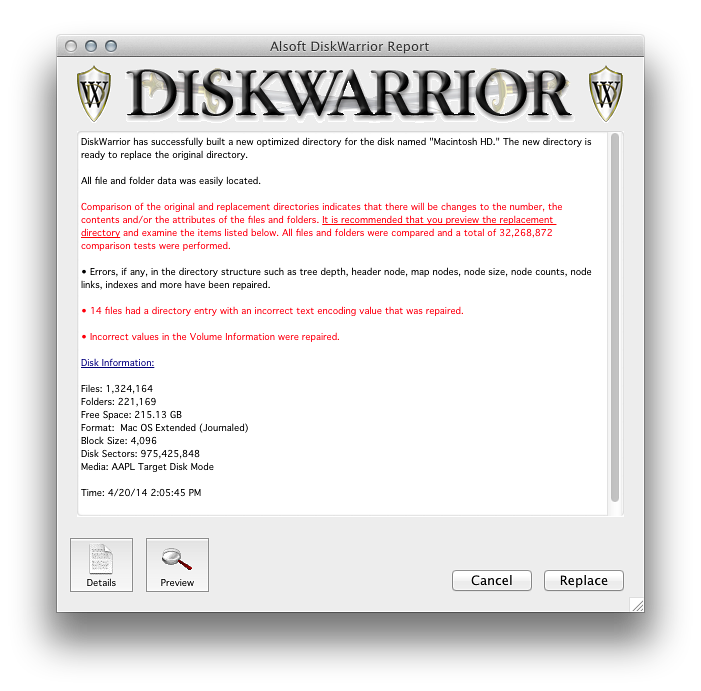
I contacted Alsoft about this and was told that they now frequently supply Disk Warrior via email. They were not able to give me any information about future non-disk downloading from the site. Disk Warrior costs $99.95. Some locally have balked at this price, but like backups, if the computer goes wrong, it is already too late and a data recovery service may cost much more. I was also lucky the last time I had a disk fail (See below): Disk Warrior was able to retrieve all the files and I saved them to an external disk. As well as a repair, it is useful to run such a utility from time to time as part of scheduled maintenance. Doing this when nothing is apparently wrong, is better than having to react when there is a problem, especially when that important project is due or some other critical event that needs the data is looming.
Both of these external disks currently have OS X 10.8 installed and work with my older computers (iMac and 15" MacBook Pro). The 13" MacBook Pro with Retina display came with a version of Mavericks so cannot be started using the older Mountain Lion.
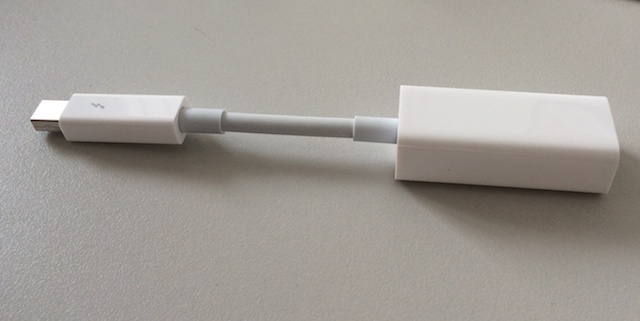
Currently, that option of the external disks is not available for the new Mac, so I have to consider Target mode. In the past I used Firewire cables to connect two devices. Apple's information on this tells me that Firewire or Thunderbolt can be used. Although a Mac can be started from external media using USB cables, there is no mention of a USB cable with Target mode. The 15" MacBook Pro has Firewire ports, while the 13" only has Thunderbolt. Fortunately, I had crossed this bridge with one of my backup disks and have a Firewire to Thunderbolt adapter.
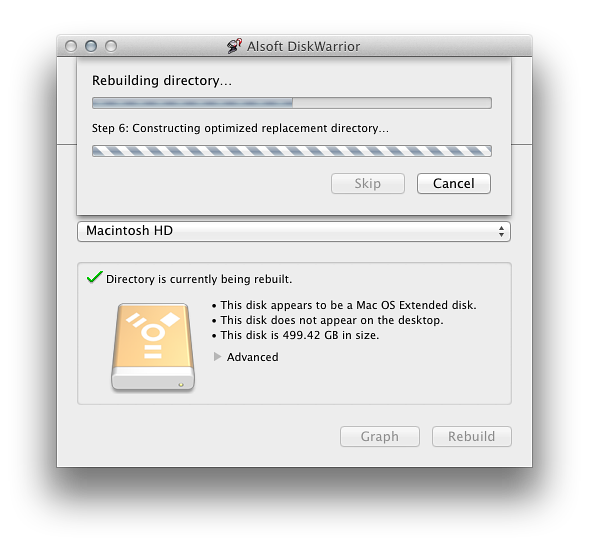
Rolling My Sleeves UpThe Mac was running fine, the sun was shining, I had the morning free: a perfect time to run Disk Warrior and keep my Mac in prime condition. First I connected the power supply and also attached a Time Machine backup disk. When both Macs were charged (this is in case the mains power cuts - it happens) and the 13" Mac was backed up, I shut down the newer Mac. I used the Firewire 800 cable from the hard disk to connect to the 15" Mac. Before connecting the two computers, I shut down the 13" Mac. The 15" Mac stayed on.With the FW 800 cable in the 15" Mac, I connected the other end to the Thunderbolt port of the 13" Mac using the Firewire to Thunderbolt adapter. I pressed the power button and almost immediately, the Firewire icon appeared on the screen. Initially there was a struck-through Thunderbolt icon, but this disappeared. When the hard disk icon for the newer Mac appeared on the desktop of the 15" MacBook Pro, I started Disk Warrrior (v 4.4) on the older device. As I was working in a User account, I was asked to type in Admin name and password.
See also:
Graham K. Rogers teaches at the Faculty of Engineering, Mahidol University in Thailand where he is also Assistant Dean. He wrote in the Bangkok Post, Database supplement on IT subjects. For the last seven years of Database he wrote a column on Apple and Macs. He is now continuing that in the Bangkok Post supplement, Life. |
|

For further information, e-mail to

|

|

 To start up those older computers using these external media, I would shut down, connect the disk (or insert the thumb drive) and start up with the Option key pressed. That displays all the disks that can be used to start the Mac. Selecting one (left - right arrow keys) and pressing Enter, boots the Mac from that external disk.